In this article, I will tell you in detail about how to view mail on Android using popular applications. Email is an indispensable component of the life of a modern person. It is used both for communication and for registering on other Internet resources, as well as ordering various goods and services in online stores. With the advent and development of mobile devices, the situation has changed significantly.
Setting up email on Android devices
Today, the user does not need to sit for hours near his PC waiting for an incoming message, because with the help of his smartphone he can read mail or send a letter from anywhere in the world.
If you own a mobile device running Android OS, you can access your email in two ways:
Using a browser
Using the installed program for accessing the Internet on your smartphone (Opera, Chrome, etc.), enter the name of the mail provider (Yandex, Gmail, Mail.ru, Rambler) in the search bar and log in to your mail client.
If you have never used mail before, go through registration, which will not take you too much time. This method has many disadvantages and can only be useful in cases where other methods are not available. So, in order to check your mail, you will need to open your browser every time and log into your account, which, you see, is not very convenient. In addition, you will not be able to quickly send an email or read an incoming message.
Using mobile versions of email clients
These applications are designed for fast and intuitive work with email and are fully adapted to the physical parameters of the human finger.
Most mobile devices using the Android OS have a pre-installed email client (Gmail) from Google.
The advantages of this application include:
- automatic sorting of letters;
- spam protection;
- support for third-party email clients;
- Extended storage (15 GB) for your mail.
In addition, you can install a third-party application if the functionality of the standard utility does not suit you:
It features a simple and user-friendly interface that allows you to work with multiple email accounts. When dialing a recipient, the program provides a hint from the list of local contacts. The application also allows you to create protected folders and files with a password directly in the program interface. There is also 10 GB cloud file storage.
- Yandex Mail
A simple and easy-to-use email client that is closely connected with other services of this Internet resource. The application provides an improved system for protecting user data - from linking mail to a mobile phone number to creating a backup mailbox to restore access to the main mail. The cloud file storage size is 3 GB.
- Mail MYMAIL
A fast and reliable email client that works seamlessly with all popular email services. Provides instant delivery of notifications and is equipped with a convenient letter filtering system.
- MICROSOFT OUTLOOK
A well-known application for managing mailboxes from Microsoft for its PC version. The ability to work with several email services, viewing attached files without downloading to your phone, the ability to quickly filter messages - this is not a complete list of the advantages of this useful application.
You can find and install the above programs on your smartphone or tablet directly on Google Play by typing the name of the application you like in the search bar. Thanks to the intelligent dialing system, the service itself will suggest the program you need. I hope that my advice will help you.
How to create an email address on Android iPhone for free
- How to create an email for free on your phone step by step
- Create a Gmail address
- Mail on Mail.ru
- Create Yandex mail
Good afternoon friends. How to create an email address on your phone? Nowadays, almost every person needs email, and more than one. Email has confidently entered our lives, and most people cannot imagine how they can do without an electronic mailbox.
If you don't have email, you simply won't be able to use the vast array of resources on the Internet. Now it is also necessary for the state. services. Also, if you want to use the most of your phone, an email account is a must.
How to create an email for free on your phone step by step
Let's look at creating an electronic mailbox on the most popular mail services in our country. This guide will be useful to owners of almost any smartphone, from any brand and Android - iPhone system. We will register using the browser of a phone or a regular tablet.
Remember! If you decide to create an email account on Gmail, this process requires a working phone number (this also applies to Yandex). You will create a real Google profile, which will have access to many Internet resources. A profile from Google will help you easily log into the Play Market, which is now indispensable on Android.
Create a Gmail address
Along with the creation of a Google profile, an email account is also created. So, to create a Google account, let's go to one of its pages using the link. In the window that opens, do not forget to enter your name, then your last name, and in the “Username” line you need to come up with a unique combination of letters and numbers so that you remember it easily and this login is beautiful. Click on the “Next” button.
After this, you need to enter a phone number. We enter it, and then take the code from the SMS and enter it in the appropriate field.
You will be asked to enter your number again. Do this because... the phone number will be useful to you if you accidentally forget it, namely, what password and login you used to register. By using your phone number, you can easily restore forgotten information. After that, indicate your birthday, and, if desired, another email address. Whenever you need, you can freely log into your mail using the link https://mail.google.com/.
Mail on Mail.ru
So, go to the next resource Mail and fill out the necessary information. You must indicate your last name, date of birth, and your gender. In the “Account Name” section, you need to come up with a nickname using Latin letters and numbers so that it is not taken and you like it. Your new mailbox will begin with this login.
The second part of the address after the dog can take the form of the following domain zones: @mail.ru, @bk.ru, @inbox.ru and @list.ru. If the nickname you like has already been taken by someone, choose it, but under a different domain zone.
Don't forget to enter your password. You don't have to enter the phone number. If you do not specify it, then you must enter a spare email address. If you have not created one, you can temporarily specify any one you come up with. You can change your alternate address by going to settings. After that, we register.
Now all we have to do is enter the captcha and click on the “Continue registration” button. Actually, you have created your new email, and if you wish, you can use it immediately.
Remember! If you use a VPN, or a proxy, or your registration is not on the territory of Russia, in this case, you need to indicate a phone number, because Without it, registration will not take place.
You can enter your mail using the link: - https://e.mail.ru/inbox/.
Create Yandex mail
Follow the following link and click on the “Create account” button. Then, you need your last name with your first name. In the “Login” section you must indicate your login. Try to make it so that it suits you. It will be the first one on your email address.
Don’t forget to enter your password (I recommend writing it down in a notebook) and your phone number. If you do not want to indicate it, then you need to click on the link that you do not have it. Then, you will be required to indicate a security question and the answer to it, as well as enter a captcha. Having completed this step, click on the “Register” button.
You have created your mail in Yandex. If desired, you can put your photo if you need it. You can log in to your email address using the link - https://mail.yandex.ru/.
Conclusion : you now know how to create an email address on your phone. Moreover, on the most popular postal services in Russia. Have you noticed how simple it is? Good luck!
conclusions
Thus, registration and authorization are completed in a few minutes. The procedure discussed is available to every user. After creating a personal account, the visitor will be able to send letters, receive messages or choose the visual design of the mail service. Yandex Mail is constantly adding useful features, so using the service becomes much more convenient. There is a mobile version for phones, and even an official application. An additional advantage of the service is that the service is completely free, regardless of the number of letters received or sent.
Official website: https://yandex.ru/ Personal account: https://passport.yandex.ru/auth
Rate this article
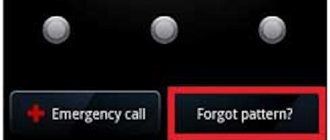
How to set up iCloud email access on Android
If you're switching from iPhone to Android, you don't have to give up iCloud services like iCloud Mail. While Apple doesn't make it easy to set up, it is possible to sign in and use your iCloud email address on Android.
While we recommend Gmail, you'll be able to add your iCloud email address to most email apps.
Create an app password for iCloud
Before you begin, you need to set up an iCloud account. Apple's two-factor authentication typically makes it difficult to sign into third-party apps, but Apple allows you to create a separate "app-specific password" for use on Android.
First, sign in to your Apple account and go to the Security section. In the App Passwords section, click Create Password.
If you don't see this section, you must set up two-factor authentication on your Apple account. You need a Mac, iPhone or iPad to do this.
Enter a short but memorable description for this password (for example, "Login to Android"), and then click "Create."
Save the password that Apple generates for you; You'll need to use this instead of your Apple ID password to complete the sign-in process.
Set up iCloud Email for Gmail
Once you've set an app-specific password, you're ready to sync your iCloud email with Gmail, the default email app for most people with Android devices. Remember that this process should also work in other email clients; we'll go into more detail about this below.
To get started, swipe down from the top of your device to access the notification panel, then tap the gear icon. Additionally, you can access Android settings from the application list.
In the main settings menu, click "Accounts". Depending on your device and the version of Android it's running, this name may be slightly different, such as Accounts & Backup.
You will see a list of accounts synced with your device. Scroll down and click "Add Account".
Select "Personal (IMAP)" with the Gmail symbol next to it.
The Gmail login screen appears. Enter your iCloud email address and then click Next.
Enter the password Apple generated for you (not your Apple ID password), and then click Next.
If your email address and password are correct, Android (via Gmail) will sign you in and begin syncing your iCloud email account with your device. You may have to confirm some additional settings, such as how often you want Gmail to sync your emails.
To check if this process works, launch the Gmail app and then click the menu button in the top left corner. You should see your iCloud email account along with others; click to switch to it in Gmail.
You can now use your iCloud email address to send and receive emails.
Use Microsoft Outlook or other email applications
You don't need to use the Gmail app to receive iCloud emails on Android. There are other alternatives such as Microsoft Outlook. The installation process is similar no matter which application you choose.
Official mobile application from Yandex
The branded email client "Yandex.Mail" is designed specifically for use on devices running the Android operating system. With its help, the user can perform the following operations:
- creating, editing and sending outgoing correspondence;
- receiving incoming letters;
- adding new and deleting unnecessary mailboxes;
- managing correspondence using gestures;
- configuring parameters for individual requests: setting up notifications and synchronization, choosing the order of grouping letters, changing a personal signature, etc.
note
The mail client is available for all versions of the operating system starting from 4.0.3.
Setting up the Yandex.Mail application on Android devices is carried out as follows:
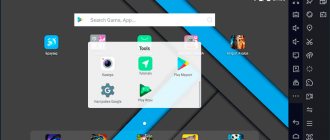
- launch the Google Play store (Play Market), enter “Yandex mail” or “Yandex Mail” in the search bar;
go to the page of the found application and click “Install”;
after installation, look for the Yandex.Mail shortcut in the list of programs and launch it; enter your email account details (username and password) and tap “Login”;
scroll through the email client invitation screen that appears until the “Go to mail” button appears, click on it;
The contents of the “Incoming Correspondence” folder will appear on the screen.
Client installation is complete.
Will be useful
You can configure the necessary parameters for the application in “Settings”, this menu item is located at the bottom of the left curtain.
How to set up email on your phone for Android and iOS
Our man won’t go into his pocket for words, but for mail he will. No, we are not talking about an envelope with a letter taken out of a box and stuffed into a pocket, but about a smartphone, which is our personal “postman” in a modern version.
Many people think that Android phones only allow you to receive Gmail, which is linked to a Google account, and iPhones only work with a mailbox that is associated with an Apple ID. And that other email accounts require additional programs. In fact, gadgets have enough capabilities for everything. Let's talk about how to set up email on your phone to receive emails from all your accounts in one mailbox - built into the system.
Setting up mail in the Gmail app on Android
Adding and setting up a new account
Gmail mail client , preinstalled on Android phones, can be used to compile letters from various mail services, except those that do not support third-party applications, such as the highly secure ProtonMail and Tutanota. By default, it collects emails only addressed to the Google account associated with the device.
To connect another email account to the Gmail client, do the following:
- Launch the application. If anyone doesn’t know, his label is a white envelope with a red letter “M”.
- Tap the hamburger button and open the side menu. To access the account management section, tap the triangle circled in the screenshot.
- Select " +Add account ".
- Select the mail service you want to connect. For example, if the domain name of the server where your mailbox is located is yandex.ru or ya.ru, select Yandex; if gmail.com, choose Google, etc. If the service you need is not in the list, your choice is “ Other ”. We will analyze further actions using the last option as an example.
- Enter your email address. To set default settings for it, click “ Next ”. If you want to specify your settings, tap the Manual .
- If you choose manual setup, the program will ask you to specify one of three account type options. For personal mail, these are POP3 or IMAP protocols (you can find out what to choose from the user manual of your mail service). For mail on a corporate server - Exchange, unless otherwise used.
- Enter your login or full mailbox address and password again to log in.
- In the next step, specify the incoming message server. If the program does not detect it itself, you will have to once again refer to the manual of your mail service.
- Next, enter the address of the outgoing message server and, if desired, enable automatic login. Then you won’t have to enter a password every time you access your mailbox.
- The basic setup is almost complete. The only thing left to do is to allow or disable synchronization of the program with the mail server. If allowed, set the synchronization frequency (15 minutes by default), and also enable or disable notification of new emails and auto-downloading of attachments when the phone is connected to a Wi-Fi network.
- Account added. As a final step, you can change your name, which will be displayed in the emails you send. By default, the account login is specified instead of the name.
You can finish here, but if you want to customize your new drawer more subtly, open the side menu in the application again, scroll down and tap the Settings button .
Select the account you want to edit.
The following parameters are available for change:
- Account name (email address).
- Your name (by default, this is your account name).
- Signature in the letter.
- Linking an address to another Gmail account.
- Request to display images in emails (if your Internet connection is slow or is charged based on traffic volume, it is better to enable it).
- Synchronization with the mail server and its frequency (high frequency of synchronization increases the amount of traffic and speeds up the drain of the phone battery).
- Automatic downloading of files attached to emails when connected to Wi-Fi.
- Notifications about new letters.
- Sorting of incoming correspondence by categories (unsorted letters, social networks, forums, promotions and notifications). Not supported by all email services.
- Automatic response to incoming emails. Not supported by all email services.
- Automatic substitution of quick answers. Not supported by all email services.
- Select a ringtone to notify you of an incoming message.
- Adding shortcuts.
- Vibrating alarm to notify you that a letter has been received.
- Incoming and outgoing mail servers (user name, address, port and encryption type), etc.
In exactly the same way, accounts for other mail services are added to Gmail. There are no restrictions on quantity. It is usually not necessary to use manual settings, as described above, except for connecting corporate or some exotic mail accounts. In other cases, the application selects the optimal parameters by default.
How to change and delete your Gmail account
By default, Gmail only displays correspondence from one account—the currently active one. To check another person's mail, you need to make it active.
All connected accounts are displayed in the top field of the main application menu (hidden behind the “hamburger” button). To switch between them, just touch the desired shortcut. And to simultaneously download messages from all your mailboxes, select “ All mailboxes ” from the list of options.
To delete an account from the Gmail application, click the triangle button in the main menu and open “ Manage accounts ”.
Next, select the email service and account you want to delete. On the next screen, highlight the desired address again and go to the menu hidden behind the “three dots” button (top right). Tap " Delete Account ".
Setting up mail on iPhone and iPad
Connect and set up your account
Adding and setting up an email account on Apple mobile devices is no more labor-intensive than on Android, but, in my opinion, it is less intuitive. And they are performed not in the mail section, but in “ Accounts and Passwords ”.
To use a different email account on your iPhone or iPad other than the one linked to your Apple ID, do the following:
- “ Add in the “ Accounts .
- Select the mail service where your mailbox is registered. If it is not in the list of suggestions, click " Other ".
- Next, select the “ Mail ” and “ New Account ” section.
- Enter your account information: username (by default the email account login is entered), email address, password and description (the latter by default matches the mailbox address). Tap the Next .
- In the next window - IMAP , oh. the “ Notes ” checkbox. Save the setting.
- Next, if you think the settings are sufficient, click “ Finish ”. A new account will be added. If you want to edit options that don't appear in this window, click Advanced .
Advanced section contains the following options:
- Behavior of boxes. Allows you to assign or change the roles of some folders - drafts, sent, archived and deleted messages.
- The place to move unnecessary letters is to the trash or archive box.
- Frequency of emptying the recycle bin (complete destruction of deleted messages). The default is one week.
- Options for receiving incoming correspondence: use SSL encryption, select an authentication method, IMAP server port number, and IMAP path prefix.
- Whether to use S/MIME encryption. Disabled by default, supported by most but not all email services.
After closing the settings window, you will be taken to the newly created account section. By the way, there is also a button to delete it.
Now the mail program built into the system will receive letters, including from this mailbox.
Setting up the mail application
The parameters of the built-in mail program are configured, as you probably already guessed, through the “ Mail ” section.
The following is collected here:
- Application integration with Siri and search system.
- Ways to notify about incoming correspondence (ringtone and sticker). You can assign individual notification settings to each mailbox.
- Message list display: number of rows to display when viewed, labels, swipe options (right, left, adding a flag, etc.), flag style and color.
- Actions when reading a message (request confirmation for deleting a message, uploading pictures).
- Sorting and processing of correspondence: grouping by topic, collapsing read letters, location of the last message (top or bottom), ending topics (showing a chain of letters that make up one topic, even if they have been moved to other folders).
- Options for the message being created: sending a copy of the letter to yourself, marking addresses, indentation when inserting a quote, signatures - general or separate for each account, and the default account from which new letters will be sent.
As you can see, the email program on Apple phones and tablets allows you to completely configure it to suit your own needs. Not every third-party application can boast such functionality. Another plus in the collection of mailers built into the system - both on Android and Apple - is the absence of advertising, which almost all free analogues are stuffed with. So both programs are quite good.
Basic mailbox settings in Yandex
Let me immediately draw your attention to the fact that “Select Design” is currently only available from the drop-down menu of the “Settings” button (gear).
It is probably clear to everyone that here you can change the appearance of your Yandex mailbox using various themes, which, in essence, are simple wallpapers stretched over a design developed by Artemy Lebedev. Although, there are also useful topics, for example, with a weather informer:
Now is the time to enter the Yandex mail settings (gear button in the upper right corner under your login):
Since we're already here, let me briefly go over what can be configured here and where.
On the “Sender Information” , you can configure everything that we talked about just above when considering the Yandex mail quick settings wizard, and you can also add a signature that will be displayed in all letters at the bottom or top of the written message:
On the settings tab called “Mail Collecting” you can specify the E-mail and password of the mailbox from which you want to automatically collect correspondence and show it in this newly created Yandex Mail mailbox. If the password is correct and the specified mailbox allows you to remove incoming messages from it using the Pop3 protocol, then in the second step the wizard will ask you to state in more detail your requirements regarding this action:
Conveniently, you will be free to assign an arbitrary label to exported mail or automatically throw it into a pre-created folder other than the “Inbox”. Lepota. After creating one rule for the collector, you can create as many similar rules as you like on the same tab, as well as enable and disable the collection of letters using the iPad-style engine.
In the Yandex mail settings on the “Folders and Tags” , you can create your own hierarchical folder structure, as well as prepare labels in advance with which you will mark various correspondence. Everything is simple and it makes me happy (Gmail with its shortcuts and filters will break your head).
On the “Rules for processing incoming mail” , you can set up filters by which certain correspondence will be processed in a certain way. You've probably set up similar filters more than once in your email programs, and there's nothing complicated about it.
You can, for example, assign several conditions at once and select completely different actions for the rules (move to a folder other than “Inbox,” add a label, delete, throw in spam, or forward to another mailbox). By the way, here, unlike Jimail, there are also black and white lists. For example, to ensure that letters from the respondent you need never end up in the Spam folder, you just need to add his Email to the white list and the problem will be solved. Quite convenient, in my opinion.
On the “Contacts” , you can add your contacts from a file, as well as create groups of contacts that are convenient to use for sending messages to several correspondents at once.
Well, on the last settings tab (not counting “security,” which we’ll look at below) called “Cases,” you can activate or deactivate this feature in the interface. This feature appeared relatively recently, and after enabling it, the “Add Case” button will appear in the lower right corner of the window.
In fact, it is a reminder of your plans. If you indicate the completion date, the post office will not forget to remind you about it within the agreed period. The to-do list can be sent to another mailbox, and it will also be displayed in the mobile version of Yandex.Mail, if you use one.
By the way, at the very bottom of the settings page there is an opportunity to completely Yandex mailbox Well, that's it, just in case.