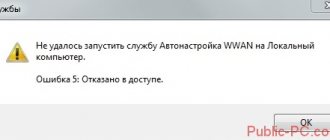
When granting permissions to a file or folder to groups of users, Windows may deny access, citing an error in applying security settings. You may also receive an error message when you try to move, copy, or delete files.
The problem seems to be quite serious because it prevents you from setting permissions on the file to make it available for use. But there are several solutions that can be used to fix the security settings error.
Causes of the error “Access to the specified file is denied”
Among the reasons for the problem, the following should be noted:
- Access was blocked by a viral malware;
- Access is blocked by an antivirus program or system firewall;
- Access lost due to random PC failure;
- The user does not run the file as an administrator;
- The file requested by the user is currently unavailable (in particular, this applies to access to network “shared” files and folders located on other computers);
- The required file has been deleted or moved to another location;
- The required file or its shortcut on the desktop is damaged;
- Windows has blocked access to the mentioned file for various reasons.
Reason 1: Restricted by Windows Local Group Policy
Windows Local Group Policy is an operating system feature that allows the user to manage certain settings. There is a possibility that the write or read permissions for the USB drive are limited, making it inaccessible. This is usually done to avoid the installation of malware or virus attacks. To solve the problem, you need to grant permissions to the specified settings using the “Local Group Policy Editor”:
Windows Home and Starter editions do not have the Local Group Policy Editor component - in this case, use the section of the article “Alternative: Editing the Registry”. The task at hand will be accomplished using a different method, but will lead to the same effect.
- Open the Start menu, type Local Group Policy Editor and click on its shortcut or press Win + R, enter gpedit.msc and click OK.
- When the tool opens, select the “Computer Configuration” section and expand the “Administrative Templates” folder in it by clicking the arrow next to its icon.
- Next, you need to find the “System” folder and expand it in the same way as the previous one.
- Inside the “System” folder, you need to find the “Access to removable storage devices” subfolder and open it. The contents will be displayed on the right side of the window. You should now find and open the "Removable drives: Deny read" option
- Specify the Disable option to remove the restriction on reading data on external storage devices.
- If after this the problem is not resolved, you should repeat the previous step with the files “Removable drives: Deny writing” and “Removable storage devices of all classes: Deny any access”.
- If this does not help, follow the entire instructions described above, starting from Step 2, but this time with the “Computer Configuration” block.
.
Alternative option: editing the registry
You can also unlock access to opening a flash drive by making changes to the system registry. The result of the method is completely identical to the previous one, so if you followed the previous instructions and it did not help, skip this section of the article and proceed to consider the following reasons.
- Press Win + R and type regedit, confirm your entry by pressing Enter or “OK”.
- When Registry Editor opens, in the left pane, navigate to HKEY_LOCAL_MACHINE\SOFTWARE.
- Next, navigate to the path \Policies\Microsoft\Windows\.
- Having expanded the “Windows” directory itself, look for the “RemovableStorageDevices” section. If it is present, right-click on it and click “Delete”.
- Next, go to HKEY_CURRENT_USER (the rest of the path is the same) and repeat the previous step there.
- Unplug the flash drive and plug it in again.
If "RemovableStorageDevices" is missing, close Registry Editor and continue with the next instructions.
Method No. 1. Solving access denial error with viruses
In the statistical majority of cases, the main culprits of the problem are virus programs that block the user's access to the necessary file. At the same time, attempts to perform any counteractions in normal mode are blocked by the virus program.
To resolve the situation, I recommend downloading (transferring to your computer) antivirus tools such as “AdwCleaner” and “Dr.Web CureIt!”, and running them in safe mode.
To do this, do the following:
- Choose to restart your computer;
- When you turn on the computer, press “F8” to access the safe mode menu;
- Boot into safe mode;
- Consistently activate the mentioned antivirus products and use them to clean the system. After removing all the malware they found, restart your PC.
What happens if the Disk is Unavailable
Sometimes hard drives, external drives and USB flash drives can suffer from viruses or power failures, which can make them inaccessible to Windows. If the disk is somehow damaged, then reformatting it can be a quick solution. However, all data on this partition will be deleted during reformatting, which is a problem if you need the data stored on the disk.
If there is a "Disk Unavailable" error, then you will not be able to open any files on the drive, which also means that you will not be able to back up your data. So, you need to wait to reformat the partition until your files have been copied to a safe location.
If you've already reformatted your drive and lost your data, you can still get your files back. When you delete something on a PC, the files are not actually destroyed, but the space they occupy on the drive becomes available for the system to write over the old files. It is very important that you do not use your computer at all, as writing anything to the disk may overwrite your files. First, you need to download EaseUS hard drive recovery software and use it to recover data from the formatted partition.
Method No. 2. Temporarily disable antivirus and firewall
The second most common cause of dysfunction is blocking access to the desired file by the antivirus and firewall. They usually block in a situation where the contents of the file raise significant suspicions of the presence of malware in it. If you are firmly convinced of the contents of this file, then simply temporarily disable your antivirus and firewall, and try to run the desired file. In some cases, only complete removal of the antivirus program and external firewall helped (especially the Comodo firewall).
This may be useful: File system error 2147219196 in Windows 10 how to fix.
How to end a process in Windows Task Manager if it doesn't terminate
Users of personal computers have to deal with various problematic situations, which are sometimes difficult to solve on their own. However, having discovered the answer to a problematic question, the next time such tasks no longer seem difficult. In most cases, even a beginner can complete a process that is no longer necessary. Unfortunately, sometimes you have to deal with the fact that, no matter what attempts are made, the process in the task manager still does not end.
Find out what to do if a process in Windows Task Manager does not terminate
What to do when some process “rebels” and does not want to obey, how to still complete it, you can find out if you read our recommendations. We will share simple ways to help you master the skills of managing all the processes that are running on your computer.
Terminating processes
If, while working on your computer, you begin to notice that it noticeably freezes, it means that it is difficult for it to perform all the tasks assigned to it. This happens when you start a lot of processes and then simply forget to stop them.
Of course, if you don’t get carried away with opening new applications, you’ll be able to encounter the problem of your computer freezing less often. Well, if you were working very enthusiastically, so you didn’t notice how you opened many windows, launched several software applications and utilities, then closing them by simply clicking on the “Exit” button may not work.
Algorithm of actions
To terminate unwanted processes that refuse to obey the user, you need to use the help of the Task Manager. If you have Windows 7 installed, just right-click on the bottom taskbar and select the “Launch Task Manager” option.
Step 1
In the window that opens, on the first tab, click on the utility that you no longer need, and then at the bottom of the window select the “End task” option. If the process is not completely hopeless, it will stop.
Step 2
You can go to the second tab “Processes”, in the same way click on the line that is causing problems at a particular moment, and then click on the “Finish” button.
Check the option to show all user processes
Unfortunately, even such advice sometimes turns out to be completely useless for some users, since the process in the Task Manager still does not close.
If such a problem happened to you, you despaired and already believed that the only way out of such a problematic situation would be to force a reboot of the operating system, we suggest that you do not panic, but read our following recommendations.
Step 3
So, do not say phrases like: “I can’t kill the process in the Task Manager,” but rather take advantage of the unique capabilities of the taskkill utility command. Many are ready to consider this team as a powerful tool.
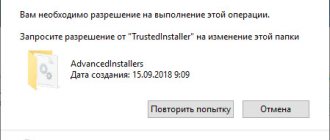
Method number 4. Getting permission to access a file
In some cases, to run the required file, you must have administrator rights to run the required file (as I already mentioned above). Or be a member of the “Domain Administrators” group, provided that your PC is part of this domain. If these conditions are met, the user receives access to this file.
To obtain the necessary permissions, do the following:
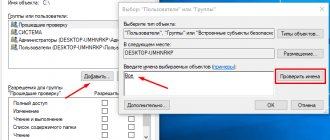
- Place the cursor over the problematic file, right-click, and select “Properties” in the menu that appears;
- In the properties menu that opens, click on the “Security” tab;
- In “Group or Users”, click on your account name to display the permissions you have to work with this file;
- If the required permissions are not enough, click on “Change”, and check all the necessary boxes for the required permissions, and click on “Ok”.
Reason 4: Conflict with a specific application
Sometimes applications installed on Windows can interfere with the system. This is because one or more programs have permissions to control certain OS features, which can cause all sorts of problems. For example, there are applications designed to configure, sort, filter, optimize space, encrypt or even add additional search functionality to USB drives, and if they fail due to an outdated or incompatible version, an "Access Denied" error occurs. To solve the problem, you need to change the device letter:
- You need to right-click on “Start” and then select “Disk Management”. The application can also be easily found through a search in Start.
- All storage devices listed by their assigned letter in alphabetical order will be displayed, as well as drives without a letter assigned. Right-click on the desired drive and select the “Change drive letter or drive path...” option.
- A pop-up window will appear in which you should click on “Change...” to assign a different letter to the flash drive.
- Select any available option from the drop-down list and click OK.
- Reconnect the drive.
Other solutions
- Don't rule out problems in the registry. It may contain non-existent or incorrect entries, which are usually the result of installing or uninstalling applications. Check with CCleaner and correct any errors found.
- There are isolated cases where a failure occurred as a result of a damaged hard drive or RAM sticks. After replacing the components, Windows functionality was restored.
- If one of the methods does not help, then try performing the recovery procedure or, as a last resort, reinstalling Windows.