Sooner or later, every user encounters problems in operating the Windows operating system. And although it is only improving every year, over time various system garbage and errors appear, which are very difficult to get rid of. The simplest solution in this case is to reinstall the OS. This can be done in two ways: either roll back Windows to factory settings, or completely demolish the old system and install a new one in its place. In our opinion, the second method is somewhat better, because there are fewer problems with it due to the fact that you are installing the most current version. We have already talked about resetting the settings to factory settings, so this time we will talk about installing a clean OS.
Reinstalling Windows 7
17.02.2017
The Windows 7 operating system has been and remains the leader among installed operating systems around the world, despite the growing popularity of the new “Ten”. The coverage of everyone's favorite operating system is more than 55% of all computers on the planet. And users often wonder how to learn how to install Seven on their own.
The OS itself is nothing more than just a program, a complex one, but it is a program that can be susceptible to various types of hacks and hacker attacks. Computer hardware also does not last forever, and when upgrading or replacing faulty equipment, reinstalling the operating system is often required.
In the period from the summer of 2015 - during the year there was an update to “ten”, and at the end of the period this update was already forced. Users could not refuse it. And many forced owners of a new product want to return their beloved, stable Windows 7, but, unfortunately, they do not know how to do this.
Ultimate, Professional or Home
Windows 7 has several editions. Their functionality varies significantly. Professional can be the optimal solution in many cases.
The installation process does not depend on the OS edition, and always follows a single algorithm. Professional excludes a number of services available in Ultimate. At the same time, most users still do not use these features when communicating with a computer. From this it is obvious that Professional takes up less space.
Preparing to reinstall Windows
Let's get started:
First of all, you need to take care of the safety of important data: copy all photos, videos and documents to reliable storage, this can be removable media or the cloud. And if your OS does not boot, you can try booting from a Live CD to copy the data. Or connect an external hard drive and remove the necessary files from your drive.
Reinstalling Windows, in this case we will talk about “Seven”, is very simple.
You will need a Windows 7 image. You can download it online or purchase the boxed version. For those who don’t know, this is a version of the OS on a disk or flash drive that you can buy in a store.
If with boxed versions everything is clear: you pay money - you get a ready-made image, then in the case of purchasing online, this downloaded image must first be prepared, that is, written to a USB flash drive or disk. The most common program for burning images is UltraISO. The utility is free and easy to use, and the Internet is full of information on how to prepare bootable media for installation on computers.
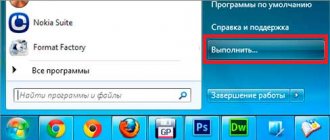
Set boot priority in BIOS
Conventionally, we have prepared the image, now you need to install it on your computer.
- To do this, insert the media into the computer; if it is a flash drive, then it is better to insert it into the connector on the back of the case,
- Turn on the computer or reboot it.
- In BIOS go to the “Boot” menu,
- In the “Hard Disk Drives” section, click “Enter” on “1st Drive”,
- Here we select our drive with the recorded image and press “Enter”, then “Esc”,
- Next we need to configure the boot order from the media, that is, set its priority,
- Go to the “Boot device priority” section,
- Click on “First boot device” and again – “Enter”, here we indicate USB or disk.
In the BIOS, you must first configure the boot priority from a flash drive or disk. To do this, when rebooting, you need to actively press one of the function keys to enter the BIOS. Most often this is “Delete” for computers and “F2”. But there may be another key; you can find out more precisely from the hint on the start window when loading the OS. In the form of a line like this.
"Press DEL to enter Setup"
In this case, the “Delete” key was used on the computer to load the BIOS.
In more modern motherboards, the interface is usually graphical, but it is not difficult to understand. Just look for the “Boot” and “Boot device priority” sections.
Loading a USB flash drive or disk with an image via the Boot menu
This manipulation is needed only once, and after installing Windows, everything will need to be returned to its place. Instead, you can simply reboot, at the moment when information about the installed memory appears on the screen, press the key to enter the Boot menu. Usually these are the "F11", "F12" or "Esc" keys, but not always. Again, there is a hint on the initial loading screen. In the “Boot menu” window, select your storage medium (disc or flash drive) and click “Enter”.
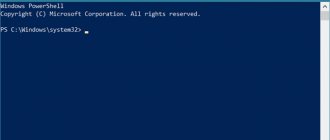
Creating a bootable USB flash drive
On the official Microsoft website, download a utility called MediaCreationTool, with which we will create bootable media. Launch the program and select the appropriate item.
Next, select the desired OS parameters, a drive with a capacity of at least 8 GB onto which the image will be downloaded, and wait until the software downloads the necessary files. The process can take a long time and is highly dependent on Internet speed. Please note that all data on the flash drive will be erased. There is no point in deleting MediaCreationTool, because it is a portable version that does not require installation, and in the future you can return to its help again. After downloading, the utility can be closed. Then you need to restart your PC and start from the installation media.
Start installing Windows 7
- When a message appears on the screen, press any key on the keyboard to install Windows 7 - press,
- The Windows download process will begin. The following picture on the screen will notify you about this:
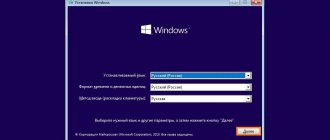
- An installation window will appear in which we select the language,
- Next there will be another window for language and regional settings. Leave Russian everywhere, or change it to the language you need and click “Next”
- In the center of the next window is the “Install” button - click on it.
It is advisable to read more detailed information about the installation progress and hardware requirements - click on the link with a description of more detailed information at the bottom of the window. The system recovery button is needed for specific cases when it is necessary to restore damaged files. Now we don’t need to go there, so we just click “Install”.
Which OS bit size to choose: 64 or 86
Next, you should select which version of Windows 7 OS you want to install. You can also select the bit depth here.
Advice: if you have up to 3 GB of RAM installed on your computer, then you should choose the 32-bit (x86) version; if from 3 and above, then 64. This choice determines how stable and fast Windows will work. With 1 GB of RAM - Maximum 64-bit, the operating system will of course be installed, but working on it will be simply painful. It will slow down and hang terribly.
- In the next window you should read the license agreement, it’s not easy to scroll through and agree, but read, you never know what kind of data you trust according to this license agreement? What if you don’t like it and in this case it would be better for you to refuse to use this product. Check the box next to “I accept the terms of the license agreement” and click “Next”.
- We are interested in the complete installation, so we select the second tile (Full installation of the new version).
- Select the Local disk for installing Windows, format it and click “Next”. The remaining disks and reserved partitions cannot be touched. Otherwise, you will have to format the entire hard drive,
- During the initial installation, the hard drive is clean; here you need to click the “Disk Setup” button and create the required number of “Local Disks”.
Formatting a hard drive when reinstalling Windows 7
When reinstalling Windows 7, you need to format the “Local Disk” on which you installed Windows. Otherwise, the OS will be installed on top of the old system, and the files of the old OS will be placed in the Window old folder and will only take up space on the hard drive.
For example: you have a 100 GB disk, and you need to create a 50 GB installation partition. Write in the window the required size of the future system disk and click “Apply”. For the remaining space, create a second or more Local Disks. When creating a new partition, the system will warn you about the creation of additional reserved partitions.
Clean installation of Windows on your computer
- Next will be installing Windows, copying and unpacking files. Here you need to wait until the installation is complete, usually the process lasts 25–30 minutes,
- Then the computer will restart,
- When the window for entering your account name and computer name appears, your account name can be anything, but the computer name must be entered in Latin. Click “Next”
- Here you can set your account password,
- In the next window you need to enter the activation key, it is indicated on the box with the disk or flash drive. If you downloaded the image from the Internet, you can activate Windows 7 after installation. In this case, do not enter anything into the key input field, and uncheck the “Activate Windows when connected to the Internet” checkbox. Click “Next”.
Here you no longer need to press anything on the keyboard as at the beginning of the installation. At this point, when rebooting, it is advisable to remove the flash drive or disk. If you changed the boot priority settings in the BIOS, the installation process may start again. Therefore, we remove the media and wait for the computer to continue the installation. All files are already on the hard drive and no removable media is needed.
Completing the installation - activating and setting parameters
Beware of fakes and the use of pirated assemblies. Believe me, this will not bring anything good.
- In the next window you will have to choose whether to install updates immediately or after installation. If you select the recommended settings, you will need an active Internet connection to download important updates. If there is no connection, select the third option (Delay decision).
- Set the time zone time and date.
- Next, select the network to which the computer will subsequently connect. The subsequent configuration of Windows depends on this.
- Windows finishes configuring the settings and the desktop opens.
Next you will need to install drivers and utilities, but that's another story. Enjoy surfing the Internet, comfortable work, and a healthy PC.
Tell your friends on social networks
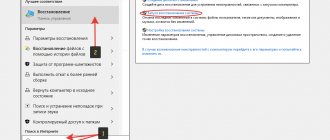
Setting up a freshly installed system
After installing Windows 10, you should configure some settings. The choice of icon size, file sorting or color theme are personal parameters that the user sets to his taste. Next we will talk about more general settings.
- The most important thing is installing drivers. Although Windows installs most of them automatically, it is worth downloading the latest versions for your video card.
- Although Windows 10 has a new browser, Microsoft Edge (an improved version of Microsoft Explorer), it is still not very easy to use. Therefore, it is worth downloading another one, for example, Google Chrome, Fifefox, Opera or others.
- It is important to activate Windows Defender if it does not turn on automatically.
- During installation, the time and date may have gone wrong; you need to synchronize with the network.