Sometimes it happens that when you try to connect a laptop to a TV via an HDMI cable, the latter writes “no signal” or the screen remains lifeless. This situation cannot be called unique: it happens quite often. The most common cause of malfunction lies in the cable, but there are exceptions. For information on how to solve problems when connecting a computer to a TV via HDMI, read the text below.
Correct connection of devices
The best solution to fix something is to do it all over again, but correctly. Connecting the TV to a computer via HDMI is carried out in the following order.
- One end of the HDMI cable is connected to the corresponding TV connector. Any modern TV has several such outputs, they are numbered, so it’s worth remembering which plug is inserted into.
- The second end is inserted into the corresponding connector of the laptop or computer. In the case of the latter, there may also be several HDMI outputs, but not all of them are active. You should select the one that relates to the video card - it is located next to the VGA or DVI output.
- On the TV, using the remote control, a menu with signal sources is opened and the HDMI connector that was used for synchronization is selected, for example, HDMI. When connecting the system unit to an old TV, you can see that after selecting the signal source, a window will appear asking you to indicate the type of connected device, you need to select PC or laptop depending on the specific situation.
If everything is done correctly, the TV will begin to display the PC desktop; if this does not happen, then it is worth considering other cases of failure.
Debugg
The algorithm for independently solving the problem of synchronizing a TV device with a computer is as follows:
- Select connectors compatible with your existing HDMI cable. Since there are several generations of this interface, each of which has unique throughput characteristics, the user must be careful when choosing an input port on a television set. You can find out the properties of the connectors located on the monitor from the instructions supplied with the device.
- Disconnect the TV from the network and switch the laptop to battery mode. By following these steps, the user will protect the cable from internal damage.
- Connecting a laptop to an external monitor.
- Activation of the TV and manual selection of the external signal source. It is necessary to switch the device from digital TV display mode to media content streaming mode.
- Starting the computer. When the signal passes, the operating system loading icon should appear on the TV screen and a special connection sound should be heard. If any error occurs during data transfer, you need to disconnect other peripherals from the laptop and try to update the image streaming settings. If there are no positive results, you will need to move to the next stage of this algorithm.
- Connect devices using a VGA or DVI cable or wirelessly via WiFi. When connecting, you will need to use HDMI adapters from the specified TV connectors.
Perhaps the cause of the malfunction lies in the incompatibility of the TV device with the version of the HDMI interface installed in the laptop.
The user can also synchronize devices without special adapters - for this, both the TV and the laptop must have a connector corresponding to the selected interface. If, after following the steps specified in the instructions above, the user does not receive the required result, he will need to seek help from a specialist in setting up telecommunications equipment.
Attempts to independently repair device connectors can only aggravate the situation and cause new malfunctions.
Conclusion
Now the user knows why the TV may not be visible to a laptop connected via HDMI. It is worth adding that sometimes to fix the problem it is enough to simply restart the computer.
Checking the health of components
The most obvious reason why the TV does not see the laptop via HDMI is faulty connectors or wires . It's easy to check their functionality.
- You should try other HDMI inputs on your TV.
- To check the laptop's output, you can connect it to other equipment.
- Do not neglect replacing the cable, even if it is new and just purchased.
An important point regarding HDMI cords.
There is an opinion that they are double-sided, that is, it makes no difference which side you connect. This is a fair statement, but if the cable is very cheap, then it may be single-sided. In this case, it should be inspected: as a rule, there is an arrow on the plug that should be inserted into the signal source. If there are no arrows, then you can try connecting both ends in turn.
How to check the signal
The most effective way to check the presence of a signal or the operability of the entire assembled system is to alternately replace individual parts of the system with known-good analogues. However, a second set of devices used is not always at hand, so the best way would be to work on the principle of “disassembled and carefully reassembled again.” You can proceed according to the following method.
- I disconnected everything from the network and waited 3-5 minutes.
- I disassembled the entire system into individual elements.
- I checked the functionality of the TV, even by turning it on via an antenna.
- I checked the cable by connecting a desktop computer monitor to the system unit.
- I checked the functionality of the laptop.
- I carefully assembled it again and wrote down the port numbers.
- Reconfigured both devices.
In 90% of cases, such “assembly and disassembly” gives a positive result. The point here is that during initial assembly, it’s easy to make a mistake - click the wrong thing, insert it in the wrong place.
An HDMI cable is typically omnidirectional, meaning there is no difference in which side of the cable the device is connected to. However, there is a type of cable in which the output plug is marked with a triangle, the apex of which is directed towards the contact set. Such a cable will not work in the opposite direction.
Setting up image output on PC
If during the check it was concluded that all connectors and cables are working, but there is still no picture, then it’s time to configure image output on Windows.
On Windows 7.
- A context menu opens on the RMB desktop.
- "Screen resolution".
- "Connecting to a projector."
- Select “Duplicate” so that the picture is displayed on both displays or “Only projector” - the desktop will now be visible only on the TV.
On Windows 8.
- "Start".
- "Control Panel".
- "Design and personalization."
- "Screen".
- “Multiple displays” - “Duplicate” or “Extend the desktop by only 2”.
On Windows 10.
- Call "Display Settings".
- "Display".
- Scroll down the menu to the “Multiple Displays” option. If the HDMI cable from the computer to the TV is connected correctly, a window with a connected second display will be displayed. It should be indicated that the image output method is similar to those mentioned above.
Notes
In the vast majority of cases, the problem with signal transmission is associated with an insufficiently reliable connection between the contacts of the HDMI cable and the socket. But the reason may be more complex. If you are faced with a problem with the HDMI connection, then do not panic, but carefully read the above recommendations, and everything should work for you.
Well, if this does not help, then contact the technical support service for the purchased devices for help. If this does not solve the problem, then you are faced with a warranty claim - contact the seller.
And also, if you are used to “looking to the future,” then immediately purchase an HDMI cable with a bandwidth of 10.2 Gbit. Today it will not provide any special advantages, but when TVs and signal sources with 4K resolution become cheaper, this cable will come in handy.
In the article “” I gave detailed instructions on how to do this, but when I tried to do the same on another computer with two operating systems installed (Windows 7 and Windows 10), I immediately encountered the fact that the logo appeared first when loading dozens, and then the screen went dark and I couldn’t do anything.
After a couple of hours of trial and error, it became clear that we needed to somehow configure the video card first, and then move on. And in order to prevent the screen from darkening, you must first disconnect the HDMI cable. But is it possible to configure the video card to detect the TV when the HDMI cable is disconnected? It turned out that it is possible.
How to set up an Nvidia graphics card
Before repeating everything described below, read the article to the end, in order to avoid unnecessary movements and damage to your nerves.
I unplugged the HDMI cable and booted up the computer.
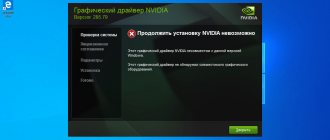
After loading the operating system, right-click on the desktop and select “ NVIDIA Control Panel”
».
In the NVIDIA Control Panel window that opens, on the right we find the item “ Installing multiple displays”
", and if only the name of the monitor is displayed on the right, and the TV is not detected, then click on the link below " There is no required display...
».
A small window will open “ Display Missing Detection”
" and in the block " TV detection
“Put a check mark next to the entry “
Detect TVs when turned on
”, and click “
OK
”.
Close the video card control panel and turn off the computer.
After turning off the computer, reconnect the HDMI cable to the computer. Check that the TV cable is also connected to the HDMI connector. For information on how to do this, read the article.
After all the manipulations, do not forget to turn on both the computer and the TV.
Setting up a computer desktop via TV
After rebooting, everything happened again, and I did not see either the boot menu or the desktop. Then I pressed the “ Source”
", and selected HDMI mode on the TV.
If everything is done correctly, then a picture from your computer should appear on your TV. I now have a menu for selecting the operating system. I chose the system on which I had just configured the video card, i.e. Windows 10
A desktop appeared, but it was completely clean. I right-clicked on it and in the context menu that appeared, selected “ Display Settings”
In the Options
“It’s clear that the monitor and TV have been identified. Go down and in the “ Multiple displays”
"set "
Duplicate these screens
".
Now the image on the monitor and TV should be the same. Everything appeared on my TV and on my computer.
And in order for the monitor to no longer go dark when the computer boots, I had to do the same thing in the second system – Windows 7. Now from any system I can connect to the TV and enjoy watching my favorite movies directly from YouTube.
Setting the frequency and screen resolution
If after this you still cannot connect the TV to the computer via HDMI, then perhaps the computer settings do not match the capabilities of the TV. It's about resolution and frequency. If the TV is old and its resolution is HD FHD by default , then the TV is simply not capable of displaying the image . In this case, you should enter the screen settings according to the instructions indicated above (for each OS version).
The resolution is set in the same menu where the display method is configured. You must first select the second screen (TV settings) and set the desired one in the corresponding menu item.
After this, you need to select “Advanced display settings” - “Video adapter properties for display 2” and specify the frequency. The default is 60 Hz, it makes sense to try lower settings.
Important! An interesting feature of LG, Sony TVs and certain models from other manufacturers is that you can set the resolution directly in the device menu. In the settings there is a section “connection to a PC”, and in it you will need to set the maximum supported by the video card of your laptop or desktop PC.
Users often receive a collection message of the following nature: “HDMI mode is not supported.” This was common on Samsung TVs a few years ago. It was proposed to “treat” this by switching the resolution and frequency, but later it turned out that this was a factory defect that could only be corrected by firmware. The problem is typical for older models; modern TVs do not have it. For those who have encountered this, the only way out is to go to a service center.
The computer does not see the TV via HDMI
There can be many reasons for such a malfunction, so we will try to consider the most likely of them. Today we will talk about what to do if the computer does not see the TV via an HDMI cable.
What defects should you pay attention to:
1
The pins are the most important part for a successful HDMI connection. The pins can rust or oxidize over time, so you need to pay special attention to this part.2. Check the port for foreign objects (dust, small debris). In case of contamination, the transmitted signal may be distorted or even completely lost.3
Check port stability. If the HDMI cable wobbles with the slightest movement, then it must be secured in any available way (by yourself or contact a service center)
In case of contamination, the transmitted signal may be distorted or even completely lost.3. Check port stability. If the HDMI cable wobbles with the slightest movement, then it must be secured in any available way (by yourself or contact a service center)
Don't forget to check the HDMI cable itself for defects
Please note the following points:. 1
Damaged contacts (cable replacement required)2. Violation of the integrity of the cable (cuts, broken wires). In this case, the cable must be replaced immediately, because in addition to poor signal transmission, it may pose a threat to your health.3. Check the cable for small debris and dust
1.
Damaged contacts (replacement of the cable is required)
2.
Violation of the integrity of the cable (cuts, broken wires).
In this case, the cable must be replaced immediately, because in addition to poor signal transmission, it may pose a threat to your health. 3.
Check the cable for small debris and dust.
Solution to the problem. Computer settings
This section will be relevant for you if you use a computer with multiple screens, because in this case, incorrect settings can lead to HDMI malfunctions.
Our instructions are relevant for Windows 7,8,10.
1.
On the desktop, right-click on a free area.
In the window that appears, go to “Display Settings”
(screen resolution).
2.
Click the
“discover”
(find) button in the central part of the window.
3.
All connected monitors should appear before your eyes (if there are no technical problems). If the required monitor does not appear, then you should check the connection.
4.
Here you can also select the display mode for the screens.
“Duplicate”
will mean that all screens will display the same image.
“Expand screens”
– monitors will complement each other.
For correct operation, it is better to select the “Duplicate” mode.
An HDMI cable is capable of high-quality support for working with only one screen, since it provides a single-stream connection. Problems with operation may occur due to the fact that you have connected more than one device to the computer.
Method 3: Update video card drivers
In some cases, your graphics adapter may simply not be capable of outputting images to two displays at the same time. You can check this video card capability on the Internet.
Now let's start updating the drivers.
1.
Open
“Control Panel”
, then go to
“Device Manager”
.
2.
Expand the list of video adapters.
3.
Right-click on one of them and select
“Update Drivers”
.
Next, you just have to wait for the automatic download to finish. 4.
Do the same with other adapters if there is more than one.
If necessary, you can find the necessary drivers on the Internet by indicating your video card model on the manufacturer’s official website.
Method 4. Cleaning your computer from malware
Various viruses can interfere with many functions of your computer, so problems with the HDMI connection are likely.
To immediately check your computer for viruses and subsequent prevention, we recommend that you use Kasperky antivirus. A huge team of qualified specialists works on this program every day, constantly increasing the level of protection. It is worth noting that high-quality software is usually paid, so you can try Kaspersky for free only for a month.
2.
In the left part of the window, select
“Full scan”
and click the corresponding button to start.
3.
You will have to wait some time for a quality analysis of your computer for threats. After the process is completed, you will see all dangerous and potentially dangerous files, and you will also be able to personally decide which treatment methods to apply.
Video card driver update
If the TV does not see the computer via HDMI, or this connection method has stopped working, then the reason may lie in the video card, or more precisely, its driver. It could have crashed, the driver might be out of date, or it might have been installed incorrectly in the first place.
In this case, you can make sure that the signal is not due to an old driver on the video card.
- On the “My Computer” icon or in Explorer, on the “This Computer” tab, RMB should select “Manage”.
- Next, “Device Manager”, “Video Adapters” tab.
- If a failure occurs, there will be a yellow or red sign next to the video card. They mean that the node is not working correctly. If there are no symbols, then the video card is working, but the driver may be outdated, and this is a common reason why a number of functions do not work.
There are several ways to update software for PC components. The most reliable option is to go to the website of the laptop or video card manufacturer and download the file for the desired operating system, taking into account its bit capacity. After installation, the device must be rebooted.
Advice! If you couldn’t find the driver, then the DriverPackSolution utility will come to the rescue - it independently scans the gadget and finds all the necessary software for each node.
If after all the above steps the laptop still does not connect via HDMI to the TV, then the reason is more complex and will have to be fixed in a workshop. You can find out which device requires careful diagnostics by trying to connect the TV and PC to other equipment.
Advice from the experts
To understand why the laptop does not connect to the TV via HDMI, you need to delve a little deeper into the cable design. We should start with the fact that not every manufacturer makes wires strictly adhering to the standards: cross-section, materials, fiber arrangement, connector coating, etc.
Unscrupulous manufacturers, in particular Chinese ones, try to save on everything they can: copper, which is needed for internal conductors, is replaced with cheaper aluminum, the diameter of each wiring is reduced, and lower-quality insulation is used. Hence the very affordable price for HDMI cables, especially if you order them on Aliexpress.
But you should not think that all sellers, without exception, are trying to sell low-quality goods. The difference in cost: a good cable can cost not 2, but at least 20 dollars. It should also be taken into account that to set the markup value, retailers often take numbers out of thin air. It is possible that the cost of a frankly low-quality cord and one that meets all standards will not be much different.
Thanks to such “paradoxes”, many users are confident that all cables are the same and there is no point in overpaying for a better one. The final cost is also affected by the technological process. A hand-soldered cord will cost more: there are 38 contacts, each of which must be connected correctly.
Due to the use of low-quality materials, at the stated 10 meters, a signal with a resolution of 720 barely overcomes 5, while being distorted to a disgusting state. A cheap cord will not transmit higher resolution, “choking” in the data stream. Therefore, one of the reasons why the laptop does not see the TV is an HDMI cable that does not meet the requirements.
When it comes to offline marketplaces, it is better to buy from a seller you know personally. At the same time, remember that the consultant’s interest is sales volume, and not a client satisfied with the quality.
For the frequency range with which HDMI operates, the following rules apply:
- The thicker the wire and foil used, the better the conductivity of the cable.
- Longitudinal installation of foil is better than spiral installation, but such wire is stiffer and bends less easily.
- An external two-layer screen is better than a single-layer one, as it suppresses interference more strongly.
- Each twisted pair should be placed in a separate shield so as not to interfere with each other's signals.
- Each screen must be isolated from one another.
- The lower the resistivity of the conductors, the better the signal will be transmitted.
Sound settings
If, when connected, the picture is displayed but there is no sound, then the problem is either incorrect configuration or the use of adapters without an audio interface.
The sound on a PC is configured as follows.
- Windows 7.8 – RMB on the sound icon in the “playback devices” tray, “playback” tab, select the connected TV and confirm with the “apply” button.
- Windows 10 – RMB in the tray on the sound icon “open sound settings”, “sound”, “select an output device” - you should specify the TV speakers.
If the problem does not go away, then check the volume on both devices, as well as on the player. It would be a good idea to check and update the driver for your sound card in the same way as for a video card.
Correct connection
The best way to fix something is to do it again, but this time correctly. So let's try to connect again, maybe you're just doing something wrong.
- Pull out the connected cable and plug it back into the HDMI port and immediately remember which one it is. I have it at number 2;
- We connect to any free port on the laptop;
- Or on the system unit of a personal computer;
- Now on the remote you must turn on the button that displays all connections to the TV. This could be a button labeled “Input” or “Source”;
- Now the following section will open in the menu, where all the ports and inputs are presented. Select the one through which you connected your laptop or computer;
- One more thing - on some TVs there is also a menu that indicates the type of device being connected. This is necessary to ensure that the image is of acceptable quality. Therefore, find the button to change the name and select “PC” or “Laptop”;
If there is no picture on the screen, but you still see this unfortunate inscription, then move on. Also, if there is still a picture, but no sound, then go to the last chapter.
The laptop does not see TV
There are options when, when connecting a computer, the TV is not displayed in the list of connected devices for audio transmission. It turns out that the laptop does not see its speakers, and, accordingly, there is no sound on the TV. You must reboot the product without disconnecting the cable. After the process is completed, the TV speakers should appear in the list, only they can be inactive. We have already described above how to make your TV active - repeat the settings, the TV acoustics will sound high quality. When a laptop finds it difficult to select a priority connection, audio via HDMI also often does not work. Try disconnecting all devices from the PC except the TV - the situation should return to normal.
Finding the cause of the malfunction
The search for the reason for the inability to synchronize the TV with the computer should begin by checking the cable used for the connection.
To perform diagnostics, you will need to connect the HDMI cable to another external monitor or laptop, and then try to display the image in the usual way: if the attempt to start broadcasting media content is successful, then the cause of the problem lies in the malfunction of the devices.
It is worth adding that when purchasing an HDMI cable, it would not be superfluous to ask the seller to demonstrate the functionality of the purchased peripherals.
The next step in diagnosing a connection error is checking the signal source on the TV.
The user will need:
- click on the button for selecting the input signal source (“Source”) - on most models of Samsung and Sony TV devices, this button is located in the upper right corner of the remote control;
- view the list of available input resources and select exactly the HDMI connector through which the computer is connected to the TV;
- save the correct TV settings.
Such a check of the connector is necessary, since sometimes the TV device “gets confused” in the signal sources and incorrectly determines the HDMI port involved in synchronization. If the personal computer is connected to several external monitors at once, it will be necessary to check the correctness of the image and sound output parameters .
The setup algorithm looks like this:
- The user must right-click on an empty area of the desktop.
- If Windows 7-10 is installed on your computer, you will need to select “Screen Resolution” from the context menu that appears. When using older versions of the operating system, the required tab will be called “Graphics characteristics”.
- The choice of the proposed image streaming options is the one that involves the screen of the desired TV.
It is worth noting that you can also open the image output settings menu using the “Fn + F4” key combination. If manipulations with signal sources do not bring the desired results and the laptop still does not see the TV, then you will need to check the computer’s system parameters.
To do this, you will need to launch “Device Manager” and find the version of the drivers installed on the video card, and then compare the build number of the software used with the index of the most “recent” version of the software.
You can download new drivers from the official website of the developer. Outdated software is also the cause of a system error in which the laptop does not see the TV device via the WiFi interface. The last step in diagnosing the problem is checking the synchronization port. From the list of possible causes of the problem, you should not exclude mechanical damage to the TV or computer connector or wire plug.
Also, with prolonged and intensive use, the HDMI cable may fray in places where it is frequently bent. It should be added that experts recommend connecting the TV to the computer when turning off the external power sources of the devices.
We carry out diagnostics
What should you do if the TV does not see the laptop via HDMI? Video cards of all modern products support this connection: HDMI on the TV is installed on almost every model. If the connection of the laptop was carried out according to all the rules, but there is still no image, then we connect the laptop to the TV, while sequentially checking all possible problems.
Cable check
Not a single product, even the most reliable brand, is immune from manufacturing defects, especially when assembled by hand. When purchasing, the quality of the image and sound are checked, but they never check the specific connectors and connection sockets on the TV - at best, they make sure that they are present, and even then not all buyers. It often happens that the cable itself does not work, although it has not been used for such a long time. You need to connect the same cable, but to another device, if it functions normally, then the reason that the computer does not see the TV lies in the latter. It is necessary to diagnose the TV to recognize similar signals.
Checking the signal source
Press the button on the remote control to select the external input option. It depends on the specific model of the product which button on the TV remote control you need to press: “source”, “input” or “HDMI” (LG, Sony or Samsung). After pressing, a menu appears on the screen with a detailed list of active inputs. Select and confirm by pressing OK or Enter exactly the desired input into which you previously connected the cable coming from the laptop.
Connection port problem
Any connector may suffer mechanical damage or burn out during a power surge, which is not uncommon in our electrical networks. Experienced technicians advise connecting the HDMI cable when the devices are disconnected from the network; it is recommended to even disconnect the antenna cable at this time.
There is also a very rare reason why the TV does not see HDMI: it simply does not have additional power on the video card, and without this the connection will not work.
To solve the problem
Knowing the causes of the main violations of the symbiosis of a computer and TV, you can solve any problem.
Troubleshooting algorithm:
- If your computer no longer sees the TV, check the connection and condition of the cables and connectors;
- Be sure to set up your computer system correctly. In the menu settings there is a possibility of incorrect selection of parameters. Please be aware that some TVs do not work with HDMI and VGA connections;
- Check the availability and “freshness” of drivers;
No signal from computer to TV
A lack of signal often indicates that this TV model cannot be connected via HDMI. It is possible that the connection type is incorrectly specified in the parameters. In this case, you should try other connection methods.
The reason for the lack of signal on the TV may be viruses, outdated drivers, broken video cards or broken cables. Be sure to check your video card settings and select the correct display type. Finally, look in the BiOS and check that the connection items are active.
Testing the signal through various connections
Truth can be achieved by trial and error. If after all your efforts you cannot solve your connection problems, you can check the signal using various connection methods.
The due diligence process is as follows:
- To study health conditions using different connection methods, you must first identify the connectors available for use; it is possible that the technology simply does not support a certain type of connection;
- Disconnect the TV and computer from the network;
- If you find suitable connectors, connect the HDMI cable to the two devices;
- Turn on the TV, press the “Normal” button; In the window that appears, select the operating mode (HDMI connection) and click OK.
- Turn on the laptop: when loading the operating system, if everything is connected correctly, the TV display will display information similar to the monitor;
- If you don't see a signal, go to Device Manager and see what other ports are available for connection;
If the work performed does not make any difference to the current state of affairs, then most likely the reason for the lack of signal is some internal failure or defect in the robot cables and I/O ports.
What to do if the laptop does not connect to WIFI? The answer is further.
For some reason the Play Market doesn't work on your tablet? Read here.
The development of digital and multimedia technologies has given us the opportunity to enjoy watching photographs, amateur and professional videos on a large TV screen. That's why TVs connect to phones and computers. The connection between two pieces of equipment, if done correctly, is established as soon as possible.
But sometimes the picture or sound does not appear on the TV screen. There could be many reasons for this
It is important to set them so that the problem can be fixed in the future. Only a specialist can diagnose problems and fix them
This is not necessary for serious restoration work. But this rule does not apply to the elimination of minor and primitive defects.
Today, almost any television panel can be connected to a personal computer or laptop. The technology is connected via an HDMI connector. But often users encounter the problem that the computer does not see the TV through the HDMI input or there is no sound. There are several reasons why such problems occur, so you need to identify the problem one by one. Also read which cable to choose to connect to your TV.