Technical progress does not stand still, new, more advanced devices with convenient functionality are constantly appearing, and regularly changing gadgets has become commonplace for many. But this raises the problem of transferring contacts from an old phone to a new one, and fortunately, there are many solutions. One of them is the ability to synchronize contacts from Android with a Google account - a very convenient feature that allows you to save a lot of time.
Why do you need contact synchronization?
In our situation, we are considering synchronizing phone numbers with the Google Contacts service. After completing the operation, the list of subscribers will be displayed not only on the smartphone, but also on any device through which you can open Google.
If you still think that this is an unnecessary and unnecessary procedure, then let's look at two examples that will make you choose Google Contacts. Firstly, this way you protect your contact list from accidental deletion or loss if your phone is stolen. Secondly, with synchronization you can access your contacts from any device, even without your smartphone.
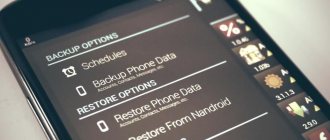
Backup
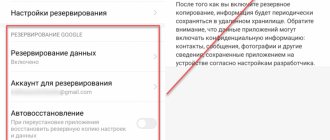
The latest versions of the Android operating system have added a function for creating backup copies of call logs, SMS, installed applications and specified settings. This allows you to restore some information when you switch to another smartphone. To enable the function, go to the “System” section; the name is relevant for OS version 9.0.
Recommended: Error: Alarm does not work on Android
Click on the corresponding item in the menu. The dates of the last copy will be shown, sorted by information type.
The documents will be uploaded to the Google Drive cloud storage; make sure that there is enough free space on it and that the phone is connected to a stable Internet. Click on "Start Copying".
Normal synchronization
The synchronization process on Android is performed in several ways. This or that option is dictated by the situation in which the user finds himself. First, we suggest paying attention to the classic method of performing the operation, which is suitable for those who store numbers in the phone’s memory:
- Open your device settings.
- Go to the Accounts section and select your Google profile.
- Open the "Account Sync" tab.
- Activate the switch opposite the “Contacts” item.
- Click the three dots button and then select the Sync option.
If everything is done correctly, the list of subscribers will be immediately uploaded to the Google Contacts servers. By the way, to gain access to the numbers, you just need to open the contacts.google.com page and log in. Also, if we are talking about a second phone, you just need to install the corresponding application, which is available on the Play Store.
Adding a Google account
When you start working with any Android device, the system will prompt you to create an account to log into the Play Market (application store) and other services. Without it, it is impossible to download applications, so if the user previously skipped this step, you can add a profile through the device settings.
To do this you need:
- go to the menu and find the Google section;
- you can also add an account through “Synchronization” - scroll down the available options and click on “Add account”;
- Then all you have to do is follow the clear instructions.
Since an email address is required to register for the service, the device will immediately offer to register (or log in to an existing) Gmail account.
Import and synchronize contacts
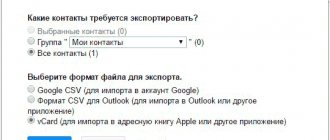
An alternative synchronization method, which is largely related to the previous option. But here you first need to import contacts. This is necessary if the numbers are stored on a SIM card, because Google cannot synchronize with this carrier. Ultimately, to implement your plan you need:
- Open the phone book.
- Go to the settings menu.
- Select the "Import" option.
- You should specify your SIM card as the location from which we will import subscriber records.
- Confirm the operation.
Next, it remains to enable synchronization using the instructions set out in the previous paragraph of the material.
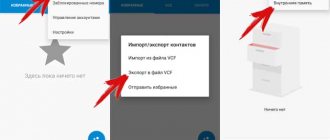
Things will be a little more complicated if the numbers are in the memory of another phone. In such a situation, you first need to export subscriber records to a VCF file through the “Export” menu in the standard dialer. Subsequently, you need to transfer the file to your device in any way (for example, via instant messenger), and then import them, selecting VCF as the source.
How to enable auto-sync of contacts on your smartphone?
You can enable automatic synchronization, which will work without user intervention, in two ways, which vary depending on the device of specific brands and models:
- The “Auto-sync” button is located in the “Accounts” or “Synchronization” item. If enabled, contacts will be automatically duplicated to your Google account.
- In your smartphone settings, you need to find and select the “Google” section. Then you need to click on “Account Services” and select “Google Contacts Sync” and then “Automatic Sync”.
If the phone is connected to the Internet, auto-sync works stably. But sometimes it crashes, and you have to manually check whether contacts are transferred to your Google account. To do this, you need:
- In “Accounts” or “Synchronization” you need to select “Google”.
- In the list that opens, opposite each data block the date of its last synchronization will be located. This way the user can track how long ago his contacts were transferred to the account.
Synchronizing Google contacts is a convenient way to transfer data into a single account. For it to work correctly, you need a stable Internet connection, timely Android updates, auto-sync enabled, and correct Google account information.
Ratings: 2 , average: 5.00
Synchronization with another account
Often, smartphone owners use several Google accounts on their device. In addition, sometimes you need to transfer contacts not to yourself, but to another person. In this case, the principle of the operation is slightly different. It requires preliminary preparation, which is carried out as follows:
- Through the “Accounts” settings section, add another Google account, if this has not been done previously.
- Next, go to the phone book settings, where the numbers are stored.
- Open the “Accounts for new contacts” tab.
- Select the Gmail account you want to set up synchronization with.
As you may have guessed, all that remains is to synchronize your contacts through your Google account settings, as we discussed in the first paragraph of the material. Check it out to ensure smooth synchronization.
How to display synced contacts on a new device?
In order for synchronized contacts to appear on the new phone, you need to follow the instructions:
- Log in to the desired Google account.
- Go to “Contacts” (the native application on every smartphone).
- In the contact settings, you need to find the “Show contacts” or “Contact filter” item.
- Then select the desired account where the data is stored.
Checking synchronization
Previously, we already partially talked about the Google Contacts service itself, for which synchronization was performed. However, how can you check that all numbers are saved and not a single subscriber is missing? To do this you will need:
- Open any browser.
- Go to https://contacts.google.com/.
- Log in to the profile with which you previously managed to synchronize records.
The list of numbers will be displayed in the “Contacts” tab. You will be able to view all subscribers added to the phone book. If for some reason not all numbers are displayed or there are not a single subscriber, click the “Import” button and follow the instructions that appear on the screen.
Using third party services
Amateur firmware on Chinese smartphones often suffer from problems with built-in services from Google or conflict with eastern counterparts. How to synchronize two Chinese phones on Android, without access to built-in functions? The most radical way is to reflash the operating system, but there are third-party synchronization programs.
We recommend: Contacts won’t load on Android
Consider the Dropsync program, it allows you to send files from your phone memory to cloud storage, similar to “Disk” or “Photos”. Unlike the original, the analogue uses Dropbox cloud storage for saving. Before installing the Dropsync application from the Play Market, we recommend creating an account in Dropbox.
Important: to create permanent file synchronization, these steps must be repeated on the second smartphone. Are your contacts duplicated? Read how to fix this in the article: “Why are contacts duplicated on Android?”
Click on the blue “Connect to Dropbox” button for your account. The program will redirect to the login page in the browser or to the official service application. Enter your account information and connect the cloud.
Click on “Synchronization Wizard”. The program allows you to create a trial pairing, to understand the principle of operation, skip this section and move on to creation.
We indicate the directory in the cloud into which files from the phone will be uploaded. In the “Local folder” field, indicate the path from which files will be loaded into the storage. You can change the settings in the future.
We activate the “Two-way” pairing method and connect additional functions by checking them. Tap on “Save”. The program will begin scanning files in the specified folders and send them to the server, showing download statistics.