Operating systems can sometimes fail and Windows 10 is no exception. The new OS, like previous builds, may not load for a number of reasons.
- Software failure due to incorrect installation of drivers and utilities.
- Or a malicious attack when the boot sector on the system is damaged.
Often, when problems arise with loading the operating system, users decide to reinstall Windows 10. Although you can solve the problem with loading Windows 10 without reinstalling the OS, but simply restore the boot record.
Recovering Win 10 boot sector via command line
Before you restore Windows 10 via the command line, you need to prepare bootable media: a CD or USB flash drive.
- We insert our bootable media and restart the computer. You must boot from this media.
In each individual case, when booting from installation media, the method may differ. But in most cases, on computers, use the Esc to load the Boot Menu and select the media here.
- When the Windows 10 installation window appears, on the first screen we need to click the “ Next ” button.
- Then select “ System Restore ”.
Let's sum it up
In conclusion, I would like to say that if you know all the intricacies of bootloader recovery, you can quickly fix your computer. It is also worth paying attention to the situation when it is impossible to restore the boot sector and the bootloader itself. In this case, you need to play it safe and use the means of full system recovery. Such tools are a complete system image created using the Windows 10 OS itself, as well as a program such as Acronis True Image . We hope that our material will help you restore the bootloader from the MBR, and your computer will function as before.
Commands to restore Windows XP
A functional failure may prevent the system from starting correctly.
A system rollback is possible only after the OS has been fully loaded.
But what if this process does not happen?
In this case, we need to use the Windows command line functionality.
The Recovery Console contains most of the most commonly used system commands.
They allow you to fix the problem and get your computer working again in a matter of minutes.
Error message
- How to roll back a Windows 10 update via the command line
First, you need to have on hand an installation disk or flash drive with the version of Windows that was installed on your PC.
Nowadays, USB drives are the most commonly used.
Using a special utility Rufus , we can create such a drive in a couple of clicks.
If the BIOS subsystem supports booting from a removable drive, we need to insert our flash drive into the appropriate slot.
Next, you need to restart your computer (or turn it on).
Open the boot menu using the BIOS key.
Typically this is the or key , but other options are possible.
During loading, a hint with the name of the desired button will appear in the lower corner of the screen.
Then we select the location from which the system will install the files. In our case, this is a USB device .
Device selection
Next, the bootloader asks us to press any key to start the file copying process.
Like the picture below:
Press any key
We press, say, the space bar and move on.
The installation process of our Windows XP will open; you need to wait until all the boot files are unpacked.
Installing files
After unpacking is completed, the following window will open.
In it, press the key to open the recovery console.
Installer
Now you need to enter the number that corresponds to the desired copy of Windows.
In most cases, only one OS is installed, click on the button .
If you have a password set, you need to enter it and press . Or just click .
This will open the Recovery Console.
We can enter any command we are interested in in a text line.
A complete list of them can be obtained by writing
help
.
Recovery Console
Enter
fixmbr
- this command will help restore the boot partition of the system.
To confirm any action, press the Latin letter and press .
We write and confirm the command
fixboot
, to begin the process of burning the OS to the system disk.
Fix command
After the process is completed, enter
exit
, to close an unnecessary console.
Then we restart the computer.
How to check the system for integrity and errors
The operating system of a modern computer is a complex architecture consisting of a large number of programs, scripts, services, drivers, instructions and databases. The more complex the tool, the greater the chance of something breaking. Damage to an important system file can lead to crashes, poor performance, or complete computer failure and loss of personal or system files.
Checking with System File Checker
System File Checker is a tool built into Windows for checking and restoring the integrity of files and the file system. It can help diagnose and correct errors.
The program is launched through the system terminal. To do this, right-click on the “ Start ” menu and select “ Windows PowerShell (Administrator).
In the command line that appears, type “ sfc / scannow ” to scan the file system. The check will end when the final message appears in the window.
The program will also notify you if any faults have been detected. The correction is carried out automatically.
Verification with Deployment Imaging and Servicing Management (DISM)
If the SFC utility reported that it detected an error or a damaged file, but was unable to fix or restore it, the built-in DISM tool will help.
Also enter the following command on the command line (you can copy or retype):
“ Dism / Online / Cleanup-Image / RestoreHealth ”
Once completed, use SFC again. It should now diagnose and fix the files without any problems.
Commands to restore Windows 7
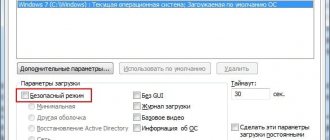
We will restore our system through safe mode.
When the computer starts, press and hold the key .
In rare cases, its function is taken over by a button .
A boot menu will open in front of us, in which we need to select the item “Safe Mode with Command Line Support” . As shown in the screenshot below:
Additional download options
A console will open in front of us in which we need to write the command
rstrui.exe
The “System Restore Wizard will open in front of us .
It displays a list of saved points to which we can roll back the system.
Among them there will be an automatically created point.
System Repair Wizard
Select the item that interests us and click . The recovery process has started.
After this, restart your PC.
This method works even when the system is heavily damaged by viruses. This method can be used if the OS does not load at all.
Interesting videos that will further help you understand the problem:
Commands to restore Windows 8
The easiest way to start the recovery process is through bootable media.
Similar to the previous option, this can be a regular SD disk or a USB drive.
We insert our system file transferr into the desired connector and reboot the computer.
“ boot ” tab and install our media in first place.
This is done in order to boot the system from it.
View of the BIOS
While in the BIOS, remember which disk is located first in the “boot” tab. If you have two or more hard drives, the boot will start from the one that does not have operating system data. Put in first place the drive on which you want to install Windows.
The BIOS configuration was successfully saved. After this, the Windows 8 Installation Wizard .
“System Restore” item and click on it.
Installing Windows 8
From the list provided, select the desired operating system:
List of available OS
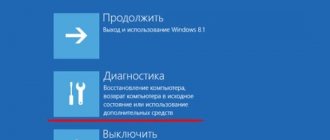
Now go to the “Diagnostics” and enter “Advanced parameters” :
Advanced options section
Click on “Automatic recovery” and wait for the process to complete.
While in the BIOS, remember which disk is located first in the “boot” . If you have two or more hard drives, the boot will start from the one that does not have operating system data. Put in first place the drive on which you want to install Windows.
Bootrec.exe - Windows boot error correction utility
Everything described in this guide is applicable to Windows 10, Windows 8.1 and Windows 7, and we will use the bootrec.exe startup recovery tool available on the system, launched from the command line.
In this case, the command line will need to be launched not inside the running Windows, but in a slightly different way:
- For Windows 7, you will either need to boot from a pre-created recovery disk (created on the system itself) or from the distribution kit. When booting from the distribution, at the bottom of the installation start window (after selecting the language), select “System Restore” and then launch the command line.
- For Windows 8.1 and 8, you can use the distribution almost as described in the previous paragraph (System Restore - Diagnostics - Advanced options - Command Line). Or, if you have the option to launch Windows 8 Special Boot Options, Command Prompt can also be found in Advanced Options and launched from there.
If you enter bootrec.exe in the command line launched this way, you will be able to see all the available commands. In general, their description is quite clear even without my explanations, but just in case, I will describe each item and the scope of its application.
Windows 10 backup
You can also create a backup copy of the operating system in Windows 10 itself.
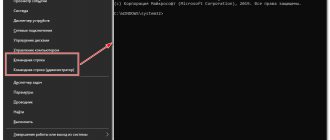
We launch the console using the hotkeys provided for this + .
Find the item “Command Prompt (Administrator)” and left-click or .
Launching the console
After this, we create a directory for our copy of Windows.
To do this, enter in the required field:
mkdir С:Imagen-Restaurar
and press the key.
Starting the directory creation process
Your actions will not result in any visible changes. Don't be alarmed.
These are the system settings. The console will give you a response after the manipulation is completed.
Leave the computer quiet for 20-30 minutes without performing any additional actions.
When the process is completed, you will see the copy you created, which will be named “C:”.
You can choose the recording path yourself. You will have two options: an external screw or another local drive.
“Imagen-Restaurar” is the name of the created folder in which our image will be stored.
So, after the process is completed, check for the presence of the “CustomRefresh.wim” file in it.
If you specified the wrong path, you should look for the mounted image in the System32 .
This image is registered as a starting point for Windows system recovery.
It is worth creating a restore point when the operating system is in order. In the future, you can roll back the OS to the last restore point at any time. Read also:
5 Tips for Configuring the Windows Page File
8 reasons why Windows freezes: What to do
4 ways to find out the characteristics of a Windows computer
Return point from recovery environment
Since we are talking about cmd, we will talk about the possibilities of creating a restore point in Windows 10 via the command line - this is not the only way. Before you start creating a complete copy of the system partition with all its contents - our working version of Windows, you need to restart the person’s computer using the following method:
- “Start” → Hold [Shift] and click on “Restart”
- In the window that appears, select “Troubleshooting”
- "Extra options"
! If you have a password set when logging in and there are more than one accounts, an additional 1 to 2 screens will appear before loading cmd:
- Asking you to select an account
- Field for entering a password, if it is set in the account
- "Command line"
Let's enter the commands in order to make the copy correctly.
- “diskpart” and press [enter] - displays all hard drive partitions and their status.
- “list volume” and [enter] – produces a list in which we need to remember the letter assigned to the system drive, since the system display and the letter from the graphical shell do not always match.
- Enter [exit] and [enter]
Windows 10 has a useful utility - “dism.exe”, which creates an image of Windows and restores the system using the command line, follow the instructions:
Type:
dism /Capture-Image /ImageFile:D:Win10refr.wim /CaptureDir:E: /Name:”Windows 10”
Be patient, the backup copy will be ready.
With this backup created, exit system recovery mode.
Finding lost Windows installations in the boot menu
If you have several Windows systems older than Vista installed on your computer, but not all of them appear in the boot menu, you can run the command bootrec.exe /scanos to search for all installed systems (and not only, for example, in the same way you can add a section to the boot menu OneKey Recovery).
If Windows installations were found on your computer, then to add them to the boot menu, use re-creating the BCD boot configuration store (next section).
Windows backup
You can create a restore point from the command line in Windows 10 itself; to do this, we need to launch the console using hotkeys, follow the instructions:
- [Win] + [X] → “Command Line (Administrator)” → OK
Now we will create a directory for a copy of Windows, enter:
- “mkdir С:Imagen-Restaurar” and press [enter]
Nothing will happen after entering - the console will return a response only as a result of completion. Therefore, for 20 to 30 years, avoid any manipulation with the computer.
I would like to note that in order to avoid mistakes, do not put spaces between words, replace “-”; Do not under any circumstances change the names of directories to avoid failure.
Here, “C:” - there will be a copy - choose the recording path yourself, be it an external screw, or another local disk. And “Imagen-Restaurar” is the name of the folder. After the successful completion message appears, make sure “CustomRefresh.wim” is in place; if it is not there, restart and try again.