Buying a second-hand modem or even new equipment will not eliminate the need to set up a network. This applies to both wireless and Lan connections. But if in most cases the creation of a local network occurs automatically, for Wi-Fi everything is much more complicated. The main difficulty is changing the WiFi password on the router (Asus). Let's take a closer look at how to change the standard password or set it again, and ways to configure Asus routers.
This article will be useful to owners of any models. Sometimes when trying to change encryption certain difficulties arise.
The main thing is to follow all recommendations and step-by-step instructions. Then there will be no questions left, and users will independently change the password on any Asus equipment.
Methods for changing settings on Beeline routers
Below we will tell you how to change the input data on the router without much hassle.
Smart box
To change the password for Beeline Wi-Fi, you will need:
- log in to the network or establish a connection to the router via cable;
- enter system settings;
- click on the “Advanced settings” option;
- select the “Wi-fi” section;
- click on the word “Security”;
- fill in the “Authentication” field with the value “WPA2-PSK”;
- in the lower lines enter a new network name and password to enter it;
- save the entered information.
Zyxel Keenetic Ultra
How to change the password on this Beeline wifi router? The procedure for making setting changes is as follows:
- open browser;
- enter the IP code;
- fill empty lines with admin code;
- a field will open for entering new data;
- in the “Protection...” option enter “WPA2-PSK”;
- enter a new network name;
- write a complex and at the same time memorable password.
Note! You can change your password an unlimited number of times
Quick Internet setup on an Asus router
When you first access the web configurator, you will see a wizard prompt to quickly configure the device. We agree. The first step is to change the default access password:
Instead of the default “admin”, use any other one. It is desirable that it be more or less complex: consist of 7-8 characters, contain letters of the Latin alphabet, numbers and special characters @#$%&.
- How to set up ASUS RT-N11P Wi-Fi router: step-by-step guide
The next step is to select your Internet connection type:
Asus routers can work in the network of almost any Russian Internet provider - Rostelecom, Dom.ru, TTK, etc. The main thing is that you need to check with technical support in advance which communication protocol the telecom operator uses.
In the next step, we will configure the Wi-Fi wireless network:
Here you will need to enter the network name SSID and password for it - Network key . If you are setting up a dual-band router, here you will need to enter the WiFi name and password for the 5GHz band. Click on the “Apply” button.
At the last step of the wizard you will see summary information:
- Default password for Asus router: how to find out and change?
Click “Next” and go to the network map.
Failure of LNB “heads”
Failures of LNB “heads” are also very common. Precipitation, short circuit, and overvoltage are the main causes of failure of satellite dish converters. To check the failure of a specific LNB, simply disconnect the drive (if you have several converters, of course) and connect the heads directly to the receiver one by one. In this simple way, you can quite accurately determine the faulty converter.
on Why the satellite dish does not work and there is no signal
Hello. This is the second time I have lost my Sirius signal. After replacing the head, the last time, the signal lasted for about 3 hours, then disappeared. I changed the connection to port 1, with a Sirius to Hotbird cable. Hotbird works, but Sirius doesn't. It turns out that disex + cable + port 1 hotbird signal passes, but port 1 + the same cable + working head there is NO signal. Astra and Hetbird are working. What could this be? Vladimir
Eh, dear Vladimir! Do you know how many disk drives they forced me to change? I have ten satellites and normally none of them have a signal. Is there a repairman in Pyatigorsk? Give me his number, please. Thank you in advance!
In Pyatigorsk there is SevKav TV, a master works there...
Hello. After delivering 360V to the house, the tuner burned out. We bought another one and wanted to invite a customizer. However, they admit that everything burned down. Is it possible to check the performance of heads and other equipment yourself?
Hello, I have the same problem. There are dishes for two TVs. When I turn on one tuner, a signal appears on the other TV and on the satellite that I turn on on the first tuner. There is no signal on other satellites. And so on each satellite.. when I turn off the first tuner, the second tuner shows no signal. .When I change the two disks everything works fine. But not for long, for half a year. And then the same situation repeats again. Tuner OPENBOX X-820BL. What could this be, please tell me. Thank you
Coaxial cables that have become widespread are checked if the cable has been in use or is made up of separate sections. Before reuse, it is carefully inspected and subjected to simple electrical tests.
Particular attention is paid to the condition of the protective shell. If the latter does not have dents, cracks, swelling or other defects, then the inspection results are considered satisfactory
When inspecting a cable made up of individual sections, they find out how they are spliced.
The simplest electrical tests of coaxial cables include checking the integrity of the internal (colored Fig. 1) and external conductors, the absence of short circuits between them, and measuring the insulation resistance.
The procedure for changing the password on wifi routers
A short guide on how to easily change the password on your router. The replacement principle applies to almost all routers.
First step: connect the PC and router
The first step before setting up a wireless network is to connect the router to the computer using a wire. Of course, you can connect them using a wireless connection, but it is safer to use a wire. Because when the password is changed, the computer will lose access to the router's settings interface. Because the network parameters saved in the computer settings will not match the network parameters broadcast by the router.
If you have previously changed the login and password to access the settings, you cannot remember or find them. In this case, you have to roll back the router to the default settings. In this situation, the computer also loses connection with the wifi router.
Second step: go to the router settings page
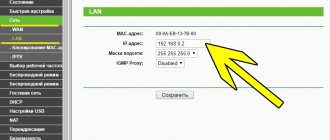
To access the router settings, you need to open any Internet browser and enter its IP address in the address bar. Almost all router models, regardless of its brand, have a sticker on the bottom of the case indicating access parameters to its settings, and the IP address is also indicated there. It usually looks like a combination of numbers 192.168.0.1 or 192.168.1.1.
If none of the combinations work, and the IP address is not indicated on the router or in the instructions, then you can find it out as follows: press the start button and in the “Search in Windows” window, enter the command “cmd” and press the “Enter” button. In the command line that opens, you need to enter the command “ipconfig”, in the configuration window that appears, we find the line “Default gateway”, the address specified in this line will be the required IP address.
Then you need to enter your username and password in the window that appears; they are often written on the bottom wall of the router case. For most models, this is the word admin, which must be entered in both fields. If these values were changed during the initial setup of the router, then your Internet provider should have left you the login information.
Third step: change the wi-fi password
After entering your login and password, the router configuration page will open, where you need to go to the section “Wireless”, “Wireless Security”. We delete the old key and enter a new one. Then you need to click the “Save” button and reboot the router. After the reboot, you need to check if the new key works.
Step Four: Reset the Router
If you do not remember your password or login and cannot find it, then you need to reset the router settings to default values, the so-called factory settings. To do this, you need to hold down the “Reset” button located on the router case for several seconds until the router starts to reboot. If the “Reset” button is recessed into the body, then you need to use a thin, sharp object, such as a needle or toothpick.
If you can't access settings
In some cases, all the specified actions do not lead to the desired result. Why might this happen? If we are recovering a password, but there is no connection to the admin panel, the reason may be the following:
- The address in the browser line was entered incorrectly. Check that the numbers and symbols are entered correctly. Use both options. If none of them are suitable, you can look for documents for the device - they indicate the IP address of the router.
- The router is disabled, its connection to the computer is interrupted, or the device is frozen. In this case, rebooting the router and checking its connection to the network and to the PC will help.
- The device is not connected to the router. Your computer must be connected to the network. The connection is shown in a bar at the bottom right of the screen. If there is a yellow or red light next to the network sign, this indicates a connection problem. Check the cable, network card, connection connector. Restart your computer to make sure there is a connection.
Before changing the default password on your Asus router, you need to check whether the lights on the router are on. They should show not only the connection to the network and the operation of the router itself. But also its contact with the computer via a local wired connection. If you are working via Wi-Fi, you need to check whether the device is connected to your network. You can automatically connect to another wireless network that is not password protected, or switch to mobile Internet if there is no connection.
How to restrict other users' access to your home Wi-Fi
Wi-Fi has become so popular that having a router is the rule rather than the exception. But, despite all the conveniences, you should take into account that your home Wi-Fi network is visible to others.
See for yourself how many available connections are shown in your home. Hardly one or two, usually their number reaches a dozen or more.
Likewise, neighbors can see your network among other available ones.
Few people want strangers to gain access to their personal wireless network
But if certain precautions are not taken, others may be able to connect to your connection. What does this mean? At a minimum, loss of Internet speed
You will not receive the full speed of your communication channel if someone connects to it at your expense.
To avoid this risk, you need to limit access to your Wi-Fi. Read below for recommendations on how this can be done.
What is a mac address and how to find it out
Each network device, when manufactured at the factory, is assigned a special mac address - a kind of unique digital fingerprint. It looks like "A4-DB-30-01-D9-43". For further settings, you need to know the mac address of the individual device to which you are going to provide access to Wi-Fi. How to find him?
Windows
Option 1. Through the “Network Sharing Center”
- Between the battery and sound icons there is an Internet connection icon. Right-click and select “Network and Sharing Center.”
- “View active networks” - line “Connections”, click on the connection name - “Details”.
- The “Physical address” line will contain the mac address of the laptop.
Option 2: Through Settings (for Windows 10)
- Click “Start” - “Settings” - “Network and Internet” - “Wi-Fi” - “Advanced settings” - “Properties”.
- “Physical address” is the mac address of the laptop.
Option 3. Via the command line
- Hold Win+R - enter cmd (or Win+X - Command Prompt (Administrator) on Windows 8.1 and 10).
- Type the command ipconfig /all.
- In the section “Wireless LAN adapter. Wireless Network" in the "Physical Address" line contains the required information.
Android
- “Settings” - “Wireless networks” - “Wi-Fi” - menu button - “Additional functions”.
- The required data is in the MAC address line.
iOS
“Settings” - “General” - “About this device” - “Wi-Fi address”.
Once you have discovered the device ID, write it down or simply remember it. Now let's proceed to the next stage - we will establish access to the required equipment through the router.
Setting up the router
First, log into the settings web interface. Using a browser, go to 192.168.0.1 or 192.168.1.1. Enter your login and password - admin/admin or admin/parol. These combinations work on most devices. If there is no access, check the information on the bottom surface of the router or in its instructions.
The layout of menu items may vary depending on the manufacturer, but the basic principles apply to all devices.
- In the “Wi-Fi network settings” section, enable filtering by mac address, because it is initially disabled.
- In the “MAC Address Filtering” tab, add the addresses of the devices to which you are going to provide access to Wi-Fi.
Now you can use Wi-Fi only through those devices for which you have reserved addresses. Attackers will not gain access to your data.
Replacing the network and router password
If you haven't changed your Wi-Fi password, change it. Moreover, it is advisable to do this regularly. In your network security settings, create a new password
It is equally important to replace both the factory password and login login when installing the router. The standard combination is the easiest way to access the connection
Correct encryption protocol
Initially, connection encryption is disabled. Change the security protocol in the settings on the router. We highly recommend WPA2-PSK - it is the most secure.
Invisible network
In the “Wireless Network Settings” section, replace the default name. After connecting the required devices, disable SSID broadcast. Actually, no one outside your network will simply see or be able to access it.
Conclusion
We have listed a variety of options on how to restrict access to your Wi-Fi network to third-party users. The best option would be to filter by mac address. But it is best to apply several actions in combination.
We also welcome your comments and feedback. We hope you can share your own experiences.
Alternative recovery method
The standard method for updating settings requires a local connection. If it is not there, for example, there is no cable to connect your computer to the router, but you have a Wi-Fi adapter or a laptop with a built-in Wi-Fi module, you can use an alternative method for recovering and updating your network password.
The router will automatically create a wireless network when it is connected for the first time or when its settings are reset. If the router still has a sticker with basic data, it makes sense to reset its settings so that all information and settings are updated to standard. After updating the settings, the router will automatically create a wireless network, and the password to access it can be found on the bottom of its case.
Changing the password for the Web interface
The following steps can be performed before changing the Wi-Fi password. To protect the router admin panel from unauthorized access, just do the following:
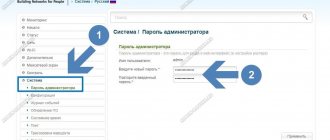
- Open the section of the Web interface called “Administration”. This section may be a subsection “System tools” or “Additional settings”. In some models of ASUS routers, you should also go to the additional “System” section.
- Among other items in this section, two fields for entering a username and password will appear on the screen. In some firmware versions of ASUS routers, there is no field for changing the login (you are only prompted to enter a password).
- After entering and saving the new password, the router may reboot automatically. In other cases, a dialog box will open with a login and password for logging into the Web interface.
Some nuances
Before you begin changing your password, please consider the following points:
- To log into the Web interface (settings, admin panel) of the router, you need to have a login and password.
- Without the admin login/password, changing the password is only possible after resetting the settings, after which the router will not be able to provide access to the Internet, the local wireless network will cease to exist, i.e. a complete reconfiguration of the equipment will be required.
- If the password for the Web interface has not been changed from the default value, it is recommended to do so. This will further prevent unauthorized access to the router settings (relevant for owners of public Wi-Fi networks).
- You can change the password for a Wi-Fi network without connecting to the router via a wireless connection, and even without the need to reset the settings. Those. Even if the current password is lost, it is still possible to set a new passphrase without reconfiguring the equipment. To do this you will need a computer and a network cable. However, the password for the Web interface must be available.
Now let's look at the process of changing the password step by step.
In what cases is wire testing carried out?
This question can be answered in a few words - if the current-carrying core breaks or the integrity of its insulation is compromised.
Let’s clarify this answer and consider typical situations:
- Let's say an outlet or switch stops working. After you have made sure that the problem is not in the connections (including the junction box) and not in the light bulb (lamp), it is advisable to ring the wires in this area. If the integrity of the wiring is compromised, the multimeter will signal this.
- Developing the first example, it can be noted that such situations are not uncommon during repair work (drilling holes) and short circuits due to dilapidated wiring and network overloads.
- An atypical, but quite effective use of multimeter testing is to determine the required conductors on large sections of wiring. This method is appropriate when the color marking of the wires does not allow you to accurately identify the desired conductor.
- Also, in everyday life, dialing allows you to determine the integrity of electrical appliances (lamp, iron, switch, fuse). And if you are well versed in electronics, then when soldering, repairing printed circuit boards and other devices, testing circuits is a mandatory step.
Changing an old password or setting a new one
Depending on the Xiaomi router model and its firmware version, the procedure for setting/changing the password may differ slightly. The simplest option (if a password was not previously set):
- Immediately after logging into the web interface, the router will prompt you to select the type of Internet connection (but usually it determines it itself). If this is the “PPPoE” type, a page will be displayed for entering your Internet login and password (the necessary data can be found in the agreement with the provider). If you do not use a login and password to access the Internet, you can skip this step.
- After moving to the next page of the web interface, a window will immediately appear to set the name (SSID) and password for the Wi-Fi network. In the first field you can enter any phrase, in the second - the required password of a minimum length of 8 characters.
- After confirming the previous action, the router will reboot. Because Wi-Fi settings have been changed on your computer, phone, etc. you will need to find the newly created network (by SSID) and connect to it using the newly set password.
If the password was previously set and you need to change it, follow these steps:
- Connect to the Wi-Fi network by entering your old password.
- Go to the network address of the user interface.
- After entering the password for the web interface, its main page will immediately be displayed.
- Find the Wi-Fi logo icon and click on it. The wireless network settings will open.
- Depending on the Wi-Fi router model, this page may display 1 or 2 sections with settings. In the first section, settings are made for a Wi-Fi network operating in the 2.4 GHz frequency range, in the second - for 5 GHz.
- The 2.4 GHz network can be turned off by moving the checkbox next to the “Switch” item to the “Off” position. This is an outdated frequency standard. Any modern communication device supports both 2.4 GHz and 5 GHz networks.
- Find the drop-down menu labeled “Encryption” in the desired section. Click on it and select “Mixed (WPA/WPA2 Personal)”.
- A field for setting a password will be displayed below (or it will already be displayed if a password was previously set).
- Enter the desired passphrase in this field, and then click the Apply button at the bottom of the page.
- The password will be changed/set. All you have to do is reconnect to the wireless network.
Wi-Fi network security
Modern wireless devices can have quite a long range. For example, the signal from a standard router can be caught at a distance of 50-100 meters, even indoors.
In an apartment building or office building, there will likely be many users in this area who will be able to connect to your wireless network if it is not secure. At the same time, they will not only be able to use your Internet, which is not so scary. Through a Wi-Fi connection you can access your computer and your files. And this is a much more serious threat.
A number of router models come with secure Wi-Fi already configured. In this case, the network name and key are printed on a label at the bottom of the device. But in some models the wireless network is not configured at all or security is not installed and anyone can connect without a password. Therefore, during the initial setup of the device, you must set the network key and set the encryption type.
Initial setup
However, changing the password is not the only thing you can do in this menu. The administration menu is a universal tool that provides the ability to change any setting in the router. That is why it is often used only by specialists, because it is easy to do something wrong.
Ordinary users are recommended to use the initial setup program. It tells you step by step how to set a password, change your name, and choose the encryption type. The advantage is that the user is not given “extra” functions. Everything is as simple as possible and is aimed specifically at those who do not understand the technical part.
You can get such a program either on the manufacturer’s website by going to the model page and selecting the “Support” tab, or by installing it from the disk that is still included with each device. If none of these methods are suitable, you can always download it from your phone via the mobile Internet and move it to your PC using a USB cable.
How to set a WiFi password in a TP-LINK router
First, let's look at the WiFi password. To set a WiFi password in a TP-LINK router, we need to open the router settings (router web interface). To do this, open any browser and enter “192.168.0.1” in the address bar. It is at this address that routers from TP-LINK are usually available. After entering this address, a window will appear asking you for your login and password. Here you need to enter the login and password for the router (login and password to access the router settings).
By default, the following data is used on TP-LINK routers: Login: admin, Password: admin. If you have not changed the password for your router before, then this login/password pair should work. After entering your login and password, the router’s web interface will open in front of you. It will look something like the screenshot (below).
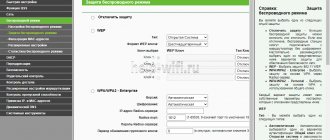
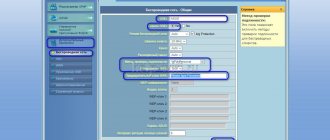
Here you need to go to the settings section “Wireless mode - Wireless protection”.
After this, the Wifi network security settings page will appear in front of you.
Please note that on this page you can select one of four WiFi network protection modes:
- Disable protection – protection is completely disabled, anyone can connect to the WiFi network without entering a password;
- WPA-PSK/WPA2-PSK (Recommended) – recommended security method. A password is used to connect;
- WPA/WPA2 – Enterprise – a Radius server is used to connect to WiFi;
- WEP is an outdated method of connecting to WiFi, vulnerable and susceptible to hacking;
If you have already selected the second authorization method (WPA-PSK/WPA2-PSK), then you do not need to change anything. Simply enter the password in the “PSK Password” field and click on the “Save” button.
If you have selected another security method (for example, WEP) or the security is disabled, then you need to first select the WPA-PSK/WPA2-PSK security mode, and then enter the password in the “PSK Password” field and save the settings.
Connection
So, now let's move on to how to change the password on the router. As an example, we decided to use the ASUS RT N12 router.
How can I connect to the router to change the password? We have two possible options for replacing or installing a security code. The best would be to connect via a network cable, but if this is not possible or everything happens from a mobile phone or tablet, then you can use Wi-Fi.
Wi-Fi password
With a password for a wireless access point, things are a little different. There are three possible options for changing the standard or custom settings. Each of these methods will be optimal in certain situations, so we first advise you to familiarize yourself with them, and only then proceed to implement the one you like.
Method 1: “Network Map”
The first method is to use the menu in which diagnostics and viewing network statistics occur. There is a section here that displays information about the wireless Internet, where you can change the password, which is done like this:
- Open the web interface and select the “Network Map” section if it is not active by default. If the router can operate in two modes, you will first need to select the frequency by moving to the required tab through the “System Status” section.
Here, if necessary, you can change the authentication method and encryption type. The password is changed by editing the "WPA-PSK Key" line.
Once the changes are complete, click Apply to save the setting.
Wait for the operation to complete, which will take just a few seconds, and the router state will be updated.
If several clients are currently connected to the router via a wireless network, you can disconnect them or reboot the device itself so that they need to enter a new access key to connect to Wi-Fi.
Method 2: "Wireless Network"
The second method is no more complicated than the previous one, but requires going to the appropriate settings menu. It can be useful in situations where, in addition to the Wi-Fi password, you need to change other parameters.
- Through the left panel in the web interface, go down to the “Advanced settings” block, where select the “Wireless network” category.
First, specify the frequency range for which you want to configure the SSID.
Set additional parameters, then determine the authentication method, encryption type, and change the key. Please note that such a password must consist of at least eight characters. For reliability, they can be written in different registers and diluted with special characters.
Finally, click Apply to save the changed settings.
Wait for the operation to complete, and then proceed to further interaction with the router.
Method 3: “Quick Internet setup”
The last option we want to talk about today is the step-by-step setup of both a wired network and Wi-Fi using the Wizard built into the router’s web interface. This may only be necessary to change the wireless access point password if you also need to perform general device configuration.
- To do this, in the web interface, click on the “Quick Internet setup” tile.
In the Wizard window that appears, click “Create a new network.”
Select your wired connection settings based on your provider's instructions.
Configure by selecting the correct option from all those offered.
When creating a wireless network, give it a name (SSID) and set a password consisting of at least eight characters.
Once complete, verify that the password was successfully saved.
Changing passwords in any ASUS router model follows approximately the same principle, so the above instructions can be considered universal. All that remains is to choose the appropriate one and follow it in order to cope with setting up access keys without any problems.
Describe what didn't work for you. Our specialists will try to answer as quickly as possible.
Hardware reset to factory settings (Reset)
Review and configuration of the D-Link Dir-320 modem
If you lose your login/password or have no access to the web interface for any reason, there is a chance to reset the parameters directly. To do this, you will need to turn the case back. The Reset or Restore button - ASUS has a special icon - when pressed once, it is responsible for turning Wi-Fi on/off. When pressed, it will reset the modem parameters to factory settings. Some Asus models have separate Reset and WPS buttons. To reset to factory settings, you must:
- Connect Asus to power; without it, the device will not be able to reset configurations.
- Press and hold Reset for 10-20 seconds until the WPS indicator on the front panel blinks. To clamp it, it is better to use a non-sharp object and press the button carefully. If the button fails, you will no longer be able to reset the configuration.
Asus will reboot, reset the password and login to the web interface and restore factory settings. This will take the modem half a minute or a minute. After you have managed to reset the settings, proceed to change the router configuration and set up your Internet connection.
Problems
Often the name change process goes without any problems. It only happens that when you try to connect to a router with the factory IP address, nothing happens. Then it is recommended to reboot the device. A description of how to do this can be read on the official website or in the instructions for the device.
Note! After a reboot the problem should go away and the default address will return. You can rename the access point to enhance security or give it a more original name
This is done in the device settings according to the simple instructions described above. Even a beginner can handle it
You can rename the access point to enhance security or give it a more original name. This is done in the device settings according to the simple instructions described above. Even a beginner can handle it.
What you need to know to change your password
When choosing between WEP, WPA, WPA2 and WPA3 wireless security protocols, experts agree that WPA3 is considered the most useful. As the most advanced wireless encryption protocol, WPA3 is the most secure choice. However, some wireless access points do not support it. In this case, the next best option is WPA2, which is widely used in enterprise environments today.
At this point, no one should use the original security protocol, WEP, or even its immediate successor, WPA, as both are outdated and make wireless networks extremely vulnerable to external threats. Network administrators should upgrade any access point or router that supports WEP or WPA to a newer device that is WPA2 or WPA3 compatible.