Users of Android devices are accustomed to one standard theme that is present on all phones from different companies. Many operating systems offer their own options on how to somehow modernize the appearance of the system, make it more interesting and newer. Among the various software operations, the operating version of Android stands out the most in this regard. It just offers an extensive selection of themes that the user can view, change, or simply change forever. It is worth understanding in more detail how you can change the topic and what is needed for this.
PREPARATORY STEPS
To perform many of the tricks described in the article, you need root and the Xposed Framework that depends on it. In the standard version, it will work 100% correctly only in AOSP firmware, but even in them there may be glitches. Problems with Xposed modules can often arise in stock firmware with modifications from the manufacturer, but there is a special version of Xposed for them: for TouchWiz, for MIUI, for firmware based on Android 5.0+. HTC owners can install the official build, but S-OFF is almost always required.
Got root, installed Xposed? Then let's go.
Launcher 8
Do you feel good when you mention Microsoft? Regardless of the answer, you can try out the graphical shell of Windows Phone 8 on your Android smartphone. Perhaps the tiled interface and live “tiles” will make you change your device? It’s unlikely, but as they say, trying is not torture.
Download Google apps
Manufacturers often use very outdated AOSP versions of applications and modify them into their own versions. These versions usually have different layouts, icons, and colors. Google is combating this by producing its own versions of apps for the Play Store. Google's Play Store page is a good place to start our venture; in particular, you can download the following applications:
- Google Keyboard
- Google Calendar
- Calculator
- Clock
- Messenger (for SMS)
- Google Photos
CHANGING THE LOADING ANIMATION
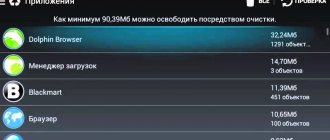
The boot animation is stored in the /system/media/bootanimation.zip file. Inside there is a text document desc.txt, it indicates the frame rate, horizontal and vertical resolution, etc. There are also the images themselves (frames), which change with the frequency specified in desc.txt. The order and rules for playing animation from folders are also written in this file.
All you need to do is get the archive from the device using a file manager with root support, unpack and replace the images, remembering to first compress them to the desired resolution. Next, just pack the archive without compression and return it to its place. But, of course, it’s easier to take a ready-made archive. The website hboot.co.uk is full of them.
On the other hand, although the animation is interesting to look at, it makes no sense. But it can be useful to see which services are running. The easiest option is to install LiveBoot, which outputs logcat and dmesg, that is, Android and Linux kernel messages.
How to install the launcher
A launcher in an Android or iOS system is a space that opens to a person after he has successfully unlocked his phone. That is, the manufacturer creates a unique appearance and design that is specific only to this OS. This is why launchers from manufacturers differ so much, yet the system is the same.
Setting up this appearance is exactly the same as changing the theme. That is why these concepts often become adjacent. It's quite simple:
- We go to the Google Play marketplace, after which we enter the launcher of interest in the search bar;
- After that, click on the “Install” tab in order to customize the design of the phone;
- Now launch the downloaded application.
After this, the user can quickly install the required launcher. No matter what anyone says, most launchers on the Android system are completely useless and do not do any harm to the phone system. The most interesting shells are presented below:
- Yandex. Launcher with Alice;
- POCO Launcher;
- MUIU Launcher;
- Huawei Launcher;
- Nova Launcher;
- Microsoft Launcher;
- Launcher iOS 13.
Skins such as Samsung Tochwiz are only available on the company's devices. Downloading them is just so difficult.
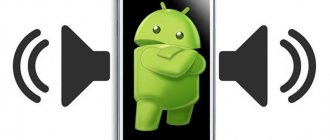
ADDING YOUR SOUNDS TO THE STANDARD SET
Sounds can be dropped into one of the folders in /system/media/audio. • alarms — melodies for alarm clock; • notifications—sounds for notifications; • ringtones — ringtones; • ui - system sounds, for example, low battery, camera focusing, selection of interface elements. Some applications may access them by default, so you can replace them with your own.
Why put ringtones in the system partition? Firstly, the files there are able to withstand a general reset to factory settings; secondly, sounds from special folders can be set to a signal (alarm sound, call, SMS receipt) in almost any application.
Replacing the bootloader
The default downloader is Google Now. Here you cannot change icons or hide applications. Manufacturers are making numerous and not the best changes to the main interface of your device - the home screen. The main thing a user can do to make their device look like it is using a pure version of Android is to change the bootloader. Which bootloader to install depends on the situation.
The most obvious choice is Google Now Launcher. Download it and get the same home screen as on the Nexus, along with the Google Now assistant on the left.
There is another option
: Nova Launcher. Nova's bootloader can be made to look similar to Google's bootloader, but it has a lot of extra features that can help clear out the clutter from your device. If you don't need anything special from a bootloader, the deciding factor when choosing between Google and Nova will be how many crapware apps you have installed on your device.
After deleting or disabling each crapware application, unnecessary programs will remain that you cannot get rid of. To solve this problem, the premium version of Nova Launcher has a trick: the ability to hide applications from the list (app drawer). The application will continue to take up space in the device's flash memory and may try to launch in the background, but you will no longer see its icon. In Nova settings, open App & widget drawers and “Hide applications”, here mark the ones in the list that you don’t want to see anymore.
If there are key apps with their own skins that you don't want to remove (like the settings app), but want to make them look like a pure version of Android, Nova can change the appearance of the icons. Open Nova settings, click Look & feel and icon theme. The Marshmallow option will replace the OEM appearance option.
CHANGING FONTS
I very, very doubt the usefulness of these actions, because the standard Android font is almost perfect. But the taste and color...
You can use a special application to install fonts. For example, HiFont allows you to change fonts in the firmware of Samsung, HTC, Motorola, Lenovo, Huawei, Nokia X without root. And if you have root, then in all other devices. You can either use fonts already available in the application catalog or add your own.
But where to get them? There are three options:
- fonts taken from different firmware of Android devices can be found in the post on w3bsit3-dns.com;
- on w3bsit3-dns.com there is a good collection of user-created fonts in the next post;
- collection on XDA.
You can install fonts without using a special application. We take the .ttf files from the archive, throw them and replace them into /system/fonts/ (root is needed) and reboot the device.
A few more mods
- Roundr - Round Screen Corners - rounds corners in almost all applications.
- Phab7 - switches the interface to phone and tablet mode without rebooting (only compatible with Android 4.3 and below).
- ScreenOffAnimation - allows you to change the animation for turning off the screen.
Rounded corners
Modifying the stock firmware
- HTC Sense 6–8: Sense Toolbox, HTC One Tweaker;
- Motorola: MotoGuide;
- Samsung TouchWiz: XTouchWiz;
- Asus ZenUI: SuperPOXy.
It is also worth mentioning that in Sony smartphones the SuperiorAuto mode can be used with a resolution of 20 MP or more. To do this, just install 20MP SuperiorAuto.
ADDING SUPPORT FOR THEMES
The Xposed module HKThemeManager will help with this. It allows you to apply themes for CyanogenMod on devices with stock firmware. Moreover, unsupported themes can be remade using apktool specifically for this program. The alteration is quite complicated, so it is much easier to use a ready-made collection on w3bsit3-dns.com.
Before installing the theme, HKThemeManager will show the entire list of applications to which the theme will be applied. Uncheck those that are not needed, click on “Apply theme” and reboot the device.
There is also an alternative option for installing themes - the Layers Manager application. It works in any firmware on Android 5.0+ thanks to the introduction of the RRO resource reassignment mechanism. The application's database of themes is huge and is located on the Play Market. To see it, just type Layers Theme in the search.
Keep in mind that the application does not work on firmware based on CyanogenMod: the local engine and RRO conflict.
Event Handlers
In order for the application to somehow react to the selection of a menu item, it is necessary to connect the corresponding handler to it. This can be done in two ways. The first, the simplest, involves creating a method in the MainActivity.java
and connecting it in the menu item description file.
Let's connect a similar event handler to the Help
.
onHelpClick
method in the MainActivity.java .
Pay attention to the description of the method: it must be public
and accept a parameter of type
MenuItem
.
The method displays a message using the Toast
.
public void onHelpClick(MenuItem item) { Toast.makeText(getApplicationContext(), "Help clicked", Toast.LENGTH_LONG).show(); }
To connect an event handling method to a menu item, you need to set the android:onClick
determine its name.
The second way to connect handlers to menu items is with the onOptionsItemSelected
.
MainActivity.java
activity includes this method, but it is empty.
It needs to be rewritten. Below is a listing of our example method, in which, depending on the selected menu item, a corresponding message is displayed. MenuItem
as a parameter .
@Override public boolean onOptionsItemSelected(MenuItem item) { String msg = ""; switch (item.getItemId()) { case R.id.CART: msg = "Cart clicked"; break; case R.id.CALL: msg = “Call clicked”; break; case R.id.CAMERA: item.setChecked(true); msg = "Camera clicked"; break; case R.id.VIDEO: item.setChecked(true); msg = "Video clicked"; break; case R.id.EMAIL: msg = “Email clicked”; break; case R.id.ADD: msg = “Add clicked”; break; case R.id.COPY: msg = "Copy clicked"; break; case R.id.PASTE: msg = "Paste clicked"; break; default: super.onOptionsItemSelected(item); } Toast.makeText(getApplicationContext(), msg, Toast.LENGTH_LONG).show(); return true; }
TURNING ANDROID 5.X+ INTO ANDROID N
The Android N-ify module will help us with this. After installation, the following features from Android N will appear:
- The design of the notification panel will noticeably change. The quick settings panel will appear;
- Interesting inscriptions will appear in the settings under some items.
- For example, under Wi-Fi the name of the current access point will be written, under the “Battery” item - the remaining operating time and battery charge in percentage;
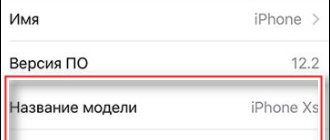
- the Easter egg will change in the “About phone” menu;
- You will quickly switch between the two most recently launched applications by double-clicking the “Recent” button.
Android N-ify also has useful settings, through which you can not only disable it, but also configure individual changes made.
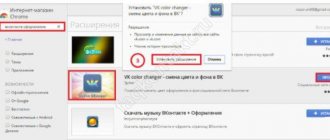
How to change the theme on Android using third-party resources
In addition to the official source, which is the Google Play market, you can find designs on many other Internet resources. The themes on these sites are in “apk” format, which must be transferred and installed on your smartphone.
First of all, you should make sure that the site from which the user is going to download the external design for his mobile gadget does not contain viruses or other malware. Also, you should not trust addresses that ask you to enter a number or other personal data, as most likely these are tricks of scammers.
Since users usually do not install applications on Android smartphones from third-party resources, it would be best to consider step by step the entire process of changing a theme downloaded from third-party resources:
- Download the topic of interest from the site.
- We connect the smartphone to the personal computer via a USB cable.
- We transfer the application in “apk” format to the internal memory of the mobile phone.
- On your portable gadget, go to “Settings”
- Select the “Security” menu.
- Find the “Device Administration” tab.
- Click on the checkbox next to the “Unknown Sources” tab.
- We find an application with a theme through any convenient file manager (the name of the standard program available on every phone with Android OS - Files).
- Launch the desired application.
If everything was done correctly, then the mobile device system will allow applications to be initialized. After this operation, the theme of the smartphone will change to another.
We display the real signal level
Sometimes you need to know how well the Internet is received in different parts of the room, how the position of the smartphone affects the signal reception level, or you simply need to compare the signal reception level of your smartphone and other models. NetStrength will help with this. The module can display the cellular network signal level in decibels per milliwatt (dBm or dBm). This unit of measurement has a negative value, and the closer it is to zero, the better the reception. You can also enable the display of ASU (Arbitrary Strength Unit - signal-to-noise ratio in the pilot channel). Calculated using the formula ASU = (dBm + 113)/2.
By the way, the module can show the Wi-Fi reception level in dBm, Mbps (Mbit/s - megabits per second) and percentage.
Check themes and settings
The tips below will not work on all devices, but some OEMs have their own theme stores. New devices from Samsung, HTC, Huawei and Xiaomi definitely have them, and soon everyone else should catch up with them.
Android has a theme framework called Runtime Resource Overlay (RRO). It's not enabled in stock Android, but manufacturers often enable it and offer access to a store that allows you to change different parts of the interface. As you can see from the word Overlay, this feature allows the interface to receive new icons and colors, but not a new arrangement of elements.
Let's try to change what the manufacturers changed. Applications, wallpapers and icons can be changed in different ways - the theme engine allows you to change the appearance of the notification panel or settings and return them to the appearance of a pure version of Android.
Samsung in particular stands out for offering some great "material" themes in the store. Find the one you want, install it, and get greater color consistency. For other theme stores, search for words like "material", AOSP, Android.
Some things can't be changed
Google has done a lot of work in the last few years to make Android more modular. As a result, the design of most manufacturers' shells does not matter. The home screen, keyboard and almost all applications can be changed. What matters when evaluating Android skins is the appearance of the remaining screens. The notification bar, recent apps, lock screen, and settings are untouchable—usually impossible to change. The notification bar and recent apps are especially important because you'll be using them multiple times every day.
The rest of the interface doesn't matter. Change it, delete it, hide it - you can change everything. As a result, the most important thing that cannot be fixed in third-party shells is delays in the release of major operating system updates and security updates.
If you don't like the interface of the Android operating system, you're uncomfortable using it, or you just want to try other design options, you can install a new launcher. With it you will get a modified desktop, widgets, shortcuts, icons, menus. This is an application that you can download and install. There are a huge number of such programs. They allow you to change a boring or inconvenient interface. If the utility does not suit you, you can return the old interface. Read how to install, how to activate and how to remove the launcher from Android devices if you no longer need it.
Main screen
Let's start reviewing the settings from the main screen. To get to the settings, you need to make a long tap on the main screen, in a free space from icons and widgets, until the menu appears. Here you select “Home Screen Settings”.
What you can change here:
- enable notification icons
- add icons of installed applications to the desktop (the application icon will be automatically added for quick access). You can always delete unnecessary ones
- display Google applications (this is the news feed located on the left side of the main screen)
- auto-rotate desktop (when you rotate the device, the desktop will rotate)
- changing the shape of icons (you can choose any of the proposed shapes for icons)