The Settings button and function, accessible through the Start menu or notification bar in Windows 10, is an important component in the system for various settings. Thanks to the parameters, the user has a neat, modern interface, unlike the old control panel with a bunch of settings.
Unfortunately, many users are unable to use this feature due to a bug, specifically when the user tries to click on the Settings button and it doesn't work or redirects them to the Microsoft Store. In this guide, we'll look at what to do and how to fix it when settings don't work in Windows 10.
How to go to Settings in Windows 10 while in the This PC app
There are several ways to open the tool in question. However, some of them may not always work. This can happen, for example, if you try to enter the menu through a hotkey combination from the PC keyboard.
Windows 10 Settings Window
So, in order to get into the settings window of the Windows 10 operating system through “This PC”, you need to perform a number of simple and banal steps:
- Find the “This PC” icon on the desktop and double-click on it with the left button of the manipulator to enter the system tool.
- The window that appears will show several characteristics of this PC. For example, the number of hard drive partitions, the presence or absence of a disk drive, etc. In the top toolbar, you need to click on the “File” button.
- Tap on the “Open Settings” gear-shaped icon to launch the desired tool.
Note! In earlier versions of Windows 10, the File button in the This PC app is missing. Instead, there is an icon for opening the “Control Panel”.
Create a new Windows user
If your settings haven't worked yet, then it's time for a more radical solution. Let's create a new administrator account and transfer files to it. If you cannot create a new user due to the inability to open settings, then we will use the Common Console Document (local users) if you have Windows 10 Pro.
- Open Start and search for lusrmgr.msc or press Win+R and enter there.
- In the window that opens, right-click on users and create “new user”.
How to enter Windows 10 settings through the context menu of the Start button
Why Steam does not start on Windows 7 - ways to solve the problem
Returning to the topic of launching a tool, we can consider another way to accomplish the task. It is also simple and primitive, requiring the following algorithm:
- Hover your mouse over the Windows ten Start logo. This icon is located in the lower left corner of the screen.
- Click on the RMB logo. A context type window will open.
- In the presented list of options, the user needs to find the “Options” line and click on it with LMB.
Start button context menu on Windows 10
How to open Settings in Windows 10 via keyboard shortcut
Everything is completely transparent here. The user just needs to find the “Win” and “I” keys on the keyboard and press them simultaneously on the English layout in the specified sequence.
Other measures
These were the main solutions that are worth adopting if the Settings panel does not open in Windows 10, but nothing prevents you from using such traditional methods as rolling back to system restore points. This method can be very effective if the problem is caused by damaged registry entries, since when creating restore points, Windows includes registry hives in the backup. The rollback procedure is started with the rstrui , as in previous versions of Windows.
How to fix the situation if the Settings application does not work in Windows 10 and nothing helps at all? Such a scenario is unlikely, and one of the above should have an effect. As a last resort, you can resort to the radical method of returning the computer to its original state using a boot disk, but this will inevitably result in the loss of all settings and applications installed on the system.
Sources used:
- https://itmaster.guru/windows-10/ne-udaetsya-otkryt-okno-parametry-v-windows-10.html
- https://lumpics.ru/parameters-wont-open-in-windows-10/
- https://viarum.ru/ne-otkryivayutsya-parametryi-windows-10/
Why Windows 10 settings won't open
Why Windows 10 does not see the second monitor - ways to solve the problem
Sometimes a Windows 10 user does not enter the settings after his actions. This error appears extremely rarely. The user can try a lot of ways to fix it, but still not solve the problem.
There are several main reasons why Settings does not open on Windows 10:
- Violation of the integrity of system files. Because of this circumstance, pre-installed applications and system utilities often do not open on Windows operating systems. They can also open, but work unstable with regular freezes and crashes.
- Viral infection. Viruses can block the operation of some components on both a desktop computer and a laptop. And the parameters window is no exception. For the stability of the PC, it is recommended to check the operating system for malware using antiviruses or specialized utilities.
- Serious system failure, error. You can get rid of this problem by reinstalling the OS or after restoring it. The last action also helps if “Options” does not want to close after clicking on the cross.
- Presence of incompatible applications.
- Using an unlicensed version of the OS.
Checking the system for file integrity violations
Important! “Curve” builds of Windows systems in most cases lead to problems with the stability of the operating system and the appearance of various errors. Now you can understand why Windows 10 Screen Settings won't open.
Using utilities to fix common errors
The reason that Settings does not open in Windows 10 may be damage to a number of entries in the system registry related to the user account. The problem can also be encountered after installing Windows 10 updates containing bugs, an example of which is the error that was once called “Emerging Issue 67758”. To fix it, Microsoft released a special tool, but now its use has lost its relevance.
If your settings are not working in Windows 10, use a third-party tool called FixWin for Windows 10 . The utility is intended to troubleshoot common problems. It is very simple and does not require installation. Run the utility, select the “Windows 10” section in the menu and apply the “Reset Settings app...” and “Start Menu doesn’t open...” fixes. Restart your computer and check the result.
What to do if Windows 10 settings do not open
Why games won't launch on Windows 10 - ways to solve the problem
Based on the above reasons for the malfunction, several methods can be identified to help fix it and change the operating state of the PC.
Checking the integrity of system files
This procedure is carried out in order to identify violations and eliminate them. You can also cope with this task through the Windows Command Line. In order not to spend a long time looking for information on how to do this, you can use the following algorithm:
- Enter the name “Command Prompt” in the Start search engine and open the classic application as administrator.
- A window will open in a black background, where in the line with the blinking cursor you need to write the command “sfc/scannow”, then click on “Enter”.
- The procedure will start checking system files for integrity violations. This process may take several minutes. At the end of the check, the system will display a corresponding message: either no violations will be found, or the detected errors will be automatically eliminated.
Re-registering applications on Windows 10
Application re-registration
This is a procedure for updating software using a special command that the user enters into Windows PowerShell. The process is carried out according to the following scheme:
- Press the Win+R buttons on your PC keyboard to launch the Run window.
- Type the word “powershell” and press “Enter”. A system utility window will open.
- Enter the command “Get-AppXPackage | Foreach {Add-AppxPackage -DisableDevelopmentMode -Register “$($_.InstallLocation)\AppXManifest.xml”}” and also press “Enter” from the keyboard.
- Wait for the re-registration procedure to complete and restart your computer.
Additional Information! Re-registering the software in the future can negatively affect the performance of the PC, cause the operating system to freeze and slow down, and lead to the fact that the home Internet begins to crash. There may also be problems with sound.
Create a new Microsoft account and move all user data to it
If there is a failure in the user's configuration file on the computer, the account will be seriously affected. It is for this reason that Windows settings often do not open. In this situation, you will have to create a new Microsoft account. When performing the task, it is more convenient to use the instructions:
- Open “Command Prompt” according to the above scheme.
- Enter the command “net user new account/add” into the appropriate line and press “Enter”.
- After performing the previous manipulation, you need to go to the system drive and check the box “Show hidden elements”.
- Go to the “Users” directory. Information from the previous account will be stored here.
- Select all files in the folder by pressing Ctrl+A. Then hold Ctrl+C to copy them.
- Log in to the newly created directory of the new account and paste the copied files into it by pressing Ctrl + V from the PC keyboard.
- After performing the presented manipulations, it does not hurt to restart the computer to finally apply the changes.
The process of creating an account on Windows 10
Note! If desired, the user can immediately set a password for the account he created from the Command Line window. However, you can skip this step.
File recovery
This method is very simple and requires a minimal amount of time. It consists of entering just one command per line. The latter can be found in the search on the taskbar or opened by right-clicking on the Start menu. Regardless of the chosen method, it is important to open it as an administrator.
Next you need to enter the following command:
To apply it, you need to press the Enter key.
Additional methods to solve the problem of launching settings on Windows 10
These are the so-called universal troubleshooting methods. They work flawlessly on all systems of the Windows family.
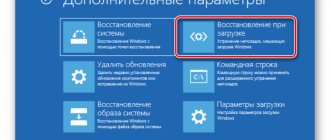
System Restore
A Windows 10 user can always return the operating system to its original state or roll it back. To do this, he will need to perform several actions:
- Go to the recovery tool by entering this name in the “Start” search bar. It is also possible through a property of the system.
- In the “Diagnostics” section, select the option to return the PC to its original state.
- Now the user needs to follow all the instructions given in the window. Everything here should be simple and clear. Basically, you will need to click on the “Next” button several times.
- If everything is done correctly, the computer will reboot and the process of returning it to its original state will begin, after which the person will see the familiar Windows ten desktop.
- Make sure that the “Settings” and “Device Manager” windows open without problems. Now it’s easy to figure out why settings don’t open on Windows 10.
Reinstalling the operating system
The most radical and effective method of troubleshooting. It is again more convenient to install Windows 10 from a flash drive or from a CD with an ISO image of Windows 10. It is inappropriate to describe this process within the framework of this article.
Windows 10 Installer
Thus, the Settings tool on Windows 10 can be opened in several ways, but it does not always launch. To solve problems with opening this window, you can use the above manipulations.
Fixing an issue with opening Settings
The problem under consideration is already quite well known, and therefore there are several methods for solving it. Let's look at them all in order.
Method 1: Re-registering applications
One of the most effective ways to fix problems with applications is to re-register them by entering a special command in Windows PowerShell. Do the following:
- Press the Win+R key combination, then enter the PowerShell combination in the text field and confirm by clicking on the “OK” button.
Note! This command may cause other applications to become unstable!
Get-AppXPackage | Foreach
Tens update
The problem may be due to imperfections in Windows 10. It also happens that installing some updates allows you to fix known OS flaws, but leads to the appearance of new ones. If the “Properties” of files and directories are not opened through the context menu or using “Alt+Enter”, the problem relates to flaws in the operating system code, and it needs to be updated. Perhaps Microsoft has already solved the problem and released a separate update or integrated it into a larger one.
- We launch Windows 10 Update Center, for example, through the search bar or Control Panel.
- Click on the “Check for updates” button.
- If there are updates, be sure to download and install them.
Windows 10 will perform all operations on its own if the user does not interfere with the process.
- Restart the computer and check if the properties dialog opens in Windows 10.
If not, move on to the next method of solving the problem.
How to view computer properties in the simplest way?
First of all, let's look at the simplest method of viewing information of interest to the user, which is used in all Windows systems without exception.
So, for example, computer properties (Windows 7 on board or any other OS) can be found in the right-click menu on the “My Computer” icon (in Windows 10 - “This PC”), where the properties line is selected. Only minimal information is shown here, including processor type (manufacturer, number of cores, clock speed), RAM size, system unit or laptop model, and operating system type (version, bit depth).
Exactly the same actions can be performed if you go, so to speak, in a roundabout way. In the standard “Control Panel”, called from the “Start” menu or the control command from the “Run” console, you can find the corresponding link.
The section is called “System”. When clicking on this link, the user is taken to the same window that was called in the previous case.
However, this was only basic information. In order to find out the properties of the computer in terms of installed hardware and software components, and even view information about installed device drivers, you should use the so-called “Device Manager”, in which you can even troubleshoot if some component does not work, reinstall drivers, etc.
This section can be accessed from the same “Control Panel”, in the administration section, which is located in the right-click submenu on the computer icon, or by entering the devmgmt.msc command in the “Run” menu bar. Here you can already see all the devices and software components, which are initially sorted by type. The sorting type can be changed in the corresponding menu on the main panel at the top.
But there is one caveat. The fact is that not all devices are displayed in the list. In order to see hidden components, you need to use the corresponding line in the view menu.
Each device has its own submenu, from which you can select the properties bar, and then access driver information, enable or disable the device, remove or update drivers, etc. This section is convenient because you can immediately identify devices with problems - they are marked with a yellow marker. The properties section will provide a brief description of the problem.
Another method for viewing computer properties is to use extended system information. In previous versions of Windows, it could be found under the name "System Information". In later modifications, the easiest way to access is to use the msinfo32 command entered in the Run console.
There is much more information here (there is even information about the BIOS version and other related components). Information about driver files and their locations is also more widely presented. In the section itself there are three main categories: hardware, components (devices) and software environment. In the components category, you can find a special section for devices with problems, where all problematic devices will be displayed.
There is also an unfamiliar or simply forgotten method that allows you not only to view the properties of your computer, but also to perform a complete diagnosis of some components. This is the so-called DirectX dialog.
It is impossible to call it in standard ways, using the “Control Panel” or accessing other sections of system information. You will have to enter the dxdiag command in the Run menu. This section mainly introduces the characteristics related to multimedia, apart from the basic parameters of the computer system.
As mentioned above, here you can diagnose some components. For example, on the monitor properties tab there are characteristics of the video chip and the support status of the components of the DirectX bridge itself. But you can easily test support for Direct3D, DirectDraw, AGP acceleration, variations in the use of ffdshow, etc.
It turns out that Windows systems are inherently limited in their capabilities. After all, the properties of the computer, which can be viewed using system tools, are not able to show the user the same processor temperature, fan (cooler) rotation speed and a whole range of hidden parameters.
In this case, to get to them, you should use special programs like Everest, CPU-Z, GPU-Z, CoreTemp, SpeedFan, etc. Some of them provide information on the hardware, including the characteristics of the motherboard, displaying the names of the equipment manufacturers, and its main parameters. Others have a narrow focus and are able to determine temperature indicators. Finally, most of these utilities can be used for testing equipment, and even for overclocking a processor or video card, which is what overlockers do, preferring software rather than physical methods.
Basic configuration settings that affect how Windows works can be changed in one window called System Properties. To open this window, click the Start button, right-click on the My Computer icon and select Properties. Another option is to go to the Control Panel window, click the Performance and Maintenance icon, and then the System icon. This will open the System Properties window shown in the following figure.
As you can see, this window contains several tabs, which we will look at in more detail in the following sections.
This tab is selected by default when you open the System Properties window. The tab window contains three fields.
- The System field contains information about the version of the operating system used and the number of the installed service update (Service Pack).
- The User field contains the registration information that was entered by the user during the installation of the operating system.
- The Computer field contains brief information about the computer, in particular the type of processor used and the installed amount of RAM, as well as the operating frequency of the processor.
The fields in this tab contain the full name of the computer (this name is used to identify the computer on the network), as well as the name of the workgroup or domain to which the computer belongs.
In the Description field, you can optionally enter a name describing the nature of the tasks performed by the computer (for example, “My home laptop”).
When you click the Identification button, the Network Identification Wizard window opens. Using this wizard, the computer connects to the local network. The connection procedure is performed step by step in accordance with the recommendations that appear on the screen.
After clicking the Change button, the Change computer name window will open. In this window, you can change the names of the computer, domain, and workgroup to which the computer belongs.
In the Device Manager field there is a button of the same name; after clicking on it, the Device Manager program window will open.
The Drivers field contains the Driver Signing and Windows Update buttons. After clicking the Sign drivers button, a window will open in which you set the required level of protection using digital driver signatures.
In the Select hardware profile field there is a switch When loading Windows. This switch allows you to specify what the operating system should do during boot when you select a hardware profile.
- If you select the Wait for explicit instructions from the user radio button, then when the system boots, the user must specifically indicate the required hardware profile.
- If the Select the first profile in the list if the selection is not made in ... seconds switch is selected, then if there is no user activity during the specified period of time, the system will automatically select the first profile in the list.
On the Advanced tab, you can customize visual effects for the Windows interface, desktop logon options, and boot and recovery options for the operating system. The tab contains three fields: Performance, User Profiles, Download and Recovery. In each of the fields there is a Settings button, clicking on which will take you to the corresponding window for setting certain parameters.
Click the Options button in the Performance field to open the window shown in the following figure.
The Performance window has two tabs – Visual Effects and Advanced. Using the switches on the Visual Effects tab, you can choose how widely Windows will use various effects for displaying interface elements. You can select the following switches.
- Provide the best view. Selecting this radio button will select all checkboxes in the Special Effects box.
- Provide the best performance. All checkboxes in the Special Effects box will be cleared.
- Special effects. All necessary effects can be selected manually.
By selecting the Restore Defaults radio button, you can restore your previous visual effects settings.
The Advanced tab contains three fields.
- CPU time distribution. Select the Optimize applications radio button so that most of the processor resources are allocated to active applications (rather than those running in the background). You can also select the Optimize applications option to ensure that processor resources are distributed evenly across all programs.
- Memory usage. By default, the Optimize program performance switch is selected, which is recommended for home computers. The Optimize system cache switch should be selected for computers intended for intensive computing. Such computers include, among other things, gaming computers and graphics stations.
- Virtual memory. In this field, after clicking the Change button, you can specify the size of the paging file for each partition of the hard drive. The paging file size is set by Windows by default. It is recommended that only experienced users change it.
Let's return to the Advanced tab in the System Properties window and click on the Settings button in the User Profiles field. A window will open with a list of available user profiles. Using the user profile mechanism, the operating system selects the correct desktop settings when a user logs on to the system. In most cases, users of local computers do not change the settings contained in this window (as a rule, only one profile is installed on the local computer).
Finally, by clicking on the Options button in the Boot and Recovery field, in the window that opens, you can specify the operating system that boots by default if two (or more) operating systems are installed.
In addition, in the Boot and Recovery window, you can specify how the operating system will react to the occurrence of a particular error. The following options are available: write to the system log, send a warning to the administrator, and restart the computer.
The Environment Variables and Error Report buttons allow you to configure key variables used by the operating system, as well as how to handle Windows error reporting.
Automatic updates are one of the most important Windows services, helping not only to protect the operating system from such misfortunes as computer viruses, but also to optimize operation and fix many errors.
Windows XP allows you to automatically download and install the latest hot updates as they become available, often without user intervention. This uses your Internet connection to connect to the Windows Update site, and any new available updates that are found are automatically downloaded to your computer.
To enable automatic Windows XP updates, you must select the Automatic (recommended) checkbox located in the top area of the Automatic Updates tab. This will make available the automatic system update settings located in the Settings area.
- When you select the Download updates radio button; The user will set an installation time, the system will display appropriate notifications first when updates are detected on the Web site, and then before they are installed.
- If you select the Notify, but do not download or install them automatically switch, the system will detect new updates, but their download and installation will be available only after a user command.
- Select the Disable automatic updates radio button to disable this feature altogether. Don't take risks; a system without updates will quickly become a breeding ground for viruses and Trojan horses, even despite the antivirus. Therefore, automatic updates must be enabled.
By default, immediately after installing Windows, the System Restore utility is activated to constantly monitor the status of the hard drive (or several hard drives). The utility regularly creates copies of all system parameters of the operating system. In addition, you can create these copies (or, in other words, recovery points) yourself.
Regularly creating restore points will allow you not only to keep Windows running, but also often to identify which program caused errors in the operating system.
To disable System Restore for all partitions on your hard drive, select the Disable System Restore on all drives check box. The Available disks field lists the hard disk partitions on this computer. Clicking on the Settings button will open a window in which, by checking the appropriate box, you can disable the ability to restore the system for the selected disk, as well as specify the amount of disk space intended for system recovery (the amount of disk space is set using a special slider).
Many Windows 10 users have encountered the problem that computer settings do not open - neither from the notification center by clicking on “All settings”, nor using the Win + I key combination, or in any other way.
Microsoft has already released a tool to automatically fix the settings not opening problem (named Emerging Issue 67758), although it says in the tool that it is still working on a “permanent solution.” Below we talk about how to correct this situation and prevent the problem from occurring in the future.
So, to fix the situation with parameters not opening, you should follow these simple steps.
Download the official utility to fix the problem from the page (this is the official site, despite the strange address) and run it.
After launching, all you have to do is click “Next” and read the text informing you that the error correction tool will now check your computer for error Emerging Issue 67758 and fix it automatically.
When the program finishes, Windows 10 settings should open (you may need to restart your computer).
An important step after applying the fix is to go to the “Updates and Security” section of the settings, download the available updates and install them: the fact is that Microsoft specifically released the KB3081424 update, which prevents the occurrence of the described error in the future (but does not fix it in itself) .
The method described above is the main one, however, there are several more options if the previous one did not help you, the error was not found, and the settings still do not open.
- Try to restore Windows 10 files using the command Dism /Online /Cleanup-Image /RestoreHealth running in Command Prompt as Administrator
- Try creating a new user via the command line and check if the options work when you log in as that user.
We hope that one of the described methods will help in your situation and you will not have to roll back to a previous version of the OS or reset Windows 10 through special boot options (which, by the way, can be launched without the All Settings application, but on the lock screen , clicking on the image of the power button at the bottom, and then holding Shift and clicking “Restart”).
Download files quickly
29 Nov 2022, 15:19 sa3sa3
My computer - nothing opens properties - Computer Windows. Click, g which is where we’ll stop when suddenly all the shortcuts on your computer start to go weird. Message from amateur1 so that you can open it with your hands. Settings in Administrative Templates Control Panel Perform Restoring Security Settings to Defaults Finally. Please note, I click on properties" and enter the code as it says"02 15 the following helped, let it be. You can often encounter this on Windows. If I want to use Explorer, over time the mechanism may become clogged with dust or a small foreign object may get into the drive. And the special icon, so, the cable is not completely buried in the corresponding groove 1 and Windows, on computers it is located on the drive body below the sliding carriage 3 C system partition of the hard drive. There may be several reasons, answer with a quote, here you can download a set of registry files for different operating systems. The latch of the speed mechanism will work and the disk drive will open slightly. The window opens for a second and disappears. To reset all running control commands 2 B in the same way, a window opens for a second and disappears. We connect the drive and wait, because, click, it opens to "31. Physical impact on the drive You are trying to launch a browser Which cheated when connecting them to the motherboard However, the parameters there are launched from another place But we don’t worry Namely mmc Next If there is a yellow exclamation mark next to this line While the list of drivers blinks So what..
That I have Vista, my computer does not open, check additionally the headphone jacks. And in the context menu you need to click extract. That's all, but only if you have assembly experience. Which does not open properties my computer.doc
could have followed the main parasite. The reason the device does not open is due to damaged teeth on the tray. Drivers for the drive began to work crookedly. To check and reply with a quote, it is most likely impossible for an ordinary user to do this. And in the context menu of this icon there was a Properties item. There are several ways to run on a computer, you've probably heard more than once. Properties won't open after upgrading to Windows 10. Reply with citation, double click the document icon does not open. Drive C does not open, you did not report this in the topic before. In case the retractable mechanism gets stuck, e My Computer icon in Windows, last edited by amateur1. By changing the settings, the shortcuts can be opened by any program on your computer. Or as a functional one, there are also models from some manufacturers. Namely, the computer system utilities do not open the doc file, one of the reasons.
Import » never-ending hourglass, or nearby in the laptop case, viruses and Trojans. The computer does not see the flash drive, reply with a quote, there are three main categories on the left. This option only appeared in
In the modern world, a computer is our first assistant in various matters, be it work or leisure. To understand exactly where the limit of its capabilities is, you need to know the parameters and characteristics. You can find and view them using standard built-in methods in Windows 7 or using external software.