One of the most annoying things about Windows 10 is the automatic reboot to install updates. Although it doesn't happen while you're working on your computer, it may reboot to install updates if, for example, you go to lunch.
This instruction contains several ways to configure or completely disable Windows 10 restart to install updates, while still allowing you to restart your computer yourself.
Download the presentation Instructions “How to DISABLE automatic reboot of Windows 10” - https://yadi.sk/i/UaNBLFerw4jx8
Disabling auto reboot in Windows 10
A large number of clients of the latest Microsoft Windows 10 operating system are often annoyed by restarting the system on their own.
According to the creators' idea, Windows should automatically download all current updates, install them, correct previous developer errors, and, if necessary, automatically restart. This was done so that, from Microsoft’s point of view, there is no hope for “stupid users” and they cannot always correctly assess the importance of certain updates and patches. But ordinary consumers have a different opinion - often such “impudent” behavior is not only annoying, but can also create some damage - not all files, documents, correspondence, and work can be restored after a forced restart.
In this article we will tell you how to reboot and how to disable automatic reboot of Windows 10. It turns out that you can fix this seemingly incorrigible feature in several different ways. Which path to choose and how to fix it is up to the user to decide.
We use the RebootBlocker program
You can use this utility, which should be downloaded from the link https://www.udse.de/en/windows-10-reboot-blocker. It automatically shifts the user's working time from the first section by one hour, every hour. As a result, the system will never reboot itself, only at the request of the user. The program does not have a graphical interface and is immediately installed on the system. To stop its operation, you must either stop the process or remove it from the system.
Setting the time to check for updates
This path does not completely disable the reboot, but allows you to configure when it should occur. This already gives some kind of convenience, and, at least, stops the “chaos” of the system on a personal computer, when the system constantly reboots at the most inopportune moment.
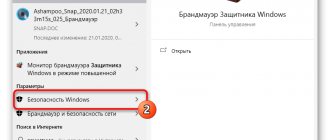
Open the “Updates and Security” section (via the “Start” tab or the Win+I combination)
We go to the “Windows Update” section and see there the two menu subsections we need: “Change activity period” and “Restart options”.
In the first, we can select the time when updates are active, so this can happen both during our work, then we can control the start of the restart: save documents, etc., and vice versa, for example, only at night (then we should Always remember this and always save all necessary documents upon completion of work).
The configured time range (no more than 12 hours) shows when Windows will definitely not update. This configuration option is only available in versions of Windows 10 1607 and higher.
The second option will only be active when current updates have already been downloaded to the system. In this case, we can set the setting for when Windows 10 can restart.
As we mentioned above, these settings do not completely cancel rebooting in Windows 10, but may be enough to make the reboot more manageable and reschedule it at a more convenient time.
Changing the period of computer use
The simplest solution to managing when your computer restarts is to set an activity period. The activity period allows you to set the time period during which the user uses the computer.
Setting the activity period
1. Open the Start menu.
2. Click on the “Settings” gear icon.
3. Select "Update & Security" and "Windows Update" will open.
4. Find the column “Change activity period”, set the period of time in which you usually are at the computer.
By default, the maximum duration of the set period of time is 12 hours, but if the operating system is participating in the Windows Insider program, the interval is 18 hours.
A reboot may be required after saving the values.
Changing the reboot time
You can also set system restart options in Windows Update, which allow you to set the time and day of the reboot. But it's not that simple:
- You can configure the system to restart only when the computer needs to restart, that is, it is about to install an update.
- The option is deeply hidden, and it is impossible to configure it for permanent use.
Still, this function is useful. For example, if you see that the computer is about to reboot, but the work is not finished yet, go to “Restart Options” and specify the desired time and day for the system update. To do this, repeat the first three steps from the guide on setting the activity period and click on “Restart Options”.
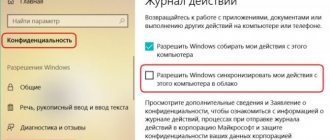
In the advanced settings of Windows Update, you can check the box next to “Use my sign-in information to automatically complete device setup after updating.” This setting allows the operating system to update itself and apply changes without user intervention.
Local Group Policy Editor and Registry Editor
In cases where it is necessary to completely disable forced reboot in Windows 10, a method using the Group Policy Editor (in Pro and Enterprise versions) or in the Registry Editor (for the Home version) will help.
Windows 10 (Pro or Enterprise versions)
To disable using gpedit.msc, follow these steps:
- Open the local group policy editor (Win+R, enter gpedit.msc).
- Computer Configuration -> Administrative Templates -> Windows Components -> Windows Update - double click on the option “Do not automatically restart when automatically installing updates if there are users running on the system.”
- Set the parameter to “Enabled” and save the settings.
That's it, now if there are logged-in users, the system will not reboot. If necessary, you can watch these steps on video:
Windows 10 (Home version)
- Launch the registry editor (Win+R, enter regedit)
- Go to the registry section (folders on the left) HKEY_LOCAL_MACHINE\ SOFTWARE\ Policies\ Microsoft\ Windows\ WindowsUpdate\ AU (if the AU “folder” is missing, create it inside the WindowsUpdate section by right-clicking on it).
- On the right side of the Registry Editor, right-click and select Create DWORD Value.
- Set the name NoAutoRebootWithLoggedOnUsers for this parameter
- Set the parameter to 1 (one). Close the editor.
- The changes must take effect.
Task Scheduler
Another way to disable unauthorized restart of Windows 10 to install updates is through the task scheduler.
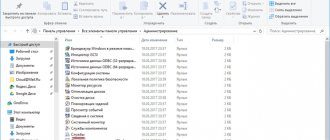
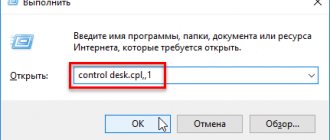
- Launch the task scheduler (search in the taskbar or Win + R keys, and enter control schedtasks).
- Go to the folder Task Scheduler Library -> Microsoft -> Windows -> UpdateOrchestrator. Right-click on the Reboot task in the task list and select “Disable” in the context menu.
In the future, automatic unauthorized reboots to install updates will be stopped, the system will not shut down without permission, and updates will be installed when you reboot the personal computer manually.
Today, these are the most common known methods of disabling self-restart during Windows 10 updates. This should be enough to ensure that such system behavior no longer causes inconvenience. For clarity of the above instructions, we suggest watching the video:
As you know, the Windows 10 operating system, like other earlier versions of the system, can automatically restart the computer after installing updates. If the user does not restart the operating system within a certain period of time, it periodically begins to show warnings that the computer will restart at a set time.
In the end, a planned system restart occurs on its own at the most inopportune moment for the user and only if he himself has not set any suitable time and day in the settings. A large number of users do not like this rude behavior of the operating system.
Moreover, the new Update Center makes it difficult for a beginner to make the correct settings. Therefore, today I will show you how you can disable automatic reboot in Windows 10 after updates.
TASK SCHEDULER. Go to the Control Panel, as you know this can be easily done by right-clicking on the “Start” icon.
Next “System and Security” – “Administration” – “Task Scheduler”.
Then “Task Scheduler Library” – “Microsoft” – “Windows” – “UpdateOrchestrator”.
Using Local Group Policy Editor and Registry Editor
This method allows you to completely disable automatic restart of Windows 10 - using the Local Group Policy Editor in Pro and Enterprise versions or in the Registry Editor if you have a home version of the system.
First steps to disable using gpedit.msc
- Launch the Local Group Policy Editor (Win+R, enter gpedit.msc)
- Go to Computer Configuration - Administrative Templates - Windows Components - Windows Update and double-click on the option "Do not automatically restart when automatically installing updates when there are users running on the system."
- Set the option to Enabled and apply the settings you made.
You can close the editor - Windows 10 will not automatically restart if there are users logged in.
In Windows 10 Home, the same can be done in the Registry Editor
- Launch Registry Editor (Win+R, type regedit)
- Go to the registry key (folders on the left) HKEY_LOCAL_MACHINE\ SOFTWARE\ Policies\ Microsoft\ Windows\ WindowsUpdate\ AU (if the AU “folder” is missing, create it inside the WindowsUpdate section by right-clicking on it).
- Right-click on the right side of the Registry Editor and select New DWORD Value.
- Name this parameter NoAutoRebootWithLoggedOnUsers.
- Double-click on the parameter and set the value to 1 (one). Close Registry Editor.
The changes made should take effect without restarting the computer, but just in case, you can restart it (since changes in the registry do not always take effect immediately, although they should).
Limiting Wi-Fi Internet connection
This section is suitable for those who use mainly a wireless connection. You should go to settings , from there go to the network and internet section, from there to wifi, and then to management of known networks . Here you will need to select your wireless network, go to its properties, and from there to Advanced settings. Here you should move the “ Set as metered connection ” slider to the active position. After this, updates will no longer be downloaded through this network.
Hidden Windows 10 features you didn't know about
Disabling reboots using Task Scheduler
Another way to prevent Windows 10 from restarting after installing updates is to use the Task Scheduler. To do this, launch the task scheduler (use search in the taskbar or Win+R keys and enter control schedtasks in the Run window).
In Task Scheduler, navigate to the Task Scheduler Library - Microsoft - Windows - UpdateOrchestrator folder. After that, right-click on the task named Reboot in the task list and select “Disable” from the context menu.
There will be no automatic reboot to install updates in the future. In this case, updates will be installed when you restart your computer or laptop manually.
Another option, if doing everything described manually is difficult for you, is to use a third-party utility, Winaero Tweaker, to disable automatic reboot. The option is located in the Behavior section of the program.
At this point in time, these are all the ways I can suggest to disable automatic rebooting during Windows 10 updates, but I think they will be sufficient if this system behavior causes you inconvenience.
Why does the computer reboot after finishing work?
The most common reason why Windows 10 restarts when shutting down is because the Fast Startup feature is enabled. It’s more likely not this function, but its incorrect operation on your computer or laptop. Try disabling Fast Startup, restarting your computer, and check if the problem goes away.
Interesting materials:
How to calculate how many foam blocks are needed for a garage? How to calculate how much fabric is needed for a product? How to calculate the cost taking into account the discount? How to calculate line 070 in 6 personal income tax? How to calculate tulle? How is military pay calculated? How is the old age pension calculated in 2022? How is pension calculated in 2022? How is the tariff for water heating calculated? How is the child benefit calculated?
How to disable the automatic reboot function after installing updates in Windows 8 and 8.1
Hello dear readers of the Internet resource WindowsFan.Ru!!!
The automatic Windows update feature saves the user from unnecessary hassle, but at the same time it can become a source of potential problems.
Most updates require a system reboot. After installing the package, Windows displays a message asking you to restart.
If, as luck would have it, you get absent and miss the message, the system will reboot without waiting for your approval. Of course, all open applications will be terminated and unsaved data will be lost.
This problem is solved in the most elementary way. Just go to Windows Update and select a different type of update installation, and at the same time indicate the appropriate time for the update.
If this method does not suit you (you want to use only automatic updates), forced reboot can be disabled. Windows will still install packages automatically, but it will no longer reboot. There are two ways to disable automation.
The first is quite civilized, through the group policy editor, the second is a bypass, by invading the system registry and changing its keys.
The easiest way to launch the Local Group Policy Editor is by running the gpedit.msc command. On the right side of the window there is a list of services and components, among which you need to find “Windows Update”.
It is located here: Computer Configuration -> Administrative Templates -> Windows Components. So, in this section there is an option “Do not automatically reboot...”. Double-click on it with the mouse and in the window that opens, set the radio button to the “On” position.
For the settings to take effect, restart your computer, or better yet, open the cmd console (as administrator) and run gpupdate /force.
The second method is more complicated. Open the registry editor (regedit.exe) and go to HKEY_LOCAL_MACHINE/SOFTWARE/Policies/Microsoft/WindowsWindowsUpdate/AU. If the last two folders are not on the path, you will need to create them.
By default, the AU section has only one parameter with no value. Select the section with the right mouse button, select New -> DWORD Value from the menu, give it a name NoAutoRebootWithLoggedOnUsers, and set the value to one.
Now close the Registry Editor and restart your computer. You can also use the gpupdate command you already know with the force switch. The job is done and now you can enjoy all the benefits of automatic updates without fear of Windows rebooting at the most inopportune moment.
This is where I’ll probably end my story for now and until new educational meetings with you, my dear friends...