Contacts saved on your Android device are automatically synced with your Google account. You can remotely access these contacts on other devices connected to your account. Syncing Google contacts is intuitive and the benefits are enormous.
There's just one problem: contact syncing sometimes doesn't work. If some of the contacts saved on your Android smartphone are missing from Google Contacts, or your contacts stop syncing with other devices, one of the 12 solutions listed below should help resolve the Google Contacts not syncing issue.
Check your internet connection.
Your Android device requires an active Internet connection to sync contacts to the cloud. If you can't find some contacts on other devices connected to your Google account, make sure the main device where the contact is saved has an Internet connection.
If you're using cellular data, switch to a Wi-Fi connection and see if it syncs your missing contacts. You can also turn on Airplane mode, wait a few seconds and turn it off again. This may resolve problems connecting your device to cellular and wireless networks.
Finally, make sure the secondary device also has an Internet connection. Otherwise, your device may not receive updated contact information from Google.
Google Drive won't sync
In addition to storing information on Google Drive cloud hosting and the ability to access data for viewing and editing from different devices, the most important option of the service is instant synchronization, which allows you to get even more benefits from using the service.
By downloading the application to a PC, tablet or phone, users are given the opportunity to create backup copies of any files and folders, including phone book contacts. This is very convenient when you lose information from your device, because it can always be restored from the cloud.
In some cases, the application produces synchronization errors, users do not see their files, they are not copied, and so on. Often, malfunctions are short-lived and data exchange soon resumes on its own, but sometimes it is necessary to manually correct problems. Let's look at why such problems arise and ways to solve them.
Troubleshooting synchronization problems between your PC and the cloud
The reasons that Google Drive does not sync with local computer folders can be completely different from low Internet speed to simple errors in the application, often associated with moving or renaming a directory.
The process may stop at the initial stage of data exchange or be interrupted in the middle of work. There are several simple methods to solve the problem:
- Restarting the application . Most often, the issue can be resolved by restarting the service. After restarting, the data exchange procedure can be successfully restored;
- Reinstallation . If the reasons do not lie in the absence of the Internet or low packet transmission speed, and restarting does not help, you can try reinstalling the service. It is better to download the latest version; during the process you will be asked to replace the already installed one with a new one. Select the folder to synchronize and wait for the procedure to complete;
- Account deactivation. Problems can be fixed if you disable your account in the application settings and then connect it again;
- Setting up file synchronization manually. Manually starting the procedure quite often solves the problem. To do this, go to the “View unsynced files” section in the application, then click “Retry all”.
In addition, if programs are not working correctly, restarting the PC often helps. There may be some system problems with your computer, so a reboot may fix the errors.
Error messages
The folder has been moved:
- Let's go to the application;
- Click “ Find ” in the error notification;
- Go to the folder and click the “ Open ” button;
After you specify the location of the folder, the auto-sync procedure will be restored.
The Google Drive folder has been renamed:
- Let's go to the application;
- Click “ Find ” in the error notification;
- Select a directory with a new name, click “ Open ”;
- After these manipulations, the exchange of packages with Google Drive should resume.
Check your contact sync settings.
Still can't find some Google contacts on your secondary devices? Go to your account settings and make sure you have turned on contact syncing.
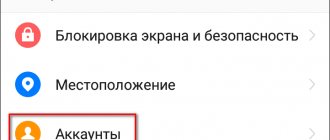
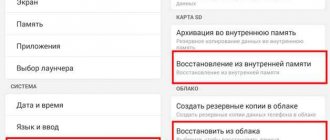
- On your Android device, go to Settings > Accounts. Make sure that the Automatically sync data option is turned on on the Accounts page. Select your Google account to continue.
- Click Account Sync.
- Make sure Contacts is turned on. You can manually restart contact syncing by turning this option off and then on again.
Alternatively, tap the three-dot menu icon in the top right corner and select Sync Now. Make sure your device is connected to the Internet.
Checking for updates
Many users underestimate the importance of timely installation of operating system updates, and in vain! Could you get rid of the Google account synchronization error on Android - what to do if you are one of those people?
It's simple:
- open your phone settings,
- find the “System” section,
- go to the “Advanced Settings” tab,
- Find the “System Update” button, “Check for updates”.
On this page you will see if operating system updates are available. If they are, follow the instructions that appear on the screen. Most likely, the question of why the Google account on Android is not synchronized will disappear by itself. And don’t forget that you should update your OS as often as possible. If available versions appear!
Check your Google sync settings.
Google may not recognize (or sync) some contacts on your device as Google contacts unless you specify so. This could be because the contacts were created by another application, or for some other unclear reason.
If some contacts on your device aren't syncing with your Google accounts no matter what you try, follow these steps to set your device to automatically save and sync all contacts on your device as Google contacts.
- Go to Settings > Google > Account Services and tap Google Contacts Sync.
- Select the synchronization status.
Enable the Automatic sync option.
- Return to the Google contacts sync page and tap Also sync device contacts.
- Enable Automatic backup and synchronization of device contacts.
- Select the account you want to back up and sync your device's contacts for.
The database is not visible in the window for selecting a database for initial unloading
You need to go to the start menu, select the Accounting database, click Edit
and just click
Next
and
Finish
. After returning to the base selection window, as a rule, this method solves the problem.
Disable power saving mode.
Android devices have a battery saver feature that temporarily pauses syncing and other background activities that drain battery power. If Google contacts aren't syncing on your Android device, turn off battery saver and try again. Open the notification panel and tap Battery Saver to turn off this feature.
If this option isn't in your notification panel, go to Settings > Battery > Battery Saver and tap the Turn Off Now button.
Disable data saving.
Data Saver is another Android feature that can prevent contacts from syncing across your devices. If you're connected to the Internet via cellular data, turning on data saver mode will temporarily pause apps and processes using background data until you turn off the feature or connect to a Wi-Fi network.
Turn off data saving to resume contact syncing. Go to Settings > Network & Internet > Data Saver and turn off the Use Data Saver option.
Allow data and battery usage in background
If you don't want to disable battery saver and data saver, you can configure the Contacts app to bypass system-wide restrictions on background data and battery usage. This will ensure smooth synchronization of your contacts.
- Go to Settings > Apps & Notifications > App Info or (All Apps) and select Contacts from the list of apps installed on your device.
- Select Mobile data and Wi-Fi.
Turn on Background Data and Unlimited Data Usage.
- Return to the Contacts app's info page and tap Battery.
- If the background restriction is set to Restricted, click it and select Remove.
This will allow the app to use your device's battery in the background. Wait about 3-5 minutes and check if the missing pins are visible on other devices.
Statements are not uploaded from ZUP to Accounting
1. In ZUP – Administration – Data synchronization – Synchronization settings – Configure
it is indicated that the unloading is carried out in aggregate, and not with detail by employee.
Set the switch to With details by employee
, then manually register the sending of the required statements. In the future, they will register themselves when created or modified, as usual.
2. In ZUP – Administration – Data synchronization – Synchronization settings – Configure
the month of the beginning of the exchange is indicated in the ZUP greater than the month of the uploaded statements.
Set the correct month for the start of the exchange, then manually register the sending of the necessary statements. In the future, they will register themselves when created or modified, as usual.
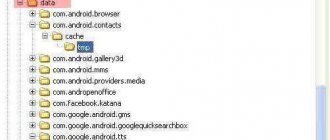
Clear the Contacts app cache.
An application may not function properly if its cache files are corrupted. If your contacts still won't sync with other devices, try clearing your Contacts app cache data. Open the Contacts app info page (Settings > Apps & notifications > All apps > Contacts) and select Storage & cache.
Click the Clear cache button.
Change the contact's name.
You can save a contact on your Android smartphone or tablet under almost any name you see fit. Contact names can include letters, numbers, emoticons, and special characters. However, it's important to note that you won't be able to sync contacts that have certain special characters in their names.
During our research, we found that contacts with the following special characters may cause problems during contact synchronization:
- Apostrophe (')
- Ampersand (&)
- Equal sign (=)
- Star
- Hash sign (#)
More than one consecutive period (…..) As a guide, the contact name should not contain special characters that cannot be used in a Gmail username
.
- Check your Google contacts storage.
You can only save 25,000 contacts in your Google account. The size of the allocated storage for contacts in your Google account is 20 MB. To check the number of Google contacts you have, visit your Google Contacts Dashboard
in your preferred browser and sign in to your Google account. You should see the total number of contacts in your account just before the first name in the list.
Make sure the correct password is entered into your email app.
When you change the password for your email account, you should also update it in the email app on your phone. If you don't do this, your phone won't be able to sync new emails because it simply doesn't have permission to do so.
You can resolve this issue by opening your email application and entering a new password. The app will then connect to the mail servers and fetch new messages for you.
Remember to update your password wherever you use this account whenever you change the password for it.
If you have up to 25,000 items, delete unnecessary contacts to resume syncing.
- Re-add your Google account.
If your contacts still won't sync with Google, disabling and re-adding your Google account is a last resort. Go to Settings > Accounts and select the appropriate Google account.
Click the "Delete Account" button and wait until the account is disconnected from your device.
An error occurs when syncing with Chrome on Android
The Google application provides for the transfer of your saved bookmarks to any devices where a browser was installed and the user is in one personal account from all available to him, including a PC.
This feature is enabled by default in the settings. If saved bookmarks disappeared and did not appear again, this is a direct sign that the connection with Chrome is broken or completely absent.
If neither clearing data, nor deleting updates, nor clearing the cache helped solve the problem with the device and Chrome, you should use other methods to restore this functionality.