Hello, friends! I would like to dedicate this article to the contacts that are stored in each user’s Google account. Many people have heard that they exist, but only a few know how to use them, where to look for them, and how to set them up so that after a sudden breakdown of your smartphone they can all be restored.
I'll tell you how I found out about them. My phone worked great and I didn’t plan to change it, but one fine day it just turned off and that’s it, no reaction at all, no matter what buttons I pressed. Of course, I took it to a repair shop and ran out to buy myself a new smartphone. I was upset about the contacts - how can I put them all back together now? There were a lot of necessary people, friends, acquaintances there. So, I logged into my Google account (to use the Play Store) and lo and behold, almost all of my contacts in the phone book were restored!
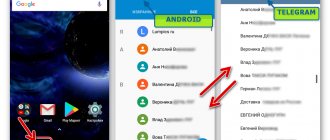
So let’s, so that everything is just as perfect for you, we’ll figure out what contacts are in a Google account, where they are, how you can view them, how to save phone contacts in a Google account, perform automatic synchronization, restore the necessary records or delete them. First, we will do everything using a computer, and then from an Android phone.
How to view the list
If the question arises: where are they located, then open a browser on your computer and go to the Google search page. In the upper right corner you will need to go to your profile. If you are logged in, then click on the avatar and make sure that the profile you need is at the very top (this is if, as in the example, several accounts are connected at once).
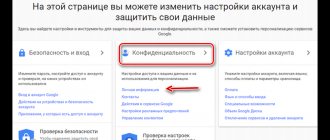
Then click on the button with nine squares, at the end of the list, select “More” and click on the “Contacts” item.
The next page will open your available contact list. There will be a main menu on the left; you can hide it by clicking on the three horizontal stripes at the top. In the middle, the following information is shown for each entry: name, email, phone number, job title. At the top of the list are contacts that are important to you and have been marked with an asterisk. Then they go alphabetically.
The “Similar contacts” tab will show those for which the same name or number is indicated; here they can be combined into one.
If you open the “Other Contacts” tab, you will see a list of users to whom you have previously sent emails.
Exporting subscriber numbers from your account
To extract subscriber data, you need to download it as a special CSV or vCard file. To do this, on the main page of the service, mark the numbers we need or select all at once, and click the “More” “Export” button. To save a backup copy to your computer, click Google CSV and the “Export” button.
Important! Creating a backup copy of subscribers is necessary for their easy restoration. If you lose your phone or want to change it, the numbers from the device memory or SIM card may be lost.
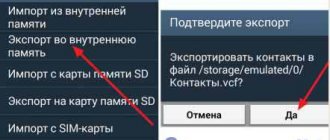
To export numbers on your phone, you need to open the “Contacts” application, select the “Settings” - “Export” menu item. Specify the required contacts to transfer and click “Export to VCF file.”
How to add a new entry
To add a new contact, click on the round pink “Create” button at the bottom right.
Next, fill in all the necessary user information. To see all available fields to fill out, click “More”. Then click “Save”.
A window like this will open with the newly created data, click on the cross to close it.
After you add a new entry to your account, it will automatically appear in the phone book on your smartphone. This is provided that synchronization of contacts with Google account on the device is enabled (we will talk about it below).
All added entries can be divided into groups. Expand the corresponding item in the menu on the left. In the example, there is only one, and three users are added to it - the number in brackets. If you want to add a new one, click “Create a group”.
Come up with a name for it and click “OK”.
To add a user to a group, hover over the user and click on the three vertical dots, this is the “More” button. From the drop-down list, click on the name of the desired group.
There are two more buttons here: “Add a note” - the entry will appear at the very beginning of the list, “Edit” - a window will open for changing the contact.
After selecting a group, a check mark will appear opposite it, and in the list on the left, the number of users included in it will increase.
If you hover your mouse over the name of the group, buttons will appear using which you can edit the name or delete it. When you select any of them, a list of users who are included in it will open. To remove a person, click on the dots next to him and uncheck the box next to the group name.
How to manage Google contacts: detailed instructions
Google Contacts are not just entries that are stored in the phone book on an Android smartphone. This service allows you to have access to the full database of your phone numbers from different devices: Android, iOS, Windows and others.
View Google Contacts
There are two ways to view the phone book with all saved numbers on an Android smartphone :
- Through the call log on the “Contacts” tab.
- Through the Contacts application, preinstalled on any version of Android.
The interface in both cases looks the same - it is a list of names in alphabetical order and a search bar for navigation. The list displays all subscribers whose data you have saved on your smartphone or SIM card, including those who were added from other sources.
If synchronization of contacts is enabled in your account settings, the latter will also be in this list. You can edit them through the Google Contacts web application.
The Google Contacts web app is typically used to view your contacts on your computer, but you can do it on your mobile device as well. It opens through any browser. All that is required is your Google account login and password.
How to delete
If you are interested in how to remove an unnecessary entry from the list, open it. Then find the unnecessary entry, click on the three dots opposite it and select “Delete” from the list.
By the way, if all unnecessary users are in one group, you can delete it along with the entries. Then you won't have to delete each person individually.
Confirm the action by clicking “Delete”.
Google Contacts service
The Contacts web service, compared to Gmail, has more settings and functions for working with address data. It can be used not only for private needs, but also to coordinate the work process in production, in a company, or in an organization.
To go to “Contacts”, log in to the system and go to the page - contacts.google.com. Or, if you're in your mailbox profile, open the Gmail drop-down menu (it's in the top left corner) and select Contacts.
On the page that opens, click “More” in the left column to fully open the functional menu.
Let's look at performing the most common tasks in this service.
Import
1. In order to copy contact information from other services, click the “Import” item in the menu.
2. In the modal window, specify the import source. The data transfer algorithm varies depending on the selected method (account).
If you need to restore contacts from a vCard or CSV file, go to the previous version of the service (click in the "Go..." panel).
In the top panel, click “More…” and select “Import” from the list. Accordingly, if you need to save contacts to your computer’s hard drive, click “Export” in the same list.
And then set the export settings:
- indicate any individual circle of contacts or all contacts;
- select the file format (CVS or vCard).
And click the "Export" button.
Removal
To remove a contact from a circle or group, click the “three dots” icon in its field (row) and click the “Delete” mini-panel that appears.
How to recover deleted
Now let's figure out what to do if the user deleted contacts in his Google account, how to restore everything he needs? To do this, click on the “More” menu – “Cancel changes”.
Please note here that you can restore records if you deleted or merged them, imported or synchronized them. Moreover, no more than 30 days should have passed from the moment you did this.
Select the appropriate item with a marker and click “Confirm”. After this, some records will be restored.
Google Contacts on your computer
A Google account allows you to add new contacts on your computer and then synchronize them with other gadgets. This is much more convenient if you need to enter the data of a large number of people. To add, follow these steps:
- in the “Contacts” section, click on the round pink button in the lower right corner;
- fill in the required fields with contact information;
- click on the “Save” button.
After saving, the contact will automatically be saved in your account and will be added to your smartphone or other gadget linked to your account (provided that synchronization is configured). This is very convenient, since it is enough to fill out the user data plate once and it will immediately appear under the same name on other gadgets, saving a lot of time on manual entry.
How to save phone contacts in your account
To copy contacts from your phone to your Google account, you need to use import/export. How can I transfer contacts this way? First you need to export them to a file from your phone, and then import it into your Google account.
- Find Import/Export Contacts on your device. On Lenovo, you need to open “Contacts”, and then go to the “Settings” section at the bottom.
If you have a Samsung, then the required item is located along the path: “Menu” - “Contacts” - three dots in the upper right corner - “Manage contacts”.
- Next, select “Export to storage device.”
- Remember where the file will be saved and what it will be called. Click "OK".
- Use File Explorer on your phone to find the file. It can be built-in, or you can use a third-party application, for example, ES Explorer.
- Long press on the file to open an additional menu. Select “Send” or “Transfer” in it.
- You can add the file to Google Drive, and then you will need to log in from your computer and save it from there. I'll send it via Skype. Only this should be a person you trust, for example, sister, mother, husband, since this is your personal data.
After sending, go to your Skype and download it from the dialogue to whom you previously sent it.
- All downloaded files are located in the Downloads folder on your computer. So open it and transfer the contacts file to your desktop.
We exported all contacts from the phone to a file and transferred it to the computer.
- Now you need to upload your contacts to your Google account. Go into it, select “More” - “Import”. A window will open where you click on “Import from a CSV or vCard file.”
- Since we are considering a new version, and it does not currently support this function, we will be prompted to go “To the old version”. Select the appropriate item.
- Then in the menu on the left again click on the “Import...” button.
- Click on the “Select file” button.
- Find it through Explorer, in the example it is on the desktop, select it and click “Open”.
- When its name appears in the window, you can click on the “Import” button.
- After this, the total number of contacts will increase. If this does not happen, you need to refresh the browser page by clicking on the circular arrow to the left of the address bar. Also, all these records will be automatically added to the “Imported” group.
- Go to the new interface and, if there are no more contacts, also refresh the browser page. After this, a message may appear that similar contacts have been found, click on this button.
- Here you can merge identical entries. Click on the appropriate button. To apply this action to all users in the list, select Merge All at the top.
- Now your contacts in your Google profile are the same as on your phone. And if, for example, you lose a device, then with the help of synchronization (which we will talk about in the next paragraph) everything can be restored.
By the way, using the described import/export procedure, you can transfer Google contacts from one account to another.
Import via mail
To import information about subscribers via mail, you need to log in to your Gmail account. By clicking on the inscription, a drop-down list will appear in which you need to select “Contacts”. Select the “More” section to expand the contents and click on the “Import” item.
A window for selecting import methods will load on the screen, from which you need to select the appropriate one. For example, by selecting “Import from another service”, you will need to enter the login and password of the email from which the transfer is to be made. In this case, you need to click the “I accept the terms” button.
Synchronizing contacts
In order to synchronize contacts, you must enable this function on your smartphone. How to do this depends on your device.
On Lenovo, go to “Settings”, then go to the “System” tab and in the “Accounts” section select “Google”.
Next, click on your email address.
At the very bottom of the list there will be two items with the name we need. To enable synchronization, place a green bird in front of each one.
For those users who use Samsung, in “Settings”, select “Cloud and accounts”. Next from the list, click “Google”.
Here you need to move the slider opposite the desired items to the “on” position.
Another option for enabling synchronization is to open the “Manage Contacts” window, as I described above. In it you need to select the “Synchronization” item.
Next, next to the connected Google account, make sure that the slider is in the “On” position.
Please note that if you synchronize contacts, they will appear on your phone from your account, but not vice versa. All records that are on the smartphone will not be added to Google contacts. The same applies to adding a new user. Create it in Google Contacts and it will appear on your phone. Create a user contact on your phone - it will not be added to your Google profile.
Synchronization
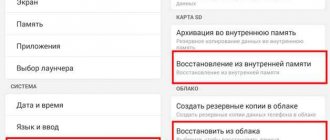
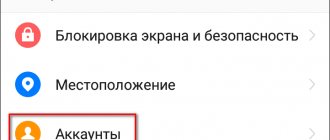
To synchronize data on Android phones, you need to go to the device settings and select “Accounts”. In the additional menu, check the box next to the “Auto-sync data” item.
After this, synchronization of contacts will be automatic and it will be very easy to restore the list of numbers after activating the profile to which they are linked.
Thus, the personal account of the Contacts service allows you not to worry about losing the phone numbers of loved ones. All information about them is stored on Google servers, and it can be easily viewed and edited. If you change your smartphone, the data can be imported and exported as a special file. All operations occur instantly in a couple of clicks and will not take much time.
How to view contacts from your phone
To view all entries in your account from your phone, go to your browser and go to: https://myaccount.google.com.
Next, either register in the desired account, or click on the avatar and make sure that the profile you need is selected.
Click on the “Google Services” button, click “More” and select “Contacts”.
The appearance of the page will be the same as if you visited it through a browser on a computer, so everything that I described above can be applied here. The “Main Menu” opens by clicking on the three horizontal bars at the top left.
This is how the article turned out. Let's summarize what we've discussed a little. To the question: where are contacts stored in a Google account, how to view them and add a new one, we answered. We figured out how to create groups, delete and restore deleted contacts. To transfer contacts from your phone to a Google account or from one account to another, you need to use the import/export function. If you need to restore your phone contacts through your Google account, you need to enable synchronization on your device. If you have any questions, ask them in the comments.
Contact information on Gmail
To view contact information in your Google mailbox, log in and go to the Gmail service. Click the “Circles” section in the options column on the left, and then select the desired subsection (Friends, Family, Acquaintances, etc.), depending on what kind of contact you want to find (personal correspondence, work, etc.).
If you need to add user data to one of your communication circles, follow these steps:
1. Open a message received from your interlocutor or any service.
2. Hover over the address area of the sender's mailbox.
3. In the panel that appears, move the cursor to the words “Add to...”.
How to view contacts in your Gmail?
The synchronization process itself occurs in almost the same way as with a Google account. All that remains is to find out how to view contacts in gmail.
In fact, it’s not difficult to find Google contacts where to look. You just need to select the “Contacts” section in the “Contact Manager” section.
Here you can view all the information on your synchronized contacts. If necessary, they can be changed immediately.
If you can’t synchronize your contacts with your mail, you need to select Google account in the “Accounts” section of the device itself as a place to save data instead of the SD card and phone memory.
If the need arises, in case of data loss, it can be restored.
Transfer from Google to iCloud and vice versa
The most convenient way to transfer contacts from Google to iCloud is to export and import a vCard file. The easiest way to do this is on a computer through any browser.
You only need access to your Google and iCloud accounts. The transfer will be performed using standard tools.
Procedure:
- Open the Google Contacts web app.
- In the menu on the left, click on the “Export” link.
- Select vCard format. Near this item there is information that it is suitable for iOS.
- Click "Export".
A file with all contacts will be saved to your computer’s hard drive. If you want to transfer individual records, first select them in the list, and then click on the “Export” link.
The next step is to transfer the file to iCloud . On computers with Mac OS, you can simply move it to the application of the same name. On Windows you will have to do a few more steps:
- Open the iCloud web interface and select the Contacts section.
- Click on the gear at the bottom and select the “Import vCard” option.
- Provide the path to the file you exported from Google Contacts. It's called contacts.vcf.
This completes the transfer. If you enable iCloud synchronization in your iPhone settings, entries from Google Contacts will appear in your iOS phone book.
The reverse transfer is carried out according to the same principle. There is an "Export vCard" option in the Contacts app settings on iCloud. If you click on it, you will save a file with data from iCloud on your hard drive. After that, launch the Google Contacts application, select the “Import” option in the side menu and specify the path to the file.
Transfer from Android smartphone to iPhone and vice versa
If synchronization with Google Contacts is enabled on Android, then to transfer entries to the phone book on iOS, just add a Google account to your iPhone. We talked about how to do this in the article about synchronizing Google contacts.
If for some reason you don’t use synchronization or don’t want to add a Google account to your iPhone, then transfer your contacts using a file. The procedure here is almost the same as when exporting/importing between Android devices.
- Export the data on your Android device to a file. We described how to do this in the previous section of the instructions.
- Email the contacts.vcf file to an address you can access on your iPhone.
- Open an email with an attached file on your iPhone. Click on it to download to your smartphone.
- Select one of the following options: “Create new contacts” or “Merge with contacts.”
If you choose to create new contacts, there may be duplicate entries. But if you add them to a new iPhone, then there will be no problems.
You can also use Apple's free Move to iOS app to move contacts from Android to iOS. However, this method is only applicable when setting up a new iPhone. If you have already set up the device, but there is nothing important on it yet, just erase the data and perform the setup again.
How to transfer contacts using Move to iOS:
- Turn on your iPhone and navigate to the Apps and Data screen in the initial setup program.
- Click "Transfer data from Android".
- Launch the Move to iOS app on Android. Accept the terms of the agreement and click Next. The smartphone must be connected to Wi-Fi.
- On iPhone, click Continue to receive the code. It can consist of 6 or 10 characters.
- Enter the received code in the Move to iOS app on Android.
- On the Data Transfer screen, choose to move contacts. In addition to them, you can transfer other files: photos, message history, calendar entries, free programs available on Google Play and the App Store.
- Once the download is complete on iOS, tap the "Done" button on your Android device.
- Continue setting up your iPhone.
Once the setup is complete, the data from Android will immediately appear in the iOS phone book.
The same methods are suitable for transferring contacts from iPhone to Android, except for the Move to iOS application. You can sync them through your Google account, export and then import the file, and use iTunes. We talked about these operations in detail in the article on how to transfer contacts and other data from iPhone to Android.
View contacts in Google account
The vast majority of Google services are cross-platform, that is, available for use on various operating systems - both desktop and mobile. Among these is “Contacts”, which can be opened both through a browser on a computer and on a mobile device. Let's consider both options.
Option 1: Browser on PC
As we said above, “Contacts” is one of many Google services, and on a computer you can open it for viewing as easily as any website.
Note: Before you begin following the instructions below, please log in to your Google account. The following article will help you do this.
Read more: How to log into your Google account on PC
- Go to Google's start page in your browser, or open any of the company's web services other than YouTube (such as search). Click on the "Google Apps" button located to the left of your profile photo and made in the form of a square of nine dots. Find “Contacts” in the list that opens and click on this icon with the left mouse button (LMB) to go to the page that interests us. You can also get to it using the direct link provided below. Go to the Google Contacts page
- Actually, the first thing you will see in front of you will be the list of contacts saved in your Google account. The first tab of the side menu displays only those entries that are saved in your phone's address book. Information about them is divided into several categories: name, email, phone number, position and company, groups. It is not necessary that all of them be filled in, and the order of these columns can be changed through the menu called up by clicking on the three vertical dots on the right. Each contact can be added to favorites (star), edited (pencil); print, export, hide or delete (three dot menu). To select multiple records, you need to check the checkbox that appears to the right of the user name (after hovering the cursor).
- The next tab in the side menu is “Who do you often communicate with”, and its name speaks for itself. This section contains not only contacts from your phone's address book, but also those with whom you corresponded via Gmail email.
- The “Similar Contacts” tab will show duplicate entries, if any are found, of course.
- In the “Groups” section you can “Create a group” with contacts, for which you just need to click on the item of the same name, give it a name, “Save”, and then add users.
- If you expand the More drop-down list, you will see several additional sections. The first of them is “Other contacts”.
It will list the users (and companies) you've communicated with via email (including those who emailed you but didn't receive a response), as well as those with whom you've worked on documents from Google Virtual Office. .Information about them will be divided into columns in the same way as address book entries from the first tab. Working with and editing them is carried out according to the same algorithm - move the cursor over the required contact, select the desired action and perform it. The only difference is that these entries cannot be changed, but from here they can be saved to the main “Contacts” section, which also means the ability to edit basic information.
- To add a “New Contact”, click on the corresponding button above the list of tabs, enter the necessary information in the window that appears, and then “Save” it.
Transfer from iPhone to iPhone
The easiest way to transfer Google contacts from one iPhone to another is again synchronization. Just add the Google account with which your contacts are synced to your second iOS device. After synchronization is enabled, all entries will be copied to the iPhone phone book automatically.
If you don't want to add a Google account to your second device, use iCloud synchronization . To do this, first set up the iPhone that stores your Google contacts:
- Open iCloud Settings.
- Sign in with your Apple ID if you haven't done so before.
- Turn on synchronization.
All contacts from the first iPhone will be sent to iCloud cloud storage. To download them from there to the memory of the second iPhone, repeat the procedure on it: log in with the same Apple ID and enable synchronization.
If you are unable to use your old Apple ID on another iPhone, transfer your contacts using the export/import function.
To export , go to the iCloud web interface. Then:
- Enable synchronization with iCloud on your iPhone and Google contacts.
- In any browser, open iCloud and log in using the same Apple ID used on your smartphone.
- Select the "Contacts" section.
- Select all or some entries in the list.
- Click on the gear in the lower left corner and select the “Export vCard” option.
The file will be saved to your computer's hard drive in VCF format. Move it to the second iPhone in any convenient way, for example, by email.
The second step is to import the file. We discussed how to do this in the section on transferring contacts from Android to iPhone.
Transfer to cloud storage
To avoid losing your Google contacts when moving from device to device, store them in the cloud. This is a standard feature available to all users with a registered Google account.
To transfer contacts from your smartphone memory to cloud storage, enable synchronization in your account settings. We talked about how to do this on Android and iOS in a separate article.
To send Google contacts to the cloud from an Android device, do the following:
- Open Settings on your smartphone.
- Go to the "Accounts" section.
- Select Google and open your account settings.
- Turn on contact synchronization.
After some time, all entries from the phone book and Gmail will appear in the Google cloud. To verify this, open the Google Contacts web application through any browser.
Synchronization also works in the opposite direction. If you add a new entry to Google Contacts, after a while it will appear in the storage of the smartphone that is associated with your Google account.
By the way, some device manufacturers offer data synchronization with their own cloud storages. For example, owners of Xiaomi smartphones can store contacts on Mi Cloud. If you have a Samsung device, then you can set up synchronization with Samsung Cloud.