Reflashing smartphones is needed to fix critical errors - the gadget may be subject to virus attack or system failures. For Samsung with an Android operating system (OS), the easiest and most reliable program to install a new OS is Odin.
Odin was released specifically to install new versions of the OS on Samsung - this is a utility released for a computer (PC) that can revive the gadget in a few minutes by installing a new version of Android on it or downloading individual components (if you don’t need to flash all) of the system .
What versions of the program are there?
The version of the utility will depend on what device is used - the more modern the gadget, the more recent version of the utility will be suitable.
The following Odin releases are available to users (the most stable ones are indicated):
- 3.11.1 – all flagship gadgets 2017-2018 .
- 3.10 – gadgets released before 2017 .
- 3.07 – all Samsung products released between 2012 and 2014 .
- 1.85 – for real “oldies” produced before 2012 .
One is suitable not only for smartphones, but also Samsung tablets You can also find a Russian-language program on the Internet - several versions 3.12 are available for download on the 4PDA website, but you must use them at your own peril and risk. There have been cases of Samsung being turned into bricks, so it is better to use the official English-language distribution.
Preparing for flashing
If the Recovery Mode of your gadget is capable of performing flashing, you can download it to the device and perform it on it. A more typical case is when flashing is carried out under the control of a personal computer (PC) or laptop.
Firmware search
Flashing requires a special PC program that organizes the flashing process. The best option is the Odin program, which Samsung uses to flash its devices.
You should download to your computer:
- Odin program: for Samsung models released before 2011, version 1.85 is recommended, for devices manufactured 2011–2014. - version 3.07, until 2022 - 3.10.6, 2022 - 3.11.1. Do not use third-party, including Russian-language versions of the program; a failure in them may cost you your gadget, turned into a “brick”;
- drivers for connecting a computer with a Samsung gadget;
- official firmware, which can be found on the websites samfirmware.com, samsung-updates.com, sampro.pl, live.samsung-updates.com. There are also wizards for downloading Samsung Firmware Linker or samfirm firmware. The wizard himself will find and download at maximum speed the latest firmware for your gadget by model number. The firmware should be placed on the computer in a folder whose address does not contain letters of the Cyrillic alphabet (you can c:\samsung\GTI9300, but not c:\users\Vova\Downloads\GTI9300).
Video: how to quickly find and download Samsung firmware
Installing the Odin program
Once you have downloaded the required software, install the Odin program and follow these steps:
- Copy all personal information (contacts, ringtones, pictures, etc.) to an internal or external SD card or to a computer. After flashing, all your settings will be lost.
- If you already had older version drivers installed, you should first remove them. When you connect the gadget for the first time, the computer OS will not be able to find the drivers and will ask where to look for them. Refuse automatic search and specify the path to the folder where you saved the drivers.
- Prepare the USB cable. An important condition for successful flashing is the use of the original USB cable. It is advisable to use the cord supplied with the device.
- During flashing, it is unacceptable to turn off the computer, mobile device or disconnect them. Therefore, the gadget must be charged to a level of 80–100%. The computer must be connected via an uninterruptible power supply. Another acceptable option is a laptop with a well-charged battery.
- For 5 minutes, while the firmware process is in progress, protect the devices from children and animals.
Installing Odin on PC
The installation algorithm for the program itself is simple - you need to download the distribution kit to your computer and unpack it (usually it comes in an archive). It's better to do this in a separate folder and place it on drive C, just for convenience. The downloaded firmware that needs to be loaded is also unpacked there.
The archive usually contains two files - for configuration and standard Setup.
To run, just select a file with the .exe extension and run as administrator . There is no need to install it the usual way.
Important! The files should not be in the Russian-language section, and there should be no Russian names on the path to them. It's better to create the Samsung folder directly in C to eliminate the username or "New Folder" titles.
Basic options
Odin can:
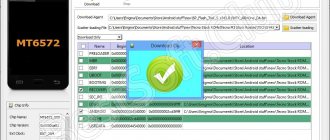
- Flash the system bootloader - in the Bootloader column.
- Install a new kernel , Recovery and, in fact, the system - in the PDA column.
- Customize the system for a specific region - in the CSC column.
- Replace the modem - Phone column.
- Redistribute and mark up from scratch Partition – Re-Partition.
- Reset data on the number of device firmwares – F. Reset Time.
- Reboot the phone after installing a new version - Auto Reboot.
It also shows the entire process of downloading Android components and installs both official and custom archives.
Types of firmware
Flashing the device, in other words, reinstalling the software, is necessary if you are not satisfied with the software component.
The firmware installation can be stored in one or more files. Depending on this, single-file and multi-file firmware are divided. There are Recovery firmwares, which reinstall the software for Recovery Mode; kernel firmware, that is, reinstalling the operating system version.
As for the kernel firmware, they can be divided into official and custom. Official firmware versions released by the manufacturer of your mobile device or Google are the best option for undemanding users: they do not have a lot of functions, but they are reliable and designed specifically for your device model. And, importantly, they come with a guarantee.
But any third-party (custom) custom firmware releases the manufacturer from the obligation of warranty repairs. Do not think that this is some kind of violation of the rules or that the firmware is illegal. Manufacturers simply cannot know what will happen to your device due to third-party firmware, and they do not want to be responsible for it.
But if you're ready to say goodbye to warranty service, third-party firmware will give you a lot of options. There are different types of third-party firmware, the most famous: Cyanogen Mod, MIUI, Illusion ROMS, AOKP.
Cyanogen Mod
Cyanogen Mod was born as a custom modification and has grown to become the most popular custom Android firmware: in 2016, there are about 14 million devices with Cyanogen installed.
It is reliable, stable and works on many smartphones and tablets. A big plus of the firmware: there is a normal installer. To install CyanogenMod, you don’t need to worry about Recovery modes, getting root rights and other deep things. The program will do everything for you.
CyanogenMod, unlike standard versions of Android, allows full access to the operating system. Even root access on the device will not give you such freedom. This leads to a variety of applications and security problems. The system is open not only to you, but also to viruses. Therefore, it is better to use CyanogenMod together with a good antivirus. The firmware also frees you from the manufacturer’s imposed standard applications that cannot be removed.
Cyanogen simplifies working with the device, supports many themes, allows you to change any element of the system, and increases performance through optimization.
Video: review of CyanogenMod 10.1
MIUI is based on Android and CyanogenMod source code. That is why it has many similarities with Cyanogen. This includes complete freedom for the user, improved performance, and support for themes. But MIUI has an interface unusual for Android, which is something similar to iOS. MIUI does not have an application menu at all; instead, it uses an unlimited number of desktops with a set of applications. But, unlike iOS, MIUI also supports widgets, of which there are a lot in the built-in store.
You can install all applications from Google Play Market on MIUI. The built-in SuperMarket store has them all. And some of those that are paid on Play are free on Supermarket.
Illusion ROMS
Illusion ROMS significantly speeds up the device and reduces energy costs. It has advanced accelerometer settings: for example, reducing the rotation angle to “flip” the screen interface from 90 to 80 degrees. You can also customize the screen: in addition to brightness settings, you can change the contrast and color rendition to improve the image.
Video: custom firmware Illusion ROMS for Android (review in English)
AOKP has many of the features of CyanogenMod (most firmwares are based on it), but has unlimited interface customization options. You can change everything, every single menu element. You can upload your own animation for the interface, create your own template for a vibration alert, set special actions for any gesture and any press, you can change the background and appearance of the notification panel, remake the status bar, and manually configure the processor.
A separate topic is widgets. They can also be adjusted. Devices powered by AOKP can turn Android into something unimaginably beautiful, all it takes is some imagination.
Video: review of custom AOKP firmware on Nexus 4
Downloading and installing drivers
Just new files for the gadget and the program itself are not enough - for Samsung to be detected in the system, you need to download drivers for it to your PC. In many cases, this happens automatically when you connect the device via USB.
However, for the utility to work correctly, the drivers must be updated (the latest version is required). You can get these automatically when you install Kies or Smart Switch. For this:
- We go to the official Samsung support website and find Kies (for Android up to version 4.2) or Smart Switch (for Galaxy with Android version older than 4.3).
- Scroll to the column “Download for Windows" and click "Download».
- Save the Setup file with the .exe extension in any folder (for example, Downloads).
- Run the downloaded file with administrator rights .
- We agree with the license.
- We are waiting for the installation to finish.
What is “Cached Data” in Android phones and smartphones
The program will pull all current drivers from the network automatically after the first launch (do not uncheck the box at the end of installation or use the shortcut) and connect the gadget to the computer via USB.
You can simply download the driver from any site on the Internet - for example, for developers, but it is still recommended to use official downloaders to avoid problems.
Creating a Backup
A backup copy will be needed if you want to save all the information from your phone - especially contacts and photos. When reinstalling application data will be deleted , but all personal files can be saved by first downloading a copy somewhere to your computer.
You can do this using already installed Smart Switch or Kies , or use the Google cloud.
Google Cloud saves everything – including your phone settings. You can upload directly from the gadget:
- Go to settings - accounts .
- Select Google .
- We select everything that should be saved before Samsung firmware in the Synchronization .
- Click the “ Synchronization ” button (in the drop-down menu at the top).
- We return to general settings and look for “ Reset ” or “ Backup and reset ”.
- Select the “ Data backup ” and “ Auto recovery ” toggle switch for Google backup.
- The next time Samsung starts up with the same gmail account, all information will be automatically pulled from the servers.
Important! With this method, only those contacts that were linked to a Google account will be saved. If any contacts are in the phone's memory, they will be erased.
If you want to upload to your computer , use Kies or Smart Switch (below are instructions for this program):
- Launch the program and connect the phone via USB.
- We are waiting for the model to appear in the program .
- Click BackUp.
- We are waiting for confirmation from the program that everything is ready.
What is firmware and when is it needed?
Firmware is usually called the version of the operating system (OS) of a mobile device. Replacing a version or part of it is more accurately called flashing. It is required in two cases: if the modest capabilities of the official version of the OS do not suit you or if problems arise in the operation of the gadget. The cause of slowdowns, application freezes, spontaneous reboots and other failures may be the installation of third-party applications or infection with viruses that can penetrate from the Internet, from unverified media, or when connecting to an infected computer. Reinstalling the system will help solve these problems, but if it fails, the new firmware has bugs or does not match your device, there will be even more trouble. Only accuracy and the use of reliable software sources will help.
Firmware can be single-file or multi-file. In addition to the official ones, there are also versions of Android created by third-party developers. They are called “custom” - custom, which can be translated as “created to order” or “to the user’s taste.” Compared to simple and reliable official versions, custom versions provide advanced users with advanced capabilities, but at the same time make it easier for viruses to penetrate the device. Installing custom firmware completely voids your warranty, since the manufacturer cannot be responsible for versions it has not tested, but as a reward for the risk, you will receive more diverse functions.
CyanogenMod is one of the custom firmwares for Android
The firmware also differs in its content: it can be the firmware of the system kernel, modem, or Recovery, i.e., recovery mode. In official versions of Android on most devices, Recovery Mode is only responsible for resetting and restoring the system, but in custom versions it also performs other functions, including flashing the OS, creating backups, etc.
Enabling Download Mode
You still can’t just start flashing the firmware - Samsung must be launched in a special download mode (often called Downloading or Bootloader ).
If your phone is connected to your computer, disconnect it now.
Important! Different gadgets enter download mode in different ways.
On new devices
Flagships with Bixby button can be sent into mode like this:
- You need to press three buttons - first Bixby, then the arrow volume down along with the button inclusion.
- The buttons should be held until the word Download .
- Additionally, press the volume up .
On regular devices
Non-flagships and other Samsung devices without the Bixby can be sent to mode like this:
- Turn off Samsung completely.
- Press the buttons together volume down, inclusion And central on the bottom panel.
- Wait for the black warning screen and then click volume up.
On devices before 2011
The instructions are similar to the previous one, only you need to press two buttons:
- Turn off the phone.
- Press the power button and together with it the volume down .
- We wait for the word Downloading and release it.
If it doesn't help
Such button pressing may not be possible for everyone, so there is an ADB RUN program that can send the device to boot mode via a PC:
- Download the application.
- On the device itself, go to the settings and install USB debugging , if it is not already installed (Settings - About the device - Tap the build number 7 times or more - Exit back - For developers - Activate the function with a slider or check mark).
- We connect the device to the PC via USB.
- Launch ADB , select Menu and item number 4 – Reboot Devices .
- Select point 4 again - Reboot Download (Samsung)
- The device should go to Downloading .
How to control your computer from Android devices
Odin Mode
Unlike regular Android gadgets, Samsung devices have an additional bootloader mode – Odin Mode. In fact, this is an analogue of Fasboot Mode or Bootloader on other Android devices. It allows you to use third-party software from your computer for flashing.
To enter it, you need:
- Turn off your smartphone or tablet.
- Press: Volume Down , Home and Power . Do it all at the same time.
- Wait until the device prompts you for Odin Mode and press Volume Up to confirm your choice.
- This will appear on the screen, which means you can start flashing.
To exit Odin mode, just restart your smartphone.
Failures during flashing
If there is a failure during the firmware installation or, after its completion, the device does not reboot normally, you should use the tool provided for this case (Hard Reset). This mode returns the device to its initial factory settings.
- Launch Recovery Mode by holding down 3 buttons: volume up, center (Home) and power.
If the transition fails, do it using ADB. Launch Recovery Mode by pressing Volume Up, Home and Power buttons - Open wipe data/Factory reset and check the wipe data box. Click OK.
- After resetting the settings, flash the device again.
How to flash
If the drivers were loaded using Kies, it is recommended to remove it and clean the computer using CCleaner before starting manipulations in Odin.
The first general steps of flashing the firmware via Odin look like this:
- The utility must be launched from Administrator rights (right-click on the Odin.exe file).
- We take a Samsung smartphone or tablet (must be charged more than 60%), put it into bootloader mode according to the instructions in the previous section.
- Connecting device via USB to PC. It should appear in the Odin program - the field will be filled in ID:COM, and in the Log box it will be displayed Added.
- Select the firmware (instructions for different types are described below).
Single-file
To download firmware packed into one file (when all options are in one), use the AP or PDA :
- Select the firmware file from the folder (unpacked) and open it as standard.
- Odin will start checking the file, after which it will be displayed in the column AP or PDA exactly the same as it was named in the folder.
- Choose Options – tab next to Log. In it you need to remove all marked positions and leave only Auto Reboot And F. Reset Time.
- To start the device firmware process, click Start.
Log tab will show what is happening, and the operation progress .
When the process is finished, the last line in the Log field will read All threads completed , and a green display will appear at the top of the field that says Pass .
The entire process usually takes from 2 to 10 minutes.
Multi-file
When an archive contains more than one file, this means that all components will be installed separately. Used in cases of serious damage and serious system failures.
All first steps are identical to the process of installing single-file firmware. The folder usually looks like a set of 5 elements (the first characters of the names are consonant with the Odin columns - this is where each of them will need to be uploaded):
So, the data is unpacked, the utility is ready and turned on, let's start uploading:
- Click on the button first column, select the desired file and “Open”, then the second – select a file – open, and so on with all components from the folder. The result should be the following picture:
Important! Users of new versions of Odin and Android should note that the names of the buttons have changed in later versions:
- Let's go to the tab Options. Again, we leave only two values out of all.
- Click “ Start ” and wait until the process stops and displays the Pass value.
PIT file
PIT is used when memory needs to be re-partitioned . It can be loaded both with simple and complex firmware - this is an additional option, which, however, is better not to use in case of minor problems with Android. Incorrectly partitioned memory sections can completely brick a smartphone.
Why I can’t hear the interlocutor on the phone - causes and troubleshooting
To install in this way, follow the following sequence:
- We download the files according to the instructions in the previous sections.
- The PIT tab is next to the tab Options. After clicking on it it will come out warningthat this option is for engineers and specialists. If you are confident, click OK.
- Click on the one that appears button PIT and select the file in the standard way.
- When everything is loaded we go back to Options and select, in addition to the two standard options from the previous instructions, also Re-Partition.
- Click “ Start ” and wait for the installation to complete.
Custom
Installation of an unofficial (custom) system is done so that Android works better and is more optimized.
Before you begin installation, you will need to download archives - for example, Linage OS or Omni Rom, and Recovery TWRP.
Further:
- We download the archive from Recovery to the computer, and the archive with the system to the root folder of the smartphone or to a memory card.
- We put the smartphone into bootloader mode and connect it via USB.
- Turn on Odin , wait until everything is determined.
- Place the Recovery file in PDA column .
- We are waiting for it to install .
- The smartphone will reboot - you cannot allow it to boot completely, you need to turn on in Recovery (identical to turning on download mode).
- Select on the screen install zip and the path where to install it.
- We find it in the list name – navigation using volume buttons.
- Confirm installation of a new version.
- The Android man and the installation progress will be displayed on the screen
- Execute Wipe and reboot the smartphone.
The first login to a device with a custom system will take about 10 minutes - don’t be afraid of this. Then you will be able to configure the system and use it as usual.
How to choose firmware for Samsung
The first step is to decide how many files should be in the firmware. There are two types of firmware released for Samsung:
- Single-file – simple firmware, great for updating a smartphone
- Service (Multi-file) – 4-file firmware, which is best used to restore smartphone software
Also, firmware via Odin can help with memory re-partitioning; a PIT file is used for this. In simple terms, you can take memory from the built-in storage and give this memory for installing applications. It is better not to use a PIT file unless necessary.
All new Samsung devices have restrictions on system rollback, which is related to the bootloader. You will not be able to install firmware with a bootloader version lower than what is currently installed. To find out which firmware is right for you, follow these steps:
- Open Settings - About phone
- Find "Software Version"
- The first 4 characters after the device model are the bootloader version
Samsung firmware with the same bootloader version will suit you. . If you can’t decide which firmware to download, write your device and software version in the comments, indicate your wishes and I will select the firmware for you.
Possible errors when flashing firmware via Odin
The user may encounter various malfunctions:
- Refuses to start Samsung after the procedure - you need to try again to install a suitable archive (download it again) or reset the data from the Recovery menu - Wipe Data.
- Odin does not see the device - values 0 in ID:COM and Log. You should check that the smartphone is in the desired mode and that the USB cable is not damaged. To flash without problems, the cable must be original. You can also install a different version of the program, remove Kies, reinstall the drivers, or turn off the antivirus during the process.
- Broken file . The phrase “MD5 hash value is invalid” in the Log box – download or delete the extension.
- Installation stuck on initialization – select a different USB port or use a different computer.
- Problems during loading new sections – a broken or unsuitable file for the smartphone. They often occur when installing an Android version lower than the one on the smartphone. It can be treated by redownloading or rebuilding system files.
- Memory corruption during installation PIT – sometimes only turning to specialists helps. You can also try installing an archive with separate 4 components and PIT for it in Odin. Errors may sound like “get pit for mapping” or “re-partition operation failed”.
- No access to partitions - USB and OEM debugging is not enabled, and remote control is not disabled in the phone settings.
Answers on questions:
What should I do if Odin doesn't see my phone?
Reinstall the drivers and restart the PC, check your USB cable, better connect another one. Also try using a different USB port.
In the mobile world, “firmware” refers to the version of a device’s operating system. For example, when they say “flash a device,” they mean “install a new version or a new shell for the system.” “Reflash the device”, respectively, “reinstall the system”. For flashing Android devices, for example, there is a special program - Odin. Reinstalling the system on a phone or tablet with its help will not be difficult.
Firmware used to be the name given to the contents of a computer's memory. There were no hard drives then; memory on magnetic cores was used. Such machines were called ROM (read only memory). The memory consisted of U- and W-shaped cores with a small gap of 1 mm into which the wire was laid. In one position the wire meant “0”, in the other “1”. The wire was pulled manually using a “pencil” device that resembled a needle. And this dreary and painstaking work was called “firmware”. The result was almost always errors, which could only be corrected by cutting the wire and placing it in the desired position (1 or 0). This was called flashing.
