Today, many users of Apple products who have just purchased a new device often encounter some problems that may arise during operation. Although, frankly speaking, this can hardly be called a problem, because these are simply features of Apple products. Features that you need to get used to and over time understand that everything here is thought out to the smallest detail. In this article we will look at the question of how to delete music from an iPhone. There are several ways to delete music, and we will now talk about all of them in detail.
Method 1: Delete individual songs directly from the phone itself
So, if you have an iPhone in your hand and you urgently need to erase several music files from it, then this can be done as follows:
- We swipe our finger across the screen, as a result of which we unlock the device and get to the main menu of the phone;
- Next, click on the “Music” icon and get into the phone’s music player, which in earlier versions of the firmware was called “iPod”;
- We “automatically” go to the “Songs” subsection, where all the tracks that are saved in the device’s memory are located;
- Scroll the slider to the song you want to delete.
- When the desired track is found, we drag our finger over its name. Attention: you need to swipe from right to left;
- After this action, a “Delete” button appears opposite the song, by clicking on which we confirm the removal of the track from the device.
Using this method, we can remove one or more unnecessary songs from our phone. Now let's move on to a method that allows you to completely delete all songs from your iPhone.
iOS Features
In 2015, the Apple Music streaming service launched, expanding the capabilities of working with music on the iPhone. Users can now do without the constant synchronization of new songs through iTunes, replacing it with a cloud one. With the latest iOS updates, smartphone storage management has become more flexible. To work with multimedia files, a PC is practically not needed.
Music app
Music control on iPhone is concentrated in the application of the same name. In it, you can change various playback settings, interact with the cloud, and delete unnecessary content.
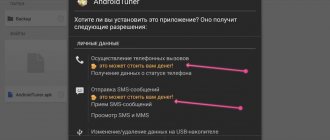
- On the main settings page, we go down to the last block containing multimedia applications. Below it will be only programs independently installed by the user.
- Using the switch indicated by the arrow, we can immediately erase from the smartphone all previously downloaded tracks for offline listening, turning off communication with the cloud. The music will remain on other devices and will be available for listening online, but it will not take up space on the device. Numbered items allow you to selectively delete tracks or limit the maximum space occupied.
- Swiping in the direction indicated by the arrow on any composition opens the delete menu. If you use this gesture on an item indicated by a frame, you can quickly delete all saved songs at once.
Method 2: Delete all songs from your phone
- Unlock the phone and go to the “Settings” section;
- Next, go to the “Basic” section and go to the “Statistics” subsection. We're in the middle of our iPhone's stats;
- Find the “Music” item and go into it. This item displays information about how much space in the device’s memory is occupied by downloaded music files;
- To delete ALL music at once, swipe from right to left under “All music”. The “Delete” button will appear, by clicking on which we will erase all music files;
Be careful: this method will delete all music from the device, which can only be restored through the computer with which the iPhone was previously synchronized.
The above two methods were demonstrated on firmware version 7.0, however, if you have firmware version 5 or 6, these methods will also be suitable. On earlier firmware versions, deleting music files directly through the phone is not possible.
Well, now we know how to delete music from our phone without syncing with iTunes. Well, now we’ll look at ways to delete music from iPhone through a computer, and in particular through iTunes.
Delete movies and TV shows
- To delete videos downloaded to your iPhone, iPad, or iPod touch, use the Apple TV app or Settings.
- To delete videos downloaded to your Mac, use the Apple TV app.
Delete items in the Apple TV app
- Open the Apple TV app.
- Click "Media Library."
- To remove an item from your Mac, hover over it, click the More Options button, and then choose Remove Download. To remove an item on your iPhone, iPad, or iPod touch, tap Downloaded, swipe left on the item, tap Delete, and then select Remove Download.
Delete movies and TV shows in the Settings app on iPhone, iPad, or iPod touch
- Open Settings.
- Tap General, then select iPhone Storage or iPad Storage.
- Scroll to the TV section, tap it, and then select View Apple TV Downloads. If you don't have any downloads on your device, View Apple TV Downloads won't appear.
- Find a movie, TV show, or episode to delete, then swipe left on the item you want and tap Delete.
If you can't delete movies or TV shows
If a download button appears next to an item, the item is stored in the cloud and does not take up storage space on your device. If you don't want an item to appear in the cloud, hide it.
If you manually synced movies and TV shows from your computer to your iPhone, iPad, or iPod touch using a USB cable, turn off syncing.
Rented films are automatically deleted at the end of the rental period.
Method 3: Delete all music using a computer
- Go to iTunes and select the “Music” section;
- We see a list of musical compositions that are present in the library;
- To delete ALL music files from the iTunes library, simultaneously hold down two keys on the keyboard: “Ctrl + A”. As a result of this, all songs will stand out;
- Next, press the “Delete” key on the keyboard. The program will ask for confirmation to delete all music files. Once we confirm, all music will be deleted.
Multiple files
How to delete songs from iTunes? You can use the previously proposed method using one interesting technique. It will allow you to delete several songs at once.
The thing is that to delete several melodies from the library you will need to press Ctrl. Next, you need to use the cursor to select the desired documents. Once all the melodies have been selected, you can use the previously proposed guide to complete the task. Fast, simple, convenient. But that's not all!
Method 4. Delete individual songs from iPhone using a computer
- Similarly to the first method, go to the iTunes program, to the “Music” section;
- A list of all the compositions opens before us again;
- Select the song you want to delete and right-click on it;
- A small menu opens in front of us, in which we find the “Delete” button and click on it;
- We confirm the deletion.
Be careful: if you delete music files from your iPhone using iTunes, they will first be deleted from your iTunes library, and will only be deleted from your iPhone when the phone is synced with the program itself. Not everyone will be happy with this option, because many will want the track to be saved in the library so that it can be returned to the phone again. For such cases, there is another way to delete music from iPhone.
If you can't delete media files
You need to make sure that the track is not located in a smart playlist when you enable the “ Live update” option. It is also possible that the tracks in iTunes 12.9 were manually synced to the mobile device via USB. In this case, you need to disable synchronization.
It happens that a user does not want to leave a specific purchase from the Store in Apple Music, but at the same time does not want to delete it either. The solution is to simply hide it.
Regardless of the program version, the process of deleting music is always approximately the same. The main thing is synchronization between iTunes and iPhone / iPod / iPad.
Method 5: Delete music files and save them in your iTunes library
- Using a USB cable, connect the iPhone to the computer and launch iTunes.
- Click on the iPhone button and get into general information about the phone;
- Go to the “Music” tab;
- If we need to delete all music tracks from the iPhone, but keeping them in the library, then simply uncheck the “Synchronize music” item and click on the “Synchronize” button at the bottom of the screen;
- If you need to delete individual tracks, then scroll the slider to the “Songs added manually” item. Before us there will be a list of those tracks that were previously added to the iPhone. To delete a specific composition, simply select it and click on the “Delete” button. After that, click the “Synchronize” button at the bottom of the screen.
So, in this article, we have described in detail five ways in which you can delete music from your iPhone. We sincerely hope that this article was useful to you.
PS As often happens, everything described above is also suitable for deleting music from iPad.
How to organize music on your phone
Track sorting is necessary if the user needs to sort songs according to a certain criterion. Both on iPhone and Android phones there is the ability to sort tracks. To do this you need:
- Open the program through which the user listens to all tracks. This can be either “Music” on Android or “Player” on iPhone;
- After this, the user should open any playlist and look at the top line, which, as a rule, displays the sorting order of the tracks;
- It is worth clicking on the inverted arrows that are directed in opposite directions - they indicate sorting;
- After this, the user should choose any of the proposed sorting methods, starting by time of addition, ending with the number of plays.
This way the user can sort all the tracks he has on his phone.
Note! On iPhones there is exactly the same function in the player settings.