Simple ways to fix the problem
If the computer where the error occurred had an operating system installed and working properly - Windows 10, Windows 11 or any other, and the error appeared suddenly, and no actions were taken to change the BIOS/UEFI settings or hardware configuration, the first thing you should try is:
- On the screen with the error Reboot and Select proper Boot device, turn off your PC or laptop by long pressing the power button.
- Disconnect any unnecessary external storage devices from your computer: flash drives, memory cards, external HDDs or SSDs, CDs.
- Turn on your computer again.
In some cases, these 3 steps can help and fix the error. If the error disappears, but later appears again after shutting down and turning it back on (sometimes not immediately, but only when you turn it on the next day), disable Windows Fast Startup.
Please keep in mind (I am writing specifically for novice users): in order for the error to be corrected in principle using any of the methods described here, the operating system must be installed on the computer (or it must be booted from a bootable flash drive or disk). For example, if you just installed a new blank disk on your PC, the error will continue to appear until you install the system on it.
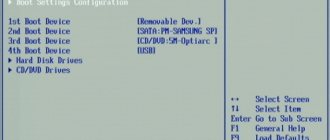
Boot order and boot options in BIOS or UEFI
If this does not help, we use the following relatively simple approaches and information:
- If an error occurs when booting from an installation flash drive, study the reasons and solutions from the material BIOS/UEFI does not see the bootable flash drive - what to do?
- Go into the computer's BIOS/UEFI and check whether the hard drive or SSD you want to boot from is visible and make sure that it boots by default (you may need to select Windows Boot Manager for UEFI systems as the first boot device if there is one point). If this is not the case, set the correct boot order. How to change the boot order in different BIOS versions, in relation to a flash drive (but the same will happen with HDD/SSD) is described in this manual.
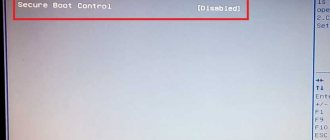
- If you updated or reset the BIOS/UEFI, the computer has not been used for a long time or has a dead battery, and is unplugged at night, try changing the boot mode: enable UEFI instead of Legacy (CSM) or vice versa, disable Secure Boot. This topic is also covered in the instructions mentioned above.
- When one of the points above helped, but later the BIOS parameters are reset and the error appears again, you may need to change the battery on the motherboard.
HDD or SSD drive is not visible
If the disk from which you need to boot is not visible in the BIOS/UEFI either in Legacy mode or in UEFI mode, and you have recently carried out some work inside the computer case, for example, cleaned it of dust, or if an error occurs after transporting a PC or laptop, check the HDD or SSD connection (for PCs - interface cables both from the drive itself and from the motherboard, as well as power cables). If the boot disk disappears after connecting an additional disk, check whether the situation will be corrected if you disconnect the newly added disk.
If we are talking about M.2 SSDs, then remember that they are different: with a SATA or NVMe PCI-e interface and the connectors on the motherboard may not support all M.2 drives - check this in the specifications of the specific motherboard. This may be applicable if such a system disk was installed into the current computer from another computer.
When, after completing the steps and checks, the disk is still not visible in the BIOS, the methods described below will not work: try disconnecting the disk and checking its functionality on another computer, there is a possibility that it will fail. If it is fully functional on another computer, replace the connection cables on the problematic PC, and also keep in mind that sometimes such symptoms (some of the drives are not visible) occur when connecting multiple devices within one SATA controller, or when there are problems with the power supply.
All of the above methods for solving the problem are suitable in cases where everything is fine with the disk and the system is installed on it, the bootloader is working and the files are readable, but this is not always the case.
Checking the system board
The most common cause is swollen capacitors or a faulty SATA connector.
In the first case: visually inspect the capacitors on the motherboard. Their surface should be smooth and flat, they should not have any bulges. If it is clear that the capacitors are swollen or burst, then they need to be replaced. The service center specialists will help you with this. The procedure is quite fast and does not take much time.
In the second case: connect the SATA cable to another connector and check operation.
If you bought a new HDD drive, made sure that it works by connecting it to another PC, but does not want to appear on yours (even in the BIOS), then most likely the motherboard is faulty.
Additional ways to fix the Reboot and Select proper Boot device error
All of the following fix methods assume that the hard drive or SSD from which the boot should be performed is visible in the BIOS/UEFI of the computer or laptop, but manipulating the boot parameters does not help, and the error Reboot and Select proper Boot device or Insert Boot Media in selected Boot device and press a key is saved.
Windows boot loader
What could this mean? First of all, but not always, about damage to the bootloader or partition with the bootloader. You can try to restore it:
- Restoring the Windows 10 bootloader
- How to restore the bootloader of Windows 7 and 8 (8.1)
Attention: if an error occurs after you replaced one of the computer disks (not the system one), this may indicate that the bootloader was on the replaced disk, although Windows itself was on the remaining one. Solution: manually create a partition with a bootloader (discussed in the article about the Windows 10 bootloader), or reinstall the system from scratch.
If, while trying to restore the bootloader, you are faced with the fact that there are RAW partitions on the partition (this will be visible during the process), missing necessary partitions, or other problems with the file system that were not there before, check the hard drive or SSD for errors in the command line (you will get there by following the steps to fix the bootloader from the previous instructions). How exactly to do this is described; the check is described in the article How to check your hard drive for errors in Windows.
Disk failure
In conclusion, about the least pleasant possible reasons - problems with the “boot device” itself, that is, the system hard drive or SSD of the computer. If the BIOS does not see the hard drive (or sees it, but operations with it, including on another computer, cannot be performed), and the HDD may make strange sounds (but not necessarily) - physical damage and failure are possible. that's why the computer won't boot. This can happen due to the laptop falling or impacts on the computer case, sometimes due to unstable power supply, and often the only possible solution is replacing the drive.
Recovering the Windows bootloader
If booting from external media is successful, but the main disk continues to refuse to boot the system, then another reason may be damage to the boot information on this disk. After all the manipulations with the BIOS, the message displayed instead of the usual OS boot may change:
"No boot device available—No bootable devices—strike F1 to retry boot, F2 for setup utility"
This indicates that the drive was found, but there is no boot record on it.
There are at least 2 possible solutions: reinstall the system or try to restore boot information. Let's consider the second option. You will need a Windows distribution disk. Sequencing:
- Boot from the installation disk.
- When the “Windows Installation” window appears, click on the “System Restore” link in the lower left corner.
- Click on “System Recovery Options”. There are 2 options here - roll back to one of the backup restore points or try to restore the Windows bootloader. Next, let's look at the last option.
- Select the desired OS and click “Next”.
- In the “System Recovery Options” window, select “Command Prompt”.
- In the window that opens, enter the following commands: “bootrec.exe /fixmbr” and then “bootrec.exe /fixboot”.
- Now you can close the window using the “exit” command and reboot.
If the problem is not solved, then you can either restore the previous state using a backup point, or resort to radical measures and reinstall the system.
Cleaning RAM contacts
The error may occur due to RAM issues. In order to eliminate it, you can do the following:
- It’s easy to press the memory bar with your finger and move it in different directions. The problem may be poor memory contact with the slot;
- Remove the sticks, clean and blow out the connectors and insert the RAM sticks back;
- You can swap the slats if there are several of them;
- You should also remove the memory sticks, leaving one connected. If loading occurs with any of them, then the others should be diagnosed.
Additional Methods
All of the above helps in almost all cases, however, there are exceptions and then you can try the following:
- Disabling the "Secure Boot" option in the BIOS settings.
- Switching the “UEFI” option to “Legacy” and vice versa.
- Changing SATA parameters from AHCI to IDE or vice versa.
- Swollen capacitors inside the power supply, which is why the power supply does not operate at full capacity. The solution is to replace damaged capacitors.
- Open the "power" panel, go to change settings and change power settings. Go to the “Hard Drive” section and set the “turn off after” option to “never”.
- Reinstalling Windows.
Recommendations for preventing such malfunctions
Now I suggest you familiarize yourself with the main list of recommendations that will warn you against such problems and help you detect and eliminate them in time:
- Always use UPS. This will solve the problem with voltage drop in the electrical network.
- Change the BIOS battery periodically, especially when you start to notice that the current time and date are reset to several years ago. Typically the battery lasts for 3-5 years.
- Trust PC setup only to competent people who understand this matter.
- Be sure to install an antivirus, even if you consider yourself an experienced user and download files only from trusted resources. They will protect you from sites that automatically download viruses to your system.
- Check the HDD for errors from time to time. This will allow you to timely detect and eliminate the malfunction, while preserving the information on it.
- Create a copy of all important data that should preferably be stored on another drive. You can also create a backup of the system partition and restore it after an unexpected failure. This is done using the True Image program.
If none of the methods helped you and the computer still does not turn on, then ask your questions with a detailed description of the entire situation, and we will solve the problem together.