Images on the Internet perform a lot of important tasks: they simplify the perception of information, break up walls of text, clearly demonstrate described actions, etc. We are deprived of all the listed privileges if the Yandex browser does not display images on sites, this makes the information more difficult to perceive, and the page loses its visual appeal. Pictures in text have already become an integral part of Internet content, without which it is difficult to imagine comfortable surfing, so they need to be returned. The good news is that images are easy to return to pages. To restore the display of pictures in the Yandex web browser, we have collected 7 working solutions.
Why are pictures not displayed in the Yandex browser?
If pictures have disappeared in the Yandex browser, we can conclude: something in the system is blocking the loading of images, there are problems on the server, or a system failure has occurred. These are common causes of failures that include a number of root causes of failure.
Reasons why pictures are not shown in Yandex browser:
- There are no photographs and screenshots on the sites due to the prohibition of their display in the browser settings;
- Some extensions block display;
- The browser crashes due to cache and cookies;
- The system is damaged by malicious code;
- Yandex browser is not installed correctly;
- Poor internet quality;
- The site servers are undergoing maintenance;
- The site is overcrowded or attacked by hackers, making it unable to withstand the load;
- JavaScript is disabled in the browser, and on some sites images are loaded via JS;
- There is not enough space on the C: .
As we can see, there can be a lot of reasons why pictures do not load in the Yandex browser. Unfortunately, it will not be possible to find out in absentia what exactly triggered the failure. The only way to get images back is to check all the faults one by one. At one stage, it is usually possible to return images to web resources.
Reason #1: Cache and cookie full
As you know, while browsing the Internet, the browser writes hundreds of temporary files to your hard drive. This helps speed up loading sites and “remember” what you did on different resources. However, if you do not periodically clear the memory, over time the program begins to slow down and work incorrectly, which sometimes leads to images not being displayed in the browser.
It is necessary to delete cache files and cookies that have accumulated over time. To do this, open the history of visited pages (via the menu or the hot combination Ctrl+H), click the “Clear” button and select the appropriate items. Finally, it is recommended to restart the program.
What to do first
First, make sure that the problem is specific only to the Yandex browser. Launch another browser, Chrome - it is created on the same engine, or standard Edge. Next, check the speed of your Internet connection. There are a lot of resources for this, for example, Speedtest. An application of the same name has been created for the Android platform. If the connection is very slow, the problem can be considered normal.
The publication is not a step-by-step instruction. Tips and recommendations are given in random order and not in order of priority. To resolve the problem, you need an integrated approach, analysis and enumeration of options.
When using a router, you can reboot it, this often solves the problem.
None of the above helped
Consequently, the problem lies much deeper, but there is no need to worry, since everything can be solved.
- First, check your computer with an antivirus program; perhaps an enemy has entered your computer. It is better to update the database with an antivirus program before doing this.
- Check your internet connection - for this I would try a speed test on speedtest.net . If there is a problem with the Internet, you can call your provider. I also advise you to read this article, which will help solve the problem with the Internet.
- If you use VPN programs or other similar applications, then disable them.
- The system may have programs and applications installed that interfere with the operation of the computer. I advise you to perform a comprehensive cleaning of everything unnecessary - this is written in more detail here.
Extensions
Pictures may not open due to browser add-ons:
- Through the main menu, go to the extensions tab.
- Disable the latest installed ones, restart your browser and check if the problem is resolved.
By searching, you can identify the problematic module.
Can't log into the VKontakte app
This problem occurs often. First of all, you need to check whether the problem is in the computer or in the application. To do this, you first need to try logging into the application from a phone or another IP address. If the application opens, then the problem is with your computer. First of all, there may be a problem with the browser. Some applications do not work with Internet Explorer - then the problem will be solved if you install another browser. Requires the latest versions of Google Chrome, Opera or Mozilla Firefox. The problem may be related to your Internet connection. To check if this is the reason, you need to turn off the Internet, and after a few minutes log into it again. If the problem is not solved, then you should try clearing your cookies.
DNS cache
We launch the command line as an administrator - to do this, click on the “Start” menu, then enter “Command Prompt” or “cmd” in the search bar, right-click and select “Run as administrator”.
Next, enter the command:
ipconfig /flushdns
After this, reboot the PC.
Find on social network
On social networks, not all users publish personal photos on their pages. If the photographs are real, then it will still be difficult to find the girl you like without knowing her first and last name. Let's figure out how you can find a person on Odnoklassniki and VKontakte only by photo.
The FindFace service can find people by photos on Twitter (https://findface.me) and VKontakte https://findface.ru/. Read more about this in our article How to find a double from a photo.
The VK Fake service https://vkfake.ru/photo-search also searches for people on VKontakte. Let's look at how to find a person's profile from a photo on the Internet. Paste the address of the original photo into the line or upload it from your computer. The site is not fast, the waiting time for results is up to 2 minutes.
You will see a list of accounts in which the specified photo was found. In addition to a specific person, using this method you can find clones and fakes – pages that use other people’s photographs.
Hello, friends! In this article I will tell you about how image search works in Google and Yandex search engines. There has always been a search for images in search engines, but it worked using words that could be found in the text next to the desired image on those web pages where the picture we are interested in is present, or words specified in the image attributes. In other words, such a search was not always accurate, since the image we were interested in was not visible to the search engine, and only the words we entered into the search string were determined.
In this regard, before the advent of the image search option, it was not possible to find the original of any picture, having only a copy in poor quality and low resolution, or, for example, you saw an image of a person in the news feed on a social network , and you would like to know who he is. And this is where the image search function, which is most convenient for such purposes, comes to our aid. This function exists in Google and Yandex search engines - the two most popular search engines in Russia (A little more than 50% of the percentage is on Yandex, and about 40% on Google).
To clearly examine the principle of operation of this function, let’s consider it using examples from both search engines.
Clearing cache
An outdated version of the page may be loading. Update it using the keyboard shortcut Ctrl + F5 . To be safe, clear your cache.
- Use the keyboard shortcut Ctrl + H to open the tab with your browsing history.
- Click Clear History .
- In the window that opens, specify the affected time period and select the “Files saved in cache” .
- Click "Clear".
After this, the first page loading on a slow Internet takes a little longer than usual.
Possible solutions
In this material, we tried to collect the most effective methods that will help solve the problem with images in Yandex.Browser. There are not so many of them, but if the reason is not determined, then you will have to go through all of them.
We will start with the simplest and most obvious options. And only if they do not work, then it will be possible to move on to more complex methods. So, let's try to solve the problem of images not loading in Yandex Browser.
Disable all kinds of add-ons
Various extensions, of course, significantly expand the functionality of the browser and make life much easier for the user. But at the same time, they require quite a lot of resources to operate. They are also able to block the loading of elements that they consider suspicious.
And that's why they should be disabled. At least just to check the operation of the web browser without them. Here are detailed instructions telling you how and what to do. You just need to strictly follow it. Then there will be no problems:
- First, you should launch a web browser. To do this, you need to use a button in the taskbar, a shortcut on the desktop, or an icon in the Start menu.
- Next, click on the button with the image of three horizontal stripes. It is located in the upper right part of the window.
- In the context menu that appears, click on the item "Extras".
- A list of installed extensions will open. Select any of them and move the switch next to the name to the position "Off".
- We repeat the procedure for all additions in the list.
- Restart the web browser.
Only after the restart will it be possible to evaluate the quality of Yandex Browser without extensions. If the pictures still refuse to load, then you need to move on to the next chapter and try another method. Perhaps he can help.
Clear cache and history
The browser's cache and history stores data about sites that have ever been visited. This information is needed in order to speed up loading when you visit the pages again. But if there is too much of it, then the cache swells to incredible sizes and can interfere with the loading of both individual content and entire pages.
Every browser has a system for clearing cache and history. You just need to know how to use it. It’s worth noting right away that there is nothing complicated about this. However, untrained users can make a mistake and delete something that should not be touched at all. Therefore, here are detailed instructions on how to clear the cache:
- In the Internet browser window, press the key combination Ctrl + H.
- A list of visited resources will appear. Click on the button "Clear the history".
- In the window for selecting parameters, in the corresponding column, enter the time period “For all time” .
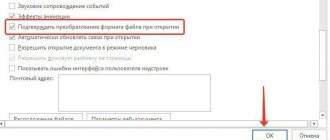
- We configure the remaining parameters according to the picture below.
- Click on the button "Clear".
The procedure itself will take about two seconds. After this, you need to restart the browser and check the adequacy of its operation. If various images still refuse to load normally, then it’s worth moving on to the next chapter of our material. Perhaps the methods described below will help solve the problem.
Updating the browser
Using an old version of the web browser can also lead to similar errors. After all, in new versions, developers fix known bugs and patch security holes. Therefore, it is worth updating in any case.
This usually happens automatically. But if for some reason the updates do not arrive, then you can try to perform this process manually. Here are detailed instructions telling you how and what to do.
- First we launch the browser. To do this, you need to use a button in the taskbar, a shortcut on the desktop, or an icon in the Start menu.
- Then click on the button with three stripes, which is located in the upper right corner of the main web browser window.
- A context menu will appear in which we hover over “Advanced” .
- Next, select the item "About the browser".
- Next, a check for the availability of a new version on the servers will begin. After checking, click on the button "Update".
The update process will begin immediately. This procedure will restart your web browser. After the restart, you can start testing the browser. If the error continues to occur, then move on to the next chapter. It describes the most radical way to correct the situation.
Resetting settings and user data
This is a very radical step. After the reset, the user will be left without his settings: including bookmarks and installed extensions. In fact, the browser will take exactly the same appearance as when reinstalled. However, this is the only option if all else fails. After it, the web browser should definitely download all the required content.
The reset option is hidden in the depths of the browser settings. This was done to prevent inexperienced users from accidentally deleting their settings. However, you can get to this function. You just need to follow the instructions very clearly and not engage in amateur activities. To perform a reset you need to do the following:
- First, launch Yandex Browser using a button in the taskbar, a shortcut on the desktop, or an icon in the Start menu.
- After this, click on the button with the image of three horizontal stripes, which is located in the upper right corner of the main web browser window.
- Now a context menu will appear in which you need to click on the item "Settings".
- Go to "System" .
- Let's activate the corresponding option.
- We confirm that the procedure has been completed.
During the reset, Yandex Browser will restart. After the restart, you should close the web browser again and restart it after a while. If this method does not help, then move on to the next chapter.
Recovering operating system files
If removing viruses did not help much, then the malicious objects probably managed to damage the operating system files that are necessary for the normal operation of Yandex.Browser. Due to the lack of elements, the web browser behaves inappropriately and refuses to load pictures normally. This happens quite often.
The good news is that standard system files can be easily restored. Moreover, using standard Windows tools. To carry out this procedure we will use the command line. There is no need to be afraid of the console. If you do everything strictly according to the instructions, then nothing bad will happen.
- Launch the Start menu and immediately move to the System Tools - Windows .
- “Command Prompt” item in this folder and right-click on it.
- Next, select "Additionally" and then click "Run as administrator".
- A console window will appear. Enter the command sfc /scannow and press Enter on keyboard.
The process of scanning and restoring system files may take 15 minutes. After completing this procedure, you must close all windows and restart your computer or laptop. Only after a restart can you check the functionality of the browser.
Settings
Another reason why pictures do not load in Yandex Browser is the ban on downloading them. It is installed/removed in the settings. Allows you to save traffic and increase page loading speed:
- Open the browser configuration, and in the “Sites” , click on the “Advanced settings...” .
- Move the “Display pictures” to the “Allowed” .
Go to the sites settings and look at the black list; perhaps the target site is included in the list of resources for which loading graphic files is disabled. When visiting such pages, an icon with a crossed out thumbnail of the picture is displayed on the right side of the smart line. Click on it and activate the function of displaying graphics on the resource.
How to save a WEBP image in a more general format?
Open the Chrome, Yandex or Opera browser on any platform - these are the only two major browsers that support displaying WEBP images. Go to a site that uses WEBP images, all images at play.google.com are in an economical format.
Right-click or long-press one of the images and click the "Open Image in New Tab" button, you will get a WEBP image with its URL at the top of that tab. This link is directly to the image object, which you can edit and change the file format at the same time. It's almost a miracle what a browser can do.
Click the URL bar, remove the last three characters in the address ( "-rw" ), and then press Enter. The same image will be displayed again, but this time it is displayed in its original format, usually JPEG or PNG.
Right-click or long-press the image and then select the "Save Image As" option. Which will save it in its original format - just like any other file.
Reason 4: Problems on the site
If a failure is noticed on only one site, there is a huge chance that your browser and Internet connection have nothing to do with it. Often errors occur on the resource side, and it is not possible for the user to correct them. Provided that the site is still being actively maintained, the administrator most likely already knows about the problem and is working on fixing it. Or, if the hosting on which all the pictures are stored is to blame, he does it.
Wait a few minutes or hours - errors will usually be resolved within this period of time. However, this should not be expected from very old and abandoned addresses. As a rule, this kind of thing is not corrected there, since the administrator is no longer involved in the life of the site.
Sites do not open completely: the first solution and search for the reason
To begin with, I advise you to close your browser and restart your computer or laptop. Perhaps everything will work great. If your Internet connection is via a router or modem, you can also reboot it. It definitely won't hurt.
Since nowadays a router is almost always installed, and all devices connect to the Internet through it, check how sites open on other devices. You can even check it on Android or iOS smartphones and tablets. But it’s better, of course, on a computer. If possible, connect your computer to another Internet. For example, to another Wi-Fi network, which can be distributed even from a phone.
Check how everything works through another browser. Even standard. Remember, maybe you installed some add-ons or programs before this.
Disable your ad blocker if you have one installed. For example: Adblock, Adguard, AdMuncher.
This way we can understand the cause of our problem and where to move next. You can describe the results of these checks and reflections in the comments. I will try to help.
Excluding a picture from the blacklist
It is possible that image files have been identified as advertisements and have been blacklisted.
- Type browser://settings in the address bar, click “Tools” - “Blocked Ads” .
- Remove the necessary files from the banned list if they were added there by mistake.
If there are a lot of materials, you will have to mark each one manually, since “Select all” .
Graphic file associations
It happens that the graphics viewer in Windows 7 is accidentally or intentionally deleted by the user, as a result of which when opening an image nothing happens or a window appears to select such an application.
- Call “Control Panel”.
- Call its “Default Programs” element.
See also: How to turn off your computer via the command line in Windows 7 and 10
- Click on the “Set default applications” link.
- Select one of the last utilities in the list - “Photo Viewer” and click “Select defaults...”.
We mark the types of graphic files that will be opened on a computer using a standard graphics viewer.
Click save and check whether graphic documents are opened by the specified utility.
Reinstalling the browser
- Click on “Win” and the “R” button, then enter the command:
control
- Go to “Programs and Features”
- Find your browser, right click and delete.
- After that, download the latest version and install.
And finally...
When you think about using images, there are two things to keep in mind: proper use of ALT tags, site speed, and overall performance.
ALT (alternative text) is the text that is displayed if the image has not loaded. It is also an important component of creating websites that can be used by people with disabilities. Every embedded image on your site should have an appropriate ALT tag
Please note that images applied with CSS do not have this attribute
When it comes to website performance, loading too many images or even a few giant images that are not properly optimized will also have a negative impact on loading speed.
For this reason, be sure to check the impact of any images you use in your site design and take any steps that are necessary to improve the performance of that site while creating an overall look and feel that is suitable for your internet project.
This material is translated from the site www.thoughtco.com.
It is also important to optimize the images on your site. What is it for? Read the next article for more details.
Enabling java scripts
Java scripts are small scripts that increase the functionality and capabilities of a web resource. On some sites they also dynamically display images. If scripts are disabled, pictures are not displayed. How to enable them:
- In the configuration options, click “Sites” and go to advanced settings.
- At the very bottom, find the JavaScript and move the switch to the “Enabled” .
After that, update the content of the tab.
There are exceptions here; if this method does not help, look through the list.
When pictures are not saved in Yandex Browser, you should update the browser or check if the download directory exists. Tools configuration options, change the download directory or create a Downloads in the specified path. Due to its absence, the program cannot save files to disk.
If graphic files are not displayed correctly, in the configuration settings section, disable graphics optimization, as shown in the screenshot below.
If colors are distorted, go to browser://flags and select a different color space - change the value of the Force color profile .
Resetting Yandex.Browser settings can also help solve the problem: click “Reset all settings” in the browser://settings and confirm the reset. Before doing this, copy the link to the graphic file and follow it. Perhaps the pictures have been deleted from the server and that is why they are not loading.
This is the fault of the site owner or hoster.
You can fix the problem when the Yandex browser does not show images on all or some sites without third-party help. Usually this does not work the first time, but after trying a couple of methods, you will definitely find the key.
( 27 ratings, average 1.19 out of 5 )
MTU and problems with incomplete loading of sites
I already talked about this parameter above in the article. As a rule, it is changed in the router settings. Very often, due to incorrect MTU values, problems arise with displaying pages when connecting to the Internet via 3G/4G modems. When the modem is connected to the router. But this also happens with a cable connection.
You can change the MTU in the router settings, in the section with Internet connection settings: “WAN”, “Internet”.
First you need to go to the control panel of your router.
I'll show you how to change MTU on some routers.
TP-Link
In the WAN section there is an item “MTU Size”. By default there is 1500. You can register 1460, or even 1400.
If you have PPPoE, then you need to click on the “Advanced” button and change the value there.
Save the settings and reboot the router.
ASUS
In the "Internet" section. "MTU" field.
Don't forget to save your settings.
I can't show you in detail how to do this on routers from different manufacturers. Therefore, if you don’t find these settings, write in the comments.
Reason 6: Very old operating system
In conclusion, let us mention another rare reason, which is associated with working on very old operating systems, usually Windows XP. Despite the fact that its support has long been discontinued, some people continue to use it because of a weak computer or for work purposes, where there is no point in installing something more modern and productive. In addition to the end of Microsoft's support for the system, other developers, including the creators of the browser and web programmers, also did the same. Due to the transition to new web standards that are incompatible with outdated capabilities of the same XP, developers are increasingly no longer providing compatibility when displaying pages in older versions of browsers, and it is impossible to install the latest, current versions of the browser, again, due to lack of support.
The only way out, although not a guaranteed fix for the problem, is to search for an alternative browser running on a more modern version of the Chromium engine than the latest available version of Yandex.Browser released for your OS.
We are glad that we were able to help you solve the problem.
Describe what didn't work for you. Our specialists will try to answer as quickly as possible.
Did this article help you?
NOT REALLY
Checking browser add-ons installed
If clearing the cache did not help, and the page in the browser still does not open completely, then I recommend checking the installed add-ons and temporarily disabling them (if any).
You can also do this in the browser settings, somewhere in the “Extensions”, “Add-ons” section. For example, in the Opera browser:
Disable all installed extensions for a while.
If you don’t know where these settings are located in your browser, then look at this article. In it I showed how to manage extensions in popular browsers.
Also look at what programs you have installed and running on your computer. Maybe you'll find something suspicious.
Resolution changed
There is probably no need to tell you that there are viruses that hide files on removable media and copy themselves with the names of hidden directories and files in place of the objects located there. When you double-click on such a photo in Win 7, it does not open, but a malicious code is launched that performs programmed operations.
The first thing you need to do is scan the catalog with problematic photos using a reliable anti-virus program, for example, Dr.Web CureIt!.
The second step is to activate the option to display extensions for known document types. To do this, we perform several steps.
- Go to “Arrange” in the main menu of Windows 7 Explorer and select “Folder Options”.
- Go to the “View” tab.
- Uncheck the box next to the “Hide extensions...” option, as shown in the screenshot.
- We apply the changes and check photo extensions that do not open.
If everything is in order, move on to the next section.
How to make a picture a link
So, we have generated an HTML link, now to make a picture a link we just need to add it to the HTML code, which visually displays the picture on the screen. The HTML code for displaying the image looks like this:
You need to add the alt="" attribute to the image, which displays alternative text instead of the image if for some reason it has not loaded. By the way, a very useful attribute, more on that below. Also, if you do not add this attribute to the image, the W3C validator will consider this an error and offer to add it to the image code.
We have a link, we have a picture, but how can we make a picture a link? To make a picture a link, you just need to combine them to get the following HTML structure:
That's it, we made the picture a link.
— Be sure to sign the alt="text" attribute and it is recommended to use title="", as alternative text it is best to use the keywords of the article in which the picture is located. Search engines do an excellent job of indexing pictures and descriptions of them.
Hover your cursor over the picture, or you can click on it, since you have read the article to the end, then you may be interested in this article.
— How do you like the article “How to make a link. How to make a picture a link?
Similar articles by tags
Creating a Video Background HTML 5 This article is about creating a video background - a background video splash screen for an HTML 5 web page.
Text formatting in HTML - Callout Callouts I am publishing several examples of text formatting in HTML. Callout callouts are needed to focus the reader's attention...
Bootstrap Ken Burns Effect Carousel Slider I assembled the Bootstrap Ken Burns Effect Carousel slider and now I’m sharing it with the readers of my site….
HTML CSS in examples | snippets | Comment
AdBlock blocks images
When enabling the AdBlock extension, you need to be prepared for the fact that sites will look completely different from how they appear to other users. But if some picture is blocked, this means that it is “clickable” and is intended to go to the advertiser’s website .
In this case, you should either disable this extension for a specific resource, or accept the absence of some images.
- How to view saved passwords in Yandex Browser: detailed instructions
Turbo mode enabled
To speed up page loading, some users turn on the “turbo” mode without knowing the specifics of how the program works when using it. This is why many resources may lack images. With low Internet speeds, you just have to get used to this, since the absence of images significantly increases the loading speed .
If you want to view a certain resource with all images, just disable the specified mode or extension that was installed to speed up page loading.
Reason #5: Antivirus settings
Everyone has probably encountered overly “paranoid” software. Most modern antiviruses monitor browser activity in order to promptly monitor and block potential threats. However, sometimes due to Internet traffic caching settings, content on sites partially stops being displayed.
Go to the settings of your antivirus and set a lower level of protection, or disable caching. After that, restart the browser and see if the pictures appear.
Reason #3: Image display is disabled
It is also possible that the display of images is blocked in the program settings. In this case, the browser does not display images on all sites.
Go to the advanced (additional) options of your web browser and find the “Content Settings” or “Content Settings” item. Check the box next to “Always show pictures”, apply the changes and restart the program.
Rules to follow
One of the main rules of any publication on the Internet is its uniqueness, so it is very important to check the added image on special sites. This procedure is not necessary if the photograph was taken independently using photography.
If the picture was taken from the Internet, then you should work on it in special programs to make a unique resource. For example, you can resort to the help of any graphic editor.
In addition, regarding the image that will be added to Yandex Images, the following requirements must be met:
- Jpg, Png formats are allowed;
- the picture must certainly be of good quality (brightness, clarity, without watermarks);
- not be of an advertising nature.
In addition to the uniqueness requirement, there are additional values that must also be adhered to. Namely, it is prohibited to add images to Yandex that display:
- violence, pornography, cruelty;
- gambling;
- medications;
- extremism, racism;
- offensive words, obscene expressions;
- false (made up) information.
If the above requirements are constantly violated, then blocking of the site or temporary restriction on viewing it will be applied as liability.
Instructions with step-by-step description
It should definitely be noted that recently Yandex photos have moved to a new address https://fotki.yandex.ru/. It describes in detail what to do to be able to add your unique photos.
But even taking into account redirection, adding an image to Yandex pictures is quite simple if they are highly unique. It will be enough to follow the links provided.
Next you will need:
- Select the block to which the picture belongs, for example, if it is a dish, then accordingly it should be placed in the section related to cooking.
- Next, click on the selected section. After this, an additional block will appear on the right side, offering options for adding a picture.
- After selecting a picture, you need to follow the instructions, which are also displayed on the right side.
- Be sure to select the name of the collection where new pictures will be added. The final step is to click the “Add to new collection” button.
A very important point is that you definitely need to indicate the name of the collection, since if you ignore such a suggestion, the saved pictures will be automatically redirected to the “Unsorted” section.
But it should be said that you can still add images as before, that is, you need to open the Yandex start page and find the pictures section under the search bar.
Then select the camera icon next to the search bar and click on it. Afterwards, a page will appear indicating how to download the image.
By selecting a picture and uploading it using one of the methods listed above, you will be redirected to another page. It displays information about similar images if the picture was selected from the Internet. Next, you need to follow the instructions if the picture is unique.
Useful tips
The presented step-by-step guide on how to add an image to Yandex Images allows you to easily perform all the indicated actions. But you can also note a few recommendations that will be really useful.
For example:
- The minimum horizontal width of the added file should not be less than 400 pixels.
- You can add as many pictures to one publication as you need, since there are no restrictions on the number.
- If the user has low Internet speed, then it is better to add pictures one at a time to avoid long delays during loading.
- To drag an image to the desired location in a publication, all you need to do is grab it and drag the image using your mouse to your PC.
- To delete an image that has already been posted in Yandex Pictures, you just need to right-click on it. After this, a menu will appear near the mouse cursor, where you need to select the “Delete” line.
It must be said that you can add an image to a publication at absolutely any stage, even after the text of the article has been checked by a moderator before publication.
How to make a non-unique picture unique
As already noted, for any publication on the Internet its uniqueness is important; the same requirements are put forward for pictures that will be added to sites. This applies to cases where the image was selected from the Internet. The main methods of “uniqueness” are considered to be the use of applications such as “photo shop”, where you can completely edit any picture. But you can also use other methods.
With their help you can:
- mirror the image in any graphics editor;
- display the inscription on the picture, frame it;
- try to take screenshots using special programs;
- cut frames from submitted videos;
- use photo hosting sites;
- you can change the orientation of the selected file, for example, from horizontal to vertical or vice versa.
But the easiest way to achieve complete uniqueness is to pick up a camera and take pictures yourself, or ask your friends to share photos
To summarize, I would like to note that adding pictures to Yandex today is done a little differently, but it does not complicate the process at all. In addition, by creating an additional Yandex Disk, the user can save all images in it, which can later be shared on the Internet.
Users of the Yandex Drive cloud service often encounter a problem when a file or folder is not downloaded from Yandex Drive. This type of problem can be time consuming and slow down work or learning processes. This article shows step-by-step methods to solve difficulties with downloading data from cloud storage.
Content
Recommendations from Microsoft
Windows 7 developers offer another tool that allows you to resolve problems with playing slide shows and displaying pictures, even if they do not open. This is Launch FixIt. You will need it to fix the following problems:
- it is impossible to set a picture as a screensaver;
- The photo preview function does not turn on;
- in thumbnails and the preview window, the colors of pictures are visualized in inverse order;
- artifacts and interruptions when flipping through slides.
See also: Typical installation of Windows 7 on a laptop with uefi
This concludes the search for problems with displaying pixel images on a computer.