Everyone knows what screenshots are and why they are needed. These are screenshots of a smartphone or other device that are designed to show what is currently happening on the screen. As a rule, they are made not for themselves, but for someone else. For example, screenshots are an integral part of all our instructions, because this greatly increases their information content. It is much better to spice up the verbal explanation with an image of exactly where to click. Another thing is that sometimes the phone simply does not allow you to take a screenshot. Let's figure out why.
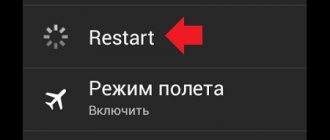
Can't take a screenshot? There are several reasons for this
How to update Play Market on Android
In fact, there can be many reasons why screenshots are not taken - from user errors to technical limitations set by manufacturers or software developers. In this article, we will try to remember the most common errors and limitations that prevent you from taking a screenshot of your desktop , and we will find ways to solve them.
What are screenshots for?
So, let's start with the fact that a screenshot is an exact photograph of what is currently happening on the screen of a smartphone, computer or tablet. Previously, when devices were just starting to be released, you had to take a regular camera and take a picture of the display. Of course, the result was not very high quality, but it was the only way out of the situation.
Now you can use hotkeys or gestures to take a screenshot. Subsequently, the resulting image can be sent to friends via a convenient messenger, and can also be used as evidence (for example, when someone insulted you in correspondence). Screenshots also allow you to remember important information, such as passwords and account logins.
What to do if the screenshot fails
Owners of old phones running Android versions below 4.0 have to use third-party programs. One of them is the free “Screenshot Easy”, an unpretentious one that, in addition to taking photos, can also record video.
The program will also be convenient due to the function of creating a screenshot by shaking the gadget (if the buttons do not work well).
It works like this: go to the application settings, activate the “Shake” mode, press “Start Capture”, go to the area that you want to capture and lightly shake the phone. That's it, the screen is automatically saved in the default folder.
This article presents various ways to take a screenshot of your phone screen. The function, at first glance, is insignificant, but over time all its possibilities open up. Owners of new smartphones are lucky - they have this option out of the box, but those who have an old Android have to use third-party applications.
Instructions: how to take a screenshot on a Realmi phone
We’ve figured out how to use screenshots, which means it’s time to find out how to take them on a Realme smartphone. As you know, these devices run the Android operating system and proprietary Color OS firmware. This means that by default all the tools designed to take a screenshot are built in there.
Using buttons
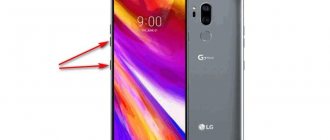
Look at the side frame of your smartphone. What do you see there? That's right, the power button and volume keys. Since Android 4.0 they can be used for screen photography. And Realmi phones in this case were no exception - the same principle works here. The instructions turned out to be very short, but we still recommend you read them:
- Open the website, application or correspondence that you want to photograph.
- Simultaneously hold down the power button and volume down key .
- Done, the screenshot has been created.
Agree that this method is the simplest. But it’s not always possible to use it, especially if one of the necessary keys is damaged. In such a situation, there is an excellent replacement for the standard method - gestures.
With 3 fingers
Many phones support taking a screenshot with a gesture, where you drag one, two or three fingers across the screen. This is a convenient option that allows you to take a photo of the display even with poorly functioning mechanical keys. But initially, the desired option must be activated in the settings of your Realme smartphone. Don't know how to do this? Well, then check out the step-by-step guide:
- Go to settings and open the “ Convenience ” tab.
- Click on the item “ Gestures and movements ”.
- And on the page that opens we find the line “ Screenshot by gesture ”. Move the slider to the right.
- Save the changes by simply closing the settings.
Please note that this feature is already enabled by default. And if you have not disabled it, then you do not need to follow the instructions.
And now, to take a picture, as you already understood, you will need to swipe the screen from top to bottom with three fingers. And if this gesture bothers you, then turn it off, again following the steps from the instructions provided in a slightly different order!
Via the sidebar
Not everyone knows, but in the settings of your Realmi smartphone you can activate a special panel that will appear on the side of the screen when you click on a small white stripe. With its help, it is convenient to control different modes, including creating screen photos. But first, this interesting block needs to be enabled. For clarity, we have compiled step-by-step instructions, so we advise you to read them:
- Open the phone settings.
- Go to the “Convenience” section.
- Go to the “Side Smart Panel” tab. Note that the name may differ, and it all depends on the installed firmware version.
- Near the corresponding line, move the slider to the right. Thus we activate the smart panel.
And to create a screenshot, you will need to click on the translucent strip located on the right side of the screen, and then select the desired option in the menu that appears. Which method to use is up to you. But often everyone is used to mechanical keys, and this is really convenient!
Art Bashlykov - blog author
Hello. Here I recorded a short course about how I create my projects from scratch, promote them and make money. Will you participate?
I will participate!
Similar steps are required in Windows XP. It should be noted that in both operating systems, not only standard Paint, but also other graphic editors, including Adobe Photoshop, are suitable for image editing.
Screenshot in Windows 8 and Windows 8.1
How to take a screenshot of the screen on a laptop or computer if you have Windows 8 or 8.1 installed? Much easier than in seven, believe me. In Windows 8, you don't need to use graphic editors or create a separate folder for screenshots yourself - the system will automatically create it as soon as you take your first screenshot. By default, images are numbered in chronological order.
In order to take a screenshot in Windows 8 or 8.1, you will need... just hold down two keys at the same time - the already known PrtSc and Windows keys (usually indicated by the logo on the keyboard). You can usually find the latter in the lower left corner, between the Ctrl and Alt keys.
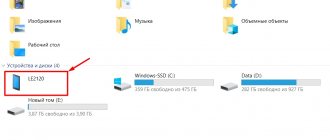
All saved screenshots are stored in the Screenshots folder, which you can find in Pictures or sometimes Documents.
Screenshot in Windows 10
Perhaps the most common request in search engines and what thousands of users are scratching their heads over is how to take a screenshot of the screen on Windows 10. Two methods are used here, one of which we have already discussed above using Windows 7 and XP as an example: by pressing the PrtSc key when taking a picture saved to the clipboard. This allows you to instantly send a screenshot into messages or when posting it to a wall on social networks via the “insert” function, but there is no provision for creating a separate folder for saving to your hard drive. Therefore, by analogy with Windows 7, you can save a screenshot to your computer using any graphics editor.
And yet “Scissors” are more popular. This is a standard program; you can find them through the search bar in the Start menu. Next, when you start the program, you see 3 main modes:
- Create – a mode that allows you to take a free-form screenshot with four corners
- The mode has 4 formats in its structure: window, rectangle, whole screen and freeform; you only need a mouse to use it
- Delay is perfect if you need to take a screenshot of a movie - it allows you to create a screenshot provided you set the timing from 0 to 5 seconds
You can save a screenshot to your computer or laptop in the usual way by clicking on “File”, then look for your screenshots in the folder of the same name in Documents or Images.
Actually, there are no difficulties in the question of how to take a screenshot of the screen on a computer. You just need to firmly know your version of the operating system and find the magic PrtSc key on the keyboard.
It is best to use a separate program for taking screenshots on your PC
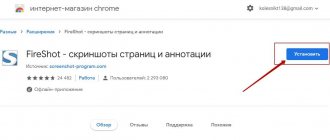
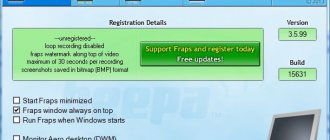
However, there is a special program called LightShot, which allows you not only to take a screenshot, but also to edit it right on the spot. It is intended not only for Windows, but also for MacOS - you can download it regardless of the version of your operating system by simply clicking on the desired button. Let me make a reservation right away: registration is not required to download the program.
I use this particular program because... It's completely free and installation takes just a few seconds. After downloading, a new window will open in the browser, where you will be thanked for the installation with a funny picture of a cat - for me, this is a very interesting bonus from the LightShot developers. For example, here is a video on how the program works (the video is in English, but the essence of it will be clear without words).
The interface is very simple, and to call LightShot you need to press the already familiar PrtSc key. The screen will turn gray and you will be required to select the area you want to take a screenshot of. The size of the future screenshot will be displayed in the upper left corner, and in the lower right you will see a panel with a variety of tools. I was especially pleased that in LightShot you can change and move the selected area.
Also, if you accidentally click on PrtSc and want to close the program, you can simply press Esc (usually located in the upper left corner of the keyboard) or right-click and select Cancel.
What is the advantage of this program, here you are free to do whatever you want with the screenshot. In the selected area, you can insert a quote, highlight an object with a marker, or point to it with an arrow. It's nice that in LightShot you can choose the color of the tools - the default is red, and this button is easy to find. It is located almost in the very corner and is filled with color, unlike other functions. If something doesn’t work out for you, you can cancel the action by clicking on the corresponding button with the left arrow.
Detailed instructions for using the program
Once you have done everything you need with the screenshot, horizontally you can choose where to upload the image. You can share it on social networks, print it, save it to your computer, or simply copy it (useful if you need to quickly insert a screenshot into a document, for example). Once you've finished working in LightShot, simply click on the cross to exit or close the window using the Ctrl+X keyboard shortcut.
As you can see, this is a fairly simple program to install and use, which anyone can understand, regardless of their level of PC proficiency. You can download the program here: https://app.prntscr.com/ru/.
How to take a long screenshot on Realme (scrolling)
We've figured out how to take a regular screenshot, but how do you take a long screenshot on Realme? To begin with, let us remind you that such a photo can display an entire site page with the ability to scroll (here is what Wikipedia says about this). This way you can easily save any important material, and then return to it at a convenient time. And making such an image is quite easy. You just need to use the following instructions:
Question to the expert
How to take a long screenshot?
1. Open the page that you want to save in long screenshot format. 2. Take a standard photo using any of the methods. 3. Click on the screenshot thumbnail that appears. 4. Select the “Scroll” icon. 5. Scroll through the page to the desired moment and select “Done” (or wait until the photo reaches the edge of the page). You can view the created image in the gallery, and you don’t even have to use additional applications to scroll through it.
As you can see, the shell is already adapted for people, so there are no problems with using certain options.
Proprietary methods for various manufacturers
Many companies are implementing innovative techniques into their devices to improve the user experience.
LG
QuickMemo application
By default, smartphones of this brand have the QuickMemo utility, with which you can:
- screenshots are created (they can be edited, for example, add text on top, crop, highlight a specific area);
- You can share finished images on social networks and instant messengers.
QuickMemo is located in the curtain. When you click on it, the frame is taken automatically, after which the editing menu opens.
HTC
These phones use the standard method, but recently they added Edge Sense technology - pressure-sensitive edges of the screen. You can press in different ways: briefly, squeeze, hold or squeeze with a certain force. Depending on the type of click, a specific function will work, including creating a screenshot.
Another method used in phones of this brand is to simultaneously press the power key and the fingerprint scanner.
Xiaomi
Quick Ball application
Xiaomi devices are characterized by an unusual shell that expands their flexibility. For example, a screenshot here can be made in 4 ways:
- hold down the “Menu” button (to the left of “Home”) and the volume rocker;
- lower the curtain and select the corresponding button;
- Quick Ball – on the screen in the lower left part there is a gray ball, clicking on it opens a menu where the desired option is located;
- gesture - this feature has been implemented since version 8 of the shell. Swipe across the display from top to bottom with three fingers and the screen is ready.
Huawei
Knuckle Sense application
An autonomous manufacturer that produces proprietary chipsets and a shell called EMUI. There are 5 ways to create a screenshot:
- standard – simultaneously pressing the power and volume keys;
- Knuckle Sense – to take a photo, just lightly tap the display with your knuckles 2 times;
- you can select the desired area - to do this, press the knuckle tightly and trace it;
- to take a photo with scrolling, “draw” the letter S on the screen with a knuckle, scroll and, when finished, touch it with your finger;
- through the curtain menu.
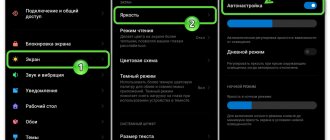
Samsung
The option is present in flagship models, and Huawei and Xiaomi liked it. To create a screen, swipe across the display from right to left with the edge of your palm. By default this feature is disabled.