Hi all! Today we will talk about how to fix the error if the proxy server does not respond. I won’t say that the problem is very popular, but it can happen. I myself sometimes saw it on my device. Let's first think about why this is happening. First of all, this can be seen if the wrong proxy address is installed on the machine. As a result, requests are sent to the wrong place.
This may happen due to a glitch in a specific browser or a configuration change in the operating system. And here the question arises: how could they change? – Either it was done by the user himself or some program. Often this is the case with software that works with networks and the Internet. But the worst thing is if the “Proxy server error” appeared due to viruses. All of the instructions below should help with all browsers: Yandex Browser, Opera, Google Chrome, Mozilla Firefox and Internet Explorer.
A couple more tips
If this problem occurs only on one browser, then you should completely remove it from your computer. To do this, go to Programs and Features. Next, download it again and install it. You can, of course, try to install it on top, but the problem may not go away. If you use a VPN or proxy, check that the entered data and IP address are correct. Try disabling the program altogether or disabling the use of VPN.
I advise you to immediately scan your entire computer for viruses. Even free antivirus programs may be suitable for this. Be sure to use the latest virus databases. After doing this, the “Proxy Connection Error” should be resolved.
Disabling proxy server
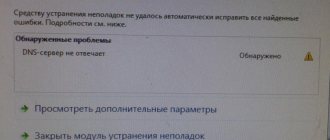
The above manipulations should help eliminate the pop-up error: “The proxy parameters could not be detected.” If these steps do not help solve the problem and the proxy does not respond, the user is recommended to try deactivating the proxy server. Let's apply the following steps using the Mozilla Firefox browser as an example:
- The first thing you need to do is go to general settings.
- Next, go to the “Advanced Settings” tab.
- Select the tab without proxy server.
Similar manipulations can be performed with the Opera browser:
- go to the parameters section;
- select the “Security” tab;
- Find the VPN field and uncheck “Enable VPN”.
There are also additional options. Opera has a Proxy-server option, it is located in the “General” section, “System” item. Go to the Proxy settings and do all the necessary manipulations.
Although the network security will be reduced, the connection will be restored and the error where the proxy was not responding will be resolved.
P660RU2EE
The P660RU2 EE model settings are identical to the P660RT2 EE and P660HT2 EE models.
Open the browser and type in the address bar: https://192.168.1.1 and press Enter.
If we simply click Login, we will open the web interface in limited functionality mode
Here we have access to only basic information: modem software version, network and ADSL channel settings, interface status, current modem CPU load, etc.
To log into the web interface in normal functionality mode, we need to enter the password 1234 and click Login.
In the window that opens, you must enter a new password, different from 1234. This is done to prevent unauthorized access to the modem settings. Click Apply.
Here we select the Go to Advanced Setup item and click Apply.
So, we are in the web interface. Before us is the settings menu (on the left) and the status window (in the center). If the telephone line is connected to a modem, then in the Interfaces Status window you can see the current speed of the ADSL connection.
Let's configure the ADSL channel parameters. To do this, select Network -> WAN from the menu on the left.
The window that opens presents the main parameters of the ADSL connection. To configure the ADSL channel directly, enter the VPI/VCI parameters, which we will first find out from the provider’s technical support. For example, for the Volgatelecom provider the VPI/VCI parameters are 0/33. Multiplexing - LLC (VC is used very rarely). The choice of modulation is also a very important point.
In most cases, Multi Mode is the best choice. If you need one specific modulation, then select the one you need from the list.
Another important parameter for this modem model is the choice of frequency standard - Annex A or Annex B. On standard lines, Annex A is used. If you have an ISDN line or a security alarm is connected, then Annex B.
Now you need to decide in what mode the modem will operate. If we have one computer, then the easiest way is to configure the modem in Transparent Bridge mode. In this case, we will establish the connection from the computer via a high-speed connection. To configure the modem in this mode, select Bridge from the mode drop-down list.
Click the Apply button to apply the settings. Actually, that's all - you can work. It should be noted that Zyxel modems do not require additional actions to save settings, i.e. When the modem is rebooted, the settings will be saved.
Now let's consider the option of configuring the modem in Router mode.
To do this, in the mode drop-down list, select Routing, Encapsulation PPPoE, in the Username and Password fields we indicate the username and password given to us by the provider. We configure additional parameters as follows:
IP Address — Obtain an IP address automatically (users are usually assigned IP addresses dynamically).
Connection - Nailed-Up Connection.
Click the Apply button to apply the settings.
This completes the setup. But sometimes it becomes necessary to configure the modem for a specific local network. To do this, select the menu item Network -> LAN.
Now we change the modem’s IP address and mask to those that we need. If we want to enable or disable the built-in DHCP server
— select the DHCP Setup tab.
Here we select the DHCP operating mode (Server/Relay/None), IP pool starting address, and Pool Size. Also here we can manually set DNS server addresses. To apply the settings, click Apply.
Some providers have IP-TV service. It usually goes over a separate virtual channel (PVC). To configure additional channels, select Network -> WAN -> More Connections tab.
Here we select the edit icon on any empty connection. Next, we configure it by analogy in accordance with the parameters provided by the provider.
And finally, if for any reason you wish to change the password for logging into the modem. To do this, in the menu on the left, select Maintenance -> System -> General.
In the Old Password field, enter the old password and enter the new password twice in the fields below.
source
Mozilla Firefox
- Let's go to settings.
- In the “Basic” tab, find the item we need and click on the settings button.
- Now disable the function if it is enabled.
Registry
- +R.
- "regedit" command. Next you need to follow the path:
HKEY_LOCAL_MACHINE\SOFTWARE\Microsoft\WindowsNT\CurrentVersion\Windows\
- There should be nothing in the line that is highlighted in the screenshot in the “Value” column. If there is any line there, then go and delete it.
Network settings
- If you still can’t connect to the proxy server, then go look at the network settings. Press +R.
- Enter the command as above and click OK.
- Next, you need to select the connection through which you have Internet access. Right-click on it and select “Property”.
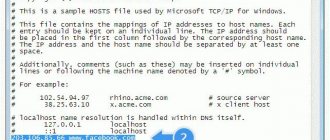
- Click on the fourth protocol and go to “Properties”. Set the settings as in the picture above and click OK. If this does not help, set the DNS settings to 8.8.8.8 and 8.8.4.4.
If all else fails. Additional actions
But still, disabling the proxy is not the preferred option. If the proxy refuses to accept connections after all the operations performed, then it makes sense to additionally do the following:
- Disable VPN connections and all add-ons in the browser, since some browsers are equipped with their own anonymizers or VPNs;
- Check the operation of your Internet connection directly, without using a proxy;
- Check the serviceability of the proxy itself. This can be done in the Proxifier application or in a proxy checker. If your proxy does not work, contact support. When using free public proxies, find a new current port on the network.
- Reinstall the operating system. But this should only be done as a last resort.
The methods described in this article to solve the proxy connection problem will help you in most cases. If suddenly the problem persists, then it is best to seek help from a specialist.
Possible causes of the error
The most common reason is that the system has a static proxy server address that is not working. When you try to access the Internet, naturally, the packets are sent to nowhere, since the server address is incorrect. How these settings changed is another question. Perhaps an update occurred or the user made adjustments on his own without realizing his actions. Also, the wrong proxy could turn on your browser.
The second reason is malicious software. The virus could change the proxy server settings or issue a false message, misleading the user. Be sure to scan your system and remove viruses. In rare cases, such problems are related to the provider. First, call the operators and find out if everything is working properly.