The disk drive, until recently a mandatory element in any computer, is today losing ground to flash drives and retiring. Manufacturers have caught on to this trend and are now happy to follow it, refusing to install a drive in computers and laptops. But what if you need a disk drive? This is discussed in our article.
How to connect a disk drive to a computer
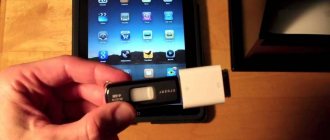
USB drive
First, let's look at the external drive. To install and connect a DVD drive to a Windows 7, 8, 10 computer, you will need one of the possible solutions:
- External drive . Sometimes you can find ready-made external devices on the market. They are not too expensive (5-10% more expensive than regular ones).
- Board or adapter. An extremely rare option, since it is usually used in service centers (due to its unattractive appearance). This board plugs into a USB port on one side and plugs into a standard internal drive on the other.
An external optical CD-DVD drive is connected in 3 stages:
- Connect the cable to the USB port of the computer.
- Wait for to be identified and configured , which will happen automatically.
- Start using .
The connection procedure via an adapter is identical to a laptop and is discussed below.
Connecting the internal drive
If the device is located inside the case, then connecting the CD/DVD drive is also carried out in several stages. The main task is to disconnect the old device before connecting the new one.
Disabling the old one
In order to remove the old drive you will need several steps:
- Unscrew the screws to make room for the new one and not break the case (red color in the image).
- Remove cables data and power (circled in green in the image).
- Pull the drive itself out through the front panel (not inside the case, but out).
The main problem is disconnecting the old wires. In very rare cases, they contain latches that must first be opened.
Installing a new
After removing the old drive, you need to do the following:
- Install the drive through the front panel.
- Screw the screws into place to secure the CD-DVD ROM.
- Connect the power and data cable to the motherboard and power supply.
The actions are essentially the reverse with one permutation. It is not necessary to tighten the device, but it is better to “grab” a couple of bolts on at least one side.
Drive connection
At the moment when the wires are connected, the installation procedure is not yet completed. Now the BIOS should recognize and determine the presence of the device. There are no problems with SATA devices at this stage. The technology is extremely simple and, if power is supplied, the drive is working properly and the data cable is not damaged, the detection will occur automatically and there will be no need to configure anything.
It should also be taken into account that >>
Drives and laptops
Laptops use their own version of disk drives. The complexity is increased by the fact that each model uses either a standard drive for the manufacturer or an exclusive option. The connection methods do not change. Only the form can be changed.
Because of this, only the CD-DVD ROM that strictly corresponds to the model is selected for replacement. On the other hand, in the complete absence of a drive, you need to get out of the situation in other ways. A good solution would be an adapter that helps you connect different drives to different devices.
The main feature of such devices is the presence of a separate power supply. You will need to plug it into a power outlet, and then turn on the adapter itself:
- For Sata : connect the drive to the output (power is supplied next to the data);
- For IDE : connect power to the drive itself.
Enabling and setting
At the final stage, it is recommended to check the functionality of the optical drive. To do this, turn on the personal computer. After this, you must wait for it to finish loading. A message will appear indicating that new equipment has been found, and it will be automatically configured. That is, the necessary drivers will be installed. At the end of this stage, it is recommended to insert a disk into the drive and make sure that information is read from it, for example, some kind of multimedia file will be played.
Let's get started!
First you need to gut the drive box and remove the USB to SATA adapter board from there. Each model is understood differently, so I won’t give general advice here. We only need the board, the rest can be thrown away.
The main problem is the power connectors. For some reason, CDs made it shorter and with a different pinout. Although in laptop drives the 12V and 3V lines are not used. In general, we will do the food ourselves. Here is a diagram of the power connectors for the optical drive and hard drive.
Now let's move on to modifying the drive. It needs to be disassembled to gain access to the board. Disassembly is not difficult: unscrew the screws (there are three of them) on the top cover and remove it.
The board we need to access is safely hidden under the drive tray. But, as with conventional large drives, the tray can be extended mechanically. To do this on a laptop drive without a muzzle, you need to poke a toothpick into the hole slightly to the right of the eject button. If there is a decorative face on the drive, then there is a hole on it where you need to poke. Although it will probably be a little narrower, so instead of a toothpick you will have to use an unbent thin paperclip.
see also
Amazing nettop Depo XS35 (aka Shuttle)
Fixing damaged color and grain on a Nautilus 200 monitor
The Xiaomi Wowstick electric screwdriver is a delight!
Repairing the DJI Phantom 3 STD quadcopter gimbal
Restoring the BIOS on the GA-B75-D3V mother
The disk drive, until recently a mandatory element in any computer, is today losing ground to flash drives and retiring. Manufacturers have caught on to this trend and are now happy to follow it, refusing to install a drive in computers and laptops. But what if you need a disk drive? This is discussed in our article.
Drive selection
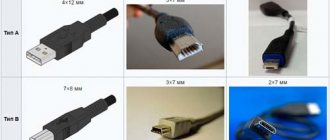
First we need to decide why we need a disk drive. It's not about his type - by default he should be able to read and write DVDs, that's just the time. But there is such a thing as a connection type - the interface that our drive connects to the computer. It is up to him to be chosen.
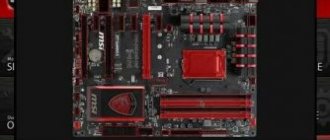
The easiest way to determine this is to visually inspect the motherboard and determine the available connection locations.
Let's figure it out in order:
- outdated interface >
Have you considered the motherboard? Let's evaluate the availability of free ports. If there are several free SATA ports and an IDE port, then you definitely need to choose the first option. It has seriously more advantages, and it’s easier to connect. If there is only one free SATA port, then you can think about it - what if you want to connect another hard drive to your computer? He needs this port more. Well, the easiest option is if you have either SATA or IDE ports. You have no choice, act according to the circumstances.
Using Command Prompt or PowerShell to Enable a Missing Drive
Why Windows doesn’t see the hard drive - how to fix the problem
Another method of solving the problem is to enter registry keys responsible for a specific drive. Here you will need to use the traditional Command Line or PowerShell utility. Each application must be run as administrator.
PowerShell
In the window that opens, enter the command:
reg.exe add “HKLM\System\CurrentControlSet\Services\atapi\Controller0” /f /v EnumDevice1 /t REG_DWORD /d 0x00000001
To start the procedure, you will need to press the Enter button on the keyboard. As soon as it is completed, you should immediately reboot the system. If the computer still does not see the Windows 10 DVD drive, it makes sense to resort to another method.
Removing the old drive
To do this, you will need a medium-thick Phillips screwdriver with a good slot and a vacuum cleaner.
Note! Take care in advance to collect the mounting hardware in a separate place - it will be very helpful during reassembly. It is very unpleasant to look for bolts throughout the apartment.
- Remove the side covers from the system unit. To do this, unscrew a pair of screws from the back on each side and pull the covers back. After moving them a couple of centimeters and freeing the grooves, remove the covers.
Housing assembly
Next, we check again that the optical drive is installed and connected correctly. After this, install the side covers of the system unit case. It is impossible to confuse them in places. One of them has holes and is installed on the side of the processor fan, and the second does not, and is mounted on the side of the motherboard. These metal covers are then secured with screws. The PC case is installed at the place of permanent use and the appropriate cable is connected to its power connector.
Installing a new drive in the system unit
In addition to a screwdriver, you may need pliers.
On a note! If you replaced the drive and followed the previous step to remove the old one, then you have already prepared everything for installation.
Now we will look at what to do if you want to install a disk drive in a new computer that has never had one, or want to install a second disk drive in addition to the old one.
- Using the instructions from the previous paragraph, open the system unit and remove the front panel.
- Carefully remove one of the plugs for five-inch devices from the front panel. Be careful not to break the grooves, as it may come in handy in the future if you want to get rid of the drive.
Note! It would be nice to find complete bolts from the system unit, but there are none; buy four or eight bolts together with the drive to secure it.
How to enable display of the disk drive through Device Manager on Windows 10
Why Windows 10 SSD does not see - how to fix the problem
The technique described above for updating the hardware configuration will also help to correctly enable the display of the drive in Device Manager. In this case, between the actions of deleting the previous drive configuration and updating the list of equipment, you must restart the computer. This way, the system will be able to recognize unknown connected equipment and will try to independently install drivers for it from its own database.
Windows 10 Device Manager
Sometimes the drive can be activated in the BIOS and be fully functional, but Device Manager does not see the Windows 10 CD ROM at all. To fix this, you can do the following:
- Open "Task Manager" in any convenient way.
- Go to the “View” tab at the top of the main window.
- Select "Show hidden devices".
- In the list of connected devices, you need to find the “SPTD” driver, which will most likely be located in the “Non-plug and play device drivers” section.
- You need to remove the driver and reboot again.
Similar problems occur on computers that frequently use virtual drives. In this case, the system simply does not have time to figure out which driver is related to the real physical component.
Sometimes the required driver is located in the “IDE ATA/ATAPI controllers” section. In this case, you will need to determine which specific channel the desired drive is connected to. To do this, you should open each channel in turn and carefully study the “Device Type” parameter. Opposite it should be the value “ATAPI CD drive” or something similar. You will immediately need to check the box next to “Enable DMA”, and then restart the computer.
Connecting the installed drive to the motherboard
Let's first consider the option with IDE
- Unpack the supplied cable from the drive. If you already have one, use it, and if you don’t have your own or a complete one, then buy a new one along with the drive.
- Make sure your power supply has IDE (MOLEX) power connectors. If there are no free connectors, ask the store for a splitter or adapter with SATA connectors (however, this is rarely found in nature).
Note! The standard IDE cable is divided into three sections. The central one is offset from the center. The outermost connector, from which the distance to the middle one is greater, is inserted into the motherboard, and the other into the disk drive. If there are two drives, both connectors, the distance between which is the smallest, are used in the drives in series.
Note! Here we consider the option of connecting to a more or less modern motherboard. But this can also cause problems.
IDE is an old format with its own configuration rules. The loop involves the installation of two devices, so it turns out that one device is always the master (“Master”), and the other is always the slave (“Slave”). This may be the problem if the connected drive is not detected. To eliminate it, check the position of the jumper on the back of the drive. Pay attention to the screenshot.
Universal case: if you have only one disk drive on the cable and it is connected with the outermost connector, then put the jumper in the left position (“Cable Select”, or auto-detection of the connection type). If there are two disk drives or devices in general on the cable, then the jumper should take a position based on the position of the device: if the outermost connector is “Master,” that is, the right position, if the middle one is “Slave,” that is, the middle position. However, IDE motherboards have been around for a very long time, so they can easily not meet the standards. In this case, there is only one piece of advice - refer to the instructions.
Now an option with SATA
- In addition to the supplied cable, you most likely need a MOLEX - SATA adapter (power supply for SATA devices has the same name for versatility). Check the availability of such power in your system unit and, if necessary, purchase the required adapter.
All that remains is to close the side covers, tighten their mounting screws and start using the computer. Ready!
Video - Connecting (installing, replacing) a PC drive
Did you like the article? Save so you don't lose!
>
How to configure drive display through System Registry Editor on Windows 10
A utility called “System Registry Editor” can also be extremely useful in restoring the functionality of the drive.
Registry Editor
Procedure:
- Open the Run window using the WIN+R key combination.
- Type the regedit command and press Enter.
- Go to directory HKEY_LOCAL_MACHINE\SYSTEM\CurrentControlSet\Control\Class\{4D36E965-E325-11CE-BFC1-08002BE10318}
- Select a branch using the left mouse button.
- In the right window, find and delete the UpperFilters and LowerFilters parameters.
- Reboot the system.
Using the disk drive on Windows 10 computers in most cases does not cause any problems. However, sometimes user intervention may be required to help the hardware appear in the system. The right approach will make the drive work as expected.