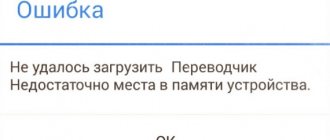
The active use of mobile gadgets as an alternative to computers and laptops leads to various types of errors. Among the problems faced by owners of Android devices, a special place is occupied by problems associated with lack of memory. When you try to download a game or application, the system displays a message that there is no free space, although in reality there are enough megabytes or gigabytes available. The ban on installation, updating, photography and video recording limits the functionality of the device, turning it into an unusable device. A way out of the situation may be to optimize the usable space or change the settings. Therefore, if you encounter an error when the system writes that the phone’s memory is full on Android, and you don’t know what to do, read this material to the end and you can solve it in a few steps.
How to clear phone memory on Android
If the system issues a “Not enough space” notification, you should not wait until your phone stops receiving SMS or it is impossible to make a call. It is important to quickly analyze the contents of your smartphone, and if the memory is overloaded, remove outdated programs, downloads and system junk. This can be done in different ways: using standard tools or using third-party tools.
Clearing the application cache
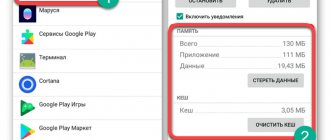
For a beginner who is encountering a similar situation for the first time, the best option would be to clear the cache on an Android device. The process of deleting unnecessary data is simple, it is performed using standard smartphone tools and requires the following actions:
- Open “Settings”;
- Go to the “Memory” or “Storage” category;
- Select the “Cache Data” section and press the “Delete” button;
- To confirm the operation, select the “Ok” option in the request window that appears. If you have never cleared temporary files on your smartphone before, read our material - how to clear the cache on an Android .
After this, all cached data will be deleted. However, you can clear the cache not only in applications, but also in the Google Play service. You can do this within a few minutes:
- In the “Settings” menu, find the “Applications” or “Application Manager” section;
- From the list that appears, select the line with the name of the Google store “Play Market”;
- Tap on it and go to the properties page;
- At the bottom of the screen, press the “Clear” button and select the “Clear cache” option.
Removing temporary files and junk
One of the features of both the Android OS and the games and programs created for it is the creation of temporary files necessary to optimize operation, since they allow quick access to any part of the application. Some consider this an advantage, others - a disadvantage, but unnecessary files continue to be stored in a special directory, and over time they accumulate in such quantities that they can take up gigabytes.
Fortunately, they can be easily detected and removed yourself. To do this, it is enough to use standard tools:
- Open “Settings” in any convenient way (via the menu or quick access panel);
- In the “About phone” or “About device” section, find the “Memory” tab and expand it (the location may vary depending on the phone brand, firmware and Android version);
- Wait for the result of calculating the occupied and free memory, and then select the “Cached data” and “Other files” options sequentially;
- How to delete the cache was discussed in the previous paragraph;
- To delete temporary data, you will need to click on the line and go to the list of files. Here you will need to check off what is still stored, but has lost its relevance, and click on the button with the image of a trash can.
If the process executes correctly, after its completion, a significant amount of memory should be freed in the internal storage.
Transferring apps to an SD card
If your mobile gadget runs on an old version of Android, you can unload the internal storage by transferring some of the user data to a memory card. This measure will allow you to use the SD card separately from the smartphone, and view its contents on any other device (photos, videos, audio recordings).
It is important to remember that not all applications can be transferred. Pre-installed and system programs are “registered” in the internal storage by default and cannot be moved. Most downloaded applications survive the “move” just fine.
The operation can be performed in several ways: using standard tools or using third-party tools. The simplest and most accessible option is the Android system menu. A similar feature is provided for smartphones or tablets with OS Android 2.2 and higher. To transfer you will need to do the following:
- Open “Settings” through the system menu or quick access panel;
- Go to the “Applications” or “Application Manager” category;
- Select the program you want to transfer and click on its name;
- A “Move to SD card” button will appear on the properties page. If it is active, then “relocation” is possible. Just click on it and the transfer process will start;
- If the button is inactive, then the function is considered unavailable for this application.
In this way, you can go through all the items from the list, determining which applications can be moved to a removable flash drive.
Clearing debris when connected to a PC
Full storage in a phone running Android OS can be cleared not only with standard means, but also using a computer. The procedure is reminiscent of deleting files through Explorer and involves performing the following steps:
- Connect your phone to your PC using a USB cable;
- Go to file system;
- View the contents, then select and delete unnecessary files.
The method is simple and convenient for freeing up space in the internal storage from unnecessary folders, programs, games, and personal data. However, you cannot clear the application cache and RAM in this way.
Clearing browser history
One option to solve low space problems is to clear your browser cache and delete cookies. In general, we have a separate article on this topic: how to delete history in Yandex on an Android phone . For Chrome, the process needs to be done as follows:
- Open browser;
- Call the menu by clicking on the three dots icon in the upper right corner;
- Go to “Settings”;
- Select the “Privacy and Security” category, and in the list find the “Clear history” item;
- In the dialog box, specify the time range “all time”, and then check the boxes: “cookies and other site data”, “images and files saved in the cache”.
Press the “Clear history” button and wait for the process to complete.
Cleaning messengers
Millions of users today communicate through messengers. However, few people know that all photos and videos are stored not on their server, but in the phone’s memory, gradually filling it up. To free up space, you can use two methods.
- Delete multimedia files - select an unnecessary file with a long tap and click on the “Trash” icon. In the same way, you can get rid of several files at once;
- Delete an entire chat - open a conversation with the user and call up the “Menu” by clicking on the three dots in the upper right corner. In the “More” subsection, select “Clear chat” from the list of options;
Next, you should check the root folders of the messenger and delete outdated videos, pictures, and music. This is done like this:
- Connect your smartphone to your computer;
- Find the “WhatsApp” directive in the internal memory and expand it;
- Go to the “Media” folder and check the tabs with pictures “WhatsApp Images” and with videos “WhatsApp Video”;
- Transfer files from smartphone to computer.
Having dealt with media from instant messengers, proceed in the same way with music, videos and photographs taken with the phone’s camera. You can also clear chats and other data in WhasApp through “Storage”.
Transfer data to the cloud
To optimize useful space on the internal storage of Android and conveniently store user data (photos, videos, audio recordings), there are convenient cloud services - Dropbox, Yandex.Disk, Cloud.Mail.ru, Google Disk and Google Photo. The latter are part of the functionality of Android devices.
The cloud is a secure storage method that can only be accessed by the device owner and those with whom he shares the password. You can enter the virtual storage not only from a mobile phone, but also from any other device. For this you will need:
- Open the corresponding application on your smartphone;
- Click the “Upload” button and select one or more files.
Once uploaded to the cloud, files can be deleted. They will be stored on the server until the user deletes them himself. Please note that some manufacturers set restrictions on file parameters and storage periods, after which the data is automatically deleted.
Cleaning out the Thumbnails folder
Little is known, but for the convenience of users, the Android operating system creates small snapshots of images that increase the speed of loading files when viewing photos and videos. They are stored in a special directory ".thumbnails" in the "DCIM" folder in the gallery, and from a practicality point of view they provide minimal benefit. But they still require a certain place in the internal storage. As they accumulate, temporary thumbnails can take up a significant amount of free space, which over time affects the performance of the smartphone. For example, if you have 500 photos, the thumbnail folder size will be 1 GB. It is not surprising that it is advisable to delete these files regularly: once every 2-3 weeks.
To clear a directory, you must:
- Connect your Android mobile device to your computer using a USB cable;
- Find “DCIM” in the list of folders;
- Go to the “.thumbnails” directory;
- Delete the contents of a directory by simply pressing the key combination “Ctrl + A”.
If you don’t have a PC, you can get rid of the folder with snapshots directly on your smartphone. Since the “.thumbnails” directory is hidden by default, you won’t be able to find and enter it through the “Gallery” settings. To diagnose and delete thumbnails, you will need to install “Total Comander”.
In this case, the algorithm will be as follows:
- Launch the application and first find the “DCIM” folder there, and in it “.thumbnails”;
- Under the list of saved sketches, find the “Select” button and tap on it;
- Having marked the files, click on the cross at the bottom of the panel;
- Confirm the action by selecting “Yes” in the window that appears.
The system allows you to not only quickly delete image snaps, but also block their creation. To do this, the user must open the PC, find and delete the “.thumbnails” folder. After this, he will need to create a text file with the same name on his hard drive and copy it to the “DCIM” folder. The same directory will appear on the smartphone, but since the mobile device is not able to support the new format, thumbnails will not be created.
Using cleaner programs
Clearing memory using third-party applications is an unattractive idea, since the utilities themselves take up a lot of space on the internal storage, and when active, they are accompanied by the display of advertising. But if there is a need to use this method, you should choose a proven product - the Clean Master cleaner. It weighs about 18 MB, has an intuitive interface, so it is suitable even for beginners.
After starting the program, you will need to define a task by selecting one of three options:
- “Garbage” – deletes unused files from the built-in storage;
- “Device acceleration” – frees up valuable megabytes in RAM;
- “Cooling” – unloads unused applications and modules.
The program includes an antivirus and an energy saving system. We also recommend that you check Android for viruses .
Another popular program is “SD Maid”. To solve problems with memory cleaning, just install the free version. After opening the application, you will need to start scanning by pressing the button of the same name. When the results are displayed on the screen, press the “Run Now” button - the memory will be cleared in a couple of seconds.
Using built-in cleaners
Devices with later versions of the Android operating system have built-in special functionality for deleting unused files that consume a valuable resource - memory. The cleaning process can be clearly seen using the example of Huawei/Honor phones.
- Open the Phone Manager application;
- Select the “Memory clearing” option;
- Mark the types of data you want to get rid of;
- Start the removal process and wait for it to finish.
Some files can be deleted manually without resorting to a cleaner. But it is worth noting that many models also have more advanced cleaning.
Where to look for “other files” in memory if you have root
On the 4PDA forums you can download TWRP and custom firmware, which allows you to get inside the device and “cut off” the excess. But, after consulting with a programmer friend, I was afraid to reflash the smartphone, so as not to accidentally turn it into a brick.
If you are ready to experiment with your smartphone, on forums users share several directions for “excavations” in memory with root.
- User Tamurai writes on MyMeizuClub that he found a 6 GB folder at data/data/com. android. chrome/app_chrome/browsermetrics. Keep in mind that this is also data that will accumulate again after deletion - it needs to be cleaned periodically.
- On w3bsit3-dns.com, user beck7, on a similar question about one of Meizu’s devices, advises finding the files custom.img (500 MB) and system.img (1.5 GB) in the memory.
After all this throwing around, the question arises: is it possible to solve the problem without resorting to custom software, but by flashing the device with the official firmware. To do this, I began to find out what firmware versions are on the Meizu smartphones that my friends use.
My friends have the same Meizu M6 Note, only with 32 GB of storage. It has the same version of firmware installed as mine, and everything is ok - there are no complaints about the memory. Another friend uses Meizu M5 Note 32GB with an older firmware version, but he is plagued by the same problem with “Other” filling up and lack of space.
What follows from this? It follows that the matter is not in the newness of the version, but in each specific firmware of each specific smartphone. So it seems that reflashing could also be an option. Although, according to reviews, the effect is small.
I hope that some of the methods included in the hodgepodge will help you free up at least a little memory. At least in my case, the result allows me to use multiple applications normally.
conclusions
Android file systems are very diverse. Among them there are both general file systems designed to work with Linux-based operating systems, and specific ones that are used in NAND drives. Despite such diversity, manufacturers still make joint efforts to promote and improve this or that file system, since the future of the Android gadget market depends on the work of the internal components.
It is also worth noting that competing concerns may be working on improving different file systems at the same time, and it is this combination that forces digital technologies to develop, no matter how fierce the competition in the consumer market. And only smartphone manufacturers determine which file system on Android works better under certain circumstances.
The memory full problem, which can be identified by the message issued by the Android operating system “Memory Full,” is quite common.
Moreover, there are no universal solutions for it, but there are many tips. In this material we will try to systematize all, or at least most, of the available information on this issue.
Results
Memory problems vary, and so do their solutions. Start diagnosing your system by performing the simplest steps and removing unnecessary games, applications, photos, videos and other files. Don't forget to add a memory card, clear the cache and .thumbnails folder. If this doesn't help, try more drastic measures.
The file system is a kind of structure of a particular drive. It is responsible for the maximum file size that can be stored in memory, the length of their names, as well as for organizing write or read cycles. File systems act as intermediaries between program code and physical storage.
There are separate FSs and gadgets on the Android OS for different operating systems and types of devices, and they are no exception. Let's see what file systems Android supports and what purposes each of them is used for?
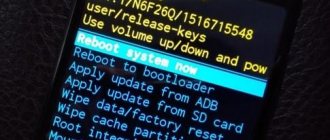
Reset to factory settings
The last option to solve system problems and eliminate the low memory error is to reset the settings to factory settings. Full formatting is recommended when other methods are ineffective or do not achieve the desired goal. As a result of this radical method, user data is completely deleted from the internal storage and the previous amount of memory is restored.
To return the smartphone to the state it was at the time of purchase, it is advisable to use the Android menu. This method involves doing the following:
- Open “Settings” through the application menu or quick access panel;
- Go to the “Backup and reset” tab (depending on the Android version, it may be located in the “Advanced settings” or “Advanced” section);
- There are two options for performing the procedure: without data loss and with full formatting of the drive. In this situation, preference should be given to the second option.
Next, you will need to press the “Reset settings” button and wait for the process to complete. In general, you can read our article on how to reset an Android phone to factory settings .
There are as many options for clearing memory on an Android device, as there are reasons for the error to appear if it is full. To achieve the desired result, you need to get rid of unnecessary files, irrelevant applications, user data in the form of pictures, videos and audio recordings. If there is still too much necessary information and it consumes a significant part of the resources, it is advisable to purchase an SD card with the maximum allowable capacity and transfer a certain part of the files there.
Share link:
How to remove “Other” from memory without knowing where it is
#1 Remove unnecessary caches
This is the first and simplest thing you can do. Through the “Junk Cleanup” tab in the memory settings or through the “Security” application.
It's also worth checking to see if there is anything else in the recommended categories that can be cleaned. But be careful here, as the smartphone will offer to delete some data from the memory card, which does not matter in our matter. He will also recommend large objects located in well-defined sections such as “Audio and Video”. They also have no relation to "Other Files".
#2 Install updates
As it turned out, the cup of “Other” and my memory in general was overflowing thanks to an update that arrived on the device a long time ago, but was not installed. Although the smartphone wrote to me more than once, saying, let’s update to Flyme so-and-so.
After installing the update, it became a little easier to use the device. And when the optimization utility suggested clearing the device of unnecessary files, including a rather large installation file, the memory situation improved even more.
#3 Return to factory settings
If your smartphone has been complaining about a lack of memory for a long time and at some point just starts to freeze, a tough but effective way is to roll back everything to factory settings.
I deleted several MP3s so that the smartphone began to function more or less. Then I checked if there was any important data for me on the internal storage (if there is any, transfer it to a memory card or to the cloud). And clicked “Reset to factory settings” and “Clear internal memory”.
Although “Others” did not decrease as much as we wanted, and very quickly began to grow again, it became possible to use the smartphone normally at least for some time.
Memory card
The logical and simplest solution to problems with lack of memory is to buy a memory card (if your smartphone has an appropriate slot). When installing microSD on some devices, you will need to activate it, because by default the phone will continue to save files to the internal memory. Go to the “Memory/Storage” section and place a marker next to the “Memory Card” option.
It is also important to choose the right memory card - take into account the class and speed, as well as other characteristics. To avoid any discrepancies, carefully study our articles.
It should be noted that smartphones running the latest versions of Android have the ability to combine internal storage with a memory card. In such cases, the smartphone itself will offer to make a connection after installing the card.
Where can "other files" be located in memory?
In addition to the methods described above, in the fight for precious megabytes, you can comb through the available folders.
For example, check the Download folder for large files and transfer them to the card or delete them. I didn't have anything stored there, but if you downloaded something large, you'll have something to subtract from "Other."
The next thing is to check the “.thumbnails” folder hidden in memory in the DCIM folder. The regular Explorer in Flyme will not show it, so download the ES Explorer program or something similar, and turn on “Show hidden files” in the settings.
“.thumbnails” stores “.thumbdata” files generated by the camera, which can be very small in size or up to several gigabytes. Removing them will not particularly affect the operation of the camera; you can remove this folder entirely. But keep in mind that the system will create it again when you start using the camera. Therefore, you need to periodically monitor its weight and clean it. Or follow the recommendation published on the it-handbook.ru resource and create an empty file with the same name “.thumbnails” - the folder will no longer appear.
Right there in ES Explorer, through the Space Analyzer, you can delete redundant .tmp, .log and other files.
In my screenshots you see only small things, but people have found very hefty logs of several gigabytes this way.
After all the above manipulations, the volume of “Other” decreased by 1.8 GB and did not want to decrease further. To find where the dog was buried, I looked to see if the user data in the applications fell into this category.
The data of the only large application weighed 564 MB, and at least half of it was clearly not included in “Other”, since it related to video. But for the experiment I removed them.
You can erase data and clear the application cache through Settings - Applications - All applications - select the one you need - Erase data / Clear cache.
After that, in “Other” there was 100 MB less, but after a few seconds the figure returned to the previous figure. Accordingly, the issue is not in your application data.
And, accordingly, out of 4 GB of “Other”, at least 3.5 GB are some hidden system files that can only be deleted with Root rights.
What does file system limit mean?
Owners of mobile devices often encounter a similar problem. This is due to the fact that the device today is used for surfing the Internet, as a camera and video camera. During operation, a large number of files are created, which can have different sizes.
Samsung file system limit - which means using all the phone's memory. A device clogged with images, cache, various files and downloads may have problems. There is a situation when, when the Samsung file system limit is reached, the mobile phone stops turning on.