Problems with the Microsoft Outlook Personal Folders file format, commonly referred to as PST, have been a huge problem for many years. Microsoft knows this, which is why Outlook comes with a built-in tool called Inbox Repair that will help you fix corrupt PST files.
In most cases, fixing it is as simple as running the corrupted PST file using the Inbox Repair tool. But sometimes you need to take extra steps to recover your lost items.
How Outlook PST File Recovery Works
The Outlook mailbox recovery tool is hidden deep in the Microsoft Office installation folder on your computer, so you'll need to do a little digging to get to it. Once you have found and launched Inbox Repair, all you need to do is select the corrupted PST file to repair it.
Important: Inbox recovery allows you to create a backup copy of your damaged PST file. Be sure to select it as you may need a copy to recover missing data later.
- Quit Microsoft Outlook completely.
- Open File Explorer. Depending on the version of Windows you are using, navigate to the following folders:
- Windows 64-bit: Local drive (C:) > Program Files > Microsoft Office > root > Office16
- Windows 32-bit: Local drive (C:) > Program Files (x86) > Microsoft Office > root > Office16
Note. The folder paths above apply to Outlook 2016, Outlook 2022, and Outlook 365. If you're using an older version of Outlook, you'll need to select the Office15 (Outlook 2013), Office14 (Outlook 2010), or Office12 (Outlook 2007) folder. instead of.
- Find the SCANPST file and run it as administrator.
- Use the Browse button to select the Outlook PST file you want to restore.
If you don't know where the PST file is, press Windows + S to open Windows Search. Then search for it by name and specify the file extension .PST. You will see the file location in the search results.
Alternatively, open Outlook and select File > Account Settings > Data Files to view the location of the PST file. Don't forget to close the application after this.
- Select Start. The Inbox Repair tool will check the PST file for problems. It will take some time.
- Click the radio button next to "Back up scanned file before restoring" and select "Recover."
- Click OK to complete restoring the PST file.
Open Microsoft Outlook and it should automatically start using the PST file without any problems. You will find a copy of the corrupted PST file (with a .BAK extension) in the same location as the restored original.
Other Troubleshooting Methods
How to get your letters, contacts, etc. back if ScanPST did not cope with its task?
Existing options for fixing Outlook database PST file:
#1 Office update
You must update Microsoft Office to the latest version. This procedure is different from updating Windows itself. Necessary:
- Open any program from the Microsoft Office package (Word, Excel, PowerPoint or other)
- Select “File | Account” (in versions 2010 and higher)
- Click on the “Update Options” button
- Select “Update Now” from the drop-down menu
- Download and install all updates;
- Reboot your computer.
#2 Using a special utility Truncate Oversized PST and OST Tool
For users of older versions of Outlook (97/98/2000/XP/2003) who use *.pst files in ASCII format up to 2GB in size, you can use the “Truncate Oversized PST and OST Tool” utility.
This utility is described in more detail on the official website microsoft.com. This solution applies only to *.pst files of the old ASCII format used in versions 97-2003.
#3 Using online data recovery services
You can use a paid online recovery service for *.pst or *.ost files here:
The user will only need:
- Select a document;
- Enter your email address;
- Write captcha characters from the picture;
- Click the “Next Step” button.
After this, the selected document will be sent to the service and analyzed.
Upon successful completion of the recovery process, you will be informed by the online service about the number of recovered objects of different types.
The folder structure in the corrected PST file will also be displayed:
As for the cost of restoration on this online service, it is $10 for every 1GB. Once the user makes the payment, he is provided with a link to download the repaired PST file. At this stage, you need to add it as a new PST file, and the previously damaged one needs to be removed from your Profile.
Advantages of the online service:
- There is no need to install or have Microsoft Outlook installed;
- Compatible with all devices: computer, tablet, phone;
- Compatible with all operating systems: Windows, MAC OS, Android, iOS and others;
- Affordable price.
Disadvantages of the online service:
- Long loading time when it comes to large files;
- It takes a long time to download large documents.
Recover lost and found files
Sometimes the Microsoft Outlook Inbox Repair tool can end up repairing a badly damaged PST file. Let's assume that the tool fails to place the repaired items in their original folders or locations. In this case, they will be placed in the Lost and Found folder or in a set of folders labeled Recovered Personal Folders.
You can recover these items by creating a new PST data file in Outlook and moving the contents from your lost and found or recovered personal folders into it.
- Open the Home tab in Outlook. Then open the menu next to New Email, hover over Other Items, and select Outlook Data File.
- Select the Outlook Data File option and click OK.
- Browse to a location on your computer, enter a name for the new PST file, and click OK.
- Click the More icon (three dots) in the lower left corner of the Outlook window and select Folders to switch the Outlook sidebar to folder list view.
- Drag the contents of lost and found or recovered personal folders into a new data file.
After this, you can delete the Lost and Found folder or Recovered Personal Folders data file from Outlook.
Solution #2: Check your profile settings
If the OST file not updating occurs due to incorrect Outlook profile settings, you can correct them to resolve the issue. To do this, follow these steps:
- Go to File > Account Settings > Select Account Settings .
- Click Data Files and make sure Mailbox Account Name is selected as the default.
- Under El. Address tab, click Mailbox - Account Name, and then click Edit .
- Make sure the Use cache mode with exchange checkbox is selected and click OK .
- In the Account Settings pop-up window, click Close .
- Now close and reopen Outlook.
After checking your profile settings, turn on automatic sync to fix Outlook sync problems . To do this, follow these steps:
- Open the Send/Receive tab in the top menu.
- Under Send/Receive Groups , hover over Define Send/Receive Groups to open Send/Receive Groups
- Make sure the Schedule automatic send/receive and Perform automatic send/receive on exit options are selected and click Close .
Recover additional items from PST
Suppose you notice any missing elements in the recovered data file. if you also can't find them in your Lost and Found folder or Recovered Personal Folders, you can try restoring them using a backup copy of the original. Essentially, you are trying to import the contents of the file without duplicating any items that the Inbox Repair tool has already recovered.
- Copy the damaged PST file backup to your desktop.
- Change the .BAK extension at the end of the file name to .PST.
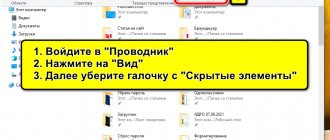
Note. If you don't see the file extension, open the File menu in the File Explorer window and select Change Folder and Search Options. Then switch to the View tab and uncheck Hide extensions for known file types.
- Open the File menu in Outlook and choose Open & Export > Import/Export.
- Select "Import from another program or file" and click "Next".
- Select Outlook Data File (.pst) and click Next.
- Click Browse and select the backup copy of the damaged PST file (the one you just renamed).
- Select Don't import duplicates and click Next.
- Check the "Include subfolders" checkbox. Then select Import folders into the same folder and select the account or data file into which you want to import the items.
- Select Done.
After Outlook finishes importing any items, you must manually confirm whether previously missing items are present. If not, try running the Inbox Repair tool another time.
What to do if all methods do not work?
In most cases, recreating the OST solves Outlook synchronization problems . However, if there is a problem in recreating the OST file or you cannot delete the OST file because it has important offline data, you can extract the OST file data using third-party software such as Stellar Converter to OST .
Stellar Converter to OST is a user-friendly and advanced OST to PST converter that recovers data even from inaccessible or lost OST file and saves it in an Outlook importable PST file. The program is easy to use and supports all versions of Outlook - 2022, 2016, 2013, 2010 and 2007.
Third Party Outlook PST Recovery and Recovery Tools
A quick search online will reveal many paid third-party tools that claim to repair damaged or damaged Outlook PST files. However, in almost all cases, an Inbox recovery tool should be more than good enough for the job.
Only use a third-party recovery program if Inbox Repair can't recover your data, and do your due diligence by carefully checking online reviews before spending any money on them.
Before we wrap up, here's an interesting tidbit: the Inbox Recovery tool also allows you to recover deleted items from Outlook.
Part 1: What is PST?
As mentioned, a PST file is a professional Microsoft Outlook file that contains all the data in Outlook when Exchange Server is unavailable. PST file stands for Offline Personal Storage, mainly used for local email data.
Like other digital files, PST files can become corrupted or damaged due to bad sector, sudden interruptions during recording, virus attack and more. Once this happens, the PST file cannot be downloaded as usual and you may lose important emails.
Use command line switches
If you're having trouble opening a certain program, you can use command line options to control certain options and settings to get things working. To do this, enter the following lines in the Command Prompt window (Windows key + X > Command Prompt (Admin)) or directly into the search bar in the Windows 10 Start menu.
- outlook /resetnavpane resets the program's navigation bar, which is a common source of several important problems.
- outlook /resetfolders restores all missing folders to the default delivery location.
- outlook /cleanreminders removes all alarms and events associated with the Outlook calendar, which may solve some startup problems.
Here are more useful command line switches to use with Outlook.
Start Outlook in Safe Mode
If Outlook stops responding when the Processing message appears on the screen, it's worth running the program in Safe Mode to possibly diagnose the problem.
To do this, press Windows + R keys to open Run, type Outlook.exe /safe and click OK.
If Outlook opens successfully, close the program and then open it again as usual. Hopefully it won't get stuck in the "processing" dialog anymore. If not, you can try booting Windows 10 into Safe Mode.
Check if Outlook is up to date
It's good to keep Windows 10 and Outlook updated. This ensures that you get the latest features and bug fixes. They should update automatically, but you can manually double check.
On Windows 10, press Windows key + I to open Settings and click Update & Security > Check for Updates.
In Outlook, open the program and choose File > Office Account > Update Options > Update Now.
Recovery Toolbox for Outlook
A convenient and inexpensive utility, you can download it from the link: https://outlook.recoverytoolbox.com/ru/outlook-data-file-cannot-be-accessed.html. The program does not require connection to third-party sites, so there are no privacy problems when working with Recovery Toolbox for Outlook . It's easy to work with her. The developers made sure that you can start immediately after installation. Before you begin, it is recommended that you make a backup copy of your important file.
In this simple way, you will not only insure yourself against surprises, but will also be able to check the system. If a Windows error appears during copying, you need to format or change the hard drive, and then reinstall the system. And so that such cases do not turn into a disaster every time, do not forget to make a backup of your operating system in the future. This will save your nerves and improve digestion.
Disable active add-ons
If you can open Outlook when using Safe Mode, but problems persist when it is deactivated, one of your add-ins may be faulty. This situation is often accompanied by an add-in-specific error message, but the instructions provided in that message are unlikely to resolve the problem.
Instead, start Outlook in Safe Mode (see instructions above) and disable all add-ins by going to File > Options > Add-ins. Open the program again without activating Safe Mode to make sure it works, and then activate each add-on individually to see which item is the culprit.
In the worst case scenario, disabling the add-in that's causing the problem will allow you to access Outlook normally again, even if you have to make do without the features it offers. Once you've narrowed the problem down to one add-on, you can search the Internet or contact its developer for more information about a fix.
Recovering Outlook emails after hard deletion
Every day, a system administrator in his work has to use many small tricks and non-obvious things, which, sometimes, are not properly described anywhere. Therefore, I decided to create a small section of short notes - system administrator tricks.
Sometimes you have to recover emails deleted in Outlook. This may need to be done for various reasons. It is important for us to know how you can restore a letter that has been deleted from the mail and from the deleted folder.
Exchange Secrets
The fact is that Exchange stores deleted information in its memory for some time (standardly, it should be 1 month); during this time, to restore a deleted letter you need to perform the following steps:
- On the computer where we want to recover deleted emails, click the Start button, select Run (for win7 - immediately enter the command), enter the regedit command and press the Enter button on the keyboard. We get to the registry editor.
- Open the registry subkey:
Other articles
Share on social media networks
Tags: mail Copyright © 2013-2017. All rights reserved.