Each of us has probably taken a screenshot of our iPhone at least once. Sometimes a screenshot is needed to record some important information in the phone's memory. Or, for example, send some kind of joke to friends; or an interesting post on a social network, when you don’t want to look for the “Share” button and it’s easier to press two buttons, select a recipient and send everything with a screenshot. To make it easier for us to find screenshots, Apple even made a special section with screenshots in the Photos app on iOS. But depending on the iPhone model, the methods take a screenshot on iPhone are different.
You can take screenshots with one hand, but two are still more convenient
How to take a screenshot on iPhone with Face ID
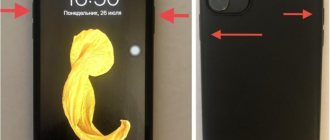
These phones include all iPhone X and newer models (except iPhone SE 2020). The entire front panel of these smartphones is occupied by the display, and there is no round Home button. To take a screenshot on the same iPhone 11, you need to simultaneously hold down the side button (which is on the right) and the volume up button (top left).
How to take a screenshot on iPhone X and later
To be honest, I sometimes get confused about which volume button to press. Sometimes I couldn't take a screenshot because I pressed the volume down button and the power button and the screen would lock instead of taking a screenshot.
Standard method
The first option is to simultaneously press two physical keys on the phone body. You need to hold down the Power button, which locks the device and is located on the right side of the device, as well as the Home button, which is located under the display on the front of the case.
How do you know if you succeeded in taking a screenshot on iPhone 7? After a few seconds of holding down the keys, your display should blink once. Also, when the sound is turned on, you will hear the shutter. A message will appear in the top notification bar indicating that the image has been saved to Photos. In new versions of the iOS operating system, the Screenshots folder will be automatically created. All screenshots will appear there.
How to take a screenshot on iPhone with Touch ID and side button
In the iPhone 6 and iPhone 6 Plus (up to the iPhone, Apple used a different button configuration. The on/off button “moved” to the right side. To take a screenshot on these smartphones, you need to simultaneously press the side button and the Home button (the round one under screen).
On iPhone 6 and later (up to iPhone, the lock button is on the side
Differences from other generations
iPhone 7 and 7 Plus are slightly different in functionality and management. From generation to generation, developers leave familiar functions for users. These also include taking a screenshot. In all iPhones up to version 6, the power button, with which you can take a screenshot on iPhone 7, was located on the top end of the case. Starting with 6 and 6 Plus, the creators moved the Power button to the right side of the phone. Otherwise, the procedure for taking a screenshot remains the same. Let's take a closer look.
How to Take a Screenshot on Old iPhones
In the classic version of the iPhone, the screen lock button was on top. Here the logic is almost the same as with the iPhone 6, just instead of the side lock button you need to press the top button and (at the same time) the Home button. Then quickly release both buttons.
On older iPhones, the lock button is on the top
No matter how you take a screenshot, after taking a screenshot, a thumbnail of your screenshot will temporarily appear in the lower left corner of the screen. You can tap the thumbnail to immediately view the photo and edit it (for example, add pointers or something else), or swipe left on it and the screenshot will simply be saved to the Photos app.
Taking a long screenshot
Long shots are screenshots of website pages, long lists, and personal correspondence. It is not always possible to fit such images into the format of a regular photo. You can create scrolling pictures using the free Tailor app. This requires:
- Download the program via the AppStore.
- Take several regular screenshots of the required page on iPhone 5 or other device models. The images must be taken overlapping: the lower part of the previous image must duplicate the upper part of the next one.
- Next, you need to launch the application, allowing the program access to graphic files stored in the iPhone’s memory.
- The program itself will recognize similar photos, then “glue” the pictures together.
How to Edit Screenshots on iPhone
Once you've taken a screenshot, you can click on the thumbnail in the corner to quickly make some edits. For example, circle some area on the screenshot with a pencil or add a pointer to this or that place to focus attention on it. There aren't a lot of editing tools, but interestingly, you can add a signature or even open a magnifying glass right here.
Quickly edit a screenshot in iOS
For advanced editing of screenshots, it is better to use the built-in Photos application. Previously, to edit screenshots, you had to use third-party applications, which take up a lot of space, but are not used to even half of their capabilities. The latest versions of iOS have advanced menus for editing screenshots and regular photos. After you select the editing menu, additional tools will open to you: filters, brightness, contrast, etc. I really liked the ability to crop and change the tilt of the screenshot.
To access filters and other menus, you need to open the Photos app.
There are at least 3 features of the Photos app that can make your life easier.
Settings
Setting the necessary parameters is a labor-intensive process. However, pairing of devices takes place at an intuitive level; gadgets display tips for correct connection.
How to sync iPhone with watch automatically
After the work done in the first and second paragraphs, the following follows:
- Place the smartphone over the resulting animation on the watch screen.
- Turn on the video camera and fix the dial strictly in the center.
- Wait for a notification that the pair has been created.
If pairing is not possible in this way (you cannot open the camera), the pair is created manually.
Making and breaking up a couple
When the watch is connected to the iPhone, the user will be presented with two options:
- set up Apple Watch like new;
- restore a backup copy from a backup.
Having chosen the appropriate option, you should then:
- Choose which wrist the accessory will be worn on.
- Agree to the iTunes terms of use.
- Provide your own Apple ID.
- Confirm actions on three pages with information about services, Siri voice assistant and diagnostics.
- Set password. Confirm it on your mobile device and watch at the same time.
- Select a method for downloading and installing programs.
- Wait until synchronization finishes.
You need to keep the devices close to each other until the pairing is complete. The completion of pairing is indicated by a characteristic sound alert and vibration of the watch. After the indicated signals, press the Digital Crown.
If you are not prompted for an Apple ID, you can sign in later in the Apple Watch app:
- Open the application.
- Select "Basic".
- Tap on Apple ID.
- Sign in.
You can easily skip the step of setting a password. However, it is better to think through the combination in order to later use the Apple Pay, Digital Touch and Handoff options.
When you unpair your Apple Watch, your watch returns to its factory settings. To break a pair, you need to place your phone and Apple Watch close to each other:
- Open the Apple Watch app.
- Go to the tab called “My Watch”. Select the appropriate device in the upper corner of the display.
- Click on the icon with the letter “i” (information).
- Select the “Unpair Apple Watch” option.
- Click again to confirm your decision. You can only confirm with a password.
Before stopping pairing, the iPhone creates a backup copy of the watch, which can later be used to restore data.
Deleting data without a phone
If the iPhone is not nearby and it is not yet possible to break the pair, you can erase the data in this way:
- Select “Settings” on your watch.
- Go to "General".
- Click on “Reset”.
- Confirm “Erase content and settings.”
Upon completion of the operation, factory settings will be restored.
How to connect Apple watch to another iPhone
To connect Apple Watch to a new phone, you need to prepare:
- your own Apple ID and password;
- connecting two smartphones to Wi-Fi;
- the minimum charge of all devices is 50 percent;
- watch password.
If you have an old iPhone, the reconnection instructions are as follows:
- Update your old mobile gadget and watch.
- Check your Health and Activity app settings.
- Back up your old phone via iCloud or computer.
- Set up a new iPhone.
- Launch the Apple Watch program on your new smartphone and follow the previously described steps.
If you don’t have your old iPhone with you, then the step-by-step instructions are as follows:
- Erase information on Apple Watch.
- Set up a new iPhone.
- Open Apple Watch PZ.
- Create a pair.
How to connect Apple watch to computer
You won’t be able to use Apple’s branded smart watch in conjunction with a computer, like you can with an iPhone or iPad. However, the company's developers have taken care of the ability to unlock your Mac using the Apple Watch.
What is the usefulness of this function for ordinary users? Auto unlock helps users access their computer without entering codes. To start working with your MacBook, you just need to activate the watch.
To use the described option:
- Enable Bluetooth and WiFi on your PC.
- Log in to iCloud. The main thing is that the Apple ID of the computer and smart watch are identical.
- Set up a password for Apple Watch.
- In the Mac settings, allow the watch to access the computer.
Connecting to iPad
A nice bonus of the watch is the connection not only with a mobile gadget, but also with other Apple equipment. You can establish pairing by following the step-by-step instructions:
- Activate Wi-Fi and Bluetooth on the tablet.
- Turn on the clock.
- Open the corresponding application on your iPad.
- Point the tablet camera at the watch screen.
- Wait until the pairing notification appears.
- Confirm watch registration.
All subsequent steps are the same as on an iPhone.
How to Screenshot an Entire Page on iPhone
An important innovation in iOS 13 is the ability to create scrollable screenshots. They are saved in PDF format, not PNG, and at the same time allow you to capture not only the visible part of the screen, but also that which extends beyond it.
- To take a screenshot of the entire page , press the Power key and the Home button or Volume Up button depending on your iPhone model;
- Once the screenshot thumbnail appears in the lower left corner, click on it before it disappears;
- At the very top of the editing window, switch to full screen mode, as shown in the screenshot;
- This action will open a screenshot of the entire page with the ability to scroll, enlarge, save and forward.
You can read our website even offline
These are the basic tips for working with screenshots in iOS 13 and later. If you know any other tricks, share them in the comments and in our Telegram chat. And don’t forget that even if you knew all these tricks, there are many users who may find this information useful.
Software Alternatives
If the universal method seems inconvenient to you or one of the buttons on the device does not work, you can take a screenshot in other ways: using the operating system tool - AssistiveTouch, or third-party applications.
How to take a screenshot using AssistiveTouch
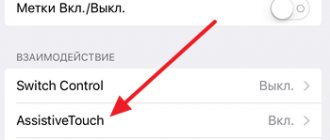
AssistiveTouch is a standard iOS feature designed to control your device using gestures. By default it is inactive.
To enable AssistiveTouch, go to the settings of your iPhone or iPad, open the “General” section and then “Universal Access”. Near the “AssistiveTouch” item (in the “Physiology and Motor Skills” section) o.
When you do this, a floating AssistiveTouch button will appear on the display (you can place it anywhere on the screen and move it freely around it). Tapping this button opens a menu of available actions, including the “Take screenshot” command.
Awesome Screenshot
Awesome Screenshot is a free extension for the Safari mobile web browser. With its help, you can take pictures of the entire page of a website opened in the browser or only its visible part.
After installation, the program icon will not appear on the desktop - it will be hidden in the “Actions” section of the Safari browser. To activate the screenshot function, go to the specified section and move the “Screenshot” slider to the “On” position.
As soon as the photo is ready, it will immediately go to the mini-editor built into the program. With this editor you can crop the edges of the image, mark the desired places with arrows and add text inscriptions to the picture.
Awesome Screenshot is officially supported by devices that run iOS 8: iPhone 4s, iPhone 5, iPhone 5s, iPad, iPad Air and Air2, iPad mini, iPod Touch and others. Support for iOS 9, 10 and earlier versions is not declared by the manufacturer.
Activator from Cydia (for jailbroken iPhones)
Activator is another free app, or rather a tweak for a jailbroken iPhone that allows you to take screenshots without a lock button. Or rather, creating screenshots is not its main function: it simply gives the user the opportunity to assign this action, for example, to the “Home” button. And when “photographing” the screen, press only it. By the way, instead of buttons, it is permissible to assign this operation to a gesture (swiping a finger across the screen, pinching, stretching, etc.) or movement (shaking the phone).
Activator officially supports iOS 9 (iPhone 6s) and earlier system releases. Support for iOS 10 has not yet been announced, but will likely be implemented in the near future.
Assistive touch
iOS has a little-used feature that allows you to create a virtual Home button. It's called Assistive Touch, which translates as “Assistive Touch”. It was developed specifically for people with disabilities and allows you to operate your smartphone with one hand, completely simulating complex gestures and pressing control buttons.
- By default, this feature is disabled and can be activated in the settings. In the general menu, select “Basic” and go to the item indicated in the screenshot.
- Having opened the “Universal Access” section, scroll down the list of settings to get to the desired option. In the screenshot it is highlighted with a frame.
- Move the slider marked with the arrow to activate Assistive Touch on the device. By default, the button that allows you to take a screenshot is located in the third nested action level. To make this feature easier to access and useful, open the boxed setting.
Working with a screenshot
With the release of iOS 11, Apple added the ability to quickly edit. The screenshot thumbnail remains in the left corner of the screen for a few seconds. If during this time the user makes no attempt to correct it, the photo is moved to the album in the Photos program. By opening it after saving, you can use filters and other enhancement mechanisms provided in the operating system for processing photographs.
Quick Edit
In fact, the Quick Menu is one of the implementations of the “Markup” option, which appeared in previous versions of iOS.
- The screenshot shows the moment a small copy of the screenshot appears and where it is placed on the smartphone screen.
- After clicking on the thumbnail, the photo opens in the editing panel. The number “1” shows the size trimming frame and the result of its action. The block, highlighted in color and marked with a two, contains a set of brushes for handwriting or simple drawings. The three indicates the Share menu. The plus symbol, above which the number 4 is placed, expands additional options.