The demand for video cards in the component market is due to two main factors. Firstly, this is the popularity of the gaming industry, which is growing every day and, at the same time, the sad situation with the optimization of modern computer games. Secondly, this is the widespread spread of a relatively new type of activity - cryptocurrency mining. However, annual computer upgrades are quite expensive, so the question of how to overclock a video card becomes extremely relevant.
General information
The process of overclocking a video card is called overclocking and implies a forced increase in hardware performance. In turn, the power of the card depends on the frequencies of the graphics core, video memory and shader units.
As the load on the video card increases, its power consumption also increases - this means that it must be provided with a good cooling system and a sufficiently powerful power supply.
Happy owners of laptops are strongly advised not to carry out such operations. Mobile chips are extremely vulnerable to overheating, so it may well be that instead of increasing the performance of your computer, you will have to send it in for expensive repairs.
The feasibility of overclocking
The first thing you should think about is how advisable it is to speed up the video adapter. After all, if you are worried about low FPS or lags in games, it is not a fact that the problem is in the video card. Therefore, I recommend checking the following:
- Monitoring . Get any utility to monitor the system under load. Launch a game or application, see how much the video card is loaded, and whether the power is limited to the processor or RAM. It often happens that the board is loaded at 50%, and the processor at 100%, and it is obvious that in this case there is no point in increasing the performance of the graphics device.
- Power unit . It must be powerful and of high quality from a trusted manufacturer. Noname do not provide the stated characteristics, have little service life and often become the culprit in the failure of components.
Separately, I will say about the built-in graphics “Intel HD Graphics” and “AMD Radeon HD”. There is nothing to drive there; the procedure is practically useless for owners of such video cards. If there is no overheating and the drivers are up to date.
After all checks and rechecks, proceed to further actions.
Why overclock your video card?
Often overclocking a video card is carried out for the following reasons:
- Increased component performance. Perhaps the most common reason why users resort to this procedure. This is the most effective way to increase FPS in both games and other 3D programs.
- Budget savings. For example, in series of mid-price video cards, manufacturers artificially limit performance. This is done in order to maintain a high level of sales of expensive flagship models. Therefore, it makes sense to purchase a more budget option and overclock it to the level of a top-end video card.
- Earnings. The growth of cryptocurrency rates over the past 10 years has increased significantly, which is why the demand for mining equipment has also increased. An increase in computing power also leads to an increase in actual profits.
The benefits of overclocking a video card also come with risks for the user. Constantly running at higher clock speeds can cause the card to overheat and shorten its lifespan.
Software methods
Optimizing game settings
This method is the most accessible and simple. Any game has many settings that can be adjusted to achieve the optimal configuration suitable for the characteristics of the video card. Reducing the graphics rendering distance, disabling some effects, such as shadows, reflections or waves on the water, reducing the detail of the picture - all this will significantly make the graphics card work easier and increase its performance. Moreover, not all effects are noticeable in the game, and disabling some of them will not lead to a sharp deterioration in the picture.
Setting up PC operation
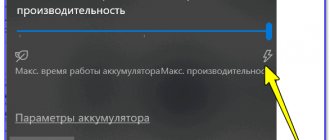
The graphics card is an integral part of the computer and works in harmony with its other components, so there are often situations when the video card slows down due to the operation of the operating system or programs installed on the PC. For example, OS settings are often aimed at saving energy or saving battery power in a laptop, which prevents the video card from working at full capacity.
Since the video card is paired with the PC's central processor, its overload will also prevent the card from functioning effectively. Therefore, to improve the performance of the entire system, you should disable or remove the programs that load it, usually these are background applications. It is also a good idea to install the latest OS updates, processor drivers or firmware.
Reinstalling and configuring video card software
All nvidia or AMD video cards have their own software for advanced and fine-grained operating mode configuration. Sometimes the video card freezes due to incorrect settings in such programs. A factory reset may fix the situation. Also, using the software, you can optimize the operation of the video adapter, for example, increase the speed of the cooler.
Updating your video card drivers can also be an effective way to increase performance. This is especially true for new cards, whose drivers are often “crude” and poorly optimized. In addition to updating drivers, updating the card firmware can be an effective speedup option. Firmware is the internal program of the card that interacts with the driver installed on the computer. Information on how to flash a video card can be found on specialized resources on the Internet.
How to overclock an Nvidia video card
Before proceeding with active overclocking steps, it is necessary to diagnose the video card and find out its parameters when operating in normal mode. The free GPU-Z utility is suitable for these purposes. The program is not Russified, but the interface is simple and intuitive.
After launching the utility, a window will appear with detailed information about the graphics card. To increase performance, the following parameters are used:
- GPUClock – shows the frequency of the graphics core;
- Shader – shows the frequency of shader units;
- Memory – shows the frequency of the video adapter’s video memory.
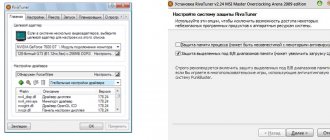
Nvidia Inspector is a portable, free program for overclocking NVidia video cards, released by the manufacturer. The utility does not require preliminary installation, so immediately after launching, in the window that appears, you need to click on the “ShowOverclocking” button, which opens a panel of additional parameters.
First, we raise two interrelated parameters – ShaderClock and GPUClock. It is recommended to increase the frequency by no more than 15-20% of the factory settings. To save the options, click the “ApplyClocks&Voltage” button.
Before increasing the video memory frequency, you should make sure that the video card is stable with the new settings by running a test for processing 3D data. This can be done using the FurMark benchmark program by running the “Burn-In Test” mode.
If no graphic artifacts appear on the screen during testing of the installed parameters, then the adapter operates stably. Otherwise, if signs of unstable operation appear, or the temperature of the video card exceeds 90 degrees, the test should be stopped. The procedure is repeated with a gradual decrease in frequency settings until the video adapter operates stably.
Next, we return to the Nvidia Inspector utility window and do the same actions with increasing the video memory frequency.
Upon completion of the selection of optimal operating frequencies, it remains to increase the supply voltage of the graphics card for its subsequent stable operation. This can be done using the “Voltage” parameter by moving the slider to the right side by one division.
The last step is to create a file with the specified settings, when launched, the video card will switch from normal mode to overclocked mode. To do this, just click “CreatClocksChortcut”, which will create a file with the parameters on the desktop.
If you wish, you can place the created file in the Startup folder, so that your Nvidia video card will be overclocked automatically when you start your computer.
What you need to know
Overclocking any element of a PC is called overclocking. It is carried out by increasing the frequency of operation of the component beyond standard modes. We are dealing with an NVIDIA GeForce video card.
So what should you keep in mind? Anyone who decides to overclock a graphics adapter must be aware of the general provisions of the procedure:
- To increase the frame rate, you need to increase the voltage in the microcircuits. This means that the probability of the power supply overheating becomes higher. This probably won't happen as often, but the chance of your PC turning off periodically is still quite high. The solution would be to purchase a more powerful power supply.
- Increasing graphics adapter performance means increasing heat output. An old cooler will not be able to cool as it should. For this reason, it is advisable to install a new one.
- It is necessary to increase the frequency slowly. Achieve a figure of 10 - 12% of the factory parameters, and then see how the PC reacts to innovations. Run the game for a short time and analyze the indicators. Pay special attention to the temperature. If everything is fine, increase your step.
How to overclock an AMD card
Overclocking an AMD video card can be done using standard tools found in the OverDrive or WattMan driver package.
First, you need to update the AMD driver, since the latest version of the software implies more stable operation of the hardware. It is recommended to use the 3DMark or FurMark benchmarks as a program for testing the capabilities of the video adapter.
The overclocking process is carried out as follows:
- Go to “Radeon Settings”, “Games”.
- Open “Global Settings” and go to the “Global Wattman” (or “OverDrive”, depending on the installed drivers) tab.
- First, you need to increase the power consumption of the graphics adapter. This can be done in the “Limited power consumption” section by moving the slider to the right side a few notches. After this, save the changes.
- Then the long process of gradually increasing the core and video memory frequencies begins. Having saved the changes, launch the 3DMark or FurMark program and begin testing the card.
- If artifacts appear on the screen in the form of freezes, blinking and other signs of unstable operation, cancel the test. We reduce the frequency and carry out the same operations until the optimal settings for overclocking are found.
If desired, you can also overclock the monitor. In the settings you need to open the “Display” section and create a new custom resolution. In the “Screen refresh rate” item, you need to gradually increase the number of Hz.
MSI Afterburner is another program for overclocking an AMD video card, which will allow you to carry out the process of increasing performance more accurately using additional parameters.
WORKING WITH FREQUENCIES
It is important to note right away that when properly overclocking a video card, it is very important to be patient. Of course, with such basic overclocking, the risk of damaging the component is quite small, but it’s better to be on the safe side - you don’t need to immediately turn all the sliders to the maximum.
So let's get started. The first step is to turn on Afterburner and make sure that the little Windows is not lit - clicking this button will ensure that the current settings will work when the system boots. It is better not to use them until you are sure that the card remains stable after overclocking.
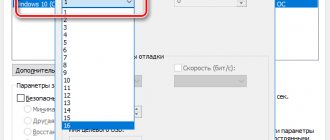
Then open Heaven in a small window so you can interact with Afterburner during synthetic tests. If you have FHD monitor, run the benchmark at 1280 x 720, and if you have a 1140p or 4K monitor , run at 1920 x 1080.
Hurray, everything is ready for overclocking. It's best to start configuring with the Memory Clock . Move the slider in short increments of 5-10 MHz, each time after that clicking the check mark. After each step, check the test window for visual artifacts appearing on the screen. These can be solid blocks, colored spots or spiky stars. Continue moving the slider to the right until you begin to see these obvious signs of memory failure (or until the program freezes or crashes).
Once you get to this stage, roll Memory Clock a step or two, apply the new settings and leave the test for a longer period. If the artifacts remain, roll back a couple more steps. If all is well, write down the memory limits somewhere and restore the card settings to default.
How to properly overclock a video card using MSI Afterburner
MSI Afterburner is a tool designed for overclocking Nvidia and AMD video cards. Due to its advanced functionality and user-friendly interface, it is one of the most popular programs among overclockers.
The functionality of this software includes:
- monitoring the state of the graphics adapter;
- voltage regulation of video memory and GPU;
- fan rotation speed control;
- the ability to create up to five personal overclocking profiles;
- video recording.
You can download the program for overclocking your video card from the official MSI website. When you launch MSI Afterburner, a window with basic graphics card parameters opens. First, you should go to the utility settings and configure compatibility properties.
Procedure for overclocking:
- CoreClock (MHz). Move the slider to the right side to 40-45 MHz and click “Apply”. This is followed by a stability check using 3DMark or FurMark. If there are no artifacts, we again increase the core frequency by 20 MHz and then test the video card. If desired, when the maximum frequency level is found, you can lower it by 10 MHz to ensure more stable operation.
- MemoryClock (MHz). Video memory overclocking follows the same principle as core overclocking. The first time we increase the value by 40-45 MHz, the second and subsequent times – by 20 MHz.
After completing all stages, the resulting settings can be saved in a profile and configured to be activated via hot keys.
How safe is it to overclock a laptop and PC video card?
Overclocking is relatively safe these days. If something goes wrong, the laptop or PC will crash or produce visual artifacts (which is also a good warning that your game is about to crash), but the likelihood of you actually damaging your hardware is slim . However, GPU damage can occur if you decide to become a professional GPU overclocker, using LN2 or “shunt mods” to remove voltage limits so you can deliver more power to the GPU... but I wouldn't touch that with a ten-foot pole! It is short-lived and provides little benefit at high risk. It's up to you, but you can obviously kiss this guarantee goodbye!
How to overclock a video card on a laptop
The steps to overclock a video card on a laptop are exactly the same as on a personal computer. Programs are used to improve performance and subsequent testing.
It should be taken into account that if there is enough free space in the system unit of a personal computer to install additional cooling, then in a laptop all the components fit quite tightly together.
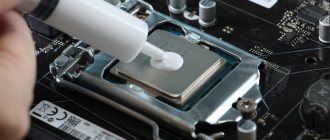
In addition, after overclocking the equipment, there is an increased energy consumption, which in turn leads to an increase in temperature. Therefore, before the procedure, it is recommended to clean the computer from dust and replace the thermal paste.
How to overclock a video card for mining
Mining (from the English “mining” is translated as “mining”) is the so-called process of generating cryptocurrency coins by carrying out various mathematical calculations of hash functions carried out during transactions using nodes of the currency network. Carrying out such calculations requires a large amount of computing power, so mining farms, which are computers with several high-performance video cards, are used to generate new coins.
With the development of a particular cryptocurrency, the process of its extraction becomes more complicated, as a result of which the growth of computing power necessary to carry out complex mathematical calculations also increases. Therefore, many miners are trying to extend the profitability of their farms by overclocking their graphics cards.
If there is a properly tuned performance increase and favorable forecasts associated with the existence of cryptocurrency, possible profits can increase by approximately 20%. Still, the figure is individual and depends on many factors.
It is worth considering that an increase in production capacity will lead to a reduction in the service life of graphics cards by about a third.
In the case of computer games, the overclocking process consisted of increasing performance, which always led to an increase in power consumption. When overclocking mining equipment, users are primarily interested in increasing the power of the graphics adapter and reducing its consumption. This is due to the fact that when mining cryptographic currency in intensive mode, the graphics cores of the card are not used.
For overclocking during mining, a standard set of tools is used:
- GPU-Z utility for displaying graphics adapter characteristics;
- MSI Afterburner software to increase clock rates.
To mine one or another cryptocurrency, graphic adapters from different manufacturers are used. For example, it is more profitable to use equipment from Radeon for mining Ethereum currency, and from Nvidia for ZCASH.
For clarity, before overclocking, it is recommended to start the mining process and monitor changes in indicators. The main characteristic that affects the amount of cryptocurrency mined is the frequency of RAM. It is this indicator that needs to be brought to the maximum level of its capabilities.
Further, power consumption is reduced through the CoreClock indicator to the left, while taking into account information about the number of megahashes. As practice shows, the reduction in energy consumption can be 20-25%.
If desired, you can reduce the rotation speed of the card fans, since with less power consumption the video adapter will heat up less.
In the MSI Afterburner settings, in the “General” section, there is an option “Run with Windows”, which must be activated to automatically launch the file when the system is turned on.
Optimizing software before overclocking the GPU
Overclocking is a hardware approach to optimizing your PC. It should only be used if your PC is already optimized at the software level, otherwise you will negate the improvements achieved through overclocking. To build a solid foundation for overclocking, you should first optimize your PC software for gaming and consider using Avast Cleanup to reduce the impact of third-party processes on your computer. The combination of optimized hardware and software will give you the best performance.
Overclocking is an easy way to improve the performance of your PC or laptop in games or multimedia. A few things you'll need:
- The overclocking tool is my personal preference and perhaps the leader of the bunch - MSI Afterburner, which works for most AMD and NVIDIA GeForce chips. Note that the new versions of MSI Afterburner also have an “OC Scan” feature, originally designed for NVIDIA's latest GeForce RTX series (2070, 2080, 2080 Ti), which automatically overclocks your GPU - a nice feature. More on this later. You can download MSI Afterburner and its latest beta versions (which I recommend, especially for new generation GPUs) from this page.
Overclocking utility MSI Afterburning - If MSI isn't for you, then EVGAs Precision XOC is a good alternative that works great on non-EVGA cards. However, EVGA requires you to register for an account before you can download this (otherwise) free and great tool.
EVGA Precision X Overclocking Utility - AMD users might want to look at AMD Overdrive, which is specifically designed for AMD GPUs. If none of the above tools are working, this will help you push your equipment to its limits—and beyond.
- GPU Stress Test - GPU overclocking works well at first glance, or even for a few minutes or hours as you game. However, in my experience, overclocking shows its true effect after a few hours of actual gaming. Just recently I thought I had found the perfect overclocking settings for my Titan Xp GPU, but I realized that these settings were crashing after 1-2 hours of gaming. That's why you need a good GPU stress testing utility - run it for a few hours to find your personal settings. Personally, I use two tools for this: 3DMark and Unigine Valley.
Run this test and get baseline data on your GPU's frame rate, stability, clock speed, and temperature. Repeat this several times to get an idea of your GPU's capabilities.
3DMarks Stress Test provides a lot of detailed analysis and is easy to automate, but you must have the “Professional” (paid) version.
Unigine Valley renders a very complex forest, pushing your CPU/GPU to its limits.