Almost every modern mobile device has a default recovery menu with not the widest functionality. Other features include inconvenient control of mechanical keys and problems with flashing, which can only be corrected using a third-party Recovery menu with advanced capabilities.
How to flash via TWRP Recovery
Let us remind you that any change in the software of Android devices in ways and methods not provided by the device manufacturer is a kind of hacking of the system, and therefore carries certain risks.
Before proceeding with the steps of the firmware procedure, it is strongly recommended to make a system backup and/or a backup copy of user data. You can learn how to carry out these procedures correctly from the article: How to make a backup of an Android device before flashing the firmware
Content:
Installing TWRP Recovery
Before proceeding directly to the firmware through a modified recovery environment, the latter must be installed on the device. There are quite a large number of installation methods, the main and most effective of which are discussed below.
Method 1: Android application Official TWRP App
The TWRP development team recommends installing its solution on Android devices using the self-developed Official TWRP App. This is truly one of the easiest installation methods.
You can download the Official TWRP App from the Play Store or from our website
1. Download, install and launch the application.
5. After downloading the image, return to the main screen of the Official TWRP App and click the “ Select a file to flash ” button. Then we indicate to the program the path where the file downloaded in the previous step is located.
6. Having completed adding the image file to the program, the process of preparing to record the recovery can be considered complete. Press the “ FLASH TO RECOVERY ” button and confirm that you are ready to begin the procedure – tap “ OKAY ” in the question window.
7. The recording process goes very quickly, upon completion the message “ Flash Comleted Succsessfuly!” " Click “ OKAY ”. The TWRP installation procedure can be considered complete.
8. Additionally : To reboot into recovery, it is convenient to use a special item in the Official TWRP App menu, accessible by pressing the button with three stripes in the upper left corner of the main application screen. Expand the menu, select the “ Reboot ” item, and then tap on the “ REBOOT RECOVERY ” button. The device will reboot into the recovery environment automatically.
Method 2: For MTK devices - SP FlashTool
Method 3: For Samsung devices - Odin
Owners of devices manufactured by Samsung can also take full advantage of the modified recovery environment from the TeamWin team. To do this, you need to install TWRP recovery using the method described in the article: Flashing Samsung Android devices using the Odin program
Method 4: Installing TWRP via Fastboot
Firmware via TWRP
Despite the apparent simplicity of the steps described below, you need to remember that modified recovery is a powerful tool whose main purpose is to work with device memory sections, so you need to act carefully and thoughtfully.
In the examples described below, the microSD card of the Android device is used to store the files used, but TWRP also allows you to use the internal memory of the device and OTG for such purposes. The operations when using any of the solutions are similar.
Installing zip files
1. Download the files that need to be flashed into the device. In most cases, these are firmware, additional components or patches in *.zip , but TWRP allows you to write image files in *.img .
2. We carefully read the information in the source from where the files for the firmware were obtained. It is necessary to clearly and unambiguously clarify the purpose of the files, the consequences of their use, and possible risks.
3. Among other things, the creators of modified software who have posted packages on the network can note the requirements for renaming the files of their solutions before installing the firmware. In general, firmware and add-ons distributed in *.zip DO NOT need to be unpacked with an archiver ! TWRP manipulates exactly this format.
4. Copy the necessary files to the memory card. It is advisable to arrange everything in folders with short, clear names, which will avoid confusion in the future, and most importantly, accidental recording of the “wrong” data package. It is also not recommended to use Russian letters and spaces in the names of folders and files.
To transfer information to a memory card, it is advisable to use a PC or laptop card reader, and not the device itself connected to the USB port. This way the process will happen much faster in many cases.
5. Install the memory card into the device and enter TWRP recovery in any convenient way. In a large number of Android devices, the combination of hardware keys on the device “ Volume - ” + “ Power ” is used to enter. With the device turned off, press the “ Volume- ” button and, while holding it, press the “ Power ” key.
6. In most cases, today users have access to TWRP versions with Russian language support. But in older versions of the recovery environment and unofficial recovery builds, Russification may be missing. For greater versatility in the use of instructions, the work in the English version of TWRP is demonstrated below, and the names of items and buttons in Russian are indicated in parentheses when describing the actions.
7. Very often, firmware developers recommend performing the so-called “ Wipe ” before the installation procedure, i.e. cleaning the “ Cache ” and “ Data ” sections. This will delete all user data from the device, but avoids a wide range of software errors and other problems.
, press the “ Wipe ” . In the menu that opens, move the special procedure unlocker “ Swipe to Factory Reset ” (“ Swipe to confirm ”) to the right.
When the cleaning procedure is complete, “ Succsessful ” will . Press the “ Back ” and then the button at the bottom right of the screen to return to the TWRP main menu .
8. Everything is ready to start the firmware. Click the Install ” button .
9. The file selection screen is displayed - an improvised “ Explorer ”. At the very top there is a “ Storage ” button (“ Select drive ”), which allows you to switch between memory types.
10. Select the storage into which the files planned for installation were copied. The list is as follows:
Having decided, set the switch to the desired position and press the “ OK ” button.
11. Find the file we need and tap on it. A screen opens with a warning about possible negative consequences, as well as an option “ Zip file signature verification ” . This item should be marked by placing a cross in the checkbox, which will avoid using “ incorrect ” or damaged files when writing to the device’s memory sections.
After all parameters have been determined, you can proceed to the firmware. To start it, we move the special unlocker for procedures “ Swipe to Confirm Flash ” (“ Swipe for firmware ”) to the right.
12. Separately, it is worth noting the possibility of batch installation of zip files. This is a rather convenient feature that saves a lot of time. In order to install several files in turn, for example, firmware and then gapps, click the “ Add More Zips ” button . This way you can flash up to 10 packages at the same time.
Backup firmware with saving settings via TWRP
As we wrote above, using TWRP you can save the installed firmware, similar to CWM. It's quite simple to do this:
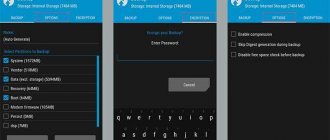
- boot into recovery;
- go to “ Backup ”;
- configure compression, system partition, backup path and name;
- we confirm the actions and wait for the end of the procedure;
- then we reboot into the system using the “ Reboot ” item.
On miroSD, according to the path selected in the backup settings, the backup archive with the .win extension will be placed.
Flash an Android phone via TWRP
Home page » Flash an Android phone via TWRP
Buying a mobile phone always instills in the user the peak pleasure of modern times and delights them with a cool version of the Android OS. However, the rapid development of digital technologies cannot be stopped. Already a year or two after purchase, owners of Android smartphones begin to experience inconveniences: lack of updates, decreased performance, etc. The phone seems to be dying. How to breathe new life into the device? How to update a custom ROM - flash a phone to Android and thereby revive the device and add a lot of useful functions?
Methods for installing alternative recovery on Android
There are several options for updating recovery on Android: using the Rom Manager and TWRPManager available on Google Play, or via a computer. It all depends on the phone model and the specific type of recovery installed. The installation procedure via Google Play, as well as preparing the device, are similar for both types of versions, and an unlocked bootloader is required for the operation.
It is important to note that to install an alternative option directly from the phone, you must root it: that is, gain superuser access.
Phone firmware - what is it for?
There are many reasons that force smartphone users to flash their phone ROM with new Android code. No one has ever given up on the perfection of digital functionality:
All this has not yet caused moral or material damage to anyone.
Upgrading your phone's firmware opens up the prospect of switching to the most modern, optimized version of the Android OS. The firmware revives the device even in conditions of partial or complete refusal of the manufacturer to support the outdated version of the phone.
An example of the revival of Samsung Galaxy
Take, for example, the Samsung Galaxy S III smartphone. The 2012 model was incredibly popular, powerful, and modern in its time. However, the release of Android 4.3 Jelly Bean turned out to be the last update for the Samsung Galaxy S III.
This once popular smartphone is still capable of delighting users. To update you only need the correct firmware
The Korean smartphone received this update 6 months after the release of Google's Jelly Bean. Then the technologies marched past the popular smartphone “Galaxy S III” and remained far at the forefront.
And yet, the device, forgotten by time, turned out to be capable of restoring its functionality. Android smartphone modders and modifiers have made it possible to get the latest version of "Android-Marshmallow" through the custom ROM "CyanogenMod".
And now, thanks to the improved performance of later versions of the Android OS, the outdated Samsung Galaxy S III smartphone today works better than ever.
Therefore, if you have a phone on hand that has been forgotten by the manufacturer due to the release of more modern versions, it makes sense to flash the device’s ROM.
In this way, it will be possible to bring the smartphone closer to the community of young elite models. But there is a certain risk in this business and anyone who is going to take the risk should consider the following:
By invading the internal contents of a phone, tablet, or other device, the user automatically voids the manufacturer’s warranty.
In addition, installing firmware yourself risks physically destroying the device. Therefore, you need to follow the firmware instructions exactly.
Android phone firmware: tools
It should be clear that it is basically impossible to simply take a smartphone, connect it via USB to a PC and flash it. First, you need to unlock the bootloader, install and configure a recovery environment like “TWRP” (Team Win Recovery Project) on your phone.
The Team Win Recovery utility is one of the main tools used to flash ROM of smartphones of various models
In addition, you will need a ROM dump for the firmware. There are tons of ROM dumps from independent developers and tweakers. Some products are quite popular. For example, a dump for the free operating system “CyanogenMod”. The firmware is suitable for many mobile devices.
What does an Android smartphone user need?
Before flashing the firmware, you should accurately determine the phone model. Find out the code name of the device by the number. For example, for "GSM Galaxy Nexus" (GT-i9250) the code name is o. And the Verizon version (SCH-i515) is codenamed “toro”.
Thus, Verizon Galaxy Nexus users need to flash a dump created specifically for this version of the phone. You cannot flash a dump made, for example, for the “AT&T GSM” version.
The firmware of a smartphone produced by the Moto X model was carried out using a practical method and the results exceeded all user expectations
Below we will describe the instructions for flashing the dump firmware for the OS “CyanogenMod 12.1” in relation to a smartphone produced in 2013, model “Moto X” from . The dump is supplied by the developers as a ZIP file. You can download the latest stable version from the CyanogenMod OS download resource (list of devices in the left panel).
Files for Android phone ROM
Regardless of which ROM dump you choose, you will also need a "Google Apps" ZIP file. The archive contains Google apps like Play Store, Gmail and Maps. None of these applications are included in the ROM dump.
Programs are downloaded from the resource “OpenGApps.org”. You should only download the version that is suitable for the phone and the Android version. In this case, Moto X requires the Google Apps package for Android Lollipop 5.1 (based on CyanogenMod 12.1) with an ARM processor.
So, the user has an unlocked Android phone with TWRP installed, a ROM ZIP file and the Google Apps package also in a ZIP file. This is enough to start the firmware.
How to prepare for flashing alternative recovery TWRP
Before installing this option on your device, you must unlock the Bootloader and enable the USB debugging service.
After completing the operations from the TWRP project offsite, you should download the image for your type of smartphone. Then you need to download the Android SDK Platform Tools, and move the custom system image file to the Platform tools directory. After that, put the phone into fastboot, connect it to the PC and proceed to the TWRP firmware process in the same order as CWM.
How to flash a ROM using the “Team Win Recovery Project” utility?
Before starting the ROM flashing, you need to download the above two ZIP files to your Android phone. To do this, connect your smartphone to the PC with a USB cable and drag (copy) the ZIP files to the phone’s internal storage area or to an SD card.
Uploading files required for the process of updating the ROM of a mobile phone is part of all actions aimed at rejuvenating the device
Most of the data on your phone will have to be deleted. If you need to save important information, it is recommended to use the backup or export functions of applications. You should also back up your internal storage.
Booting Android in TWRP mode
Next, you should turn off your Android smartphone and boot into TWRP recovery mode. How to do it?
Each phone model has its own nuances in this regard. Specific instructions for the model being flashed can be easily found by searching “Yandex” or “Google”. So, if the TWRP download is successful, the main screen of the recovery application appears on the smartphone screen.
It is recommended to make a backup using Team Win Recovery before continuing the phone flashing process.
Here you need to activate the “WIPE” button and then go down the screen to the option to select the reset function. Before flashing the ROM of an Android phone, it is always recommended to perform a factory reset. An exception can be made for updating the ROM, but this is also not advisable.
Firmware for Android phone via TWRP
After resetting the settings, you should return to the main “TWRP” screen and activate the “Install” button.
By activating this option on the recovery utility screen, the main action starts - flashing the Android phone with a new system dump
On the next screen, at the bottom, find the ROM file that was previously downloaded to the phone. Select the ZIP file by clicking and confirm the action on the firmware. The Android firmware process can take some time. You should wait for the operation to complete without taking any action.
Once the flashing operation is complete, you should return to the main screen and find the second ZIP file with the Google Apps package. Repeat the firmware with this package, waiting for it to complete.
The last option in the update process is to clear the cache. Then all you have to do is reboot Android and wait for the new system to appear
When the second stage of the firmware is completed, the next screen will open, where the “Wipe cache/dalvik” button will appear. You need to activate this button. After clearing the cache, the entire process is completed by rebooting the system.
Algorithm for working with TWRP for Xiaomi devices
So, when TWRP is already installed on your Xiaomi device, and, of course, the bootloader is unlocked, you can begin the procedure. It is also important to have a firmware file in .zip format, which is downloaded for each specific device on the manufacturer’s official website or on thematic forums, if the user is more interested in the unofficial build.
The firmware is installed via TWRP recovery as follows:
- The smartphone reboots and enters TWRP recovery mode. To do this, you need to turn it off, and then start it by holding the volume rocker in the up position and the power button of the smartphone. The result of pressing this combination will be the inscription “recovery” on the screen and, as a result, entering the desired menu.
- Now you need to reset all data except SD and OTG. To do this, go to the Wipe – Advanced Wipe sections and check the following items: Dalvik Cache, System, Data, Internal Storage, Cache. The device will be completely cleaned!
Reset data
- Then press back, select Reboot recovery and confirm the action (usually you need to drag the switch across the screen to the right).
- The firmware file must first be placed on the device.
It is recommended to place the .zip file on an SD|OTG memory card, since in this case the system information on the device will take up significantly less space, but not less than 200 megabytes. Backups created via TWRP should be placed in a similar manner. .
- If the necessary files have been downloaded and all previous steps have been completed correctly, then you can click “Install” and confirm the action (also by swiping to the right according to the standard). The firmware procedure may not be displayed on the screen in any way: you just need to wait a long time.
- When the firmware via TWRP is completed, you need to select the Wipe cache/dalvik section, and then Reboot System.
- Successful completion of the procedure will result in the fact that during the first reboot, three dots under the manufacturer’s logo (Xiaomi) will “blink” for about 10 minutes, and then the device will start.
Method 1: flashing firmware via Fastboot mode
Fastboot mode allows you to interact directly with the boot partition. Therefore, for most Android devices, the main method of installing TWRP recovery is flashing the firmware via Fastboot.
1) Place the TWRP file in the folder with ADB and Fastboot.
2) Next, connect the device in the appropriate mode to the PC.
3) In the command line, check that the connection is correct using the fastboot devices command.
4) If the serial number is displayed, then enter fastboot flash recovery recovery.img
5) One second, and the modified recovery is flashed.
Among the disadvantages of this method, it is important to note that an unlocked bootloader is required. While the lock is active, you will not be able to install TWRP. It is also necessary to clarify the availability of such recovery for your model and the preferred installation method. Perhaps in your case, other, more convenient installation methods are available.
Method 3. TWRP Recovery via Flashify app
Another application that allows you to install CWM Recovery, TWRP, Philz or download stock. You can also flash the kernel through it and install custom firmware. All this is available in Flashify.
1. When you launch Flashify for the first time, provide root access.
2. In the main menu, click “Recovery image”.
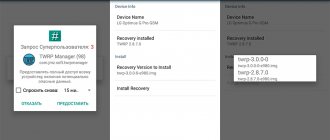
3. The program will ask you to select recovery. In this case we need TWRP.
4. Unlike the Rashr application, it correctly found the newest version 2.8.7.0. It's best to use it.
See also: Three ways to disable Talkback on Huawei and Honor
5. The download of the file from recovery will begin.
6. Once the application has finished downloading, you will be asked if you really want to install TWRP. Click on "Yup!" for confirmation.
7. At the end there will be a message about the successful completion of the recovery firmware.
Click “Reboot now” to immediately put your mobile gadget into recovery mode.
Method 2: Install TWRP via Flashify or Rashr
You can do without a computer and the long procedure of unlocking the bootloader if root rights are available on the device.
To get root, you should use Framaroot or 360 root programs. If there is a vulnerability in the firmware, the program will take advantage of the security hole and install root. More often, devices with Android version no higher than 4.4-5.0 are susceptible to hacking.
After obtaining root rights, you need to install the Superuser or SuperSU program to grant rights to the Flashify or Rashr programs. Both tools allow you to flash recovery, as well as make a system backup.
Why do you need TWRP?
TWRP stands for TeamWin Recovery Project. This is a custom recovery for Android. It allows you to do the following:
- install firmware from third-party developers;
- root your phone;
- create and restore backups;
- reset Android and its components;
- manage system files;
- install patches and do even more complex operations.
The reason why TWRP Recovery is the best solution is that it is updated frequently and officially supports a large number of devices. There are also many unofficial builds for other smartphones.
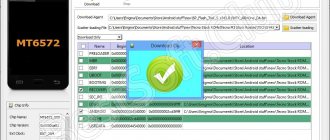
Method 5: Using SP Flash Tool
The SP Flash Tool program works similarly to QFIL, but flashes devices on the MediaTek platform. The program also allows you to install recovery.
3. If you are using Flash Tool version 3, check the box next to DA DL ALL WITH Cheksum .
4. Click on the Download , then connect the switched off device. Wait until the installation is complete.
Method 6: Installation from system applications
Programs such as Rom ToolBox, ROM Installer and the like offer to install TWRP or other recovery directly from the application. This installation method is outdated and irrelevant. Applications do not always correctly select the correct custom recovery, which is why owners get bricked. Therefore, do not use such harvester applications to install custom recovery.
The Flashify and Rashr applications also offer to install the recommended recovery, which is not worth doing. Use Flashify and Rashr only to flash the TWRP package that you downloaded personally from the official website. Do not use the recovery version that is inside the program.
What is CWM and TWRP Recovery?
For those who do not yet know what CWM or TWRP are, you can familiarize yourself with detailed instructions for using custom Recovery:
- How to enter the Recovery menu
- How to use CWM Recovery
- How to use TWRP Recovery
Why do you need custom Recovery?
If you want to get Root rights, or create a Backup of the current state of Android, or restore, or change the interface of a smartphone or tablet, custom recovery will help you!
Conclusion
The main way to install TWRP is through Fastboot mode. This type of installation is reliable and safe. For devices on the Mediatek platform, Flash Tool is used mainly. If you have root rights, installation is available via Flashify or Rashr. The QFIL utility is used primarily when installing on devices before 2014. Other methods are less relevant and reliable.
Leave comments with your wishes and suggestions for improving the article. Also share the article via social networking buttons to help your friends and acquaintances install TWRP correctly.
Was the article useful to you?
Rate it and support the project!
(
2 ratings, average: 3.00 out of 5)
Let us remind you that any change in the software of Android devices in ways and methods not provided by the device manufacturer is a kind of hacking of the system, and therefore carries certain risks.
Before proceeding with the steps of the firmware procedure, it is strongly recommended to make a system backup and/or a backup copy of user data. You can learn how to carry out these procedures correctly from the article: How to make a backup of an Android device before flashing the firmware
Content:
Installing TWRP Recovery
Before proceeding directly to the firmware through a modified recovery environment, the latter must be installed on the device. There are quite a large number of installation methods, the main and most effective of which are discussed below.
Method 1: Android application Official TWRP App
The TWRP development team recommends installing its solution on Android devices using the self-developed Official TWRP App. This is truly one of the easiest installation methods.
You can download the Official TWRP App from the Play Store or from our website
1. Download, install and launch the application.
5. After downloading the image, return to the main screen of the Official TWRP App and click the “ Select a file to flash ” button. Then we indicate to the program the path where the file downloaded in the previous step is located.
6. Having completed adding the image file to the program, the process of preparing to record the recovery can be considered complete. Press the “ FLASH TO RECOVERY ” button and confirm that you are ready to begin the procedure – tap “ OKAY ” in the question window.
7. The recording process goes very quickly, upon completion the message “ Flash Comleted Succsessfuly!” " Click “ OKAY ”. The TWRP installation procedure can be considered complete.
8. Additionally : To reboot into recovery, it is convenient to use a special item in the Official TWRP App menu, accessible by pressing the button with three stripes in the upper left corner of the main application screen. Expand the menu, select the “ Reboot ” item, and then tap on the “ REBOOT RECOVERY ” button. The device will reboot into the recovery environment automatically.
Method 2: For MTK devices - SP FlashTool
Method 3: For Samsung devices - Odin
Owners of devices manufactured by Samsung can also take full advantage of the modified recovery environment from the TeamWin team. To do this, you need to install TWRP recovery using the method described in the article: Flashing Samsung Android devices using the Odin program
Method 4: Installing TWRP via Fastboot
Firmware via TWRP
Despite the apparent simplicity of the steps described below, you need to remember that modified recovery is a powerful tool whose main purpose is to work with device memory sections, so you need to act carefully and thoughtfully.
In the examples described below, the microSD card of the Android device is used to store the files used, but TWRP also allows you to use the internal memory of the device and OTG for such purposes. The operations when using any of the solutions are similar.
Installing zip files
1. Download the files that need to be flashed into the device. In most cases, these are firmware, additional components or patches in *.zip , but TWRP allows you to write image files in *.img .
2. We carefully read the information in the source from where the files for the firmware were obtained. It is necessary to clearly and unambiguously clarify the purpose of the files, the consequences of their use, and possible risks.
3. Among other things, the creators of modified software who have posted packages on the network can note the requirements for renaming the files of their solutions before installing the firmware. In general, firmware and add-ons distributed in *.zip DO NOT need to be unpacked with an archiver ! TWRP manipulates exactly this format.
TWRP and what you eat it with
Initially, you should understand what TWRP is, and then talk about how to install the required firmware using it. In fact, everything is quite simple if you read the decoding of this abbreviation: TeamWin recovery. In fact, this is an unofficial recovery that can replace the standard software of any smartphone running on the Android platform. TWRP is also called custom, and most users who have dealt with it and with standard recovery believe that TWRP is more effective, functional and easy to use, and in addition to custom firmware, it allows you to install kernels, modems and other system components of the firmware .
Next, we will present more detailed instructions for TWRP recovery, with which you can install the firmware on any Xiaomi device (the instructions have a general form, since system files for different models often differ).
It’s worth saying right away that to install custom firmware, it is recommended to delete all data from the phone, which means you need to make a backup copy of it for later restoration on a device with a clean system. It is also important to unlock your smartphone's bootloader. How we install TWRP has already been discussed in one of the articles, so let’s immediately move on to information on how to reflash a device using TWRP with your own hands.
Sample list of TWRP features:
- installation of custom ROM builds;
- installation of updates, additions and corrections;
- connection to a computer in storage mode;
- connection to a computer for ADB debugging;
- saving copies of system files by backing up memory sections (system and user software, settings and other data);
- backup restoration;
- rollback of user settings;
- work with a removable drive (depending on the version, work with USB-OTG may also be supported).