Let’s imagine the following situation: a computer game lover purchases a recently released shooter, launches it, and realizes that the computer “can’t handle it”—a gamer’s worst nightmare. It’s not so disappointing to encounter lags and freezes, being the owner of already outdated hardware. The field of computer technology is constantly evolving; not a month goes by without presentations by leading manufacturers of new devices, PC components, gadgets, and software. Against this background, computer games are also improving: they become more dynamic, brighter, and receive more special effects and animation. It is quite logical that a modern toy places more serious demands on the computer hardware than an RPG game or shooter from 5-10 years ago.
But even owners of modern computers are not protected from nervous breakdowns and headaches caused by freezes and lags in their favorite game. It often happens that the game, in which you could spend time calmly a month ago, began to suddenly slow down. Experimenting with settings and trying to reinstall does not bring the desired results. The problem is obvious - the computer's performance has decreased. This can happen for various reasons. The user’s task is to find exactly where the problem lies and take all necessary measures to eliminate it. We, in turn, will help and tell you how to increase your computer’s performance in games.
Determining the number of FPS in the game
How to evaluate PC performance in games? To do this, you should use the free Fraps utility. A small program will measure the number of frames per second, in other words, determine the FPS. Users who play computer games know that the higher the FPS, the smoother the gameplay, the less stuttering and freezing. 60 FPS is considered a good indicator, but, as a rule, 40 FPS is enough for a comfortable game of strategy or RPG.
Dynamic shooting games like PUBG already require about 100 FPS. In any case, it's worth making every effort to get the most out of your hardware. Thanks to Fraps, you can track the effectiveness of actions taken to increase productivity. So, download the utility, install it, launch it and go into the game. All the necessary information should appear in the upper corner, where FPS is exactly what we need. We remember the average number of frames per second, after which we proceed to optimize the computer.
Update the video card driver
By spending just a few minutes updating drivers, you can increase your PC's gaming performance by as much as 30%. Of course, in order for the toy to “fly”, you don’t have to update the driver of the sound card or physical drive, but the video card must be running a fresh and current version of the software. By the way, we talked about the best utilities in the article on programs for updating drivers. To update the driver of a video card, it is enough to know the name of the device manufacturer. Owners of a video adapter from Nvidia just need to download a special utility.
This is interesting: How to overclock a laptop without burning its components
Similar applications have been developed by other companies - AMD Driver Autodetect, Intel HD Graphics Driver. It is recommended to update drivers immediately after the release of the highly anticipated game. Often, video card manufacturers release special assemblies aimed at optimizing hardware for the specific requirements of a gaming hit. All you need to do is open the application, go to the “Drivers” tab and click the “Check for updates” button. The program will make a request to the manufacturer’s official website and check if new “firewood” is available.
Optimizing visual effects for PC performance
If the Windows interface itself is slow, your video card cannot cope with the display. This happens on older netbooks and other devices with a built-in video card (see Which video card is better). But these effects can be disabled, which is recommended.
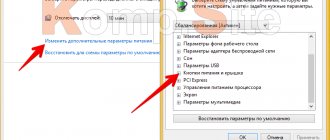
To do this, press the Win+X key combination, which will bring up the context menu. Select “System” → “Advanced system settings” → (on the “Advanced” tab → “Performance”) “Options”
select which visual effects you want to disable or enable. If you don’t want to delve into details, check the boxes as in the screenshot “Smoothing unevenness of screen fonts” - they have little effect on performance and improve the appearance of Windows.
If you do not have a built-in video card, and the Windows interface is still slow, you may not have installed the video driver.
Intel video card drivers are updated by the operating system. For Nvidia graphics cards, follow this link. AMD Radeon owners can.
If you don’t know the manufacturer of your video card, open the case of the system unit and look, it should be written on it.
There are information stickers on laptops and netbooks (see How to find out the characteristics of your computer).
Tablets and netbooks are only available with Intel graphics cards. Or, use the AIDA64 program, which will show you the manufacturers and models of PC components.
Hard disk cleaning software
One of the best ways to optimize your system is to clean it of unnecessary files. This group includes copies, reports, temporary files, browser cache. Lack of free space on the hard drive leads to a decrease in the speed of the computer, and, as a result, a decrease in its performance. The machine “thinks” for a long time and slows down the system while surfing the Internet, watching videos, playing shooters and strategy games. A small utility effectively copes with the task of completely and safely deleting unnecessary files. It is free and extremely easy to use.
After clicking the “Analysis” button, the program tracks unnecessary files according to the settings specified in the left block. Then just click “Cleaning” and the operation will be completely completed. Another good thing about CCleaner is that it allows you to eliminate small errors in the registry, which also have a negative impact on the speed of your PC.
To complete the picture, you should also use the built-in Windows tool to help free up some extra space. Go to “My Computer”, right-click on the name of the drive, select “Properties”. All you have to do is click “Disk Cleanup”. The system will scan the hard drive and display the final result on the screen.
For in-depth cleaning, instead of “OK,” click “Clean up system files.” This way you will be able to get several hundred megabytes of free space, in some cases GB of memory will be freed up.
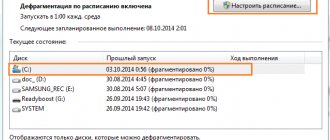
Disk Defragmenter
When the hard drive is cleared of unnecessary files, errors in the registry have been eliminated, it can be defragmented (this only applies to owners of “classic” hard drives; SSDs do not need to be defragmented). The defragmentation process involves updating and optimizing the logical structure of the hard drive. When files stored in memory are organized and collected together, the system spends much less time accessing them. We can say that defragmentation brings order to the system. The tool is available in utilities.
This is interesting: How to speed up Windows 10: 10 ways that you weren’t told about
The result of successful defragmentation will be an increase in computer performance by 50-60%, which will also be reflected in games. But it is worth considering that this is not an easy process, which can take about 5-6 hours for hard drives with a capacity of 1 terabyte. You will not be able to use a personal computer during this time. This operation should be performed once every 1-2 weeks.
Freeing up RAM
Before starting the game, it is advisable to close all background programs that, to one degree or another, consume the computer’s RAM. It wouldn't hurt to use a program like . It is able to terminate all unnecessary processes that remain in RAM even after exiting applications. For example, after exiting Skype, Opera, ICQ immediately before starting the game on a computer with 6 GB of RAM, you can additionally free up 700-800 MB of RAM.
Lack of RAM is one of the common reasons why the computer slows down when playing games. You can free it without third-party programs. To do this, you need to go to the “Task Manager”, which allows you to close active and background processes. It is best to close all unnecessary applications that appear in the corresponding tab. Also review everything that happens in the processes. You need to be careful here, since disabling a system process can lead to a short-term computer crash or deterioration in its performance. Therefore, if possible, you should only disable processes that are familiar to you. For example, browser.exe indicates Yandex browser activity.
Cleaning autostart
The main reason for decreased performance is the action of various background processes and programs that the user is not working with. This primarily refers to the “startup list”, which contains applications that start with Windows.
Many programs are added to the startup list without the user's knowledge. As a result, loading the system takes an order of magnitude longer than immediately after installation. How to fix it:
- Press Win+R.
- Enter "msconfig".
- Go to the Startup tab.
- Disable programs that you do not want to run with the system. It is recommended to leave only the antivirus and video card management utility - other programs can be launched manually if necessary.
This method works on Windows XP and all subsequent versions of Microsoft OS. On the “eight” and “ten” the startup list has been added to the “Task Manager” (Ctrl+Alt+Delete). You can clean the startup list using the CCleaner utility (Tools tab) - here this function is implemented even more conveniently than in the system itself.
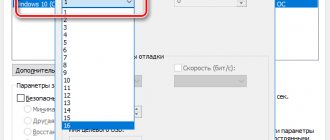
Increasing the swap file
A unique addition to the amount of RAM is the paging file. This is virtual memory into which some processes are unloaded from RAM. The size of the paging file is set by the user, and its entire volume is taken from the hard drive. As you know, the data transfer speed of a hard drive is much lower than that of RAM. Therefore, it is, of course, impossible to completely replace RAM by setting the maximum possible size of the paging file. However, with simple steps you can optimize your computer system and increase its performance in games.
To get to the paging file, you need to do the following: Go to the “Control Panel”.
Go to the “System” section.
Then select “Advanced options”.
In the “Advanced” tab, under “Performance”, click on the “Options” button.
All that remains is to go to the “Advanced” tab and click the “Change” button.
This is interesting: Creating a bootable USB flash drive for Windows 7 using the UltraISO program
It is strictly not recommended to set the paging file to be too large. Otherwise, instead of an increase in productivity, the user will receive the opposite effect - the system will begin to slow down. Ideally, you should set the volume to 30% of the amount of RAM, so that in total the RAM and page file have 6-8 GB. Set the required size, save your changes and restart your computer.
A few more simple but effective tips:
- place the swap file on the fastest hard drive;
- set the initial and maximum values of the paging file to the same value;
- turn off visual effects in the corresponding tab to knock out a few more performance gains;
Thanks to these actions, it will be possible to significantly optimize the system and prepare it for the launch of a new game.
Setting up Windows 10 for maximum performance
First of all, you need to understand that not all problems can be solved by optimization alone. For maximum operating speed of the OS, you also need good hardware. Ideally, your PC has at least 8 GB of RAM, as well as a high-speed solid-state drive on which Windows is installed. True, in this case you are unlikely to need optimization, except for better performance of games.
But in any case, the system must be kept clean, tidy and up to date. Updating drivers, the absence of garbage and viruses will have a beneficial effect on the operation of the OS, and the need to reinstall or restore Windows will disappear for years.
There are many ways to reduce the load on RAM and hard drive, some help only a little, while others can breathe life into an old PC.
Optimizing Windows 10 improves performance and extends the life of your computer
Setting up startup
Startup is the process of launching applications when the operating system starts. That is, when you turn on the PC, programs are launched that can run in the background regardless of user actions. Some malware can also get into startup and load RAM. This often happens when installing unlicensed software and utilities that are obtained from dubious sources.
It is recommended to optimize autoloading - eliminate everything unnecessary. This will reduce the consumption of computer computing resources.
- In the Windows search, enter “dispatcher” and select the best match.
In the Windows search, write the word “dispatcher” and select the best match - In the window that opens, go to the “Startup” tab.
All processes launched when the operating system starts are located in the “Startup” tab - Right-click on the unnecessary process and select “Disable”.
To remove an unnecessary process from startup, right-click on it and select “Disable” - We restart the computer so that Windows starts without unnecessary programs.
Removing temporary files and other junk using Disk Cleanup
As you know, a heavily cluttered hard drive interferes with the operation of the operating system. The more space and files are occupied (especially on the system drive), the more difficult it is for Windows to get to the required directory while running. That is why you need to regularly clean the partition on which the OS is installed.
- In Explorer or any other file manager, right-click on the C: drive and select “Properties”.
Right-click on the C: drive and select “Properties” - In the window that opens, go to the “General” tab and click on the “Disk Cleanup” link.
On the “General” tab, click the Disk Cleanup button - We wait for the cleaning wizard to generate a list of files to delete, then check the boxes for the required groups and click OK. Be careful when choosing file categories. All of them, including the contents of the trash, will be deleted permanently. Check again to see if the marked categories contain the information you need.
Mark the categories that need to be cleared of unnecessary files and click OK
It is worth noting that disk cleanup can free up a huge amount of memory. Especially when the system has been updated several times. I remember a case where the Disk Cleanup utility detected 27 GB of unnecessary information. In this case, the removal took place over two hours. Therefore, I advise you to be patient if the section is very cluttered.
Disabling unnecessary services
Services are standard Windows programs that are created to communicate between the system and individual computer devices. Services always run in the background and do not have their own interface. There are a lot of similar programs, but there are “superfluous” ones among them. For example, why do you need a working fax service if this device is not among those connected to the computer?
There is a large list of programs that can be easily disabled without any harm to the computer. This will free up operational space, which can be used to solve more useful problems.
- In the Windows search, enter “Services” and select the best match.
In Windows search, enter “services” and select the best match - In the services window, double-click on a program from the list to bring up its properties. Then change the startup type to “Disabled” and save the changes with the OK button.
In the services properties, change the startup type to “Disabled” and restart the computer - We carry out the same operation with all unnecessary services and reboot the computer.
List of services that can be safely disabled without damaging the operating system in any way:
- "Fax machine";
- NVIDIA Stereoscopic 3D Driver Service (for NVidia graphics cards if you are not using 3D stereo imaging);
- “Net.Tcp Port Sharing Service”;
- "Working folders";
- "AllJoyn Router Service";
- "Application Identity";
- "BitLocker Drive Encryption Service";
- "Bluetooth Help" (if you don't use Bluetooth);
- “Client License Service” (ClipSVC, after disabling, Windows 10 Store applications may not work properly);
- "Computer Browser";
- Dmwappushservice;
- Geographic Location Service;
- "Data Exchange Service (Hyper-V)";
- "Guest Shutdown Service (Hyper-V)";
- "Pulse Service (Hyper-V)";
- "Hyper-V Virtual Machine Session Service";
- "Hyper-V Time Synchronization Service";
- "Data Exchange Service (Hyper-V)";
- “Hyper-V Remote Desktop Virtualization Service”;
- "Sensor Monitoring Service";
- "Sensor Data Service";
- "Sensor Service";
- “Functionality for connected users and telemetry” (this is one of the options to disable Windows 10 “tracking” of the user);
- “Internet Sharing (ICS)” (provided that you do not use Internet sharing functions, for example, to distribute Wi-Fi from a laptop);
- "Xbox Live Network Service";
- Superfetch (assuming you are using an SSD);
- "Print Manager" (if you don't use printing features, including Windows 10's built-in printing to PDF files);
- "Windows Biometric Service";
- "Remote registry";
- "Secondary login" (if you don't use it).
Among the default Windows 10 services, there are quite a few that can be disabled without harming the operation of the computer.
Disabling visual effects
Visual effects such as shadows on windows, beautiful minimization, the ability to view media elements without opening a file, and others have a huge impact on system performance. All this “beauty” takes up space in RAM and video memory, so if you are not dependent on the aesthetic contemplation of visual effects, it is better to turn them off.
- In the search, we enter any characters from the name of the section we need, “Configuring presentation and system performance,” and select the best match.
In the search, enter any characters from the title of the section “Configuring presentation and system performance” and select the best match - In the window that opens, move the toggle switch to “Ensure the best performance” or uncheck all the visual effects, then save the changes with the OK button.
We put the toggle switch on the item “Ensure the best performance” and save the changes with the OK button
Disk Defragmenter
Fragmentation is a method used by Windows for writing files to disk. Let's say there is a movie and you need to save it to your hard drive. But there is no free space among the clusters located next to each other. In this case, Windows literally splits (fragments) the file into parts and writes it separately, into different sectors of the hard drive. In the opposite case, when the data needs to be read, problems begin - the file must first be glued together. This wastes RAM resources. It is for such cases that an optimizing process was invented - defragmentation.
Defragmentation is the rewriting of files into consecutive sectors . This process significantly reduces the load on the hard drive, thereby freeing up resources to increase the performance of the operating system.
- Open the disk properties as shown above.
- In the window that opens, go to the “Service” tab and click “Optimize”.
The button to start defragmentation is located on the “Tools” tab of the disk properties window - We wait until the program finishes its work. We repeat defragmentation for each partition and restart the computer.
To maximize system performance, you need to defragment all hard drive partitions.
Defragmentation is not always an optimizing process. In cases where a solid-state drive (SSD) is installed on the computer, the process of overwriting files only causes harm. The fact is that hard drives of this type have an extremely limited resource in terms of the ability to write information to the media. At the same time, the speed of an SSD is so high that the disk simply does not need to be defragmented. Most users simply disable the file rewriting service.
Disabling Defender
Windows Defender is a built-in antivirus program. It just so happens that the application consumes on average up to 100 MB of RAM when running in the background and up to 1 GB when scanning the disk. And although the work to protect your computer from external threats is invaluable, sometimes it is advisable to disable such a program.
- Open the Startup menu, as shown in the example above.
- Right-click on Windows Defender and click “Disable” in the drop-down menu.
In the Startup window, right-click on Windows Defender and disable it in the drop-down menu - Reboot the computer.
It is important to remember that disabling Defender makes your computer vulnerable to viruses and malware. Disabling an antivirus program is really justified only if the application is replaced by a less resource-intensive one or the computer is disconnected from the global network for the time being.
Driver Update
Drivers are the most important software products that are responsible for the correct operation of devices. In fact, this is the connecting link between Windows and the hardware. It is very important that the drivers are up to date, otherwise the system performance will be “limpy”. This is especially true for devices such as a chipset, video card (video controller, video adapter), buses, etc.
Standard drivers (which come with the OS and are installed during updates) only make the devices work, while programs from the manufacturer’s official website reveal all the capabilities of the connected devices.
All official driver suppliers work on the same principle: you need to find the required model through a search, select the operating system for which installation will take place, and download the product. Then you will need to install the driver and restart the computer.
On the manufacturer’s website, select the model, operating system and download driver installers
Conventionally, manufacturers are divided into two types: those creating complex (laptops and assembled system units) and private (individual components - video cards, disk drives, etc.) equipment and drivers for it.
It's worth noting that the drivers that Windows provides are often really up to date. But on my laptop, I noticed that the video card driver works better when installed from the official website. In this case, the power of two video cards is combined, and accordingly, gaming performance improves several times. Perhaps this is because Windows does not have time to process the entire flow of device software, or maybe not everything is licensed, but in any case, it is better to download drivers from the developer’s website.
Disabling file indexing
File indexing is a process that makes it easier for queries to find the files you need. At the same time, the indexing service consumes resources, and if the user does not have several thousand documents on the computer or there is no need to constantly search for favorites among them, it is better to disable indexing.
- Open the properties of the hard drive, as shown in the example above.
- In the “General” tab, uncheck the “Allow indexing...” item and save the changes with the OK button. The procedure will take some time and in the case of a system disk will require user participation, since some Windows files must be indexed.
In the disk properties, uncheck the “Allow indexing...” item and click OK
Video: Settings for maximum Windows 10 performance
Installing special utilities
Game optimizers have been developed especially for computer game lovers, designed to increase the number of frames per second during gameplay. Just a few years ago, there were a dozen companies involved in the creation and development of such utilities. Not all programs were useful, and most importantly, effective, so most of them simply stopped being supported and updated. Of the remaining utilities, it is worth noting.
The program frees system resources automatically and directs them to the game launched by the user. The developer claims that Razer Cortex doubles PC performance - this is perhaps a special case. If we talk about figures close to reality, then the computer will speed up by about 20-30%, which can also be considered a good indicator. Using Razer Cortex makes sense on a modern computer, but on old hardware the optimization effect may not be noticeable. To disable all internal Windows components that reduce the performance of your PC and free up virtual memory, you should go to the “Game Accelerator”, click on “Optimize” and “Acceleration”.
*** It is worth understanding that if the hardware does not meet the required minimum for the successful launch of the game, then optimization alone will not do. You will have to upgrade your computer - buy a modern video card, a powerful process, and a motherboard. If you already have a good, productive computer, just keep it in order and then there will be no problems with launching a new game. This includes not only systemic, but also physical cleaning. The accumulation of dust on the heatsink disrupts the heat exchange between the processor and the environment, resulting in a decrease in its power. If you take a comprehensive approach to optimization, you can achieve good results - FPS will double. Now you know how to increase computer performance.
Good game!
PC Performance Index
To view the PC performance index, close all running applications and do the following:
- press Win+X → “Command Prompt (Administrator)”;
- type Powershell → Enter;
- enter winsat formal, press the Enter button;
- the test will start. Execution time depends on system performance.
To see the performance rating, type Get-CimInstance Win32_WinSAT and press Enter. The same command is suitable for requesting a performance evaluation without running a previous test. It is not necessary to run the command line with administrator rights.
To view information about the processor (see How to choose the best processor), RAM and other hardware, do the following:
- Press the key combination “Win+R” → a command window will open, enter msinfo32 (relevant for all versions of Windows)
Before moving on to optimization software, clean your computer physically. Disconnect the PC, remove the side cover of the system unit and carefully remove dust from it. It is advisable to use dry wipes.
Blow into hard-to-reach places with a household hairdryer and set to cold air. This needs to be done because dust is the number one cause of computer overheating, and when it overheats, performance decreases.
It is recommended to clean your computer as often as possible, at least twice a year.