The most annoying and frustrating computer problems always occur at the worst times. Just about to start your tax return? Problems with the keyboard. Are you ready to Skype your distant relatives? Problems with the microphone. One of them comes first: a faulty mouse. Without your mouse, navigating your system is a difficult task.
Luckily, unless you have terminal problems, most mouse problems have a solution. Here are six ways to fix mouse problems in Windows 10.
Mouse Fixes to Try First
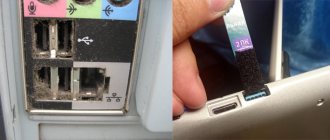
I say this in every troubleshooting article I write: check your connections. This is an incredibly simple thing. Sometimes a loose cable is the only thing causing a problem.
- Make sure your mouse or wireless adapter is not dead in its port.
- Try disconnecting the mouse cable or wireless adapter completely and reconnecting to a different port.
- If this is a new problem, sometimes restarting your system will provide an immediate solution.
If none of these quick tips solve your Windows 10 mouse problem, read on!
The mouse itself is broken
After checking the functionality of the USB ports of your PC or laptop, you can proceed to working with the mouse. In this case, it will not be easy to troubleshoot problems yourself, so the first step is to simply connect the mouse to a working laptop or computer. If there is an alternative device nearby with a working mouse or USB keyboard connected, then a check suggests itself. How to determine exactly whether the mouse is broken without the use of additional equipment? There are several ways:
- Complete all the items from the checklist for checking the functionality of the USB port. This will allow us to remove one unknown from our equation and continue to move towards the goal, assuming an obvious problem.
- Perform a visual inspection. The mouse cable, sensor, case - everything must be intact. There is no point in inserting a mouse with a broken cable into the connector. Visual damage will not guarantee that the mouse is faulty, but if the ports are working, the likelihood of such a development will increase sharply.
- Connect the mouse to a working computer. This list item can be completed immediately - a completely logical attempt to determine the health of the mouse. But we moved it to the 3rd point for two reasons. First of all, this is a completely logical and obvious solution. Secondly, not everyone has the capabilities for such verification. I also don’t want to go to friends or acquaintances, because I usually need a mouse urgently and right now.
After a series of checks, it is important for us to take away the following points. If the mouse is visually intact, the USB ports are working properly, and when the mouse is connected to the connectors it gives life signals (the optical indicator lights up), then almost always the problem will be in the software. If the cause of the failure is in the ports, it is simply tedious to carry out repairs, replacements, or connect the computer device to another connector. The mouse will have to be repaired or new equipment purchased.
Incompatible drivers
One of the first ports that causes mouse problems in Windows 10 is system drivers. Windows 10 takes care of driver updates for most of your hardware. However, it doesn't always do this correctly, and sometimes it doesn't always find a driver update after release. This doesn't mean you can't install a driver update manually.
Type Device Manager in the Start menu search bar, then select the appropriate option. Go to Mice and other pointing devices, select, then right-click and select Properties. Select the Driver tab, then Update Driver.
If you have the correct driver
If you have downloaded the correct driver, you should search your computer for the driver. On the next page, use the Browse option to find the driver, then click Next. The driver will install. Reboot the system when it completes.
If you don't have the correct driver
If you haven't downloaded the driver directly from . Windows will now automatically scan your computer and the Internet for any driver updates, and install accordingly. Windows will tell you if there are no updates available.
Driver update not available
If a driver update is not available, you can try reinstalling the mouse driver manually. Make a note of the name of your mouse or touchpad in Device Manager, and then go to the manufacturer's website. The manufacturer must ensure that your mouse driver is loaded with the latest version.
If you can't find the appropriate download on the manufacturer's website, do a web search for "[PC model] windows 10 mouse driver" or "[laptop model] windows 10 touchpad driver." The correct driver for your hardware should appear.
Once you download the new mouse driver, go back to Device Manager. Then go back to Mouse Properties and the Device tab. Select Remove and follow the instructions. Now install the mouse driver you downloaded manually and restart the system (see If you have the correct driver above).
The computer does not see the new mouse: what to do
If, when you connect a new computer mouse, it refuses to work, then there may be many reasons, the most common of which are described below.
- Errors occurred when connecting the gadget. You need to check whether the mouse is connected to the PC correctly. The contact must be tight.
- A low-power power supply is installed in the system unit. This problem arises when assembling a computer on your own, when the assembler does not have enough money for an expensive, powerful power supply. Be that as it may, the power supply will still have to be replaced.
- An outdated driver is installed on your computer. There are two ways to solve the problem. You can install a program to check and automatically install new drivers from the Internet (for example, Driver Booster). Or you can open the website of the manufacturer of this model yourself and rewrite the new driver from there.
- It should be said that the entire necessary driver package is installed automatically the first time you connect the device.
- The problem may arise due to the incompatibility of the mouse model with the system. For example, new devices will no longer be able to work with older versions of the system (Windows 95, Windows 98, Windows 2000, Windows XP, Windows Vista). This is especially true for gaming-type devices.
- Some users complain that new mice also refuse to work on Windows 10. This means that this system has many flaws. Therefore, there are two ways to solve the problem: purchasing a new mouse or installing a different version of the system.
- Driver conflicts. When you connect a multifunctional gaming gadget to your computer, the manufacturer's software package and drivers are installed. Therefore, in order to avoid driver conflicts, you need to disable the analogue supplied with the system installation.
Mouse cursor and disappearing cursor
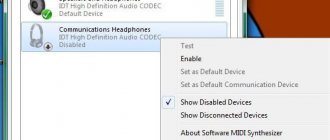
A common mouse issue on Windows 10 is related to Realtek HD Audio Manager. Unfortunately, Realtek HD Audio Manager is also the cause of audio driver problems. Right-click the taskbar, select Task Manager, and go to the Startup tab. If you see Realtek HD Audio Manager, right-click and select Disable. Now reboot your system.
Disabling Realtek HD Audio Manager is known to fix both mouse freezing and cursor disappearing issues.
My solution to this problem
Unfortunately, the above tips did not help me, but I had to do something. I just had a mouse with a PS/2 connector and with the help of it I was able to install Windows 7, but the problem did not end there after starting Windows, not a single USB socket was available it worked, but the computer did not have a DVD drive. I decided to start from a live disk (surprisingly, everything worked there), then I downloaded the drivers to the system partition, restarted the computer, installed the drivers and everything worked.
I hope some of the above helps you.
Mouse lag and beep
Your third mouse problem is another driver issue. Your mouse lags and makes a strange beeping sound. Microsoft first addressed these issues back in April 2016 with cumulative updates KB3147458 and KB3147461. However, trying the following fix will not do you any good if you are still experiencing mouse lag on Windows 10.
If you still have problems, go to Device Manager and look for Human Interface Devices. If you see a list of XINPUT HID compatibles, this fix may very well help you.
First, you need to download this version of the Xbox Wireless Adapter for Windows and extract it to a memorable location. Return to the XINPUT list in Device Manager. Right-click and select Update Driver.
Select "Browse My Computer for Drivers" and then "Let Me Choose" from the list of device drivers on my computer.
On the next screen, select Have Disk. This allows us to browse the system for the driver of our choice. Find the extracted files using the Browse button. Select xinputhid, then Open, then OK.
You should now be returned to the driver selection screen where the "new" XINPUT driver will be available for selection. Click Next, then reboot your system.
If this does not resolve the issue despite Microsoft releasing a fix, look for the above-mentioned updates (KB3140743 and KB3140768), uninstall them, and wait for the next set of updates to arrive.
Note: The list of human input devices may vary from system to system. This fix has been shown to work on a variety of systems using different hardware settings.
Mouse and keyboard does not work when installing Windows 7 solution
Let's start with advice from the Internet that didn't help me, but maybe it will help you.
- Use the USB connector. 2.0 instead of 3.0
- Disable the intel xHCI parameter in the BIOS (Responsible for transferring control of the USB 3.0 controller from the BIOS to the operating system)
- In the BIOS, set USB Keyboard Support and USB Mouse Support to Enabled. As a sign, the LED on the optical mouse does not light up after startup (no power).
- Insert the driver disk that comes with the motherboard, the installer will find everything automatically.
- ASRock motherboard, enabling PS/2 Simulation in the BIOS helped. After getting to the desktop, I installed the drivers from the disk, everything worked fine, I disabled this option in the BIOS.
- The solution was to set the Smart Auto parameter in XHCI Mode
- BIOS - Boot tab - Fast Boot Enabled - USB Support, change the option to another.
- I cured it by embedding a USB-3 driver into the Windows installer and distribution kit using NTLite.
Freezing touchpad
Some Windows 10 users report the touchpad randomly freezing after using the keyboard. This issue appears to be related to the Synaptics touchpad drivers, possibly a sign of a mismatch between your Windows 10 touchpad driver settings and the ones you typically use.
- Search for mouse in the Start menu search bar and select Change mouse settings. Alternatively, search for Mouse in Cortana's search bar and select Change mouse settings.
- At the bottom of the newly opened Mouse and Touchpad menu is an option called Advanced Mouse Options.
- Select ClickPad tab → Settings → Advanced tab.
- Slide the filter activation time bar back to 0 seconds and click OK.
Mouse acceleration
The mouse acceleration problem is incredibly frustrating, especially for the gamers among us. You line up at the head and BAM! Your mouse moves to the opposite side of the screen and you look at the spawn screen.
Windows 10 users are reporting acceleration issues in several scenarios. There is no single solution to mouse acceleration problems. Try some of the mouse acceleration problem fixes below and see which one works for you.
Turn off and on
First, try turning mouse acceleration on and off in system settings.
- Go to Control Panel → Hardware and Sound → Mouse.
- Select the Pointer Options tab.
- Uncheck "Improve pointer precision" to turn off acceleration.
- Select Apply and OK. Check how your mouse responds.
MarkC Mouse Fix
If the good old "turn off and on" doesn't work, you can try using MarkC Mouse Fix to fix your mouse acceleration problem on Windows. MarkC Mouse Fix is a registry file that fixes mouse pointer acceleration in Windows 10, retuning the feature to the expected level of accuracy.
Download the compressed MarkC Mouse Fix file and extract it to a memorable location. Next, find out which DPI (access point) you're currently using by typing "Display" in the Start menu search bar and selecting "Display options" from the options menu.
- If the slider is all the way to the left, your display DPI is 100%. If it is in the middle or to the right, it indicates a different scale. Click the slider to open a tooltip displaying the current DPI. Write down your DPI.
- If the slider is all the way to the left, your display DPI is 100%. If it is in the middle or to the right, it indicates a different scale. Click the slider to open a tooltip displaying the current DPI. Write down your DPI.
Go back to the extracted MarkC Mouse Fix folder, find your version of Windows and open the folder. Select the registry file that matches your display DPI. Answer Yes or OK to the prompts that appear. Now reboot your system to complete the fix.
You should now enjoy precise 1-to-1 mouse control, with no acceleration or pause between movements.
Download: MarkC Mouse Fix for Windows (Free)
Changing BIOS Settings
You don’t have to worry - if the keyboard and mouse are working properly, they will work in the BIOS settings. If you cannot manage partitions in the system menu, then the problem should be looked for on the side of peripheral equipment.
So, when you turn on the computer, you need to press the key responsible for entering the BIOS or UEFI. The button you need should be listed on the Start screen. After logging in you need to do the following:
- Go to advanced settings and set USB Legacy Support to Enabled. This will enable traditional support mode
- Now check if your BIOS version has separate options for enabling and disabling the keyboard and mouse. They are called USB Keyboard Support and Mouse Support. Both items need to be enabled.
- The next step is to disable the XHCI Mode parameter. It can also be found in advanced settings. It is necessary to set the option
- Now save the changes using the F10 key and restart your PC.
You don't have to do all the steps at once. You can set one setting and check its effectiveness, and then move on to another if necessary. If all else fails, don't forget to reset your BIOS to factory settings.