Author
Yuri Sanaev
System Administrator. Sales manager of computers and wi-fi equipment. Work experience – 10 years. Knows everything and even more about hardware and software.
TP-Link produces reliable and high-quality routers that are inexpensive and easy to use. Before use, it is important to correctly connect and configure the TP-Link router. In step-by-step instructions, we will analyze the technical characteristics of the routers of this company, get acquainted with possible connectors and indicators, and also consider all the subtleties of manual and automatic configuration.
Features and Specifications
TP-Link routers are presented in different price segments, from budget to premium. Depending on the capabilities and technical characteristics, they are suitable for solving different problems - setting up Wi-Fi in a small apartment or a wireless network in a large office. The devices offer different Wi-Fi speeds - from 150 to 3000 Mbit/s and support Internet speeds from 100 to 3000 Mbit/s.
The devices have different modes - they can be used not only to set up a wired or wireless network, but also in repeater or access point mode.
TP-Link routers work with different types of connections - with their help you can set up a connection via fiber optic, telephone line or USB modem.
An important feature of the company’s products is ease of setup. You can create a connection, select an operating mode, and set parameters for a wired or wireless network both through the WEB interface and in a mobile application (for models in the mid- and premium price segment). The web interface for all routers has a quick setup wizard, with which even an inexperienced user can set up a connection.
The additional functionality of TP-Link routers is very wide. The technique can be used to access IP TV, create VPN tunnels, guest networks, configure file, media, FTP and print servers (via USB) or to solve other problems.
You can compare models and choose the most suitable one to solve your problems on the manufacturer’s website at https://www.tp-link.com/ru/home-networking/wifi-router/?page=1
Remote access to the router via TP-Link ID from your phone
To link remote access to the router from a smartphone via the TP-Link Tether mobile application, you need to open the “Tools” menu and go to the “TP-Link ID” section of the same name.
Next, either log into an existing account or create a new one
To register, we also indicate your email, set a password and agree to the rules
And we link our router to the new account
After which he will be displayed as the owner of the device.
But it is also possible to add additional network administrators, who can similarly enter the settings remotely.
Connection
Before connecting the router, you need to install it correctly in the room. If you plan to set up a wireless network, it is recommended to place the device in the center of it. This will ensure a uniform signal in all rooms. If necessary, the router can be hung on the wall - on the bottom side of most models there are holes for vertical mounting.
The device must be placed so that the Ethernet or power cable is not stretched, as it can be pulled out by careless movement. There is no need to put the device in a niche, mount it too high or move it close to the wall - this will make it difficult to access the buttons on the case.
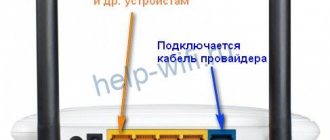
After installation, you need to connect a cable from the supplier to the router. The telephone wire is connected to the ADSL connector, the Ethernet cable is connected to the WAN port. Next, a network cable is routed from the LAN connectors to similar inputs on the PC system unit or other devices. The power adapter is connected to the connector on the case and then plugged into the outlet. If there is a power button, you need to press it to start the router, otherwise it will work immediately after connecting to the network.
Before you start setting up, you need to prepare an agreement received from the provider and find in it the data for establishing a connection. If it is not there, you can clarify the necessary information by calling the service provider’s support line.
Login to router settings
To set up an Internet connection on your router, you need to know how to connect to TP-Link to complete this task. All operations with the device are performed through the WEB interface.
Instructions:
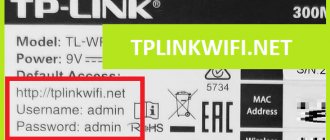
- Launch any browser and enter the IP address 192.168.0.1 or 192.168.1.1 in the address bar.
- A window will appear in which you need to fill in your credentials. If the router is new, then the values with .
- Press the enter button.
A web interface will open in which the user can establish a connection to the Network and configure the TP-Link router for further work.
Depending on the router model, there are 3 types of interface – blue, green and black. The instructions are similar, but the names and locations of the sections may differ. If the user is interested in setting up for a specific router model, it is better to find a manual specifically for it.
Read what to do if you can’t access TP-Link settings.
What is TP-Link ID?
TP-Link ID is a user account in the cloud service of the TP Link router.
We have already encountered cloud services on routers from other manufacturers, who managed to implement it a little earlier than TP-Link. Its essence is to have access to the router’s settings not only by being directly connected to its wifi signal, but also remotely, via the Internet. This makes it possible to manage your home or work network while being far away from the premises anywhere in the world. Convenient, isn't it?
Automatic setup
Automatic or quick setup of a TP-Link router is the easiest way to set up an Internet connection. A step-by-step wizard will help even inexperienced users create a connection.
Instructions:
- Click “Quick Setup” or “Quick Setup”.
- Select time zone.
- Set "Connection type". If the router supports this function, click “Auto-detection” so that it independently selects the connection type.
- If your provider uses Dynamic IP, you will not need to provide any other information. If Static IP, PPPOE, PPTP or L2TP are selected, you will need to enter additional data - login, password, IP address, etc., depending on the connection method. This information can be obtained from your service provider.
- Select "Do not clone MAC address".
- Set up a wireless network - specify a name, enable encryption, create a password. If the router operates on two frequencies, repeat the procedure for the wireless network on the second frequency.
- Check that the settings you have made are correct, if everything is correct, click “Save”.
The quick setup of the router is complete. Depending on the router model and the type of web interface, some steps may not be present or they will differ. If any difficulties arise, the instructions for a specific model will contain a more detailed description.
Possible errors and problems
Most often, when setting up a router from TP-Link, users encounter errors that say “No Internet access” or “Restricted”.
Do not be afraid of this problem; most often the problem lies in three aspects: incorrect router connection settings, faulty connection ports or incorrectly connected cables. If you have a problem like this, you should check these three points first. Just try different LAN connectors, use a different cable and carefully check the connection again according to our instructions. You can try resetting the settings. If this does not help, then seek help from a specialist or provider, who will be as accessible as possible and simply explain the essence of the problem and its solution.
Manual setting
Step-by-step manual configuration of a TP-Link router is more flexible than automatic configuration. In it, the user has access to more parameters that can be changed, in contrast to the quick one, where only basic settings are presented.
You can manually configure TP-Link on a laptop or computer using step-by-step instructions:
- Click "Basic setup".
- Click “Auto-detection” to have the router manually detect the connection type. If there is no such option, you need to ask your provider what kind of connection it supports and select the required type from the list. Typically this is a “Dynamic IP”, it is automated and does not require any data entry.
- If you select “Static IP”, you will need to manually fill in the IP, subnet mask, gateway and DNS server.
- PPPOE connection requires a login and password provided by the service provider.
- When installing L2TP or PPTP connections, fill in the username, password and IP. If the IP address is static, additionally enter the subnet mask, gateway and preferred DNS server.
- After making changes to the router, save the changes.
For the settings to take effect, the router will be rebooted.
You can reconfigure the router to a different connection type in the “Network” section, “Internet” tab.
Setting up via mobile application
You can manage TP-Link routers using an application for Android and iOS. This is a functional program that does not work with all router models. To see the list of supported devices, you need to open the application page on Google Play or the App Store.
Among the program features:
- viewing the router status;
- setting the status for connected users;
- setting up parental controls;
- creation of guest networks;
- control the router from a long distance;
- setting up the router: creating a connection, name and password for the Wi-Fi network;
- Manage your wireless network in real time: view connected users, block unwanted clients.
To work with the router, you need to download and install the application on your smartphone, and then launch it. The application will require registration via email.
To control the router, you just need to connect to it via Wi-Fi. If you need to set up a new device, you need to plug it in and then connect to the standard wireless network that appears (the name and password are on a sticker on the bottom of the router).
Now you need to launch the application. The router will appear in the list of detected devices. To start managing it, you need to enter your login and password (“admin”/“admin” or set by the user).
The main page shows a network diagram. You can tap on any connected device and block it if you don't want it.
In the “Management” tab, you can enable or disable the wireless network, change the password or name, and make it open.
In the “Parental Controls” section, you can add or disable devices to which the settings are applied. The rules are configured via the browser.
The Blocked Clients tab shows blocked devices.
The “Internet Connection” section is used when setting up the router for the first time. Here you select the connection type (Dynamic IP, Static IP, etc.) and enter the data (username, password, IP address, etc.) provided by the provider. More in-depth settings are performed via the WEB interface.
In the “System” section, you can reset the router to factory settings, reboot, and change passwords for logging into the application and the web interface.
How to connect a device to a network, PC or laptop
The procedure for setting up a router does not cause much difficulty. This is done for 5-10 minutes. Follow the steps in the following instructions one by one:
- Find the optimal location for the device. The network and power cable should not be under tension or create problems for the user when pressing buttons (WPS/Reset).
- If you have a Wi-Fi router with removable antennas, screw them into the correct places.
- Plug the power supply into the outlet and insert the end of the wire into the appropriate socket. Make sure the power indicator light turns on.
How to connect a device to a network, PC or laptop - The Internet cable is inserted into a port called WAN or Internet. It is often visually distinguished by a different color.
- Connect the LAN inputs of the router and the network card of the computer/laptop with a network cable.
How to connect a device to a network, PC or laptop
Models with Wi-Fi i can be configured over the air. This is relevant if you are not able to connect the router to your computer via LAN. This completes the manipulation of the wires. The process then continues in the web interface.
Wi-Fi connection and settings
Creating a wireless network on TP-Link routers is performed during the quick setup process, but if the user has not done so, he can configure the Wi-Fi network later in the WEB interface of the router.
TP-Link routers can operate in one or two bands, which means you can create one or two Wi-Fi networks on them.
Guide using the Archer C20 dual-band router as an example:
- Click “Select operating frequency”, specify both frequencies or select one.
- Click "2.4 GHz Wireless Mode". Check the “Enable” field, enter the name of the network, enable SSID broadcasting so that the created Wi-Fi network is visible in searches on connected devices. If you remove the label, the network will not be visible to others, but you will need to enter its name and password manually on your equipment.
- Click "Wireless Security". Select the “WPA/WPA2-Personal” type, create and enter a password.
- Select 5 GHz wireless mode, repeat the steps to create and protect the network described in steps 2-3.
For single-band routers, you do not need to select an operating frequency. In their web interface, you need to click “Wireless Mode”, turn on the network, enter your name and password, and choose whether to hide the SSID or not.
Advanced settings section
Advanced Wi-Fi settings. Useful advancements.
As a rule, TP Link modems do not require advanced settings. Everything should work with default values.
1. Channel: Auto is recommended. If there are many other networks in the neighborhood and the connection speed is weak, then you can experiment by manually selecting the optimal channel (from 1 to 11).
2. Mode: b / g / n / ac or their variations - bgn, bg, etc. In fact, generations of the Wi-Fi standard. You should select the most recent connection mode in the settings, bgn setting, or, if present, bgn+ac. The rest are needed only for rare cases of device incompatibility.
· The ancient and slow a and b modes were hardly seen even by seasoned specialists. These are retained for compatibility purposes and should not be used.
· Old “g” mode: can be used if older devices categorically refuse to work with other modes.
· Modern standard “n”: the most common for most devices.
· Latest “ac” standard: not supported by all devices.
3. Bandwidth (“width” of the Wi-Fi channel). Recommended values are 20/40 MHz, or Auto. The acceptable value is 40 MHz. Using 20 MHz significantly reduces network throughput, but sometimes helps to slightly increase its range.
Setting up IP TV
If the router supports IP TV, the user will be able to set up viewing interactive television on all of their devices connected to the wireless network.
Management:
- Connect the IP TV set-top box to the LAN connector on the router body.
- In the web interface, open “Network” – “IP TV”.
- Enable “IGMP proxy” (if there is no button, skip step).
- Select the LAN connector to which the set-top box is connected.
- For most providers, select the “Bridge” mode and save the changes.
- Some service providers (Rostelecom) require the VLAN ID value to be specified when connecting. You need to find out this parameter from a support specialist, and then select “802.1Q Tag VLAN” instead of “Bridge” mode.
- Disable “VLAN TAG for Internet”, in the “VLAN ID for IP TV service” field enter the value received from the provider. Select a port for IP TV. Save changes.
Depending on the web interface, to open the “IP TV” tab, you will need to go to the “Advanced Settings” section and then to “Network”.
Change Password
Changing the password must be done so that strangers do not gain access to the router and change its settings. To do this you need:
- Open the “System Tools” tab.
- Select "Password".
- Enter your old login and password (if the router is new, you need to enter “admin/admin”).
- Specify a new login, create, enter and repeat a new password.
- Save changes.
The new login and password must not be longer than 15 characters and contain spaces.
Security section – Wi-Fi security and password
Perhaps the most important section of the settings. The QSS parameter (more often called WPS on other routers) is responsible for quickly connecting new devices to your network at the touch of a button, without entering passwords. If we are setting up a network outside the home (in the office), then it is better to turn it off (disable).
TP-Link modem security settings section
· Network Authentication: security type. Remember the word WEP - and never use it at all. Exclusively WPA, or WPA2 - no other values are suitable for a secure connection. WPA type variations (Home or Enterprise) are also acceptable. However, there is an ancient belief: a person who does not encrypt his wireless network goes to heaven.
· Configuring Open in network encryption means that your Internet can be used by random strangers, and they can have access to computers on the network. Use it only when you know exactly what you are doing. Even public Wi-Fi networks with free access for cafes/gyms are now commonly protected with a password.
· Wireless Network Key: Enter your own network password. Do not confuse it with the password for connecting to your provider. It is this password that will allow other devices to connect to the network. If the device is used as a repeater, then you do not need to set a password. Passwords like 111111, qwerty, Andrey, etc. sooner or later they will definitely be picked up by their neighbors. Choose a complex password, with letters, numbers and special characters, at least 10-15 characters.
An old joke: a computer geek's best password is the name of his pet. After all, a professional IT specialist’s dog’s name is always something like [email protected] !kw.
· Encryption algorithm (WPA Encryption). Both AES and AES-TKIP are equally good, there is no fundamental difference.
Repeater mode
Repeater mode (repeater, signal amplifier) is a convenient option that allows the router to receive and amplify the wireless signal from the main router to expand its coverage area.
This mode is not available on all TP-Link router models. You can find out about its availability in the technical specifications of a specific device or in its web interface. If the device has several operating modes, it will have an “Operating Mode” section. You need to open it and find “Signal Booster”, select and click “Save”.
The router will reboot. In the “Status” tab you will see that the operating mode has changed to “Wi-Fi signal booster”.
Now you need to open “Wireless Mode”, select “Network Connection” and launch “Search”. If necessary, you can manually enter the main network name and MAC address. When the router finds it, you need to click “Connect”, enter the password and click “Save”.
Now the router should connect to the existing Wi-Fi network and expand it.
Firmware update
Updating the router firmware is performed in two ways - automatic (some models) or manual. New versions for manual updating should only be downloaded from the official website at https://www.tp-link.com/ru/support/download/. Downloading software from other resources can lead not only to the breakdown of the router, but also to infection of the computer with viruses or the installation of malware.
Instructions for automatic firmware update:
- Open "Advanced Settings" and go to the "System Tools" section.
- Select "Firmware Update".
- Click “Check for updates.”
- If a new version of the software is found, a corresponding notification will appear and a proposal to install it. You need to confirm the action, and then wait for the download and installation of the firmware to complete.
It is recommended to update online only with a stable Internet connection, connecting to your provider via cable. Wireless networks are less reliable, and a loss of connection can cause the update process to fail and cause the device to break.
Manual firmware update guide:
- Download the official website of the manufacturer https://www.tp-link.com/ru/support/download/.
- Select the device type and router model name, go to the device page and in the “Firmware” tab download the latest version of the software. Unpack the archive and extract the file.
- Open “Advanced settings” - “System tools” - “Firmware update”.
- Click “Browse”, specify the path to the firmware file, click “Update”.
- Wait for the process to complete.
It is forbidden to turn off the router while installing the update. This may cause it to break.
Reset
Resetting the router settings is performed if the device does not work correctly after installing new firmware, a technical failure, or incorrect user actions.
Instructions:
- Open “Advanced Settings”, select the “System Tools” tab.
- Click "Backup and Restore".
- Click "Restore factory settings".
The router will reboot, its parameters will be returned to their original settings, and user settings will be erased. The router will have to be configured again.
Some models support device recovery in a different way. If there is a “Reset” button on the device body, you need to press it and then hold it down for at least 10 seconds until the indicators on the body blink. The router will reboot and reset the settings to factory defaults.
Router hardware problems
All changes are stored in the modem’s volatile memory, in a specific chip located in the device body. In the event of a power outage, all changes must be saved. However, improper operation, wear, or initially low-quality materials cause breakdowns of microcircuits, which entails resetting the installed data. There are three main reasons for this type of malfunction:
- Unstable power supply, power surges;
- long service life (wear of parts);
- general wear and tear of the device.
What to do if the Internet or Wifi light on the router does not light up
Repairing hardware faults requires tools, new parts and skills. At home, it is rarely possible to fix such breakdowns; usually the modem is taken to a service center.
Important : if the device is still under warranty, you may still have to pay for repairs. This is due to the fact that power surges and overheating of the device are violations of operating rules, and therefore not a warranty case.
To prevent the router from overheating and changes from being disrupted, it is recommended to install the device in rooms with good ventilation, away from heat sources. If possible, it is better to connect all electronics, including the router, through uninterruptible power supplies.