Every novice user of an Android tablet or phone, traveling through thematic sites and forums, sooner or later comes across a mention of the mysterious, which is especially often mentioned in instructions for firmware, replacing the system kernel and other “hacker” things.
So what is it, what is it intended for, and how to handle it correctly? I will try to answer these questions in this article, which contains complete instructions for working with ClockworkMod Recovery.
In a nutshell, or ClockworkMod
or simply
CWM
is an alternative recovery for Android devices. Instructions for working with ClockworkMod Recovery contain the following sections:
What is recovery?
Every Android tablet or phone has a factory recovery that can be loaded when you turn on the device by pressing a specific key combination. Factory recovery usually knows how to install system updates from the update.zip file and clean the system.
Introduction to alternative recovery ClockworkMod
- this is a much more powerful system recovery utility (menu) compared to the factory one, which allows you to make full backups of the entire system of the device, install software, firmware, kernels and much more on it, which is usually not possible with factory recovery. ClockworkMod is installed in a special system partition of the internal memory of a tablet or phone, in place of the factory recovery menu.
ClockworkMod Recovery can help you out in some seemingly hopeless situations. Even if your tablet or phone cannot boot, in many cases, using CWM you can restore the system with all its settings and applications.
Here is a rough list of what you can do with ClockworkMod Recovery:
Install custom firmware and unofficial kernels
Install factory system updates, add-ons and patches
Connect to a computer via USB in removable storage mode
Connect to a computer via USB to work with the ADB program
Create a complete backup copy of the current firmware and its individual parts (system, settings, applications)
Restore a device from a previously created backup
Reset to factory settings (Wipe – data/factory reset), clear cache (wipe cache), clear Dalvik-cache (wipe Dalvik-cache), clear battery statistics (wipe battery stats)
Create partitions on a memory card and format them
Created by developer Koushik Dutta (also known as Koush), there are versions of CWM for most Android phones and tablets.
Installing ClockworkMod Recovery
For many smartphones and some tablets, installing ClockworkMod Recovery is a very simple procedure; you just need to install the ROM Manager
and the first item in its menu will be the ClockworkMod installation item.
For other devices, there may be separate utilities similar to the Acer Recovery Installer
for the Acer Iconia Tab tablet, or ClockworkMod Recovery can be installed on them using the
adb
.
Launching ClockworkMod Recovery
There are several ways to boot your tablet or phone into ClockworkMod Recovery.
1.
Using the ROM Manager program, selecting “Load Recovery Mode” from its menu.
2.
By pressing a specific key combination when turning on the device. This combination depends on the device model. On many devices, you can get into recovery by pressing the volume down and power buttons at the same time when turning them on.
Installing firmware, updates, kernels and more on an Android device using ClockworkMod
All alternative firmware, custom kernels, cracks, add-ons, decorations, application packages that can be installed on a tablet or phone using ClockWorkMod recovery are packaged as a zip file.
Before installing anything on your device, do not forget to make a complete backup copy of the current firmware, so that later you can painlessly return your tablet or phone to its original state.
Make sure your device's battery is fully charged and disconnect it from your computer and charger.
Copy the file you want to flash to the memory card, preferably to its root, WITHOUT UNPACKING IT. Make sure that the file name consists only of Latin letters and numbers and does not contain spaces or special characters.
If you are installing new firmware, be sure to do a complete wipe using the “ wipe data/factory reset”
«
Let's get started with the firmware
:
Insert the memory card into the device
Reboot the device into ClockWorkMod recovery
Select “ install zip from sdcard”
«.
Open the item “ choose zip from sdcard”
«.
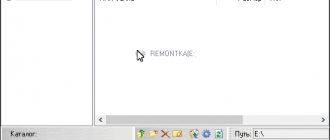
In the window that opens, we find our file, it will be located at the bottom, after the list of folders (if they are on the memory card)
Confirm your choice by going to “ Yes”
«.
As you know, the Android operating system provides the user with enormous functionality, using which he can realize the full potential of his smartphone: from advanced configuration using the engineering menu to a complete factory reset using a special mode - Android System Recovery 3e. You will learn what to do in this menu with a smartphone in this article.
This settings mode was designed for working with system files and system parameters. With its help, you can activate or block almost all functions of your Android device. Here you can perform such complex manipulations as completely cleaning or restoring the system in just a couple of clicks. Due to the important role this menu plays, getting into it is not so easy, but more on that below. In order not to harm your device, you need to know the mode items, their meaning in Android System Recovery 3e and what to do to carry out certain actions.
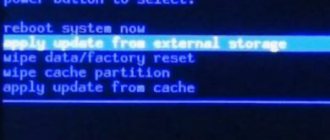
Apply Update From ADB
Translated into Russian, apply update from adb means “apply update from adb,” that is, by selecting this command you update the Android OS. As you know, the Android system update is installed via recovery in the phone or through a special program for flashing firmware from a PC corresponding to each manufacturer. At the same time, few people know about installing packages using ADB. Why this is necessary, you will learn from this article.
What does apply update from adb mean?
In "recovery" mode on a smartphone or tablet, several commands are available to apply system updates. If you have a firmware update file, then the following command is used, taking into account the location of the package:
- apply update from adb cache (the file is taken from the cache)
- apply update from adb external storage (the file is taken from the external drive)
- apply update from adb (update from computer)
In the standard “recovery” mode, you are prompted to select a file from the cache if the update has been downloaded by the system. You can also select on an external drive, or install the update via ADB if the package is on your computer.
Typically, updates are installed through a program built into the system. The user checks the availability of the package on the manufacturer's server and downloads it if necessary. The further installation process occurs automatically, without the participation of the owner. However, sometimes this method does not work.
Companies issue updates “in batches” in certain markets, which reduces the load on the server. Sometimes the update is recalled, less often the built-in program refuses to accept the update. More often, manual installation is used by impatient owners who want to be the first to test a new “package” of updates.
Mounts. Storage
Here are the controls for the internal and external memory of the smartphone. This item allows you to clear a memory card or built-in memory, format it, or attach it as a drive directly from recovery. This section can be used if you forgot to transfer the firmware file to the memory card, and there is no desire to reboot your smartphone into the operating system. In order to mount the device's memory card as a drive, you need to select Mount USB Storage. As soon as the connection is established, the computer itself will install the necessary drivers for operation.
Once the connection is established, you can do whatever you want with the memory card: format, clear, copy the necessary files, and so on. In order to unmount the flash drive, you should select the Umount USB Storage item on the smartphone screen in recovery. After this, you can move on to other recovery points and carry out further resuscitation of the device on your own.
Instructions for installing the update via ADB
Important! The minimum battery charge for installing small packages is 50%. For major upgrades, it is recommended to charge the battery to 75-100%.
- Download the update archive in ZIP format. Rename the package to "ota" or "update".
- In your phone settings, open the developer section, where you can enable “USB debugging”.
- Connect the device to a computer where ADB is configured. A data cable is required.
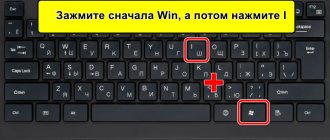
- In the context menu, while holding down the Shift button, open the command window.
- Put your phone into recovery mode using the adb reboot recovery .
- Confirm the action if a request to use USB debugging appears on the screen of your mobile device.
- In the recovery menu, select “apply update from adb” to apply the update via ADB. Use the volume buttons to navigate, and the power key to confirm the action.
- Next, on your computer, enter adb sideload (path to the archive on your PC) ota.zip.
- Once the installation is complete, reboot your smartphone from recovery – reboot system now. Or the adb reboot command on a PC.
The apply update from adb command is used to install a system update. This method is useful when other methods are not suitable at the moment. For example, there is no way to put the archive on the phone. It is also worth noting the ease of installation of the package. If you find it difficult to use ADB, then use ADB Run, where the commands are included in the program, which simplifies interaction.
Found an error or inaccuracy? Write about it in the comments, and also add a correction.
Was the article useful to you?
Rate it and support the project!
( 1 ratings, average: 5.00 out of 5)
Method 1: Unlock via Google Account
To remove the blocking using this method, the device must be connected to the Internet. If this is the case, then we perform the following procedure. We enter the wrong key several times in a row. Typically, devices are given 5 attempts to enter the key correctly, after which attempts are blocked for 30 seconds, and the display shows the message “You may have forgotten your graphic password.” Click on it, a window appears asking you to enter your Google account login and password. In this window, enter only your login (before the “@” symbol) and password, and click “Login.” You will then be prompted to create a new lock password. Create a new one or click “Cancel”.
In this method, it is important to remember the following. Creating a Google account after locking your device is useless
The account must be registered and synchronized in the device before the problem.
Also, a Google account can help you unlock Android in the following way, however, this method is not effective for all devices. From a third-party device (computer, smartphone, etc.), you should log into your account, select the “Security” tab and go to the “Two-Step Verification” section. The account is linked to your Android device - good, if not, try linking it to your phone number. In the “Two-Step Verification” section, select “Application Passwords” – “Manage Application Passwords”, where you need to enter your account password again. In the “Step 1 of 2” field that appears, create a new application password, enter the application name (any), click “Create password”. This creates an application password, which at the same time is a password for the device.
Apply update from ADB – updating your Android smartphone
“Apply update from ADB” is available in Recovery mode, including stock, CWM and TWRP recovery. First of all, you need to make sure that the smartphone can boot in this mode. The function is used in many situations, such as:
- Android cannot access the system launcher, but can enter recovery mode.
- The phone starts up with unknown system problems.
- Android is locked and does not allow further operations with other tools/apps using PC.
- OS is not available in certain country or area.
- The Android version has already been released, but is not yet available in a specific country or region.
- You don't want to force the ROM to boot, which could result in data loss.
- It is simply used as one of the ways to flash ROM (boot another version of the OS).
Using Apply update from ADB to update your smartphone.
Brevent
Apps running in the background can consume system resources and reduce battery life. There are many apps that can help prevent this, including the popular Greenify app. But they are often cluttered and difficult to implement certain features.
Brevent can run apps in idle mode or force stop apps just by using ADB.
Setting up ADB
Launch the application and configure ADB. Then enter this command:
Brevent does not force applications to stop or put them into standby mode by default. You must first put them on the violation list. Long press any app, then tap the Deny button. Once your app is on this list, it will no longer remain active in the background.
Tap the app and select Allow Sync in the dialog box to receive notifications or complete tasks.
Unique Features
- You can limit battery-hogging apps like Facebook while still allowing sync to receive notifications.
- For rarely used apps, you can set aggressive settings to force them to stop as soon as you hit the return button.
Download: Brevent (free, premium version available)
What does Apply update from ADB mean?
Android Debug Bridge is a powerful command line program that allows users to share data with a gadget such as an Android phone. The command activates various actions of the device, such as installing applications or debugging them. This is a client-server program that includes three components:
- The client that sends commands. The client runs on a PC. You can call the client from a command line terminal by running the ADB command.
- An application that runs commands on the device. It runs as a background process on every gadget.
- A server that manages communication between the client and the gadget. The server runs as a background process on the PC.
To use the Apply update from ADB option as a program on your computer, you must first download Android Debug Bridge.
What is ADB Sideload
Apply update from ADB, or "Sideload" is a technical term similar to the "upload/download" command. However, it usually refers to the process of transferring data between a mobile phone and a computer. As mentioned above, this is a program and you will need to “download it” from your PC to your Android phone to complete the update process. Compared to other methods of this approach, Sideload has several advantages:
- There are no wireless data charges.
- Content can be optimized for each mobile device.
- There are no geographical restrictions or network coverage.
- The content is not transferred to the network and can be saved to the mobile device.
Application management
Two commands are used to manage applications: pm
(package manager) - package manager and
am
(activity manager) - activity manager. These teams have many keys, which can be viewed on the developers portal. Let's look at a few.
To begin with, we will get a list of applications installed on the device in the form of package names that will be useful later:
Option 1. Subscribe to Hacker to read all materials on the site
Subscription will allow you to read ALL paid materials on the site within the specified period. We accept payments by bank cards, electronic money and transfers from mobile operator accounts.
When a user wants to update the firmware of his Android device, he encounters the “Apply update from adb” option in the Recovery menu. We will tell you what it is and what ADB is responsible for on Android.
Many Android users are interested in the question: how can you modify the existing firmware and thereby get a newer one? The Android debugging bridge, which has the abbreviation ADB
. Using this option, you can control any device with the Android operating system, unless the manufacturer has blocked access to this functionality. It is worth saying that the operating principle of ADB has a client-server basis.
Apply update from ADB
(translated as -
Apply Android Debug Bridge updates
) is a phone management function used when updating, restoring or customizing the system firmware.
Apply update from ADB function in the phone's Recovery menu
Instructions for installing the update via ADB
Before moving on:
- Make sure your Android device is charged more than 60%.
- Make sure you have enabled USB debugging on your Android.
- Install device drivers on your PC and make sure your device can be detected.
- Download the desired update.zip file from trusted sites such as smartphone manufacturer portals to your computer.
- Download the Android SDK on your computer.
Next, download Platform-Tools on your computer and extract the zip.file. Follow our instructions to avoid any problems. There are quite a lot of files in the folder. You will only use these four elements:
Connect Android to your computer using a USB cable, enable USB debugging on Android, and make sure your phone is detected by the computer. In the unzipped folder, hold down the Shift key and then right-click. Now select "Open Command Prompt". A command prompt window will open. Enter the command “adb devices” to check if the component is installed correctly and is compatible with the PC. If you get a serial number followed by "device", that means the server is working correctly. Move the update.zip file previously downloaded to the Platform-tools folder.
You should now boot your Android into recovery mode. To do this, turn off the gadget, and then turn it on while holding down the volume up or down key. Use the Volume keys to select the “Apply update from ADB” option and confirm the selection with the “Power” button. On your computer, in the command prompt window, type “adb sideload firmware file name”, then the zip.file will be sent to your Android.
For example: adb sideload sample.zip
Now your Android will open and check update.zip. The zip.file will then be downloaded on your Android. The process will take quite a lot of time, so do not turn off the gadget or turn off the computer, otherwise you risk getting a brick. When the process completes, you will see something like "Install from ADB complete". Ready!
How to use android system recovery 3e - command instructions
Hello, please explain how to use the Android System Recovery 3e mode, there is such a huge menu that half of the items are not clear.
Recovery (also known as the recovery menu) is a separate small operating system that has a minimum of functions and works independently of the main one. There are stock and custom recovery. The first is “native”, the second is modified and improved, it must be installed independently.
The most common custom ones are CWM and TWRP; they are supported by most devices.
To enter recovery on Android you need:
- be sure to charge the battery 80-90%;
- turn off the device;
- simultaneously hold down the “on/off” button, volume control button “louder”, sometimes also the “home” button (depending on the model);
- wait until the manufacturer icon appears;
- release, the recovery menu will appear.
To move around it, use the volume control carriage - “louder” up, “quieter” down. To enter the sub-item you need to press the “on/off” or “home” button. Returning to the previous menu is carried out using the “go back” item. After selecting any command, a list appears with sub-items “no” and one “yes”, which must be clicked to run.
The number of points depends on the android system recovery. Instructions for use are as follows:
- “reboot system now” - reboot, through it you can exit android system recovery, depending on the device, the menu may contain this item in the “power menu” section;
- “wipe data/factory reset” - reset to factory settings, deleting all information from the device, after which the smartphone will be the same as after purchase;
- “wipe cache partition” - this item is responsible for deleting the system and application cache, that is, clearing unnecessary files;
- “install from sdcard” - installation of archived files from a flash drive.
Some points have additional sub-points, so I’ll tell you about each of them. “Backup and restore” section:
- “backup” - a backup copy of the operating system is created and stored on a flash drive;
- “restore” - installing a backup, opening the item, a list of firmware will appear;
- “advanced restore” - restores part of the operating system, the command works with the same partitions as the next function.
You need to be very careful with the “mounts and storage” item, as it can damage the device. It is used for formatting - permanently deleting all information and mounting, that is, connecting to the system. This item works with the following sections:
- “mount / system” - system;
- “unmount /data” - for storing user information;
- “mount / sd-ext” - mount part of the operating system onto a flash drive to expand capabilities;
- “unmount /cache” - cache, temporary files; “mount /sdcard” - SD card.
The "format" command works with the same sections, but only clears all the contents. Applying this item to “system” or “data” will kill the smartphone.
In recovery there is an “advanced” submenu, which includes additional features. Here is their list:
- “reboot recovery” - reboot into recovery;
- “wipe dalvik cache” - cleaning unnecessary files from the dalvik machine in which programs are launched on the phone;
- “wipe battery stat” - clearing information about battery usage;
- “restart adb” - loading into adb mode, which is needed to control the device via the command line from a PC;
- “fix permissions” - the command returns file permissions to their original state.
Reboot system now
This menu item performs a complete reboot of the device. After selecting this option, the smartphone will load the standard Android operating system without any changes. Typically, this item is used after completing all manipulations in recovery. Or if you loaded into this mode by accident. Although it is unknown how this can be done accidentally. Be that as it may, Android System Recovery 3e, the instruction manual for which is simply vital for the user, has such a clause. And we have to take this into account.
The menu item should be used last. That is, when all operations are completed, all components are updated, factory settings are reset and firmware is installed. This is the essence of a reboot: to allow the device to apply all the changes made. True, after some of them the smartphone may not boot at all. But that's a completely different story.
What is Recovery on Android?
Recovery mode is translated as “ recovery mode ”, and the name itself reflects its main function - it is designed to troubleshoot various problems that cannot be dealt with using standard methods. The Recovery menu makes it possible to manipulate the Android OS and system files when a software failure occurs on the phone. If the gadget does not work correctly and the reason is not in the hardware, then Recovery mode .
Recovery can be compared to BIOS on a computer. Logging into it is an alternative to the usual startup of the device; the menu has a simplified interface and strictly limited functionality, so in this mode the phone is immune to the effects of viruses and other malware.
Note: if the software on your gadget is outdated, find out how to flash Android yourself.
Wipe Cache Partition
Another useful command in Android System Recovery 3e. The recovery instructions say that you need to use this option in tandem with Wipe Data. If the previous item clears the internal memory of the device, then this one clears its cache. Namely, this is where the working application files are stored. Of course, if this is not done before installing the firmware, then nothing bad will happen. It’s just that in the future, when installing new programs, the device’s cache will grow to incredible sizes. As a result, the smartphone will work very slowly. But this is not so scary, since there are many programs for clearing the Android OS cache. And they work great.
It is also recommended to select this function after a factory reset has been done. This will help the smartphone become even “cleaner,” which will have a positive effect on the performance of the operating system. The instructions in Russian for Android System Recovery 3e recommend performing this procedure after the reset. Before rebooting the device. Then everything will be as it should be.
Features of the Recovery menu on Android
Before moving on to the capabilities of Recovery, it should be noted that there are two types:
- Stock - Recovery installed by the gadget manufacturer. The standard menu has a limited set of functions. Works only with official firmware.
- Custom is an unofficial custom Recovery that is saved to the phone as a separate program and replaces the stock version. It has more extensive functionality and allows you to install unofficial firmware on Android.
Main functions of standard ( stock) Recovery mode :
- firmware update and reset;
- installation of add-ons for system software;
- reset settings on Android to factory settings;
- updating software while saving user data;
- reboot the device in normal mode.
Unofficial custom Recovery, in addition to standard functions, allows the smartphone owner to:
- create backup copies of the firmware, system and its individual parts;
- clean the cache partition, including the cache of the Dalvik virtual machine;
- set access rights to folders and files;
- format and create partitions on the SD card;
- reset battery statistics;
- restore the system from previously created backups;
- disconnect and mount Android partitions to apply different patches;
- connect your smartphone to your computer via USB as a removable storage device, etc.
The most popular custom Recovery programs are TWRP and CWM. They can be downloaded for free through the Play Market, but for custom modifications to work correctly, root rights are required.
Possible solutions to problems
CWM 5.5.0.4
Installation of .zip archives occurs through the “Install ZIP” item. The file is either custom or deoxidizers, crackers or embellishers, kernels or modems. I would like to remind you that before any manipulation, do not be lazy to make a BACKUP! You will need it, and I guarantee it. You can find out more about backup at the end of this topic. So, you downloaded, for example, custom firmware CyanogenMod 11, and you don’t know how to install it. I will help you, follow the points described below:
- First, we need to have, in fact, CWM Recovery itself and a backup copy made, in case of an unfortunate event
- Before starting the installation, I would recommend that you have at least 50% battery charge! Because when the battery charge is 20% or less, a failure may occur! It's better to insure yourself!
- If your smartphone is connected to a computer or to a charger, it is better to disconnect it from there
- In my case, we are installing custom firmware CyanogenMod 11, first we need to download it and copy it to the root of the memory card without unzipping
it! - That's it, we downloaded the necessary files and copied them to the desired address, now we need to go to CWM
- After that, select the item “Install ZIP from Sdcard”, and after that “choose ZIP from Sdcard”
- A kind of file manager will open in front of us, in which we need to select the downloaded archive
- After selecting the archive, you need to confirm the choice by pressing “YES”
- After successful installation, we need to reboot our smartphone
- Everything went well, the instructions are complete!
Backup copy
system:
- Launch CWM
- After that, select the next sub-item “Backup” and select “Yes”
- We reboot the device “Reboot System Now”
After the operation is completed, a backup copy of the entire system is stored on the memory card, located at /clockworkmod/backup. Why is this necessary? This is necessary in case you have flashed your smartphone incorrectly or your IMEI has been lost. We made a backup, now we just have to learn how to restore it! Restoring
a backup:
- Launch CWM
- Select the item “Backup and Restore” (creating a backup and restoring from a backup)
- After this, select the next sub-item “Restore”
- We select the backup copy we previously saved, it is located at /clockworkmod/backup and click “Yes”.
- We reboot the device “Reboot System Now”.
I would like to end this FAQ, goodbye dear friends!
Hello, gentlemen. Most people do not know their new devices well, they ask “How to get ROOT?”, “How to change OS” and so on. And to avoid such frequent questions, I will talk about various secrets about this popular mobile operating system - Android.
This time we will start with the most important thing - ClockWork MOD Recovery. Why is he and what is he hiding? We will learn about this further...
In general, CWM is like a kind of BIOS (more understandable for PC users), which helps us fine-tune an Android device. Thanks to it, we can install different patches, firmware and mods. CWM itself is located in the system memory of the smartphone, but first it must be installed. You can find details about installation for your device on this site, or download Rom Manager from Google Play (Requires Root) Basically, each device has a native Recovery. They are of different types - 1e, 2e, 3e. These native Recovery are limited in many functions than CWM.
Now let's move on to CWM itself. It comes in different versions for each device. For example, I now have version 6 of CWM. The menu may differ for some, but in general it is the same.
In the photo we see several points:
- Reboot system now - Immediately reboot the system
- Install zip from sdcard - Installation.zip from sd cards
- Install zip from sideload - Installing.zip using ADB
- Wipe data/Factory reset - Wipe data/factory reset
- Wipe cache partilion - Cleaning the cache partition
- Backup and restore - Backups and restoration
- Mounts and storage
- Advanced - Advanced settings
Meanings of items in the main menu
: 1.
Reboot system now
- simply reboots the device
2. Install zip from sdcard
has several sub-items:
- Choose zip from sdcard - select zip from sd card
- Apply /sdcard/update.zip - apply automatically /sdcard/update.zip
- Toggle signature verification — Toggle signature verification
Choose zip from sdcard
- allows us to select the .zip to install. After clicking on this item, the file manager appears.
Apply /sdcard/update.zip
— installs a special update from the root of the memory card only if it is named update.zip
Toggle signature verification
— turns on/off verification of signatures in .zip, in order to install only factory .zip
3. Install zip from sideload
- a special function that installs .zip from a computer via a USB cable. For this you need ADB drivers and a special program that manages it all. The program contains detailed information on what and how to do.
4. Wipe data/Factory reset
- allows us to return the device to its original state and deletes all data on the phone, but the memory card will not be touched
5. Wipe cache partition
— clears application caches. Needed only when flashing or when the device often freezes
6. Backup and Restore
- the savior of your Android device. This section helps you make backup copies of software, and restore software from a “backup” if it has become corrupted/bootloped. Let's take a closer look at this section:
Backup
— makes a backup copy of the software to save applications, application data and the entire firmware itself. You just need to click on the partition and a “backup” will be created (The speed of creation depends on the class and cache of the memory card)
Restore
— restores software thanks to “backup”. When we click on a section, we will see a folder with some numbers. This is the year.month.day.time the backup was created. Select the desired folder and the software will be restored.
Delete
— deletes the backup copy if it is no longer needed. Selects what you need and the “backup” goes to waste.
Advanced Restore
— restores from a backup only what is needed from the firmware. For example, user data or the system.
Free unused backup data
- freeing up memory in the backup
Choose deafult backup format
— selecting the backup format.tar or .dub
7. Mounts and Storage
-mounting and storage. I see no point in describing it.
- Unmount /cache - unmounts the cache directory
- Mount /data - mounts the data directory
- Mount /system - mounts the system directory
- Unmount sdcard - unmounting an external SD card
- Mount /sd-ext - mounts the sd-ext directory
- Format / cache - formatting the cache directory
- Format /data - formatting the data directory
- Format /system - formatting the system directory
- Format /sdcard - formatting an external SD card
- Foamat /sd-ext - formatting the sd-ext directory
- Mount USB Storage - mounting an external USB
8. Advanced
- advanced settings:
Clearing Dalvik cache. Needed when the device freezes or when installing a mod. Report error
— saves all errors in a special file error.log
Key test
— hard key test.
When you press a key, its code is displayed on the screen Show log
- saves all your actions in a special file recovery.log
Fix permission
- corrects all permissions in rw-rr in the /system
Partition sdcard directory - mounts partitions such as ext3, ext4 and creates a swap file SWAP
How to get into Recovery? Each model has different methods, but I’ll tell you one universal one. When you turn on the device and see the manufacturer’s logo, quickly press the “Volume -” key
Be careful when playing with CWM, and make backups in every possible way. Good luck on your adventures!
In this article I will tell you what CWM
and how to flash a phone through it. The capabilities of CWM, installation examples, and rules for flashing some phone models will be discussed. This method is the most popular and very convenient, since almost all custom firmware works through it. Professionals will not find anything new in this material, but beginners will find it very useful.
So, let's start in order. CWM
is an abbreviation for ClockWorkMod, in other words, a modified unofficial recovery. It has much more capabilities than native recovery. Depending on the device model, it can be installed either separately or operated in parallel. With its help, you can install unofficial firmware, install add-ons and patches, connect to your PC in different modes (including ADB), create backups (full or partial) and many other useful things.
How to install CWM recovery?
First you need to download the file you need, this is a zip archive. We put it on the phone’s flash drive. Sometimes it is better to rename the archive to update.zip, since in older versions the standard recowery manager cannot install anything other than archives with that name.
Enter recovery.
Turn off your phone. Press and hold 2 keys at the same time, the power button and the center button. You should have something similar to what is on the screenshot.
Select “apply update from sdcard”
, and select our archiver
“update.zip”
, then reload it, and load exactly the same keys as above.
As a rule, most devices use the following CWM control scheme: - volume up button - up, - volume down button - down, - on/off button - select an item. On some devices, navigation may be using other keys.
If all steps are done correctly, you should have something like the following image.
Anyone who takes the first steps in learning the procedure for flashing Android devices initially pays attention to the most common way to carry out the process - flashing firmware through recovery. Android Recovery is a recovery environment that almost all users of Android devices have access to, regardless of the type and model of the latter. Therefore, the method of flashing firmware through recovery can be considered as the easiest way to update, change, restore or completely replace the device’s software.
Almost every device running the Android OS is equipped by the manufacturer with a special recovery environment, which provides, to some extent, including ordinary users, the ability to manipulate the internal memory of the device, or more precisely, its partitions.
It should be noted that the list of operations that are available through the “native” recovery installed in devices by the manufacturer is very limited. As for the firmware, only official firmware and/or updates are available for installation.
In some cases, through factory recovery, you can install a modified recovery environment (custom recovery), which in turn will expand the ability to work with firmware.
At the same time, it is quite possible to carry out the main actions for restoring functionality and updating the software through factory recovery. To install official firmware or updates distributed in *.zip
, perform the following steps.
How to enter the Recovery menu on Android?
To enter the Recovery menu on Android, you must first turn off your device . After this, you will need to start the smartphone by holding down certain buttons at the same time. On different models, the combination to enter Recovery is different, but the general list comes down to several options:
- power button + volume up/down key (or both controls at once) - the most common method, it is suitable for most Androids;
- Power button + Home key;
- “Power” + “Home” + volume control (up or down) - this combination is most often found on Samsung smartphones.
On some devices, entering Recovery is preceded by a launch mode selection menu, where you need to select the appropriate option among the “Normal Boot”, “Fastboot” and “Recovery” options.
Note: find out how to get root rights on Android so you can change the system files of your smartphone.
Wipe Battery Stats
This feature helps you refresh your device's battery. After clicking on this item, the battery cache begins to be cleared, into which the current state of the battery, its nominal capacity and other necessary parameters are recorded. By resetting the battery usage statistics, you can slightly extend its life. And the new firmware will work more adequately with the battery. For some reason, many Android gurus are dismissive of this option. But in fact it is very useful. However, it is not recommended to use it too often. Only before flashing the device.
Explanation of the names of Recovery modes
To make the Recovery mode universal and understandable for all users, it is written in English on most devices. Each smartphone may have its own distinctive features, but the developers strive to ensure that the owner of the gadget can easily understand the provided functionality.
How are the main names of menu items deciphered?:
- Reboot system now - standard phone reboot.
- Reboot to bootloader—restarts the device in operating system bootloader mode.
- Apply update from ADB - installing the update via the Android Debug Bridge command line tool.
- Install ZIP (Apply update from SD card) - unpacking and installing the archive from the memory card. This function allows you to update the firmware.
- Wipe data/Factory Reset - cleaning the system partition “/data” and resetting the settings to factory settings. Helps restore the correct operation of the device, but leads to the deletion of user settings, multimedia files, applications, contacts, etc.
- Wipe Cache Partition - cleaning the “/cache” partition, where temporary data of programs and the operating system is stored.
- Backup and Restore - backup and restore Android OS from previous copies.
- Mount /system - mounts and formats individual system partitions.
- View recovery logs—view recovery reports.
- Run graphics test - launch a graphics test.
- Power off—turns off the device.
Note: find out how to install the Play Store on Android if you do not have a default application store on your phone.
Wipe Data. Factory Reset
This is a very important point. This option can restore the functionality of the device without any firmware. This tool resets the gadget's operating system to factory settings. Naturally, everything that was on the smartphone will be deleted: applications, photos, music. In general, everything that was in the internal memory of the phone. Android System Recovery 3e, the operating instructions for which are discussed here, was created precisely in order to revive the device without serious intervention in the firmware. And this option allows you to perform this operation.
This function is also used before installing any firmware. It is necessary to reset the phone to factory settings before flashing the firmware. Otherwise, the new operating system will be unstable. But that's not the worst. If you do not return to the factory settings, the firmware may not be installed at all, and then the user will receive a completely “dead” smartphone. There are no instructions in Russian, but the one that is there clearly states that it is imperative to use the Wipe Data & Factory Reset item before each firmware update of the device.
How to enable BIOS mode
The first difficulty that many users will encounter is how to enter BIOS mode. On most devices, for example, Samsung, Lenovo, Nokia, you need to enter Recovery Mode by simultaneously pressing and holding the power and volume keys of the device.
In order to enter BIOS mode, you need to turn off your smartphone or tablet, then press and hold the indicated buttons. On some devices, you can go to the Recovery menu only when the device is connected to charging. After pressing the keys, the device manufacturer’s logo should appear on the screen. When this happens, you can release the buttons. After a few seconds, the BIOS menu should appear.
As for the mode buttons, you mainly need to hold down the volume up key, but on some devices you can use volume down or both buttons. In older smartphone models, you sometimes need to hold down the power key and the Home button.
If none of the proposed options worked, then you need to study the instructions for the device. Typically, non-standard ways to enable BIOS mode are found only in unpopular smartphone models, as well as Chinese-made devices. All modern devices from well-known manufacturers are manufactured according to certain standards, and therefore the method of enabling and working with System Recovery on them will be similar.
Restoring stock firmware
If you don’t like it or don’t get used to it, there is always the opportunity to return everything to its place. Many people ask the question: “How to restore Android through Recovery, namely the stock version?” The answer lies in the point above. Roughly speaking, returning everything to normal occurs in the same way as making the initial changes.
All you need to do is download the firmware from the manufacturer to a flash card or internal memory, then select the appropriate “Recovery” menu item and do a complete reset of settings/content. In principle, nothing complicated.
It seems that understanding how to flash Android via Recovery is not so difficult. But if some points are unclear, or you are not confident in your knowledge, it is better not to get involved with such processes. But even if something doesn’t work out, you can always restore the device’s firmware through the corresponding menu item. The main thing is to make a backup copy before flashing Android via Recovery. To do this, you will need a custom “Recovery” and a little patience, because the process of backing up the firmware takes a lot of time.
If something goes wrong, you can always turn to knowledgeable people. At least an authorized service center will definitely help you. The main thing is not to lose heart and move forward confidently. This is the only way to achieve any results. Good luck with the flashing!
The Internet was born as a result of the confrontation between the USSR and the USA. In America.
BQ Strike 5020, the characteristics of which will be discussed in this article.
Mobile devices have already become quite an integral part of our lives. Now a person cannot imagine existence without a smartphone or tablet. Devices based on the Android operating system are extremely popular. This OS was developed by Google, and now its market share is incredibly high. Apple's iOS and Windows Phone have a negligible presence in mobile markets compared to Android. However, like all technology, devices on this platform tend to glitch. Various system failures are a hallmark of any operating system. No matter how advanced it may be. Very often devices have to be reflashed. But not everyone knows that it is possible to do without such radical measures. After all, any Android gadget has Android System Recovery 3e. How to use it and what is it even? This is what we will talk about.