The hard drive is the most fragile element of a computer. It is he who is responsible for storing all information and it is clear why its damage leads to panic. Sooner or later, every person asks the question of how to fix a hard drive. Exception: very prudent people who constantly monitor the condition of the drive and regularly make backup copies of all information stored on it. But since such people are rare, information about DIY HDD repair is very popular.
Where to start repairing a hard drive yourself
A hard drive can fail for various reasons: due to physical damage or software failures. It happens that a hard drive breaks without external intervention. Simply due to time and mechanical wear of parts. The normal service life of a hard drive is up to 8 years. During active use, it breaks down faster even with very careful handling. You need to keep this in mind and try to back up your files as often as possible. Such actions will help you avoid spending money on recovering data from a damaged HDD.
If you still need to repair your hard drive, you first need to understand your priorities. Hard drive repair and data recovery are two different procedures that are often mutually exclusive. Therefore, before repairing your hard drive, it is better to try to restore existing files. If you cannot do this yourself, you will have to contact a workshop. In many cases, it is possible to ask the technicians to return the existing information and then install a new hard drive into the computer.
And one more piece of advice: do not try to disassemble the HDD. After such an intervention, dust, dirt, and moisture will get inside the part, which will completely destroy it. Then no laboratory will undertake restoration and repair.
What is Hard Disc Driver
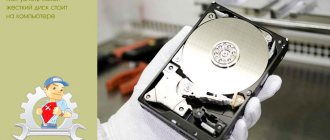
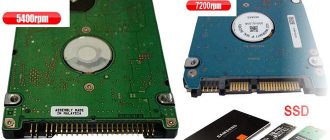
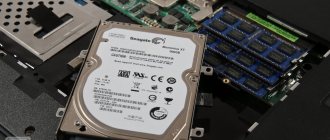
The HDD or hard drive of a laptop is a 2.5-inch magnetic disk. There can be several such “pancakes”, enclosed in a solid body. It rotates all the time and the faster this happens, the greater the data transfer speed.
And when the hard drive breaks down, the operating system stops loading or freezes and reboots when accessing files. According to company statistics, manufacturers provide a 12-month warranty on this device, but this does not mean that it will break in a year. Typically, the average hard drive “lives” for about 4 years.
Checking the ability to repair a hard drive via SMART
To determine whether a hard drive can be repaired at home, it must be tested. Manufacturers have prepared in advance for such a test: all carriers are equipped with a SMART system that allows you to test the part. The system allows:
- check the degree of wear of the drive,
- see operating parameters and compare with critical ones,
- evaluate electronics performance.
To check, you need to download the utility for SMART, run it, wait for the results to appear and evaluate the parameters shown. If the situation is critical, it is better to immediately transfer the data to another storage and install a new hard drive in the PC.
Features of laptop upgrading
First of all, I want to dispel the myth that a laptop cannot be upgraded. After all, this is exactly what many users think and refuse to buy a laptop or buy the most expensive models in the hope that their performance reserve will last for a long time. As a result, they overpay more: you can buy a not very expensive model and upgrade it over time, so as not to shell out a large amount at once. But first things first.
Yes, upgrading a laptop is more expensive than upgrading a regular desktop computer. Memory modules for a laptop are slightly more expensive than memory modules for a regular computer, and the laptop processor must be replaced only at a service center. While on a regular computer you can buy a new processor and install it yourself (all you need is a screwdriver and a little knowledge), in the case of a laptop, the processor is usually soldered to the motherboard. I don’t think there are many users who are fluent with a soldering iron. As a result, upgrading the processor costs a pretty penny, so they refuse it and limit themselves to replacing the RAM and hard drive. However, we will discuss this later.
Checking the hard drive via BIOS
Another way to check is through the BIOS. This step will help you understand whether it is possible to recover the data and the drive itself at home. Turn on the BIOS, see if the PC sees the hard drive in the list of drives that opens. If the hard drive is there, you can test the effects of recovery utilities without removing the part from the computer case.
If the BIOS does not see the hard drive, there are several options:
- Bad sectors appeared on the media. We'll tell you how to fix it below;
- mechanical malfunction. This is the most unpleasant case, since nothing can be corrected here. To extract information, the device will have to be taken to the workshop. This outcome can be predicted by the uncharacteristic sounds heard from inside the device when turned on: squeaking, clicking, rustling. All this shows that the media cannot spin normally;
- oxidation of contacts connecting the storage to the motherboard. You can clean them with a regular eraser and pure alcohol (not vodka!);
- port damage. To fix it, just connect the drive to a different port;
- cable damage. When replacing the connector the problem disappears.
The BIOS will not even recognize a working hard drive if it is connected incorrectly or the contacts are loose. In order to eliminate this possibility, the following steps must be taken:
- disconnect the PC from the network, press the power button on the case (remove the battery on the laptop);
- remove the hard drive, carefully disconnecting it from the motherboard and power supply;
- clean the storage from dust and dirt (only from the outside, the HDD cannot be disassembled!);
- check the cables from the motherboard and power supply, the power cable, eliminating damage;
- return the media to its place (it should fit tightly into the slot), connect the cables and cables;
- connect the PC to the network, click the “Start” button, go to the BIOS. A working hard drive should appear in the list.
If the computer does not see the drive even after this, it means the device is damaged. In order to repair your hard drive, it is better to contact a professional.
Changing the hard drive to iMac
Replacing the hard drive on an iMac has some differences, but installing an SSD yourself is not difficult. Rumors that aimags have special drives that can only be replaced by a specialized service center are greatly exaggerated.
Before starting work, stock up on T8, T10 screwdrivers and a pair of suction cups. Apple does not use the usual screws and bolts, but prefers hexagonal sprockets.
Step-by-step process to replace HDD with SSD in iMac:
- Unplug the cord from the outlet;
- The monitor glass is held in place by magnets. We attach the suction cups to the glass at the top of the screen and detach it with a smooth movement;
- Unscrew the matrix. Use a T10 screwdriver to unscrew the side hexagons, there should be 8 of them. The sides of the aimak are magnetized, so tweezers can be used to easily remove the sprockets;
- Carefully disconnect the matrix. Lifting it, disconnect the wire from the motherboard, then lift it a little higher and disconnect the cable and another wire;
- Using a T8 screwdriver, unscrew the hexagons holding the HDD;
- We remove the old HDD and disconnect it from the holder;
- We install a new hard drive and assemble everything in reverse order.
For more convenient removal and tightening of hexagons, screwdrivers can be magnetized.
Automatic detection of bad hard drive sectors
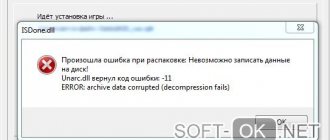
Often a hard drive fails due to bad sectors. When you try to write something to such an area or read existing information, the device slows down or an error message appears on the screen. Damaged sectors are:
- logical – software errors resulting from a failure. For example, while working on a PC, the power suddenly went out. In this case, the sector in which the operation was performed may be damaged. Fixing such an error is not difficult;
- physical – device breakdowns due to natural wear and tear or mechanical damage. For example, if the computer was dropped, hit or shaken. Result: damaged controller. The problem is often accompanied by sound signals: tapping or squeaking. In such a situation, the question of how to fix a hard drive at home has no answer. You will have to seek help from a workshop where there is special equipment.
It is impossible to guess why bad problems appeared without diagnostics. You can test your chances of repairing your hard drive using special utilities that are freely available on the Internet.
Diagnostics
Any DIY seagate repair begins with diagnostics. All modern devices are equipped with a built-in self-diagnosis function called SMART. It records all events and operations with the drive, starting from the number of power-up cycles to monitoring faulty situations.
You can and should enable this function through the BIOS; to do this, find the HDD SMART Cabiliry menu item and set the value to “Enabled”.
But in order to read the data obtained using this function, you will still have to use third-party programs, which must be searched by the exact name of the drive. It can be read in the same BIOS. Next, go to the disk manufacturer’s website and find the corresponding program by number.
How to fix a hard drive yourself if it is not detected by Windows
Sometimes hard drive problems arise due to a conflict with the operating system. Windows may not see the drive for the following reasons:
- The hard drive does not have a letter. The name may not contain the letter by which the system defines it (B, C, D). In this case, you need to format the hard drive by giving it a new letter. Please note: formatting will erase all data on the media. It is possible to restore them. There are special utilities for this;
- RAW file system type is specified. The main type of hard storage system is NTFS. Formatting, in which a new abbreviation is indicated, will help return the type. But all recorded files will be deleted;
- The OS does not see the new drive. This often occurs when installing a new hard drive into a PC. To fix the problem, just initialize it.
In any case, if the source of the problem with the hard drive lies in the OS, you can cope with the situation and repair the hard drive without the help of specialists and at home.
Pitfall No. 3 - power supply
But here, there may be “unexpected people”. Usually, if the power supply dies, it is better to buy a new one. But... A new original power supply can be quite expensive. Or it may simply not be for sale.
Then they buy an analogue that has similar characteristics.
This is what I did for my DELL laptop. I bought an analogue. But... The power supply refused to charge the battery.
Important! It turns out that some laptops have a special “friend or foe” code “sewn” into the power supply and power controller. And if the controller does not recognize that the power supply is “its own”, there will be no charging!
Therefore, do not rush to buy a non-original power supply. First, find out if there is such a “amulet” in your laptop. By the way, not all laptop repair specialists know about this problem! Therefore, I recommend searching for information on your laptop on the Internet yourself.
Is it possible to repair a computer hard drive yourself if it is external?
Repairing external media is basically the same as with regular media. There are only a few nuances:
- If problems arise with external storage, first of all you need to check the functionality of the USB cable. If it is damaged, the hard drive is disconnected from the PC;
- The second “weak link” of the external drive is the socket through which it is connected to the device. There is an adapter inside the socket. Over time it becomes loose. Solution to the problem: replacing the adapter. You can buy the part at any electronics store;
- Windows may not notice the external device due to outdated drivers. Exit: update drivers and restart the computer.
The remaining steps for restoring a remote hard drive are completely identical to the operations performed with stationary media.
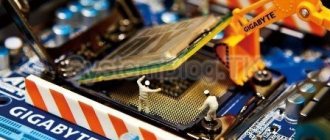
Let's start replacing the hard drive
Below we will look at an example of replacing a hard drive with an SSD in an Asus laptop. If your laptop is from another manufacturer, it’s okay; the principle is always the same for most models.
Let's get started:
- Unscrew the lower part of the case (or a small panel) using a screwdriver. In some laptop models, you have to disassemble the entire case.
- Unscrew the bolts that hold the hard drive and carefully remove it by pulling the “tab”;
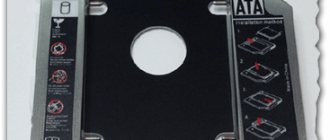
- The HDD drive is located in a kind of tray, to which it is attached with 4 bolts, unscrew them;
- Insert the SSD drive into the tray and screw the bolts back;
- Insert the tray back into the device connector;
- Reinstall the housing or housing parts and tighten the bolts.
What should you not do with a hard drive when doing DIY repairs?
In some cases, repairing a device with your own hands leads to the fact that no workshop undertakes restoration. There are a number of actions after which it is impossible to restore life to the media, just as it is impossible to remove existing files:
- hard drive disassembly. Sometimes users, deciding to act on their own, remove the device from the case and completely disassemble it. You can't do this. The drive housing is sealed. If this parameter is violated, dust from the air and small particles of dirt immediately enter inside. During disassembly, scratches or chips may appear on the internal parts. Bottom line: you can simply throw away the HDD;
- hits on the HDD - advice from the Internet. Allegedly, blows to the HDD case put all the parts in place, and it begins to work as it should again. But shocks and impacts will only make the situation worse. Restoration and repair become impossible;
- storage freeze. Placing a disk in the freezer is a way to retrieve information at home. It may work if, when you immediately connect the hard drive to the PC, the computer recognizes it and allows you to pull out the files. But this is where the work of the carrier ends. After this, the hard drive cannot be restored.
Experts advise: if all the standard measures for repairing a hard drive with your own hands do not lead to positive dynamics, it is better not to try to do something extraordinary, but to take the device to the laboratory. The sooner the drive falls into the hands of professionals, the greater the chance that it will be repaired or at least it will be possible to extract existing information from it.
Causes and symptoms of problems
Before you start repairing a hard drive yourself, you need to understand the essence of this equipment. A hard drive, also known as a hard drive or HDD, is a relatively small device that is based on a magnet, a set of disks, a rotating positioner frame and a head for reading data.
The average disk rotation speed is about 720 revolutions per minute, and during the installation and launch of programs it increases even more. The harder the hard drive works, the higher the likelihood of rapid wear and tear of the drive.
There are several main symptoms and reasons why a hard drive fails and requires immediate attention from the computer or laptop user.
- Clicking noises appear during operation. Objectively, this is the most common and common malfunction. It indicates the presence of mechanical problems. Drive components are damaged. As for the reasons, there could be many different factors. This includes the ingress of dust and debris, wear of the reading head, the consequences of mechanical shocks, etc. To accurately determine the diagnosis, it is necessary to disassemble the computer device.
- During operation, the hard drive hums intermittently. A characteristic sign indicating wear on the read head.
- The BIOS does not show the drive. This is a consequence of mechanical shocks and damage, or an error on the part of the operating system.
Depending on the specific situation, it is quite possible to bring the HDD back to life. Even in cases where the BIOS does not see it.
But design features do not always allow you to achieve the desired result. Sometimes repairs cost several times more than the cost of the hard drive itself. And here it is worth thinking about the feasibility of restoration. It would be wise to do this only if extremely important data is stored on the HDD.
Repair is different from restoration. Restoration is considered to be the return of lost data, while repair is the restoration of functionality.