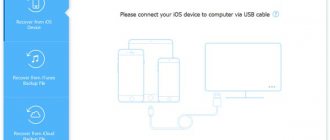
Hello! Agree that the built-in “notes” application is an excellent tool for quickly writing down some text or drawing a picture. I myself use this functionality very often and it’s really convenient. However, few people know that if you use several Apple devices at the same time, be it an iPhone or an iPad, then it is possible to easily synchronize notes between them. Yes, you can also access them on your computer.
And it's very cool! A common example is that you quickly create a note on an iPhone, edit it on the large iPad screen, and then make the final edits on your computer. I can note to myself that I don’t often create any huge notes, but even for small text, I’m pleased with the possibility of transferring them from one iOS device to another. Let's start talking about how to do all this, let's go!
To fully synchronize notes, including the ability to view them via the Internet, you must use the iCloud service. However, nothing prevents you from also using Gmail or Exchange accounts.
Transferring notes via AirDrop
This option allows you to transfer data only with the iPhone version running iOS 7.0. To do this, Wi-Fi or Bluetooth is launched. Further:
- Go to the Notes application and select files to send.
- After clicking the "Share" button, select AirDrop.
- Once the connection is complete, select the device to which you want to transfer the data.
The receiving phone must also have the AirDrop application connected. To do this, use the “Control Center”, where the utility icon is fixed.
Transferring audio recordings
Audio recordings will always be at hand - from a summary of a report to a rhyme that your child reads at a matinee in kindergarten.
- Export voice recordings from any iOS device.
- Play them on your computer.
- Transfer original audio to any Mac or Windows computer.
How to copy notes from iPhone to computer
“Transferring” files will be quick if you strictly follow the steps below:
- Go to Notes on your iPhone and click Edit.
- Select the desired entries and click “Move to..”
- Move the file to the iCloud folder.
- We go through any browser on the computer to the site https://icloud.com and log in. We open the corresponding section and see the previously moved entries.
If you wish, you can copy the contents to a text file and save it to your computer.
The recordings will be stored in the cloud, which means they can be downloaded at any time. This ensures the security of the content.
Part 2: Is it possible to export iPhone notes to PC via iCloud?
Strictly speaking, we can't use iCloud to export notes from iPhone to PC. But iCloud backup is still useful since you can save iPhone notes on cloud. In that way they can be accessed anywhere, anytime. Below is the way to use iCloud to transfer the notes from your iPhone to cloud. But it is just transfer to your iCloud. You can only read it by entering https://www.icloud.com/ on your browser. It is not export your iPhone notes to your computer.
Steps to export notes from iPhone to PC/Mac via iCould
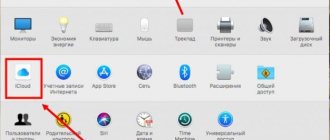
1. Click on the settings option and go to 'iCloud'.
2. Login with the iCloud login details and enable the iCloud option.
3. After the 'Notes' option has been enabled, click on 'Notes' and set 'iCloud' as the default medium for transferring purposes.
4. Thus all of your notes will be automatically uploaded to the cloud. The notes can be accessed from the internet by entering the iCloud logging details.
Note: After you login to iCloud.com, you can read your iPhone notes on your computer, but you can't save it to your computer. We tried to save some notes as HTML files on computer and log out of iCloud.com. But when we open these files again, it can't show contents of your notes normally. So, we can just backup/sync our notes with iCloud and read them on your browser. Strictly, we can't export iPhone notes to our computer via iCloud. So it is actually impossible to export iPhone notes with Apple's product. Confronted this problem, we'd like to introduce you a friendly tool to export your iPhone notes to your computer.
Conclusion
To decide on a suitable method for transferring data to the user, it is worth starting from how “reminders” are carried out, what program is used, where the information is stored: in the “cloud” or locally. Each of the presented options is effective and safe for content, and most importantly, it allows you to transfer recordings from one iPhone to another, as well as to a computer, quickly and safely.
Import text files created in other apps into Notes to keep all your notes in one convenient place.
Summary
The standard Notes application from iOS is quite primitive, but it provides the minimum necessary functionality. And most importantly, it is well integrated with Apple cloud services, allowing you to synchronize and even export notes.
But if you want something more powerful and advanced, then Evernote and Microsoft OneNote are the best options here. Evernote is perhaps a little easier to use because it was originally designed as a cloud-based note-taking solution. True, it works best with its own cloud.
As for OneNote, the complexity of working with it is explained by the fact that it was originally a desktop application, and then they created a mobile one, without particularly worrying about their relationship - in fact, both programs are united first of all by a common name, and only then by a general integration of capabilities. But other than that, it's a great program that works well with the OneDrive cloud.
The rest of the note-taking apps for iOS also look good, but they are far from the leaders, and in some places they are not as good functionally as the original Notes client. But in any case, you can look for something interesting.
We often store a lot of important information on the iPhone or iPad, because it is almost a mini-computer in our pocket. Users of mobile devices often need to synchronize data between iPhone/iPad and computer in order to be able to use the necessary files in a more convenient format on a PC. Most often, phone/tablet owners do not know how to synchronize notes from iPhone to computer quickly and in just a few clicks. We will tell you several ways at once - using iCloud or GMail, and also the most convenient way is the Tenorshare iCareFone program.
Import notes on your Mac
When you import text or .enex files, you can add notes to your iCloud account or On My Mac account. Once you save your notes to iCloud, you can see them on any device you sign in to with your Apple ID.
- Open the Notes app.
- Choose an iCloud or On My Mac account to store your notes. Click the folder in the desired account.
- From the menu bar, choose File > Import.
- Select the file or folder to import. If your imported notes are organized into folders, click Options in the lower left corner to maintain their order.
- Click the "Import" button. In the confirmation message, click the Import button again.
After you import your notes, a new folder called Imported Notes will appear in the Notes app. You can later move your notes to any folder in the Notes program.
Installing and setting up iCloud
- If your computer uses the Windows operating system, then first of all you need to download and install iCloud;
- You'll then need to sign in to your account using your unique Apple ID as well as your password;
- Now that it's enabled, you can now select the services you want to use, such as: Drive, Photo, Mail, Favorites, etc;
- Initially, iCloud provides 5 GB of free free space , but you can increase it by choosing a convenient plan.
iCloud on your computer, tablet and phone"
Import notes to iPhone, iPad, or iPod touch
You can import Evernote export files (.enex files) into the Notes app on your iPhone, iPad, or iPod touch. Each .enex file can contain one or many notes.
When you import an .enex file, each note from Evernote will be converted into a new note in the Notes app. Before importing into Notes, send the .enex file to your email address or save it to iCloud Drive from your computer.
Using the Mail program
- Open Mail and tap the message with the file you want to import into Notes.
- Tap and hold the file, then tap Add to Notes.
- After downloading the file, a confirmation window will appear on the screen. Click Import.
Using the Files program
- Open the Files app and navigate to the file you want to import into the Notes app. If you're using iOS 10 or iOS 9, open iCloud Drive.
- Touch and hold a file, then choose Share > Notes.
- After you download the file, you can add it to an existing or new note. Click "Save".
When you open the Notes app and select iCloud Notes, you'll see a new Imported Notes folder. If you don't use Notes with iCloud, this new folder appears in your On My Device account notes.
If you don't use iCloud and don't have an On My Device account, you'll see a warning when you tap Add to Notes.
Account registration
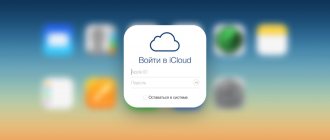
To create an iCloud account, let's return to the program's official website - icloud.com. You will see a form for logging into your personal account on iCloud from your computer.
You need to click on the "No Apple ID" link. If you already have an AppleID, then you do not need to register, because it is already a login for all Apple services.
Basic information to be entered in the registration form:
- First and Last Name;
- Country of Residence;
- Date of Birth;
- Email address;
- Select and enter a password and its confirmation.
Next, you need to configure security settings in case you need to recover your password in the future. Namely, Apple suggests coming up with two security questions.
Please note that it is better to choose answers that are relevant to your life so that the process of password recovery does not turn into the cause of a nervous breakdown in the future.
For example, the name of your first pet.
- Next, all you have to do is enter the captcha to confirm that “you are not a robot” and click on the “Continue” button.
Then you will receive a 6-digit code by email to confirm it and link it to your new AppleID.
After confirming your email, you need to read and accept the terms of use of the service:
That's all. iCloud registration completed.
Additional Information
Information about non-Apple products or independent websites not under the control or testing of Apple is not intended to be a recommendation or endorsed by Apple. Apple is not responsible for the selection, functionality, or use of third party websites or products. Apple is also not responsible for the accuracy or reliability of data contained on third party websites. Please be aware that there is a risk in using any information or products found on the Internet. Please contact your supplier for more information. Other company or product names may be trademarks of their respective owners.
The Notes feature on iPhone is a classic and indispensable feature that allows you to record important information. Using this application, you can also perform many other tasks, and most importantly, design them beautifully.
“Notes” is built into every iPhone out of the box, and when you switch to a new device, you don’t have to look for the app in the App Store. Another thing is that the saved recordings on the old smartphone were not transferred to the new gadget. If you need to transfer notes from one iPhone to another, we recommend using one of the methods described below.
Using iCloud cloud storage
You can also use iCloud cloud storage to synchronize notes between iPhone and Android. First of all, you will need to set up backup on your old smartphone:
Now your notes, contacts, etc. will be periodically copied to iCloud. This will avoid loss of information if the phone is stolen or broken.
To transfer notes from backup storage to Android, you need to do the following:
What are notes and why are they needed?
Using the Notes program, it's easy to capture new ideas, make sketches, and, of course, write down information that you might forget.
To create a new note, just click on the pencil icon with a square at the bottom of the display. After the text has been written down, just tap on “Done” and the note will be saved. And it’s even easier to ask Siri. To do this, you need to say: “Create a new note.” If desired, you can additionally say something specific at the end of the phrase in order to quickly record the information in your voice.
What this application can do:
- Formation of lists. For example, before you start creating a shopping list, click on the check mark icon. Enter one word, and then separate the list with the “Enter” key. Empty mugs will appear next to goods or products. Tap on them when you put something in the cart (then the circles will be highlighted with orange checkmarks), thus marking the item that you have already taken;
- Tables. Click on the grid icon to create a table. You can add or remove the number of columns as desired;
- Editing text . The “Aa” icon allows you to change the text style, font, size, and add a bulleted list;
- Drawings . You can draw in Notes: select the last marker icon. Here you select the marker tip size and color;
- Adding a location . Tapping the arrow square in the Maps app allows you to add a location to the selected note. Internet connection required;
- Sending a note via social network or email . The square arrow icon will also help you share your posts with other people. To do this, select an email or social network and click on “Submit”;
- Scanning documents . Bring the device to the document, and the camera will record what is written. To do this, click on the “+” icon, then click on “Scan documents”. If desired, after scanning, the corners of the document can be changed, filtering out the unnecessary;
- Also, clicking on the “+” allows you to add media files stored on your iPhone, record a video or photograph something right now, and also add a sketch. A sketch and a marker icon are not the same thing. Several sketches can be inserted (there is a virtual ruler function), but there is only one drawing.
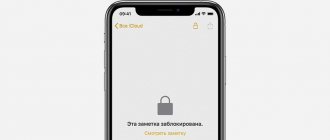
To hide your notes from prying eyes, you can easily lock it and set a password by swiping left (the lock icon is gray).
Important information! Remember that the first information recorded is still displayed in the general list of notes, so we recommend adding some symbols or emoticons in front. To pin a document, swipe it to the right.
By clicking on the arrow icon in the top left corner, you will be taken to a small menu where there is a main folder with all notes and deleted entries. You can create a new folder by clicking on the appropriate option in the lower right corner. Previously deleted documents are saved in a separate folder and can be restored or deleted permanently.
Transfer notes via iCloud
The easiest and fastest method is synchronization via Apple cloud storage. Do the following:
- Make sure your device is connected to Wi-Fi;
- Go to “Settings” on your old iPhone, click on the first line with the name and make sure that you synchronize all files (in this case, it’s enough to save it to the “Notes” backup). If this feature does not work for some reason, please create a backup copy. Also check if the icon is next to the Notes option (it should glow green). To do this, swipe right;
- Next, move the slider to the right on the iCloud Drive value. Allow access to other programs to store and copy information;
- On the new iPhone, enter the login and password for your Apple account >If for some reason the method described above did not work, then try following the other instructions below.
Transfer from iCloud to Google, Yandex mail
iCloud synchronizes well with other cloud services. The only condition is that the storage facility supports the postal service. After import, a folder called “note” is automatically created in the mail. Yandex.Disk or Google Drive are suitable for these purposes. In general, synchronization is carried out as follows:
- Find the “Passwords and Accounts” tab in the settings;
- Select one of the linked accounts: either Yandex or Google;
- Once in your account, swipe right on the Notes option. After this, synchronization will occur automatically.
Follow the same steps on your new iOS device. All data should be transferred.
Now, to access your notes, all you need to do is sign in with your account on another Apple device. You can also simply go to Yandex or Google and access all your notes in a separate folder, and for this you do not need to have another iPhone, since authorization is possible from a computer or tablet.
How to Sync Notes Using Gmail and Exchange
However, it is not necessary to use iCloud; transferring records between iOS devices is also possible using other popular Internet services, such as Gmail and Exchange. To enable them, you need to log into your mail account.
- Let's go to settings.
- Click on Mail, addresses, calendars.
- Select the account you want to enable.
- Activate the switch and enable note synchronization.
Now, having completed the same steps on another iOS device, all recordings will be transferred to it.
Transfer to a new iPhone via Tenorshare iCareFone
Tenorshare iCareFone is a useful tool that replaces iTunes. What is the advantage compared to the classic program? The utility has many more functions. And also - the program works not only with new versions of iOS, but also with versions 8, 9 and 10.
In order to be able to import Notes, you need a computer. You can download the free application with Russian language support on the developer’s official website. Suitable for both Windows and Mac.
How to transfer data:
- Download Tenorshare iCareFone and launch it. Select “Backup and Restore” in the top menu;
- Connect the new and old device to your computer or laptop via a USB cable;
- If you have iTunes installed, the program will most likely launch automatically. Close it as it will not be needed;
- After the PC recognizes the devices, they will appear in the program. If necessary, swap the devices - place the iPhone from which you want to transfer information on the left, and the iPhone receiving the data on the right;
- After that, do a memory analysis. The files on the old device will be shown on the left, and the storage of the new gadget will be shown on the right (information about what the capacity is filled with will also be displayed here. This is necessary to understand whether there is room for importing notes);
- In the Personal Data section, find the Notes tab and check the option. You can select other files if you wish;
- Next, click on “Start Transfer” and wait until the transfer is completed. This usually goes quickly, but the final time depends on how many notes you need to transfer and whether they contain media files.
Part 1: Is it possible to export notes from iPhone to PC/Mac via iTunes?
When it comes to iPhone data backup, sync or export, we may take it for granted that iTunes can do all of that for us. But actually, iTunes is not that perfect. And iTunes certainly can't export notes. You can check the steps below.
Step 1: Launch iTunes and connect your iPhone to the computer.
Step 2: Click the iPhone icon in the upper-left corner of the iTunes window. Then you can see a list of contents that you can sync in the blow of “Settings”. But notes is not included in the list. You can only click the listed data types to sync and then export to your computer. So we can't use iTunes to export notes from iPhone to computer.
Transfer notes via AirDrop
Another classic method that does not require installing third-party applications is the standard AirDrop function. Works on most modern devices (from iOS 7 and older). Ideal for transferring a small number of notes. The downside is that you will have to import each document separately if there are many of them. The procedure will be as follows:
- Make sure both gadgets are connected to the Internet via Wi-Fi or mobile. Activate Bluetooth on both devices and make sure that AirDrop transfer is allowed for all devices (to do this, launch the settings, go to “General”, then to “AirDrop” and check the “For everyone”) box. To quickly navigate, pull the curtain upwards and, once in the control center, press your finger on the menu where there are Wi-Fi and mobile Internet icons;
- On your original iPhone, go to the Notes app;
- Next, select the required file and click on the “Share” icon (a square with an arrow coming out). Click on AirDrop (the icon is displayed at the very top);
- Select your paired device and confirm the transfer on your new iPhone.
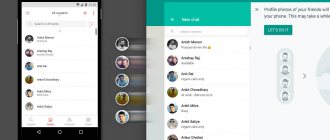
Import notes from iPhone to Android
There are several ways to transfer documents from iOS to Android. Everything is complicated solely by the fact that to create notes you used the native Notes application, and not any other downloaded from the App Store. There is no such program for Android devices. Therefore, simply copying will not work.
The easiest way is to use a Google or Yandex mailbox. We described this method earlier. In this case, a “note” folder will be created in the mail.
- Launch “Settings” on your Apple gadget;
- Go to “Passwords and Accounts”;
- Select a Google or Yandex account. If it is not there, then create a new one by clicking on “Create a new account”;
- After adding an account, click on it and move the toggle switch on the “Notes” option. Wait while the data is synced and copied;
- After that, check your mailbox. If a new “note” folder appears, then you did everything right.
Next, all you need to do is log in to this account on your Android device and you will have access to your notes.
Transfer notes from iPhone to Windows (iTunes + Outlook)
Importing to Mac computers is easy - if you are logged in under the same account where you recorded the notes, the folder will be transferred to your PC automatically. New entries will sync immediately. Things are a little more complicated with Windows computers. You will have to install third-party software, and there are two such programs: iTunes from Apple and Outlook, included in the Office package from Microsoft. You can download and install both programs on your computer in a few clicks.
How to import from iPhone to Windows PC:
- Download the above programs. Launch Outlook and leave it active in the background;
- Connect your iOS device to your computer via a USB cable (preferably the original one from the box);
- Launch iTunes if the program does not open automatically when you connect your device;
- Next, go to the “Information” section (located on the left in the side menu);
- A new window will open, in it select the action “Synchronize with...” and among the list of programs, click on the above-mentioned Outlook.
If you did everything correctly, a new “My notes” folder and a “Notes” subfolder will appear in the Microsoft utility. All transferred documents will be signed as they were called in the original application.
Part 3: Simple way to selectively export notes from iPhone to PC/Mac
Dr Fone - iOS Data Backup & Restore is a wonderful software which can be used for backup and export your iPhone notes, text messages, contacts, photos, Facebook messages and many other data to your PC or Mac.
dr.fone – iOS Data Backup & Restore
Backup and export your iPhone notes in 1 click!
- Selectively backup and export any data you want to your computer.
- Allows you to flexibly restore your iPhone notes without overwriting your original notes.
- Supported iPhone SE/6/6 Plus/6s/6s Plus/5s/5c/5/4/4s that run iOS 9.3/8/7/6/5/4
- Fully compatible with Windows 10 or Mac 10.11.
How to access notes through a browser
It is known that Apple's iCloud cloud service has a full version via a web browser. This makes viewing records much more convenient, and you can access them in a short time. What should be done:
- Go to the website https://www.icloud.com/;
- You will be taken to the main page where you will need to enter your login and password for your Apple account >This article explained how to transfer notes made on an iPhone in the original application, what is the advantage of this particular utility from Apple and what functionality does Notes have? . As you can see, the number of ways to import notes to other devices (not only iPhone, but also Android and Mac and Windows computers) is very large. The main thing is to strictly follow the instructions and enter the data carefully. If any of the methods did not work, try any other of the above.
But at the same time, always try to create backup copies of your data, including notes, so that they are always stored in iCloud or any other cloud services, because when you delete an account, all notes associated with it will also be automatically deleted from the device.
«>
Preparation
Make sure you set up iCloud on your iPhone, iPad, iPod touch, or Mac and sign in with your Apple ID. Then follow these steps to download and install the iCloud for Windows app.
Want access to the latest iCloud features? See recommended system requirements. iCloud requires an Internet connection to work. iCloud availability and features may vary by region. If you are using a managed Apple ID, iCloud for Windows will not be supported.