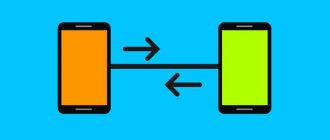
What phone data can be synchronized?
Synchronization involves the exchange of information between a smartphone and an Internet server. Data that appears on the phone is uploaded to it, and vice versa, information sent to the server ends up in the device’s memory. This means that due to this, both storage locations contain the same files, which is especially convenient when using several smartphones at the same time.
An example of the implementation of the function: when the option is activated, the list of subscribers from your Google account is automatically synchronized with contacts on your smartphone. After adding a new number to the device's telephone directory, it is automatically uploaded to the Google service. And if you add a subscriber to your contacts from your account, he will immediately appear in the standard application.
This useful feature allows you to save all entries in the phone book if the owner of the smartphone has lost access to it, purchased a new device, or lost the SIM card.
If you have access to the network, data exchange occurs regularly. By default, the following information is synced on your device:
- user-saved logins, passwords, bookmarks and browsing history in the Chrome browser;
- emails from Gmail;
- multimedia and applications from the Play Market;
- saving in games;
- files and documents from Google Disk storage;
- information from system applications (for example, Calendar, Notes, Contacts).
This is a list of information that is associated with Google services, however, programs from third-party developers can also perform the procedure for exchanging data with their own servers. For example, after downloading messengers, contacts will be synchronized with the application.
What is synchronization
Synchronization should be understood as the process of copying information from the phone to remote storage. Having a copy of the data provides quick access to information on another device, and also facilitates the process of data recovery in the event of loss or damage to the mobile device.
The process is performed manually or automatically. In the first case, synchronization is activated as needed. In the second, data is copied without user participation. In this case, the settings allow you to select the type of data that will be transferred to the server. It is worth noting that synchronization consumes a certain amount of battery power and Internet traffic, which is why users often disable the function in order to save money.
How to set up data synchronization on Android
To synchronize yourself on a mobile device via a Google account, you need to follow these instructions:
- Check if your phone is connected to the Internet or Wi-Fi.
- Go to the standard settings menu, shown as a gear.
- In the list that opens, find the “Accounts and Synchronization” subsection.
Attention! Depending on the Android OS version and the type of graphical interface, the section may have a different name, for example, “Backup and reset”.
- Find the required account type.
- Find the required account and click on “Synchronization Settings” or on the account itself. Once in the vault, you can see the date it was last saved and the information available for archiving.
- Depending on the firmware version, click “Synchronization” or in the list of data and applications, mark the items that need to be synchronized.
Important! The amount of free cloud storage may not be enough when synchronizing large amounts of information. In this case, you may need to expand the memory for a fee.
To start the auto-synchronization process, you should go to the corresponding section in the settings, move the slider, and the action will begin to run in the background.
Auto-sync allows you to simplify the task and save time when transferring data from one phone to another. However, for the function to work correctly, you will need to set up an account for storing content, specifying the interval, location and file type. You can disable data sharing to avoid wasting traffic and saving battery power.
What data is stored on the server
The following information is loaded into Google storage:
- Gmail. Emails and attachments.
- Play games. Saving gameplay.
- Google Fit data. Physical activity statistics.
- Google Drive. Phone backup.
- Google Photos. Photos and videos from the camera.
- Calendar. Events, activities, reminders and goals.
- Contacts. Directory telephone numbers.
- Device data. Wi-Fi network passwords, call history, application settings, installed background images.
Data from certain applications associated with Google is also often synchronized or if the synchronization function is selected in the program settings. When using the services of electronics manufacturers - Xiaomi, Meizu, etc., the list of downloaded data is similar or slightly different. The main difference is that each company focuses on synchronizing data from its own applications.
Some problems and ways to solve them
Owners of Android gadgets can use them and not know about the existence of a Google account. Similar situations happen to the older generation. Having bought a smartphone in a store, they order the service to create an account. The only disadvantage of this situation is the inability to use a Google account on another device. Some Android gadgets experience malfunctions. For example, after turning on, a smartphone or tablet requires you to fill in your Google account login information. To resolve this issue, the user must:
How to transfer data through third-party applications?
If for some reason you do not want to use Google services, install other programs. They will transfer data from android to android no less effectively. There are dozens of applications. But the three most commonly used are:
- CLONEit
- X-Transfer
- Mi Cloud
Transfer via CLONEit
- Download the utility via Play Market.
- Install on both devices.
- Launch the program on your old phone and click “send”. A wireless access point is created from this device.
- We turn on the program on the new smartphone. You choose that he will be the recipient.
- Wait until the phones detect each other and give the “Connect” command.
- Selecting what needs to be transferred
- Click “Start”. Synchronization has begun and data is being transferred.
X-Transfer is the second application with similar functionality
Works directly with devices. In this case, it is possible to copy to a PC. To copy data:
- Download the program via Play Market. Do not download these applications from other unofficial sites, otherwise you risk installing some kind of virus.
- The program must be installed on both devices.
- Accept the user agreement and give access to the data (otherwise the program will not be able to copy it)
- Then you need to connect the phones to each other. QR codes are used for this. Scan and receive confirmation that the connection is established.
- Then the system will begin scanning the device and show all available data.
- On the old gadget, select the information you want to copy;
- Start the transfer process. After 5-10 minutes the data will appear on the new device.
Operation statistics and their impact on battery consumption
Similar information, however, in a more convenient format, can be viewed through the “Settings” menu, followed by going to the “Battery and Performance” tab by selecting the “Battery Usage” item in the drop-down list. After this, a list of all processes will open in descending order of consumption, with the percentage impact of the application on battery consumption, which will allow you to assess the situation and determine the most difficult and unnecessary programs for operation.
To stop the process, you will need to open the selected application and click “Stop”. It's simple.
Conclusion
The article describes in detail what synchronization is in an Android phone. This function is useful for saving important information on remote storage. And in case of an unforeseen situation, personal data can be easily restored, for example, phone book numbers, photographs or other data. At the same time, for uninterrupted operation, automatic synchronization and provision of Internet access must be activated.
Do you use synchronization or don’t trust remote servers? Leave your opinion in the comments below the article.
How to enable/disable auto-sync on Honor and Huawei
How to enable auto-sync on Honor and Huawei? Such a question rarely bothers users, since this function is active on all smartphones by default. Exceptions are cases when it stops working due to rash user actions. In such situations, you need to find out what is preventing synchronization and eliminate the cause of the problem. Usually such actions take a matter of moments.
What is auto-sync in a smartphone?
Auto-sync on Honor/Huawei is a special feature that allows you to combine all the user’s Android devices using a Google account. As a result, the user-selected settings will be used on all gadgets. And contacts added to your phone are automatically saved on other devices. This mode of operation of smartphones is necessary to simplify the lives of their owners and help in saving important data, contacts and phone operating parameters.
How to enable synchronization on Huawei and Honor?
To activate synchronization, you need:
- link your Google account to Android;
- log in;
- enter the smartphone settings and switch to the “accounts” section;
- Click on the icon with three dots to open a menu of available actions;
- select the item that mentions synchronization and put a checkmark next to it.
Usually the listed actions are enough to achieve success.
Shutdown
To figure out how to disable synchronization on Huawei and Honor, you need to decide what effect the smartphone owner wants to achieve:
- completely disable synchronization;
- prohibition of interaction between individual services and applications.
other methods
It is worth noting that you can copy data to all your devices in other ways.
For branded shell
Almost all smartphone manufacturers use proprietary Android shells (add-ons) on their gadgets. Some of them have a synchronization function for your own profile.
Note! For example, we used Meizu with the Flyme shell, which provides a Meizu account. Different manufacturers' own profile may differ or be completely absent.
- Go to “Settings” → “Meizu Account”.
- Select Data Sync.
- Check the boxes for the required items → click “Synchronize”.
Similar actions for Mi-account and others.
Third Party Applications
There are many apps available in the Play Store that allow you to back up your data and sync it to another device. Let's look at the example of one of the most popular programs - G Cloud.
- Install and launch the application.
- Click "Don't have an account yet."
- Select “Register with Google+” → enter your account.
- Check the boxes to add the items to the cloud → click on the button with the floppy disk.
- Wait for the process to complete.
- Your data is now in the cloud.
For automatic synchronization:
- Open settings (gear).
- Activate "Startup".
To install data on another phone, just install the application on the second device → log into the same account.
- Open the side menu → “Restore”.
- Select your smartphone.
- Go to the folder with the relevant data.
- Click on the file → “Recover”.
Synchronization with PC
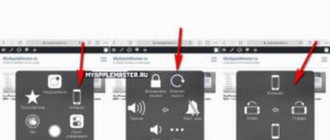
You can access the elements of your smartphone via your computer using the MyPhoneExplorer program.
Feature overview
- Contacts:
- View and edit all smartphone contacts;
- Add or remove;
- Write SMS or email;
- Transfer to the desired group;
- Call;
- Export Import.
- Challenges:
- View the history of current calls;
- Add a contact from lists or edit the current one.
- Organizer:
- Full work with the calendar;
- Fully functional alarm clock;
- Add, edit or delete notes.
- Messages:
- View all messages and conversations;
- Write SMS;
- Deleting SMS or transferring them to the archive;
- Files:
- View all files on a memory card or internal memory;
- View all system storage files.
- Additionally:
- View monitoring of the current state of the smartphone;
- View available Android memory.
Note! Before connecting to a PC, you must enable
debug mode
.
- Install the application and launch it.
- Connect your smartphone via cable.
- In the program, click “File” → “Connect”.
- In the pop-up window, select “Google Android Phone” → “USB Cable”.
- Wait for the process to complete.
- To access the necessary data, select the appropriate item.
How to synchronize Google Chrome with Yandex browser
In the full sense of the word, synchronization between different browsers is not available. Each company develops its own servers, communication tools, and thus they try to lock the user in their own ecosystem. The only option is to manually transfer some of the data between web browsers. Unfortunately, now only bookmark synchronization is available between both browsers, but in both directions, both from the Yandex browser to Google Chrome and vice versa.
Instructions:
- Open Yandex Browser.
- Click on the three bars in the top menu, open the “Bookmarks” tab and select “Bookmark Manager”.
- Next to the line “Bookmarks panel”, click on the ellipsis and click on “Export bookmarks to HTML file”.
- We save the file in any path that we can later find.
- Launch the Chrome browser.
- From the menu, select “Bookmarks” and click on “Bookmark Manager”.
- In the upper right corner (within the settings window) click on the 3 dots and click on “Import bookmarks”.
- Specify the path to the file and download its contents.
Practically the same actions can lead to reverse synchronization. You just need to export the file from the Google browser and import it into the Yandex web browser.
How background mode works
The running application runs in the foreground while it is displayed on the screen of a mobile device or is being used by the user: gallery, browser, music player, etc. If you leave the application using the “return to main screen” button, the program does not close, but is minimized to the background.
If there are active actions, such as playing music, the utility continues to work. Otherwise, the program is paused and stored in the RAM cache. If there is enough RAM, the newly called application from the “running programs” menu will continue to work from the last point it stopped.
The application is closed if the user has selected the appropriate function or the system needs to free up RAM for other tasks. In this case, the running services of a specific application remain in memory. The purpose of the service is determined by the application's functionality. For example, the JobScheduler service is used to schedule tasks, and the SyncAdapter is used to synchronize data. If necessary, the application automatically starts the necessary services.
The presence, number and type of services are determined by the application developer. With the right approach, it will be possible to automate various processes that do not require user intervention - creating a backup copy of data on a schedule or when the Internet is available, communicating with the server to check new letters, accessing sensors, etc.
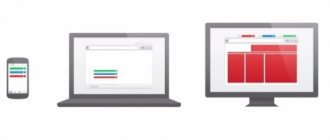
Synchronization between smartphone and PC.
USB
Photo from the network. Data transfer and synchronization by connecting your smartphone to a PC via USB.
The easiest way to sync your smartphone with your computer is USB. To do this, you need to connect your smartphone, set data transfer in the settings (on the smartphone) and transfer the necessary files.