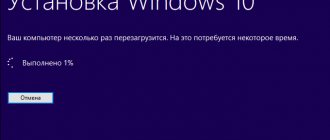
Disk defragmentation using Windows 10
To defragment a hard drive in Windows 10, there is a standard utility with a convenient graphical interface.
To run it, open the properties of the section you need, switch to the “Service” tab and click the “Optimize” button. A window will open asking you to select a drive. Select the desired volume and click “Analyze”, thereby starting the process of determining the state of the disk. Next, if the fragmentation level exceeds 15%, click “Optimize”. The procedure will take some time, and during its execution you can use the disk without restrictions. Now let's see how to defragment Windows 10 via the command line. On thematic forums, opinions are expressed that this method gives better results. However, these statements are only true if additional command line options are used. The defrag utility, which has the following syntax, is responsible for defragmentation in the console:
Defrag
To perform a simple disk defragmentation on Windows 10, you need to run Defrag C: in the command line running as administrator. You can add the following parameters to the command:
- /A – initiates preliminary analysis;
- /K – performs additional optimization of disk space;
- /U – is responsible for displaying the progress of the process;
- /V – Shows detailed fragmentation statistics.
Disable automatic disk optimization
Disk Defragmenter.
what it is? http-equiv=”Content-Type” content=”text/html;″>class=”remon-after-2nd-h2″ id=”remon-1407774327″>
To disable automatic optimization (defragmentation) of HDD and SSD drives, you will need to go to the optimization settings and also have administrator rights on the computer. The steps will look like this:
- Click the "Change Settings" button.
- By unchecking it and clicking the “OK” button, you will disable automatic defragmentation of all disks.
- If you want to disable optimization of only some drives, click on the “Select” button, and then uncheck those hard drives and SSDs that do not need to be optimized/defragmented.
After applying the settings, the automatic task that optimizes Windows 10 disks and runs when the computer is idle will no longer run for all disks or for those you have selected.
If desired, you can use the task scheduler to disable automatic defragmentation from running:
- Start the Windows 10 Task Scheduler (see How to start the Task Scheduler).
- Go to Task Scheduler Library - Microsoft - Windows - Defrag.
- Right-click on the “ScheduleDefrag” task and select “Disable”.
Disabling automatic defragmentation - video instructions
Let me note again: unless you have some clear reasons for disabling defragmentation (this could be, for example, using third-party software for these purposes), I would not recommend disabling automatic disk optimization in Windows 10: usually it does not interfere, but on the contrary.
And maybe this will be interesting:
Disk defragmentation using the command line
How to defragment a disk on Windows 7
Run the line as administrator via Start. In the window that appears, type the command diskpart and select OK/Enter. After this, activate the list volume command and find the desired partition in the list of disks that appears.
In the next step, you should select one of the commands, the use of which will display the purpose of launching this process.
Using Commands
1) defrag C: /O – defragmentation of a specific partition. As you may have guessed, the command is written to optimize the “C:” drive;
2) defrag /C /O – defragmentation of all existing partitions. The process is carried out in a way that corresponds to the type of hard drive on your device.
If the process does not start
There are several reasons why this could happen. Let's try to solve each of the possible causes of this problem one by one.
Checking for system file damage
First of all, you should check the system for damaged files. If any are found, they will need to be restored. To check the system:
- Using administrator rights, launch Command Prompt.
Run Command Prompt as Administrator - The command to scan the system is sfc /scannow.
Enter it and confirm your entry. Type sfc /scannow into the Run window and click OK - Wait until the scan is completed.
With these simple steps, you can identify Windows file corruption that could be affecting the defragmentation service.
Enabling the defragmentation service
If the previous check did not reveal anything, the problem may be in the service settings. We do the following:
- Open the “Run” window using the Win+R key combination.
- Enter the services.msc command into this window and click OK.
Type services.msc into the Run window and click OK - Among the many different services we find the item “Disk Defragmentation”.
After which you should check the status of this service. It is best to set it to the “manual” position, in case it is the automatic start setting that interferes with the correct operation of the service. Switch the Disk Defragmenter service status to Manual.
If you have configured this point, but nothing has changed for the better, it is also worth checking the status of the following services:
- DCOM server process launcher;
- RPC endpoint mapper;
- remote procedure call (RPC).
Each of them must be configured to start automatically.
Checking the hard drive for faults
Another reason for possible startup problems is a malfunction of the hard drive itself. Perhaps it is damaged and you don't know about it. To perform this check:
- Launch the command line again in the same way as above.
- Specify the drive letter you want to work with.
- Enter the command chkdsk /r. This command will not only check the disk for damage, but will also try to repair it.
- A notification will appear informing you that the disk will stop working during the scan.
Agree to this by entering Y when prompted. Enter the drive letter, then enter the command chkdsk /r and when prompted to disconnect the drive, agree to enter the letter Y - Wait for the check to complete and its results, then try to start defragmentation again.
How to defragment a disk
Setting up and optimizing an SSD drive in Windows 10
To accomplish this task, you will not need any third-party software, since the necessary tool is included in the Windows 10 operating system itself.
To run it you only need to do the following:
Press the key combinations “WIN+S” and enter the phrase “Disk Optimization”;
In the window that opens, select the desired disk and click on the “Analyze” button;
- After analysis, the utility will give you the percentage of fragmented parts of the total disk volume;
- All you have to do is click on the “Optimize” button to complete the defragmentation procedure.
Next, you can close the “Disk Optimization” window, but if you want to set up automatic defragmentation, click on the “Change settings” button.
How often is defragmentation required?
There are three options for the frequency of running the defragmentation procedure: “Daily”, “Weekly” and “Monthly”.
Taking into account current practice, the best and most optimal option is “Weekly”.
With this approach to optimizing the operation of information storage devices, the procedure itself will not take much time, even if the disk volume exceeds 1 TB.
To run automatically, simply check the box next to “Run on schedule” - “Weekly”.
Defragmentation of an SSD drive: how it differs from regular defragmentation and how to do it
An SSD drive stores information in special flash memory cells. In addition, all solid-state drives are equipped with special controllers that help optimize the state of the cells and completely delete information from them, rather than overwriting it, as is the case with HDDs. Defragmentation is not required for SSDs, since the built-in controller optimizes the state of clusters and completely removes information from them.
Important! If you need to defragment a solid-state drive, it is better to do it once a month. This is due to the fact that SSDs have a short service life due to limitations in the read and write cycle of information
The process of defragmenting an SSD
Disk defragmentation can improve OS performance. To perform this procedure, you can use standard Windows tools or third-party software. It is recommended to defragment the disk at least once a month. There is no need to use the “Defrag” utility to optimize SSDs, since SSDs are equipped with a built-in TRIM controller that optimizes flash memory clusters.
Flash drives and solid-state drives (SSD)
It is recommended to perform this operation with regular hard drives.
For flash drives , this is not recommended at all. Since during defragmentation a large number of “write/read” cycles occur, and for flash memory the number of such cycles is strictly limited. That is why such a process can affect the service life of the flash drive, it will decrease.
Should I do this with SSD drives ? Since SSD drives are based on the same technology as flash drives, it is better not to perform such an operation with them. And Windows 7 already provides for automatic disabling of defragmentation when the system recognizes the SSD drive.
If, when analyzing an SSD drive, a large percentage of fragmented files are still observed, then it would be better to do the following:
- Copy all data to third-party media.
- Format the SSD drive.
- Return all data to it again.
Why is disk defragmentation necessary?
To be honest, before performing defragmentation, users should figure out whether they need it. If you have been using your hard drive for a very long time and have not fully formatted it, then you definitely need to defragment it. Since the user often deletes or changes files not in the order in which they were written to the hard drive. Because of this, so-called memory gaps appear on the disk, where the system tries to write other files. If there is not enough disk space in that location, the file will be located in several parts.
If you try to access such a file written to your hard drive this way, it will take you longer. Please note that the more full your hard drive is, the more file fragmentation zones it will have. The figure shows how the files before the defragmentation process were written on the hard drive in fragments (this is where the name of the process comes from), and after defragmentation everything was in perfect order.
The process itself is that all files that are not written sequentially will be overwritten. And all empty clusters will disappear, since all the necessary files in these places will be overwritten. This will speed up the operating time of the system as a whole, since when running such files the system will not have to search for pieces throughout the entire file system.
Operation optimization
Before you begin the defragmentation process itself, it’s worth understanding what it is. The hard drive in your computer is a very important component. Access to all files and, as a result, the speed of working with the computer depends on its performance. But with regular use, you may notice that file opening times become higher. This is a sure sign that you need to defragment.
The fact is that when writing files to disk, each file is divided into many equal-sized fragments. These fragments are located next to each other and the file opens easily and simply. But as you work with the hard drive, copying, installing and deleting files, these fragments become further and further from each other. The file still opens, but it takes more and more time to collect its pieces. The process collects these pieces and, as a result, speeds up the time it takes for the hard drive to interact with the file.
When file fragments are far apart from each other, the system response when interacting with them slows down
The operation must be performed from time to time. You can either be guided by your own observations of computer performance or use the disk analysis function. However, it is recommended to simply do it once every certain period. For most ordinary users, once a month will be enough. If you work a lot with the computer or a huge number of operations are carried out on the device to move files, you should make this process more frequent.
On large file servers, the procedure is performed daily.
We carry out defragmentation through “Disk Optimization”
Let's start with the more common method. As mentioned at the beginning of the article, in the latest version of the Windows operating system, the optimization and defragmentation processes are combined in a single tool, which will be directly used in this instruction.
So, first, activate “Explorer” (key combination Windows + E) and in the left “tree” click on “This PC”. In the process we will use the “C:” drive (as an example). On the last tab, which is called “Management” (see the top of the screen), select “Optimize”. After this, the previously mentioned “Optimize Disks” tool will appear. By the way, it can be called in another way. It involves using the “Properties” option, which is included in the context menu. To select this item, you need to select the desired section with the cursor and right-click to call up the drop-down menu in which this option is at the very end.
After this, a dialog box consisting of 7 tabs opens. Among them, find the “Service” tab and click on the “Optimize” button.
Then the system will prompt you to select a disk that should undergo the defragmentation process. After that, activate the “Optimize” button. The duration of the process directly depends on the “weight” of the section, so it can take 3-4 hours.
To do this, find the “Analyze” button (located next to the “Optimize” button in the disk selection window) and click on it.
After this, information will appear regarding the degree of disk fragmentation. In the case when this figure is below 8%, then there is no need for the system to deal with this issue.
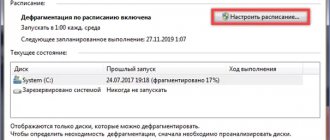
As already mentioned, the process is carried out automatically once a week. You can disable this feature or change the check interval. To do this, in the “Disk Optimization” window, find the “Change settings” button.
Here you can change the frequency of processes and select sections that will be optimized.
Using third party solutions
There are a huge number of utilities in Russian that can cope with hard drive defragmentation no worse than the tools built into Windows 10. Let's look at the most popular and effective ones.
Defraggler
Download the utility from the official website, because it is absolutely free. The process of use is practically no different from using the standard method:
- Select the HDD and click on the “Analyze” button in order to identify the percentage of fragmentation.
- We pay attention to fragmentation and, based on the value, click “Defragmentation”. In addition to the usual check, the application allows you to conduct a quick check.
Defraggler is an excellent full-featured replacement for the standard Windows method and allows you to carry out all the necessary procedures with maximum efficiency and convenience.
Auslogics Disk Defrag
This is a powerful utility for fully working with disks. Its advantage can be considered higher efficiency than that of a standard product.
You must use the program according to the following instructions:
- Select the required partitions, click on the arrow opposite the “Defragmentation” button and go to the “Analysis” item. In addition to analysis, the application offers such procedures as SSD optimization using a special algorithm, as well as quick defragmentation.
- Having received information about the degree of fragmentation and the number of files, you can, if necessary, proceed to organize them by clicking on the appropriate button.
- We wait for the operation to complete and, if possible, do not use the computer. The program will show all the information (for example, how many passes were made).
Let's move on to the next utility.
Smart Defrag
At its core, this is another free tool that can operate both manually and automatically according to a set schedule. Its main advantage is its automatic operation, because during use the program performs all actions without having any impact on the performance of the PC.
During installation, make sure that no unnecessary components are selected.
This tool is almost as simple to use as the previous programs:
- Place the cursor over the arrow next to the “Smart Defragmentation” button and select “Analysis”.
- Upon completion of the analysis, all that remains is to select the fragmented disk and click on the “Smart Defragmentation” button.
- We wait for the end and close the program.
How to defragment a disk on Windows 7
Defragmenting a disk or disks running version 7 of Windows is quite simple. Let's not write SEO optimized nonsense and get down to business.
The algorithm for starting defragmentation for a laptop and a computer is the same. Click on the start menu in the lower left corner of the screen and select “Computer”. A window will open showing all your drives.
Select the drive you want to defragment. Usually the local disk is divided into two: one with the system, the other for games, programs, etc. Hover your mouse over the required drive and right-click.
A context menu will open in which you need to select the “Properties” item.
A window will open with 7 tabs. Select “Service”, select “Defragmentation”.
A new window will open with the defragmentation program that is built into the Windows 7 system.
There are several points here:
- setting a schedule - you can set a time for automatic disk defragmentation on Windows 7. It will be carried out at a specified time, without your participation.
- disk analysis - assesses the current state of the hard drive.
- disk defragmentation - launching a file defragmentation algorithm (includes analysis).
If you haven’t defragmented for a long time, then the “Analyze disk” tab is not needed. Feel free to run defragmentation and be patient. The built-in data grouping algorithm is slow.
You should not use your computer while the disk is defragmenting. This is fraught with freezes, especially if you have a weak PC or laptop. The duration depends on the size and fullness of the computer’s hard drive.
After the process is completed, I recommend setting the procedure time in automatic mode. At least once every two weeks.
Determining the number of passes
The meaning of the procedure is to combine data clusters, which reduces the time it takes to access files and thus somewhat speeds up the performance of the computer. This usually requires a certain number of passes because the process overwrites areas of the drive. The number required depends on the following indicators:
- storage volume;
- computer power;
- interval between procedures;
- number and size of files on disk.
Now in more detail on each point.
Storage capacity
Current HDDs reach a volume of terabytes, which is equal to thousands of gigabytes. Accordingly, the number of individual data clusters on such drives can number in the millions, which naturally increases the time the system spends on defragmentation. Therefore, the number of passes is directly proportional to the volume of the hard drive: the larger its capacity, the more passes will be made.
Computer power
The next important parameter is the hardware capabilities of the PC or laptop. Typically, the defragmentation process involves both the central processor and RAM: the former controls the procedure, while the latter stores data for later recording. Therefore, the more powerful the CPU and RAM, the fewer passes will be required.
Interval between procedures
During computer operation, data is constantly fragmented: the OS and user applications actively use the drive for their tasks, so it is important to carry out the procedure at regular intervals. If fragmentation is carried out irregularly, the number of data clusters grows, which is why each subsequent manipulation will take more and more time and, accordingly, more passes.
Number and size of files on disk
The quantity and size of the disk contents also plays a significant role. The point is in the peculiarities of the file systems that Windows 7 uses: several large files are fragmented less than a thousand small ones. So a disk with several high-quality movies will be defragmented faster than a drive with tens of thousands of text documents.
Thus, we can draw the following conclusion: a powerful computer with a relatively small HDD on which large files are stored will require fewer defragmentation passes than an office PC with a large disk that contains many text documents. Alas, it is impossible to calculate the exact number of operations for a specific computer - you should focus on an average of 10-12 passes.
Defragmentation takes a long time
If defragmentation is taking a long time or seems to be stuck, you should follow these steps:
- Just wait - as we mentioned above, the operation in question is time-consuming and can last more than a few hours.
- If the operation has been going on for 5 hours or more, but there is no visible progress, most likely you really have encountered a problem. The procedure should be canceled - there will be no consequences for the computer.
If the process is frozen, you can disable it through Device Manager. Press the key combination Ctrl+Shift+Esc, then find the corresponding defragmentation program in the task list and right-click on it. Select "Go to Process".
Select the found process, right-click again and select “End process”.
In the warning window, confirm your intention.
After forced completion of defragmentation, we recommend checking the disk for errors - as experience shows, freezing during cluster merging is a symptom of an imminent HDD failure.
Read more: Checking the disk for errors in Windows 7
Conclusion
Now you know the approximate number of passes the disk defragmentation procedure takes on Windows 7, as well as the reasons why it may freeze.
As you can see, the number of passes depends on many factors. We are glad that we were able to help you solve the problem. Describe what didn't work for you. Our specialists will try to answer as quickly as possible.
Did this article help you?
HomeWindowsHow to defragment a disk on Windows
A computer's hard drive is a real encyclopedia where all the data on your computer is stored, from a regular text file to music, movies, and games. The provided algorithm of the technique divides all files into several hundreds, thousands and tens of thousands of fragments. Over time, you begin to notice that the computer begins to “glitch” or “slow down”. As a result, a bottleneck occurs in the operation of the equipment and users ask a reasonable question of how to defragment the disk on Windows 7 so that they can “revive” the computer’s operation.
How many passes in Windows 10 defragmentation
Personal computer users often ask how many passes are there to defragment Windows 10? The pass involves scanning and then optimizing HDD or SSD clusters. The number of passes will directly depend on how many fragments will be detected when analyzing the hard drive. If fragmentation is less than 10%, the process will take from 10 minutes to 1 hour. In a situation where the value ranges from 10 to 40%, then 1-3 hours will be spent on defragmentation. If the user has never used the standard “Defrag” utility and the disk is completely cluttered, then the process can last more than a day.
Important! If you use a flash drive connected using Ready Boost technology to increase the amount of RAM, then it also needs to be defragmented
Defragmentation (optimization) of disks
Disk Defragmenter (in Windows 8 and 10 – Defragment and Optimize Drives) is a Microsoft Windows utility designed to optimize and defragment drives.
The utility is designed to increase the speed of data access by reordering (defragmenting) files on disks so that they occupy continuous storage chains.
As a result, the data blocks that make up the files are distributed in close proximity to their headers, which allows the operating system to save time searching for them.
Step 1. Expand the “Computer” directory.
Open "Computer"
Step 2. Right-click on the disk and select “Properties” with the left mouse button.
Right-click on the disk and select “Properties”
Step 3. Select the “Service” tab.
Select the “Service” tab
Step 4. In the “Optimization and defragmentation...” field, click “Optimize” (Perform defragmentation).
In the “Optimization and defragmentation...” field, click “Optimize”
In the “Optimize disks” window, in the “Status” section, there is a list of all disks on the personal computer.
For each of these disks it is indicated:
- name, letter, media type (solid-state, hard, removable disk, etc.);
- when was the disk defragmented last time?
- The current fragmentation status for each partition.
The list also includes hidden drives, such as the recovery drive that is automatically created when you install Windows.
In the provided window you can also get an update on the status of each partition and see if it needs to be optimized.
Step 5. To do this, select the section of interest and click “Analyze”.
Click “Analyze”
After some time, the utility will analyze the partitions and report in the “Current Status” column whether the disks need to be optimized or not.
The utility analyzes disk partitions
Step 6. To defragment a partition, select it with a mouse click and click “Optimize”. Using the Ctrl key you can select multiple sections at once.
Click “Optimize”
When optimizing selected partitions, you will see their current state in the "Last Run" column and progress expressed as a percentage in the "Current State" column.
When optimizing selected partitions, you will see their current state in the “Last run” column and progress expressed as a percentage in the “Current state” column.
The defragmentation process can take anywhere from 5 minutes to more than half an hour, and depends on the fragmentation and size of the disk. A total of 12 optimization passes will be performed.
If you want to interrupt the process, click “Stop”.
If you want to interrupt the process, click “Stop”
How to schedule defragmentation
The Optimize Drives tool allows you to schedule actions to perform. In the initial settings, the process runs weekly, but it can also be set to run every month or day.
Changing “Schedule Optimization”
Step 1. To change the frequency of these actions, click the “Change parameters” button in the “Schedule optimization” section.
Click the “Change parameters” button in the “Schedule optimization” section
Step 2. Check (if not checked) the “Run on schedule” checkbox. Select the frequency of optimizations (daily, weekly or monthly) from the drop-down list. Click “Disks” to select devices for optimization.
Click “Disks” to select devices
Step 3. Select the disks required for optimization. Check the “Automatically optimize new drives” checkbox if you want to defragment new drives detected by Windows during defragmentation. Click "OK".
Selecting the disks required for optimization
Step 4. If you want to receive notifications about skipping three consecutive planned optimizations, check the box next to “Notify if missed...”. Click "OK".
Check the box next to “Notify..” and click “OK”
The schedule will be scheduled.
Programs and utilities for conducting
Despite the fact that Windows 7 has built-in tools for defragmentation, their quality, speed and ability to customize this process are not suitable for everyone. Therefore, over time, many programs have appeared for defragmentation (and other procedures for optimizing operation) of the hard drive.
Defraggler
A fast and highly admired program by users, Defraggler is from the creators of the equally popular program Ccleaner. The program has the following advantages:
- the ability to defragment not the entire disk, but only part of it or even individual files. This makes the process much faster and more convenient;
- more in-depth analysis and defragmentation than the standard Windows 7 tool;
- there is a choice between types - regular and package;
- by defragmenting system files - the process is completely performed during system boot;
- slowing down further file fragmentation means you won’t need it again for much longer;
- the existence of a portable version - the Defraggler Portable version of the program allows you to use all the functions of a full-fledged program without installing it on your computer. The utility can be launched from a flash drive or any disk.
Defraggler from the creators of CCleaner
Auslogics Disk Defrag Free
Auslogics Disk Defrag Free is no less popular defragmentation tool than the previous one. It is different:
- a very deep scan - the analysis methods correspond to the previous program, but it checks a larger number of files on the disk;
- additional functions for checking the registry and analyzing files - the program does not correct these errors, but notifies the user about them;
- defragmentation speed - complete defragmentation of a hard drive takes about ten minutes.
Of course, this program has a paid version with advanced functionality, but the capabilities of the free version are quite sufficient.
Free version of Auslogics Disk Defrag
Video: Auslogics Disk Defrag Free disk defragmentation program
Diskeeper
It is recommended to purchase this program before use, since only the paid version of the program has significant advantages over analogues. This program, in addition to the usual defragmentation, allows you to:
- launch a continuous process of hard drive optimization through background defragmentation. This way, it will be running all the time, without putting too much stress on the system, and keeping your disk in the best possible condition;
- optimize the disk for frequent file rewriting or other purposes;
- carry out quick defragmentation when you turn on the computer.
Diskeeper supports background defragmentation
- Is it necessary to defragment the hard drive in Windows?
PerfectDisk Enterprise Suite
Another paid program that has one unique feature. It can directly control the process of launching files onto the hard drive and ensure that they are saved in the best possible way. This will significantly reduce the need for defragmentation. In addition, the program allows you to:
- create convenient templates for several disk optimization actions;
- analyze your work on the computer and configure the disk based on this data;
- run defragmentation automatically when the computer is idle.
PerfectDisk has extensive features in the paid version
Knowing how to keep your hard drive in good condition using defragmentation will significantly increase the performance of your computer. Choose the defragmentation method that suits you and successfully optimize your hard drive. This will allow you to work comfortably at your computer.
Experts recommend regularly defragmenting your hard drive: this will improve the performance of your computer and improve the overall stability of the system. This procedure occurs in several stages, and users unfamiliar with it are afraid that defragmentation may freeze. Today we will answer the question of how many passes are required for Windows 7 OS.
Reasons for fragmentation
Fragmentation occurs when the file system cannot or will not allocate enough contiguous space to store a complete file as a unit, but instead places parts of it in gaps between existing files (usually these gaps exist because they previously contained a file that the file system has subsequently deleted or because the file system initially allocated excess space for the file). Files that are added frequently (as is the case with log files), files that are added and removed frequently (as is the case with email and web browser cache), larger files (as with videos), and more files contribute to fragmentation and , as a result, productivity. a loss. Defragmentation attempts to solve these problems.
example
Consider the following scenario shown in the image on the right:
Otherwise, an empty disk has five files, A through E, each of which uses 10 blocks of space (for this partition, block
is the distribution unit of the file system; The block size is set when the disk is formatted and can be any size supported by the file system). On a blank disk, all these files will be placed one after another (see Example 1 in the image). If file B were deleted, there would be two options: mark the space for file B as empty to use later, or move all files after B so that the empty space is at the end. Since moving files can take a long time, if there are a lot of files to move, it is common to simply leave empty space there, marked in the table as available for new files (see Example 2 in the image). When a new file F is allocated that requires 6 blocks of space, it can be placed in the first 6 blocks of space where file B was previously located, leaving the next 4 blocks available (see Example 3 in the image). . If another new file, G, is added and it only needs 4 blocks, it may take up space after F and before C (example 4 in the image). However, if file F then needs to be expanded, there are three options since the space immediately after it is no longer available:
- Move file F to where it can be created as one contiguous file of a new, larger size. This is not possible if the file size exceeds the largest contiguous space available. The file may also be so large that the operation will take an undesirably long period of time.
- Move all the files after F until one of them opens up enough space to make it contiguous again. This presents the same problem as the previous example: if there are a small number of files or data to move, this is not a big problem, but if there are thousands or even tens of thousands of files, there isn't enough time to move all of those files.
- Add a new block in a different location and specify that F has a second extent
(see Example 5 in the image). Repeat this hundreds of times, and the file system will have several small free segments scattered in many places, and some files will have multiple extents. When a file has many such extents, its access time can become prohibitively long due to all the random disk lookups when reading it.
Additionally, the concept of "fragmentation" is not limited to just individual files that have multiple extents on disk. For example, a group of files typically read in a specific sequence (such as files accessed by a program during loading, which may include certain DLLs, various resource files, audio/video media files in a game) may be considered fragmented if they are not are in sequential loading order to disk, even if those individual files are not
fragmented; the read/write heads will have to search for these (unfragmented) files randomly to access them sequentially. Some groups of files may initially be installed in the correct sequence, but become divergent over time as certain files in the group are deleted. Updates are a common cause of this because to update a file, most updaters typically delete the old file first and then write the new, updated file in its place. However, most file systems do not write a new file to the same physical location on the disk. This allows unrelated files to fill the remaining empty spaces.
Why does disk fragmentation occur?
Before moving on to solving a problem, you need to know how it forms. When the disk is new or recently formatted, there are practically no files on it, except for system ones.
Now let’s imagine a situation: you decide to download 10 films of 1 GB in size from the Internet and watch them over the weekend. Since the disk is empty, all files are written in a row, one after another. Let's say you watched the second, fifth and eighth films and deleted them. The remaining files are in their places, but now there are gaps between them.
And then you decided to download another movie in higher quality, 7 GB in size. Since all files on the disk are written sequentially, the new movie will be written to all free spaces, starting from those spaces that remain free, and what does not fit there is written further, to free spaces after the first 10 films.
Thus, it turns out that one solid file is split into several pieces and located on the disk far from each other. This leads to the fact that in order to “get” to one necessary file, the system has to search for it for a very long time before providing it to the user, and this naturally takes time.
In this case, it doesn’t matter how powerful your video card is today, the number of processor cores or how much RAM you have installed; it will all remain idle until the hard drive reads its information. If you decide to do defragmentation, read on to find out how to do it.
3Running Optimize-Volume
For those who like to do everything, so to speak, “according to a recipe,” here is a list of the necessary processes that need to be done to defragment a disk:
- In order to call the system menu, the user must press the Win + X key combination.
- Now you need to run the command line, and you need to do this as an administrative user.
- To get into the scripting language, so to speak, you will need to enter “PowerShell” in the line, and then confirm your action by pressing the Enter key.
- It's time to insert the Optimize-Volume command, after which the operating system will inform you that the specified command will be executed in order. But in order for the work to be carried out in a normal and full-fledged mode, it will be necessary to change some of its parameters.
It is not recommended for ordinary users to go far into the depths, but there will always be those who want to find out specifically what and how is going on with their drive. It turns out that if you do not enable disk defragmentation, it will be carried out automatically, because initially, this is how it is built into any system, if no one has “managed” it.
Defragmentation is an automatic process, so essentially, if no one has accessed your computer device without you, you don’t need to make any settings, which means you won’t have to go through various partitions and other files on your PC.
Now you are probably convinced that disk defragmentation is a really necessary process, so there is no need to cancel or interrupt it.
Defragmentation speed
The duration of the process is influenced by several factors:
- Hard drive capacity. If it has only 10 gigabytes, then it will take 3 minutes to process it. On a terabyte disk, and even if it has never been cleaned, this may take all day.
- Amount of RAM.
- CPU frequency.
Also, due to the fact that different programs use different analysis algorithms, the time and quality of the process itself can also differ significantly.
Defragmentation will fail if the file system is other than NTFS, FAT, or FAT32.
But on the other hand, if the process is running, work on the computer can not be interrupted.
So, a full cycle can take a significant amount of time, so it is better to defragment the disk on a schedule at night when it is not in use.
What are the advantages:
- The divided data is combined into one partition and fills the empty partitions of the disk.
- Improves computer performance due to faster reading/writing from the hard drive.
This is, in fact, why a complete disk defragmentation is needed.
Scheduled disk defragmentation
By default, the hard drive defragmentation process on your computer runs weekly. However, the Disk Optimization application allows you to perform the task on a “Daily” and “Monthly” basis.
To configure the disk drive optimization schedule on the device, left-click on the “Change settings” button located in the “Schedule optimization” section.
Click on the “Change settings” tab
In the next window, select one of the options: “Daily”, “Weekly” or “Monthly” by clicking on the down arrow (2) in the “Frequency” section (see photo below).
In the “Frequency” section, select one of the options, check the “Run on a schedule” checkbox and click the “Select” tab
Also, check the “Run on a schedule” checkbox (1). This will ensure that the planned SSD optimization is enabled. Clicking the “Select” button (3) helps you select drives that will be included in the defragmentation schedule.
Select the required disks to defragment and click “OK”
Optimizing and defragmenting your hard drive in Windows 10
Over time, the data stored on the device's hard drive becomes unorganized and scattered. This happens with conventional drives and causes a general slowdown in the operating system and programs.
When data on a hard drive becomes scattered and fragmented, your computer ends up working harder than usual because it has to check multiple areas of the drive to find files.
Hence, it needs to be defragmented from time to time. To do this, use the available system utility “Disk Optimization”.
Disk Optimization utility system
What does the application do?
When defragmenting a solid drive, the data scattered on it is organized, occupying adjacent places.
Information organized on the media minimizes the time required to read and write files, which contributes to an overall increase in the speed of data transfer on the computer.
Once defragmentation is complete, you may notice progress in the device startup time, as well as faster opening of files and applications.
How long does the process take?
This process takes an impressive amount of time, which depends on the volume , fullness and speed of the hard drive. Some half-empty hard drive with a capacity of 500 gigabytes will undergo complete defragmentation in a couple of hours, or maybe even faster.
Filled disks with a huge volume of several terabytes will take a very long time to undergo the procedure (in some cases it takes over ten hours). It takes such an impressive amount of time due to the fact that during the process, files are constantly transferred and literally the entire hard drive is rewritten
The more free space there is on the hard drive, the faster and better the process will be completed. That is why before starting this process it is recommended to free up at least 15 percent of the disk , because in this case defragmentation will take place much faster than on a full drive.
How to defragment a disk on Windows through the system
To do this, we need to simply enter the word “Defragmentation” in the search bar. If you have Windows 8, 10, you need to enter the Win + R hotkeys. We get a picture:
You won't necessarily have one like this, but something like this. Click on the word disk defragmentation, select the system drive C (you can select all diskb), and first carry out the analysis by clicking “Analyze disk”.
We see that the analysis has started and we see how many percent have been analyzed:
From the screenshot we see that all our drives are fragmented, but we will defragment only drive C. To do this, select this drive and click “Defragmentation”.
I RECOMMEND READING: - High-quality disk defragmentation
We have started defragmentation. When finished, you will see a message that defragmentation is complete.
The system, of course, does defragmentation well, but I prefer to perform defragmentation using third-party software. In my opinion, such software does it better. How to defragment a disk using one of these software, Defrag Free, I already wrote in the article: - “Program for defragmentation - Defrag Free”. Now we will look at another program, namely Wise Dick Cleaner.
What to do if Start does not work after disk defragmentation
If, after performing defragmentation, you no longer have the Start menu, which is very important for full use of the system, then you need to perform the following steps:
- Launch the Run window by holding down the Win+R key combination on your keyboard.
- In the line that opens, enter the regedit task and complete it by clicking the “OK” button.
- Navigate to the following path: HKEY_CURRENT_USER\Software\Microsoft\Windows\CurrentVersion\Explorer\Advanced using the folder tree on the left side of the window.
- In the final folder, create a DWORD file that will be written in 32-bit encoding.
- Name it EnableXAMLStartMenu, and in the “Value” line write the number 0.
- Save any changes you made to the registry and restart your computer. After rebooting, the Start menu should start opening and working normally again.
So, defragmenting a disk will be useful if it is divided into 8% or more unordered cells. Otherwise, this process will not affect the speed of the computer at all. To avoid manual defragmentation all the time, you can change the settings for this process by turning on automatic mode. If you want to make more detailed process settings, then use one of the third-party programs described above.
A noticeable decrease in computer speed is directly related to its workload and an excess of various installed programs. The more often we install and uninstall various games and programs, the more different folders and directories are created on the hard drive, which increasingly have to be accessed and rechecked by the system in order to provide the user with full access to the entire system.
In other words, defragmentation
is an irreplaceable utility for improving the quality of personal computer performance. And the sad thing is that many have not even heard and do not know how to defragment a disk.
Disk optimization (defragmentation) options in Windows 10
You can disable or otherwise configure drive optimization settings using the appropriate settings provided in the OS.
You can open HDD and SSD defragmentation and optimization settings in Windows 10 in the following way
- Open Explorer, in the “This PC” section, select any local drive, right-click on it and select “Properties”.
- Open the “Tools” tab and click the “Optimize” button.
- A window will open with information about the optimization of disks, with the ability to analyze the current state (only for HDD), manually start optimization (defragmentation), as well as the ability to configure automatic defragmentation parameters.
If desired, automatic optimization can be disabled.
How to defragment a hard drive.
Method 1.
The process is quite simple and will take you literally half an hour of time, or even less. To begin, you should open Windows Explorer. This can be done using the Win+E button combination. Next, you should act progressively, without skipping certain points:
- Open Explorer and go to the “This PC” tab.
- You must select which drive you want to defragment. It is better to choose the one that already has as much memory as possible.
- Having selected the disk we need, we right-click on it.
- In the menu that opens, select “Properties”.
- In the window that appears, click the “Service” tab.
- Go to the “Optimization” item. Let’s start “Optimize”.
- Next we will see a list of partitions with defragmentation status on the right in percentage.
- Select the desired section and click “Optimize”.
It is important to remember here that the larger the partition you choose, the longer defragmentation will take. But spending a few hours on defragmentation will definitely save you many more hours in your life and work on your PC.
Method 2.
You can do this through the Control Panel:
- Launch the Control Panel.
2. Select the “Large icons” viewing mode.
3. There, click on the “Administration” item.
4. Find “Disk Optimization”. Windows 10 often has automatic disk defragmentation, that is, scheduled optimization. But it is not done often enough.
5. Click on the “Change parameters” button below. Here you can easily change the frequency of automatic optimization, as well as configure other parameters.
But we are here to do defragmentation manually. Therefore, we analyze the disks:
- Select the disk we need and click the “Analyze” button.
- After this, you will see the percentage of defragmentation completed. It is logical that the lower the percentage, the more the disk needs optimization.
- After that, wait for the “Optimize” button.
Here, as in the first case, defragmentation can take quite a long time, depending on the extent of the fragments and the size of the disk.
How to improve Windows 10 manually.
Before you start defragmentation itself, try using the tips that we will give you now. It will be very useful to know how to release on your computer. First of all, of course, in order to improve the speed of your device, you need to reduce the load on it.
We will achieve this by removing unnecessary and time-consuming programs and games, followed by cleaning the system. Any cleaning program that allows you to clean the registry and files is suitable for this purpose.
The next step is to close unnecessary background programs. Quite often you can come across such a case when background programs, which users do not even suspect, literally “eat up” all the RAM, thereby significantly reducing the performance and speed of decision-making by the system.
This can be done using the System Configuration utility. To do this, from the “Start” menu, go to “Control Panel” and select this item there. Go to “Services” and click on the “Do not display Windows 10 services” button.
After you do this, you will see a list of programs and processes that are loaded along with the system in the background. From this list you need to remove all unnecessary programs, as well as all suspicious programs (it is best to look at the root location of such programs and remove them).
This approach should slightly, but still more or less significantly improve the performance of your system.
Every day, the average PC user views a huge number of pages on the Internet and downloads a huge number of files in a week. Naturally, after this, the device’s memory begins to gradually become clogged, and if you do not provide assistance to the system in the form of deletion or the same defragmentation and cleaning, then over time you will not be able to avoid freezes and sometimes even random reboots. Well, okay, let's move on to the defragmentation process itself.