Create an ISO image of your system. UltraISO is a program for creating ISO.
If something suddenly happens to your operating system, it can lead to a huge number of problems. In the best case, you will have to reinstall it, search on the Internet for drivers and installers of the programs you need. In the worst case, there is a risk of completely losing all personal information, unique photographs, important documents and projects. Typically, restoring the OS is unlikely to help in this case - it only works with Windows settings. Therefore, to save your data, it is important to know how you can create a backup disk image of your Windows 7.
Types of images
You don't need to have the DVD itself for this. There is specialized software (for example, the UltraISO utility) with which you can do everything you need right on your computer. You prepare a set of folders and files, and use the program to create a disk image.
The second type is a backup copy of the operating system. It can be done even using standard Windows tools. It is needed to restore your OS in case of unforeseen emergency situations.
In fact, this is a cast of the hard drive. The computer scans the entire contents of the specified HDD and packs it into a special archive. If something happens, you can always restore everything back.
Create an image from a USB flash drive using the USB Image Tool
Unlike UltraISO, USB Image Tool is free and not a trial! It has an intuitive interface and perfectly creates images from a USB flash drive and records it!
Create an image in USB Image Tool
- Download USB Image Tool from the official website, and then unzip it to your computer
- Run the program
- Select the drive and click the “Backup” button
- After which you will be offered a place to save the future image.
Burn the image using the USB Image Tool to a new flash drive
- Launch USB Image Tool
- Select the drive and click the "Restore" button
Creating an ISO image
If you want to burn DVD or CD content to digital ISO format, you will need a special program. The simplest and most reliable example of such a utility is the free ImgBurn application.
Transferring many small files over the Internet is not very convenient. It is for this reason that various assemblies of operating systems can be downloaded from the Internet in the form of an image saved in ISO format. The downloaded image can be stored on a computer or recorded on any device, thus either a disk.
If you have a disk, for example, with a game or various programs, you can, in which the files and its structure will be completely saved. Then, using special programs, for example Alcohol 120% or Daemon Tools, you can run the created image through a virtual drive. If, over time, you need the one you created, read the article on this topic by following the link.
In this article we will look at how you can make
an ISO image from files and folders
. In this form, it is more convenient to transfer them over the network, and the image transfer speed will be higher than each file separately.
First, let's look at creating an ISO image using the Alcohol 120% program. You can read the description on our website by following the link.
In the menu on the left, click on the “Image Mastering” button.
To create an image from files, click on the “Add files” button. If you need to create an ISO image from a folder, click "Add folder".
Select the desired files or folders on your computer and click Open.
You can create folders in the program itself, and then add files to them. To do this, right-click in the program window and select “New Folder” from the menu. You can also use the corresponding button located on the right side.
Once you have added all the files, click Next.
Next, specify the location on your hard drive where you want to save the created ISO image. In the "Image format" field, select "ISO image" from the drop-down list. You can change the "Image name". Click Start. I'll name the image "MyPhoto" and save it to my desktop.
Wait for the process to complete. In the same window you can see how much space the created ISO image takes up on your computer. Click Done.
Now I have the created image in ISO format on my desktop.
By double-clicking on it, you can mount the image into a virtual drive and view the files stored in it. Please note that the amount of memory in the virtual drive corresponds to the size of the created image.
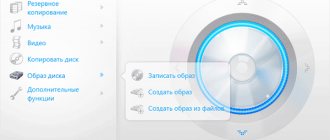
Now let's look at how to make an ISO image using the UltraISO program. It is the most popular program that is used to create images, edit them and burn them to disk.
Launch UltraISO. At the bottom of the program window, find the files and folders you need on your computer and drag them to the top area. You can also select them and click on the “Add” button.
In the upper right corner of the window you can select the media type.
Once all the files and folders have been added, go to the File tab and select Save As from the menu.
The image will be saved in the specified location. It can also be mounted into a virtual drive.
I think now you understand how, using the programs described, you can create an ISO image from files and folders that are stored on your computer.
Watch the video
An ISO image of a system is the lifeline of a user whose computer has been hit by viruses. Of course, no one wants to suddenly lose all their personal data without the possibility of recovery, and therefore it is very important to back up all files from time to time, that is, create a system image.
Ultra ISO
https://www.ezbsystems.com/ultraiso/download.htm
UltraISO is not free, but it is the most famous program for specialized work with ISO files. She can mount them, record them, compress them, convert them to other disk image formats, edit them, create images from optical discs and from files on the hard drive. The program costs $29.95 , but its capabilities can be tested in an unlimited trial version with restrictions on working with data weighing no more than 300 MB. To do this, when starting the program, you need to select “Trial period” .
To create an ISO, in the UltraISO window, click the “File” , then “New” , then “UDF DVD Image” .
Next, we place the recorded data in the top panel of the program - either by dragging it from Windows Explorer, or using the explorer implemented in the bottom panel of the UltraISO window.
We save the ISO through the menu “File - Save As” .
Finally, give the file a name and click “Save” .
No installation of additional software
- Click on the “Start” button and select the “Control Panel” menu item. Set the viewing mode to “Small icons” and open the “Backup and Restore” section.
- In the window that opens, select “Create a system image.”
- In a new window, the user will be asked the question “Where should the archive be saved?” You will be asked to choose from the following options - removable hard drive, internal drive, DVD or network drive. The safest and most reliable way to store information is on a removable hard drive.
- Next, we solve the question: “Which disks should be included in archiving?” You can create an image of at least all the volumes of your system, but the more partitions you check, the more space, of course, they will take up.
- Now we confirm the archiving parameters and click the archive button. This procedure will take a long time. The average computer archives 15 GB of information for about 20 minutes.
Once the backup procedure is complete, the system will prompt you to create a recovery disk. We agree and wait for the recording to take place. This concludes our work.
Creating an image using Alcohol 120%
- Download, install and launch Alcohol 120%.
- In the “Basic Operations” section, select “Image Mastering” and click “Next” in the window that appears.
- A window will open in which you can specify a name for the image, as well as select all the files that you want to include in the image.
- Next, you will need to select the folder in which the image will be placed. Additionally, you need to make sure that “ISO Image” is selected in the “Image Format” field.
- Click “Start”.
- Upon completion of the procedure, click the “Done” button.
- The image is ready, and you know where it is stored, which means you can copy it wherever necessary, for example, to a removable hard drive.
As you can see, there are many ways to create an ISO, and they are all quite simple. You can find even more information in our articles and.
OS installer media is useful. You never know at what point the system will refuse to work or a friend will urgently need to reinstall Windows, let alone a recovery disk that can bring a dying operating system back to life. Let's look at how to create and burn bootable (installation) media for different cases.
Create an image from a USB flash drive using UltraISO
Probably many have heard about the UltraISO program, which allows you to burn an existing image to a flash drive or to a CD or DVD disc. It turns out that this program also allows you to do the opposite - remove an image with recorded data from a flash drive (bootable flash drive)!
Create a flash drive image in UltraISO
To do this you need to do the following:
- Download UltraISO from the official website, and then install it on your computer
- Run the program
- In the “Boot” section, select “Create a hard disk image”
- Select a bootable USB flash drive and the location where the IMA image will be copied
- And wait until all the data is copied
All is ready!
Burn the image to a new flash drive
- Run the program
- Select “File” -> “Open” in the panel and select the previously created bootable USB flash drive image
- Then on the panel go to the “Bootboot” section and select “Burn Hard Disk Image”
- Select the media, format it and write data
- All you have to do is wait a little and the new boot drive is ready
How to create a boot disk for Windows 7
To create a disk or flash drive to boot the system, you need to have with you what you will need directly during the work process:
- the media itself (disk or flash drive);
- utility for working with disk images;
- disk image or Windows 7 system files to create it.
Nothing else is required from the user. To begin with, let's get acquainted with the first, preliminary part of creating a boot disk - building an ISO image for its subsequent recording to media.
Creating and Burning an ISO Disc Image
Creating a boot disk assumes that the user has an ISO image that will be burned to the media. A disk image is a file that is a complete copy of the entire contents of a software disk and is widely used in creating bootable disks and flash drives. If the image is not available, you can create it yourself without experiencing any problems: only for this... you will need an existing installation disk with Windows 7 or system installer files copied to a separate folder. If you have any of this, you can safely start creating an image for a new boot disk.
ISO is the most popular image format, and it is what most utilities for creating and burning images work with. You can also create a recording file using standard OS tools, but there is no data on the quality of such recording on systems younger than Windows 7. Therefore, it is recommended to use third-party programs in any case.
Ashampoo Burning Studio Free
This is a free, lightweight utility for working with disks, characterized by ease of use and a laconic interface, as well as the absence of advertising and built-in malware programs. In it you can not only write files to a disk or flash drive, but also create an image in two ways to choose from: from physical media (CD or DVD, which is previously inserted into the drive) and from a folder with files located on the computer.
Working with this utility is very simple: an ISO image is created in just a few clicks.
You can download Ashampoo Burning Studio Free on the official website.
CDBurner XP
This program is also free, very easy to use and is considered one of the best utilities of its kind. It is adapted for older versions of Windows, but it also works great in new ones (unless the antediluvian interface confuses you). Just like the previous one, the program can create disk images from CDs, DVDs and user files, as well as burn them.
The utility is available for download on the manufacturer's website.
Ultra ISO
The most famous and widespread program that is usually used to create and burn discs is UltraISO. A wide range of functions makes this program a universal tool for creating and recording images, so it is recommended to use it. We'll come back to this program when we move on to burning a disc, but for now we'll look at creating an image in it.
UltraISO is not a free program, but on the official website you can download its trial version, which you can use for free for some time.
Video: creating an image in UltraISO
Creating an image manually
If you don’t want to tinker with programs (keep in mind, you’ll still have to when writing to an installation flash drive), then Windows has good news for you: you can create a disk image through the console using standard Windows tools. To do this, however, you still have to download utilities: this time official tools from Microsoft that work from the console.
However, there is nothing particularly difficult about this.
- First you need to place the files to be written to disk in a separate folder and save it in a convenient location, for example, C:\Win7ISO. Why convenient? Because the shorter the path to the file, the easier it is to register it in the console.
- Then you need to download from the Microsoft website a set of utilities that will be needed when creating the image. The utilities need to be unpacked and installed.
- After installing the utilities, you need to open the command line as an administrator (press the Win + X key combination and select “Command Prompt (Administrator)” in the menu that opens) and enter the following code in it:
oscdimg -n -m -b»C:\Win7ISO\boot\ etfsboot.com» C:\Win7ISO C:\Win7ISO\Win7.iso
Dmitriy
remontka.pro
The console will begin creating the ISO image, and all you have to do is wait for the build to finish. After this, the newly created image will be available in the path you specified.
Burning an image to a disk or flash drive
When the boot image is created, all that remains is to move on to the most important thing - writing it to disk. This can be done both using Windows tools and through special programs, some of which have already been discussed above. Programs are a simpler and more popular option, but we will look at both methods.
Burning an image to UltraISO
We will show the software recording method using UltraISO as an example, since this program is the most convenient and popular among users. However, you can use any other utility for this: their general operating principle is similar.
Video: how to burn an image to UltraISO
Manual recording
This option is suitable for people who use new versions of Windows (7, 8, 8.1, 10): they have the best implementation of disc burning. In the case of a flash drive, everything is a little more complicated: the instructions will only work for computers with UEFI.
If you don't have UEFI, you will have to use programs.
If the system being installed is Windows 7 x32, then this method will also not work.
Let's start by burning the disc. Everything here is extremely simple: you just need to right-click on the image and select the “Burn disk image” option. Of course, you first need to check that the disk is inserted into the drive and there is enough space on it to record the image.
To manually burn a disk image, just right-click on it and select the appropriate item
But with a flash drive everything is a little different. To record it, you will need a command line opened as administrator (how to do this is indicated above).
At the command line, enter the following commands in order:
- diskpart
- list disk
- select disk N (here N is the disk number under which your flash drive is displayed)
- clean
- create partition primary
- format fs=fat32 quick
- active
- assign
- list volume
Ready! The flash drive is formatted as bootable, then you need to copy files to it. It's done like this.
Creating a multiboot disk
To create a multiboot disk (that is, a disk on which not one OS is installed, but several, and in addition more programs), you will need slightly different software.
The best choice today is the free program Sardu, which, in addition, also provides a choice of many images that it downloads itself.
The program interface is quite complex, so some explanations would be helpful.
In the main menu of the Sardu program, you can select images and write them either to a flash drive or to a disk
- antiviruses;
- utilities;
- Linux distributions;
- different versions of Windows;
- other (allows you to upload your own images, but is only available in the paid Pro version).
On the right are the buttons used to record.
Creating a system repair installation disc
To create a system repair disk (this is the one with which Windows 7 can be restored if it fails), you need the disk itself - that's all.
Creating a recovery flash drive is somewhat more complicated.
- In this case, you should create a system image (in the same window where the recovery disk is, there is the “Create a system image” item.
- When the system collects and writes the image, you will need to write it to a flash drive using one of the methods discussed above. A little longer, but more convenient: a flash drive is more reliable than a disk. The only negative: the system image for recovery weighs quite a lot, so it is recommended to use a large flash drive or a removable hard drive.
Reliable media is a very important point in the “treatment” or installation of any system. Make sure to burn properly and don't neglect recovery discs: you never know when you'll need to reinstall or roll back Windows. And specialized software will help you with this.
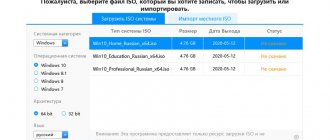
Windows 7 will be distributed in various types and formats, the .ISO format is one of the most popular and convenient among all images.
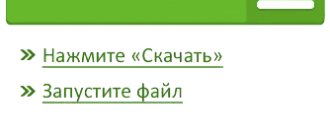
If you want to download the Windows 7 installation file, then you need to download it in .ISO format. To put it simply, this is an operating system image that you can write to a disk or flash drive, and then install the OS from them. You need to download an additional program or any of its equivalents.
Use ImgBurn to Create ISO Files from Folders in Windows
ImgBurn has been a popular application for creating and burning image files for a long time. If you've ever backed up your drives or burned a disc, you'll probably recognize the application.
The application can also be used to create ISO files from your folders.
- Download, install and open the ImgBurn application on your computer.
- In the main interface, find and click the "Create Image File from Files/Folders" option.
- You will see a screen that allows you to add folders that you want to include in your ISO. Click on the small folder icon and add folders for your ISO file.
- Click on the tiny folder icon next to where it says "Destination" and choose a name and destination folder for your ISO file.
- In the right pane you will find different setting options for your ISO. With these options, you can change the image type, enter a label for the image, set restrictions, and do a few other things.
- Finally, click on the large Build button on your screen to begin creating an ISO file from the folders you selected.
Format
The .ISO format is in no way related to Windows 7. This format is used to distribute any programs, including the distribution of operating systems. Moreover, when you buy a CD/DVD with a game/program, there is a very high probability that the media was created from this type. So there is no connection between Windows 7 and the ISO format; the OS is only one of many utilities that is distributed in this format. This format has gained popularity for a number of objective reasons:
- Allows you to reduce the size of installation files;
- Allows you to create installation media;
- Optimal for working with external media;
In Russia they are not very accustomed to the term ISO, most often calling it simply an image. This is the same thing, and if you want to call it an ISO image, then you can do so. The main thing is not to get confused about why this format exists. From it you can create installation media.
On the Internet you can download the OS in another form, for example, in its pure form or a ready-made installation file. These formats also have a right to exist, but they often hide viruses. The ISO format is also good because it is literally transparent to antiviruses and can be checked even by regular ones.
How to use
Using this file, you will not be able to install the OS until you create an installation disk/flash drive. You can even open .ISO with a regular archiver, but it won’t do any good. The installation must take place from external media and start from the BIOS. Otherwise, you may harm the operation of the system on which you downloaded Windows 7. More details about downloading:
If you open the archive, you will find regular program files inside, as if you had opened them on disk. In this regard, the format is as similar as possible to archives. Moreover, using this format, the final size of installation files is significantly reduced. But this is not an archive, it is a convenient shell for creating installation media. You can use it not only to create a disk, but also a flash drive.
To give you the maximum experience, we have released Windows 7 Ultimate. This is the most complete version of the OS, but it is also the heaviest.
CDBurnerXP
Very simple software with a Russian-language interface, the main purpose of which is to burn discs, but it is also excellent for working with ISO.
- A completely free application that can burn not only the usual CD and DVD formats, but also modern Blu-Rays;
- It is possible to create both regular data disks and bootable media for later launching recovery utilities and OS installers;
- Allows you to copy discs;
- Performs a post-burn check;
- Russian-language menu with simple controls.
Instructions:
- Download the software from the link and install it into the system. During the installation process, I recommend selecting “Advanced options” to disable the installation of unnecessary programs;
- We launch the application and immediately see a window with options. We are interested in the very first item: “Data disk”:
- A window will open consisting of several areas. A “tree” will appear on the left. Select the necessary files from the folder and drag them with the mouse to the right side of the window (which is still empty). This will be the content of the future image.
- Then in the top “File” menu, click on the inscription: “Save as ISO...”:
- We indicate the location on the disk where the project should be saved.
Ready!