Changing settings in the System Configuration application
Some of the RAM in Windows 10 can be reserved by hardware.
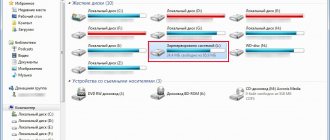
- Open the “Task Manager” using the hotkeys “Ctrl” + “Shift” + “Esc” and go to the “Performance” tab. Then open the “Memory” section on the left side of the window. In the upper right corner of the window we will see the total amount of RAM, and below the amount of memory reserved by hardware.
Checking how much memory is reserved by hardware
- If the amount of reserved memory is too large, say several gigabytes, try changing the settings in the Windows desktop System Configuration application. You can open it using the Run window. Press Windows + R keys, type msconfig and press OK or Enter on your keyboard.
Launch the MSConfig utility
- In the window that opens, go to the “Download” tab and click the “Advanced options” button.
Open additional options
- In the “Advanced boot options” window, uncheck the “Maximum memory” checkbox and click the “OK” button in the current and previous windows, and then restart the computer.
Uncheck “Maximum memory”
- The amount of hardware reserved memory displayed on the "tab" should decrease.
SEARCH: msconfig
OR press “Win+R” and enter “msconfig”.
Click on additional parameters
Uncheck the box
and reboot
Changing the integrated graphics settings in the BIOS (UEFI)
Many motherboards have an integrated video chip. The built-in video card does not have its own memory and uses the system's RAM. The integrated graphics core may reserve memory for itself, in which case it will not be available to the system.
- We restart the computer and enter the BIOS firmware interface or its more modern UEFI version. On different computers, different keys can be used for this; the most commonly used keys to enter the BIOS are “Delete” or “F2”. When your computer boots, prompts will appear on the screen to tell you which key to press.
- The appearance of the BIOS screen depends on the motherboard manufacturer, so it is impossible to give exact instructions. In our example, to change the settings of the built-in video card, go to the peripherals section. The parameters that interest us are “Integrated Graphics”, “Memory Amount for Video Subsystem Needs” and “Total DVMT Memory Amount”.
Finding the integrated graphics settings in UEFI
- The minimum memory size should be set.
We set the amount of memory for the needs of the video subsystem
Changing the total amount of DVMT memory
- If your computer has a discrete video card, you can completely disable integrated video by setting the corresponding line to “Disabled”.
Disable integrated graphics
- To save changes and exit the BIOS (UEFI), press the “F10” key and restart the PC, and then check the amount of available memory.
What to do if only 2 of 4 GB of RAM are available?
This helps many people.
- One possible reason is poor RAM contact
- Enabling the Memory Remap Feature option in the BIOS.
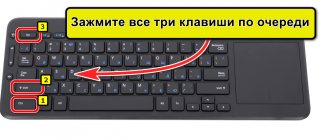
- The combination of the “Win” + “R” buttons on the keyboard
- Open the system configurator with the msconfig command.
- Additional options on the Download tab
- Uncheck “Maximum memory”
Interesting materials:
Why are there no Emojis on iPhone? Why is there no tethering mode on iPhone? Why no Windows 9 and iPhone 9? Why is there no bluetooth icon on iPhone? Why can't anything download to my iPhone? Why is my new iPhone charging slowly? Why doesn't the new iPhone recognize the SIM card? Why does Wi-Fi drop off on iPhone? Why does wifi drop out on iPhone? Why is the front camera of my iPhone glowing red?
Checking RAM for errors
Windows 10 has a built-in tool to check and fix RAM if software errors are detected.
- To launch it, open the “Run” window by pressing “Windows” + “R”, enter the mdsched and press the “OK” or “Enter” button.
Run the utility for testing RAM
- In the window that opens, select “Reboot and scan.”
Running a memory check
- The check takes place in two passes, you need to wait until it is completed. The next time Windows boots, the results will be displayed on the screen.
Memory test process
If the above tips did not help, there is a possibility that the problem lies in hardware problems with the memory modules. Disconnect your computer from the network and try swapping memory sticks. Check the instructions in what order the memory modules should be installed in the slots on the motherboard. Wiping the contacts of the modules with alcohol or cleaning them with an eraser can help, as it happens that problems arise due to poor contact between the memory stick and the connector.
Also check if the motherboard sees all the available memory, this can be seen on the first screen after entering the BIOS (UEFI). Check the motherboard specifications on the manufacturer's website to find out how much memory it supports.
We look at the full amount of memory in the BIOS (UEFI)
Additionally, the system may not be able to access all of the memory if the motherboard is using an outdated BIOS or UEFI version. Check for a new firmware version on the manufacturer's website.
Finally, let us remind you that versions of Windows 10 of different bit sizes support different amounts of RAM, for example, the 32-bit version of the OS supports only 4 GB of RAM. If you are using a 32-bit version of Windows and your computer has more than 4 GB of memory, upgrade to a 64-bit version of the system.
Source: https://tehnichka.pro/error-memory-reserved-windows-10/
Alternative options for the problem
You are using a 32 bit version of Windows 7 or Windows 8
The maximum amount of RAM that 32-bit versions of Windows can “see” is 4 GB. Therefore, if you have more RAM, you should install the 64-bit version to take advantage of that memory. To find out what version of Windows is installed on your computer, open the “System” item in the Control Panel (or right-click on “My Computer” and select “Properties”). In the “System type” item, information about the bitness of your version of Windows will be displayed. However, it is not only the system bit size that can affect the amount of available RAM in Windows.
Your version of Windows has a maximum memory limit
In addition to the bitness of the operating system, the amount of visible memory is also affected by which edition of Windows you are using. For example, if you have Windows 7 Starter installed on your computer, the maximum available amount of RAM is 2GB, not 4. Windows 7 Home Basic users only have 8GB of RAM available, even if they are using a 64-bit version of the OS. . There are similar limits for the latest version - Windows 8.
Maximum amount of available RAM memory in Windows 8
| Version | X86 | X64 |
| Windows 8 Enterprise | 4 GB | 512 GB |
| Windows 8 Professional | 4 GB | 512 GB |
| Windows 8 | 4 GB | 128 GB |
Maximum amount of available RAM memory in Windows 8
| Version | X86 | X64 |
| Windows 7 Ultimate | 4 GB | 192 GB |
| Windows 7 Enterprise | 4 GB | 192 GB |
| Windows 7 Professional | 4 GB | 192 GB |
| Windows 7 Home Premium | 4 GB | 16 GB |
| Windows 7 Home Basic | 4 GB | 8 GB |
| Windows 7 Starter | 2 GB | Not available |
Memory is allocated for operation of the built-in video card or other equipment
Various computer hardware can use some of the system RAM to operate. The most common option is the use of RAM by integrated video controllers (integrated video card). But this is not the only option when hardware uses RAM. You can see the amount of RAM used by the built-in video card and other computer equipment in the same “System” window. If memory is allocated to them, you will see two values - installed RAM and available for use, which will be displayed in parentheses. Accordingly, the difference between them is the size of RAM that the devices took for themselves.
The motherboard has a memory limit
Motherboards also have limits on the available RAM memory. Just because all the memory modules have successfully fit into the slots does not mean that the motherboard is capable of handling all that memory. To find out if the motherboard sees the memory, enter the computer's BIOS. To do this, immediately after turning on the PC and before starting to load the operating system, press the appropriate button for this; information about it is usually on the screen (As a rule, this is F2 or Delete). In most BIOS versions, you will see information about installed memory on the first screen. If all the memory is visible in the BIOS, but not in Windows, then we are looking for a problem in Windows. If the memory is not displayed in the BIOS, then you should look for the problem at a lower level than the operating system. First, you should familiarize yourself with the specifications of the motherboard (for example, find it on the Internet).
Incorrectly installed memory
If you are sure that the motherboard supports the entire amount of installed memory, but it still does not appear in the BIOS, it makes sense to check whether you inserted it correctly. Turn off the power to the computer, open it, it is better if it is grounded. Remove the memory sticks and carefully place them back in place, making sure that the memory is seated correctly. You can also clean the RAM contacts using a hard eraser. In some cases, for proper operation of RAM you need to install it in specific slots - in this case, look for information in the instructions for the computer motherboard. Another way to diagnose a problematic memory module is to remove them one at a time, then turn on the computer and look at the amount of available memory.
Problems with the RAM itself
If you are having any problems with your memory, it may be the cause. You can use a RAM testing utility such as memtest86 or use the built-in Windows memory diagnostic utility. You can also recommend testing the memory sticks one by one by installing them in the computer - this way you can more accurately determine the faulty module. I hope this article about possible reasons why your computer does not see memory will help you solve the problem.
- How to remove hardware reserved memory in Windows 10
When Windows 10 loses access to part of the random access memory (RAM), it directly affects the operation of the computer. Its performance drops or does not increase when additional modules are installed. Missing megabytes and even gigabytes are sometimes backed up by hardware, but the system may not see them for other reasons.
We return memory that is inaccessible to the system
Information about the total amount of RAM installed on your computer and the amount available in Windows 10 can be found in the System Settings window.
Data on how much memory is reserved by hardware can be found in the “Task Manager”, in the “Performance” tab.
First of all, read the manual for your motherboard. It must support the amount of RAM installed in it. Make sure that your computer is running a 64-bit system, since unlike a 32-bit system, it can detect more than 4 GB of system memory. If these conditions are met, we move on to ways to solve the problem.
Method 1: Disabling Memory Limit
Windows 10 has a setting that allows you to independently set the maximum amount of RAM available to the system. To remove the restriction:
- Call up the “Run” dialog box using the Win+R key combination, enter the msconfig command and click “OK”.
Instead of an afterword
For the rest, you should initially rely on the limit tables for the used RAM, since failure to comply with such conditions if the system is incompatible with the hardware of the installed equipment may cause such problems in the future, not to mention more serious consequences.
As for the main solution, immediately pay attention to the graphics card, for which the 32-bit OS allocates memory, even for the execution of its own processes, which cannot be executed without using the minimum required volume (the graphical interface simply will not work). And this, in turn, can provoke the emergence of problems of a more serious nature that cannot be eliminated using standard methods.
Earlier on our forum people were interested in the question of how to enable hardware acceleration in DirectX, which allows you to speed up some functions of graphics accelerators and run games that previously refused to work on a PC. This time we’ll look at the topic of how to enable hardware acceleration of the video adapter on Windows 10 or deactivate this option.
What does “Memory reserved by hardware” mean: how to remove it (Windows 10)
The operating system plays it safe and reserves resources for itself or third-party applications that it considers important for the performance of the device. At the same time, the amount of RAM taken out of circulation can reach several gigabytes.
If the system has reserved a large amount of RAM for itself, then even when installing new memory sticks, the device’s performance will not increase
To find out how much memory is reserved by the system, you should open the “Task Manager” using the hot keys “Ctrl + Shift + Esc” and go to the “Performance” tab. The data you are looking for will be in the “Reserved by hardware” line.
Using the System Settings menu, you can see the amount of RAM reserved by Windows
Important! Before disabling excessive backup, you need to make sure that a 64-bit version of Windows is installed on the device (a 32-bit version cannot see more than 4 GB of RAM), and that the computer’s motherboard is capable of supporting this amount of RAM.
Computer performance is greatly reduced when the message “Hardware reserved memory” appears; how to fix this problem in Windows 10 in various ways can be found below.
How to enable dual-channel RAM mode in BIOS?
To activate dual-channel RAM mode, you need to insert at least 2 RAM dies into different slots of the motherboard (if there are more than 2 slots, then they must be of the same color). In most cases, you don’t need to do anything else; the dual-channel RAM mode is activated automatically.
Interesting materials:
How to make backticks? How to make an image using daemon tools? How to make an image of Windows 7 from a flash drive? How to make an image of Windows 7 on a USB flash drive using UltraISO? How to take a cropped screenshot of Windows 10? How to crop a photo on a laptop? How to share local disk? How to do a master reset on your phone? How to make a shared folder in iCloud? How to make a shared folder on the Windows 10 local network?
Disabling memory limits using Windows 10
Figuring out how to remove reserved RAM in Windows 10 is not difficult. The top ten has many convenient standard tools built in for system management, including setting the maximum amount of RAM allowed to the system. To change the parameter you need:
- Open the system configuration module. The fastest way to do this is to use the “Run” window (called by the keyboard shortcut “Win + R”), in the field of which you should enter the “msconfig” command.
- In the “Download” tab, click on the “Advanced options” button.
- Remove the check mark next to the “Maximum memory” line.
- Reboot the device to activate new settings.
It is necessary to remove the forced limitation of the amount of RAM
Note! The “Maximum memory” value is used to forcefully reduce the speed of a laptop or computer. You should not change this data unless necessary.
The best method to solve the problem
In general, it is believed that the problem of how to remove memory reserved by hardware can be solved quite simply by installing an operating system similar to the previous one, but with a 64-bit architecture.
Here you don’t have to deal with additional settings of options. No, you can, of course, try again to set the use of all CPU cores, but believe me, this will not lead to anything good (tested in practice). Therefore, to avoid such incidents, it is better to give independent choice to the system itself.
Freeing up memory in BIOS/UEFI
Most modern motherboards are manufactured with a video chip integrated into them. Since the built-in graphics core does not have its own memory, the card uses the system memory reservation for its needs (for example, loading games with complex graphics).
You can free up this memory by disabling or setting this parameter to minimum in the BIOS or UEFI. To do this, you first need to enter the main program of the computer by pressing special keys when it boots (most often this is “Delete” or “F2”, but there may be other options depending on the device model).
Keys for entering BIOS/UEFI on computers and laptops from various manufacturers
Note! The BIOS or UEFI interface depends on the motherboard manufacturer, so it is impossible to give an exact step-by-step guide suitable for everyone.
Inside the BIOS settings, find the “Advanced”, “Advanced” or “Advanced” tab. In UEFI, the section may also be called "Peripherals".
In the required tab, set minimum or zero values in the items “Memory reallocation”, “UMA Frame Buffer Size”, “Memory expansion” or similar ones. If in UEFI the settings for video chip memory parameters are displayed separately, then the necessary items will be called “Memory volume for video subsystem needs”, “Integrated graphics” and “Total DVMT memory volume”. Accurate data on the structure of your computer's BIOS can be found in its technical documentation.
After changing the parameters, they are saved (in most cases by pressing the “F10” button) and the device is rebooted. The next time you turn on your computer, the number of resources available to it should increase.
For your information! If a separate video card is installed on your computer, then the integrated video can be completely disabled by selecting the “Disabled” value in the desired item.
Graphics adapters
In addition, if you see that the memory is reserved by hardware (how to remove the reserve is already a little clear), pay attention at that moment that two video cards can be installed on the computer.
Try switching from an integrated adapter to a discrete one, using at least the “Device Manager” in the simplest case, where the built-in chip, as is already clear, just needs to be disabled.
If this solution does not work, the question of how to remove the reserved memory can be resolved by changing the parameters in the primary BIOS input/output system (UEFI), where you should find both accelerators in the hardware section and for the integrated one, apply the system inaccessibility parameter (Disabled ), then restart and look at the result in the same computer properties.
Checking memory modules for functionality
A lack of computer RAM can occur not only due to the system reserving part of it, but sometimes the cause of the failure is a malfunction of the computer hardware. Damage or failure of RAM strips or their slots on the motherboard will certainly lead to the fact that the system will not have access to the entire possible amount of RAM.
Replacing the RAM strips one by one will help identify the faulty element or ensure that all modules are working
Testing memory modules using both built-in Windows 10 tools and third-party applications will take a lot of time (and the testing process cannot be interrupted). Before running the software diagnostic process, you should try to fix the hardware:
- disconnect the device from the power supply and remove the system unit case or unscrew the required cover at the bottom of the laptop;
- swap the RAM strips (Windows and BIOS will perceive this action as replacing the equipment with a new one and will redefine the value of RAM);
- if there are fewer RAM strips than there are slots for them on the motherboard, you should check the motherboard manufacturer’s website or in the equipment instructions for the correct order of their location;
- before installing the strips in place, you can carefully clean their contacts using a clean eraser or a cotton swab moistened with alcohol;
- To check memory modules for functionality, you should remove them from the motherboard one at a time, each time rebooting the system and checking the status of the RAM.
Checking components
In some cases, problems arise not with the built-in RAM, but with the technical condition of the hardware. Possible verification options:
- inspect the personal device externally for damage, scratches, rust and other defects;
- check the slots and contacts for connecting the computer’s motherboard;
- open the back cover of the PC, clean it from dust, dirt, rust, and if necessary, replace damaged components (additional skills and abilities are required).
External diagnostics are carried out independently; detailed information can be obtained if you use internal Windows software products.
Attention! The user can perform most of these actions independently, without turning to a wizard for help. If you are not confident in your skills in the internal settings of the operating system, it is better to call a professional programmer.
RAM is reserved by hardware, how can I remove it?
General Discussions
Good day!
Please tell me how to remove this restriction
IBM 3650 M2 Server Windows Server 2008 R2 OS
of 8 GB 3.99 GB available
installed 2 dies of 4 GB 10600
- Modified by madeinrussia October 5, 2012 5:08 am
- Changed type Rotar Maksim Moderator October 23, 2012 9:22 Topic moved to discussion due to lack of activity
All answers
Yes, definitely Windows Server 2008 R2 Enterprise
Yes, definitely Windows Server 2008 R2 Enterprise
Hypervisor not installed? Did you mess with the BIOS?
Yes, definitely Windows Server 2008 R2 Enterprise
This means you need to look at some settings in the BIOS. The operating system has nothing to do with it: what is shown to it is what it sees.
1. Look for and disable parameters like Memory Hole in the BIOS
2. If it doesn’t help, swap the dies – will the situation change? Is the memory the same?
No restrictions set
Look at which slots the memory is inserted into. For IBM x3650M2 the order is:
for the 1st processor: “Install the DIMMs in the following sequence: 3, 6, 8, 2, 5, 7, 1, 4”
for the 2nd processor: “Install the DIMMs in the following sequence: 11, 14, 16, 10, 13, 15, 9, 12”
There has been no activity on your topic for the last 5 days. If there is no action within the next 2 days, the topic will be relegated to discussion. You can resume the discussion by simply leaving a message in this thread.
The opinions expressed here are my personal views and not those of Microsoft Corporation. All information is provided “as is” without any warranty of any kind.
Source: https://social.technet.microsoft.com/Forums/ru-RU/38940b8c-b946-4bb3-9e0a-c369b81d87b6/105010721082-109110731088107210901100?forum=ws2008r2ru
What needs to be done to free up system-reserved RAM
First of all, you need to make sure that your OS supports the amount of memory you have installed, yes, this is exactly the reason most users encounter; they immediately start tinkering with the BIOS and system settings, but for some reason they are in no hurry to go to the Microsoft website and look at the tables. Of course, this is a great “merit” of would-be gurus who, without understanding the topic themselves, rewrite texts from other sites.
Therefore, I recommend visiting the site or at least looking at the screenshots of the tables below, finding your OS and making sure that it supports the installed amount of RAM, and only then dig further. If it doesn’t support it, then there are two options: either forget about the memory, or install another OS.
Physical memory limit table in Windows 7
Physical Memory Limit Table: Windows 10
Physical Memory Limit Table: Windows Server 2016
Physical Memory Limit Table: Windows 8
Physical Memory Limit Table: Windows Server 2012
Physical Memory Limit Table: Windows Server 2008 R2
Physical Memory Limit Table: Windows Vista
Physical Memory Limit Table: Windows Server 2003 R2
Physical Memory Limit Table: Windows Server 2003 SP2
Physical Memory Limit Table: Windows Server 2003 SP1
Physical Memory Limit Table: Windows Server 2003
Physical Memory Limit Table: Windows XP
Physical Memory Limit Table: Windows Embedded
So, after making sure that everything is in order with RAM support, we move on to other steps.
How to disable "Reserved Storage" in Windows 10
“Reserved Storage” is a new feature in Windows 10 that is designed to allocate a certain part of the device’s storage for updates, in order to avoid various problems associated with insufficient free space.
"Reserved Storage" typically allocates about 7 gigabytes of disk space for updates, temporary files, system cache, and applications. When a new update is available, Windows 10 will automatically delete old files in the reserved area to ensure it installs successfully.
The new feature will be enabled by default on new devices with Windows 10 May 2022 Update (version 1903) preinstalled, as well as when performing a clean installation of the operating system. If your device has very limited storage or you simply don't like this feature, you can disable it by manipulating the system registry.
In this tutorial, we will show you how to disable Reserved Storage in Windows 10 (version 1903).
How to disable Reserved Storage in Windows 10
To free up disk space by disabling reserved storage, follow these steps:
- Open the Start .
- Enter the search term regedit and select the very first result “Registry Editor”, right-click on it and select the “Run as administrator” option.
- Follow the path:
- Select the ShippedWithReserves and change its value from 1 to .
- Click OK.
After completing these steps, restart your computer to apply the changes.
How to check if the Reserved Storage feature is disabled
To find out if Reserved Storage is disabled after installing a new version of Windows 10, use the following steps:
- Open the Settings app > System > Device storage .
- Click the Show more categories .
- Select System and Reserved .
- Reserved Storage feature should not be available.
If you still see the Reserved Storage section, either the settings were not applied correctly, or you did not update to a new version of Windows after changing the registry.
You can subsequently enable reserved storage again by changing the value of the ShippedWithReserves key from 0 to 1. The next time you update Windows 10, the system will allocate part of the storage for updates.
Changing settings in one click
If you do not want to carry out manual manipulations in the registry editor, we suggest using a ready-made tweak for the registry. Simply download and extract the following ZIP archive:
Source: https://www.comss.ru/page.php?id=5720
How to free up physical memory?
How to Make the Most of Your RAM
- Restart your computer. The first thing you can try to free up RAM is to restart your computer. ...
- Update your software. ...
- Try a different browser. ...
- Clear cache. ...
- Remove browser extensions. ...
- Monitor memory and cleaning processes. ...
- Disable startup programs that you don't need. ...
- Stop running background apps.
Apr 3 2022
We are fixing a computer, the machine is glitching or something is wrong with the system.
If you don’t know how and why, then the process of repairing your computer may turn out to be a failure.
Ooh, computer guru! Why did I start an article with a well-known truth. If you don't know how, don't interfere!
To inflame passions, I would say that I myself am afraid to twist and correct something there.
But, Friends, I won’t say that!
Because I want to talk about some nuances in Windows 10 that you may not have known about.
And so let's go, fix the computer.
Let's start with memory. You probably noticed that in the characteristics you can see the value of available memory is much less.
Yes, yes, it is less than the RAM you installed personally or in a workshop. It turns out that more memory is reserved in hardware.
We've come to the point. Or how to remove hardware reserved memory in Windows 10.
Reserved memory is used by the BIOS or installed device drivers. For example, on laptops it is often found that part of the RAM is given to the integrated video card.
Hardware reserved.
This is RAM that is reserved for use by the BIOS and other peripheral device drivers. The value of reserved memory can be viewed in resource monitoring.
If the value of hardware reserved memory in resource monitoring is very large, then it will be possible to correct the situation.
In fact, there may be several reasons for the inaccessibility of all RAM:
OS bit size.
Different bit versions support different amounts of RAM. While the 32-bit version of the system often sees only 3 GB, the 64-bit version supports 4 GB or more.
If necessary, I recommend switching to the 64-bit version of the system.
How to determine whether a system is 32 or 64 bit.
To launch the system settings window, you can use the keyboard shortcut Win+I.
1. Go to Start > Settings > System > About. 2. Next, in the Device Characteristics section, look at the System Type.
Module errors.
Very often, users encounter RAM errors, especially if different modules are used.
We recommend not only checking the RAM for errors, but also trying to run the system with fewer sticks. It may be possible to find the problematic memory module.
How to check RAM for errors in Windows 10.
The system comes pre-installed with an application to diagnose computer memory problems. In the search bar, start typing:
1. Windows Memory Checker, and in the search results, click Run as administrator. 2. Now in the RAM Checker window that opens, click Reboot and check (recommended).
After restarting the computer, the process of checking the RAM for errors will begin. The user has the opportunity to change the scan parameters.