ATIFlash & AMD VBFlash is used to flash the BIOS of a video card. The version released by ATI was called ATIFlash or simply WinFlash. It supports all AMD Radeon graphics cards such as RX 5700, RX 5600, RX 5500. You can also flash BIOS for all AMD Radeon RX Vega, RX 580, RX 480 and all old ATI cards. VBFlash BIOS update software runs on Windows.
How to increase hashrate on AMD RX Polaris graphics cards?
To speed up mining , you need to resort to overclocking, but not the core (in the case of Ethereum) but the RAM video memory. Initially, the RAM operates at standard timings, which need to be changed for better performance in Ethereum mining. Then all that remains is to lower the power consumption and core frequency in order to achieve better energy efficiency and payback as a result.
When buying video cards of the 400 or 500 series, pay attention to the frequency of the RAM; the higher it is, the easier it will be to increase it to the required stable values.
Ether mining on a video card with 4 GB of RAM is IMPOSSIBLE.
Programs for flashing AMD RX video card for mining:
- ATIWinflash – A program that saves the BIOS file from the video card and also flashes the video card;
- Polaris Bios Editor is a utility that allows you to manipulate and adjust values in the BIOS file, unloaded from the video card using the ATIWinflash utility;
- GPU-Z is a program that helps you find out the manufacturer of the RAM modules for your video card.
DO NOT SAVE your video card BIOS using GPU-Z!
I will clearly demonstrate an example of BIOS firmware on an AMD RX 580 8GB video card.
Why flash the GPU BIOS?
There are really no circumstances under which you should flash the BIOS, and in fact, video card manufacturers generally discourage doing so precisely because it is a dangerous practice. However, there are times when the graphics may have factory issues and the manufacturer itself is running a critical BIOS update to resolve them, so we have no choice but to do this to resolve them in our particular case.
However, there are quite a few power users who decide to update their GPU BIOS of their own volition in order to achieve higher levels of performance, unlock overclocking limits, or even "upgrade" the GPU to a higher one because, as you know, is in the past There have been many cases where with a BIOS update we could literally turn a GPU into its larger, more powerful sister.
In short, flashing the BIOS is not a recommended practice, and if done, it is usually recommended by the manufacturer to resolve issues or by advanced users who want to unlock the limitations of the GPU to have better performance, especially through overclocking. In any case and for any reason, it is always recommended to back up the BIOS in case something goes wrong so that we can go back and "restore" the schedule.
We unload the BIOS image from the video card.
To change the BIOS of the RX 580 video card, you first need to unload it from the NAND chip on the GPU board. ATIWinflash program will help us with this . By running it as an administrator, we will see a list of video cards at the top of the window (if several are connected), select the graphics accelerator we need, and click on the “Save” .
In the file saving window, add “.rom” to the end of the name so that the file is saved correctly and so that the video card can be successfully flashed in the future.
Make backup copies of stock BIOS images of all video cards that you are going to flash.
Firmware via DOS
Flashing the BIOS firmware of an NVIDIA video card is also possible via DOS. This is an operating system that is interacted with using commands. To switch to it from Windows, you need a boot disk or flash drive. You can create it using the Rufus program.
- Find it on the Internet, download and run it.
- Insert a flash drive into the USB port. There shouldn't be any data on it.
- Select it from the "Device" drop-down list.
- Set "File system" to "FAT32".
- A. Select "MS-DOS" from the list next to it.
- Click "Start". The program will format the media and create a boot sector on it.
Then copy the NVFlash files, old and new Firmware to the same flash drive. The old one is needed so that it can be restored from the same media.
Firmware for an NVIDIA video card via DOS is suitable for experienced PC users. If you have never started your computer from bootable disks or drives before, it is better to use the previous method.
First, change the boot order so that the OS starts from external media.
- Turn off your computer.
- Insert the flash drive into the USB port.
- Turn it back on.
- When booting the PC, open the BIOS of the computer (not the video card, but the computer). To do this, press a specific key (F1, F2, F11 or Delete) - it depends on the type of motherboard. Specific information will be shown immediately after turning on the PC. Something like “Press DEL to enter Setup”.
- Go to the "Boot" section. Control using the arrow keys on the keyboard and Enter.
- Open "Boot Device Priority". The download order will appear.
- Put a USB flash drive with DOS and software for your NVIDIA video card first in the queue.
- You can return everything to the way it was in the same menu. Just replace the drive with a hard drive with the OS.
- Save the settings - go to the “Save and exit” tab.
The BIOS will boot the OS from the flash drive. Then everything is similar to the previous method. Only instead of the command line there will be an entire operating system.
To flash the BIOS of an NVIDIA video card, you need to use DOS commands. The new software will eliminate many errors related to the graphics card. But it can also do harm. For example, if the Firmware turns out to be broken or incompatible with your type of video adapter. Therefore, you should not install it just like that. Decide what you want to get from the update. Suddenly you can do without it.
What graphics card do you have: Radeon, NVIDIA or AMD?
We change the BIOS in the Polaris Bios Editor program.
We launch the program and open the BIOS ROM in it by clicking on the “Open” .
On the right side of the program interface there will be a table with timing fields. The simplest thing you can do is copy the “Value” from 1750 and paste it into all the fields below (higher in Value: 2000 and 2250).
For video cards with 4GB memory, you need to copy the values from 2:1500.
This timing substitution works in 20% of cases. So this method is definitely not suitable.
There are three types of VRAM timings for video cards:
- Factory, stock, which are slow, because the manufacturer needs, first of all, to reduce the power consumption of the video card with minimal performance losses and make a power reserve so that the video card works stably.
- They are fast and perform very well in mining.
- Aggressive/extreme, can operate at higher frequencies.
Memory chips from different manufacturers have their own timing values, and you need to choose the right ones. Polaris Bios Editor 3 PRO or direct hands and a little knowledge will help us with this
Using the GPU-Z , you can find out what manufacturer your memory chips are.
Before substitution, you need to select the memory manufacturer in the “VRAM” .
You need to change the timings, which are with the number “2” in the list, to do this, click on the frequency, and below there will be a field with the value, change it and click on the “APPLY CHG” , go to the next value.
If in the end the hashrate does not increase, try changing the timings of the frequencies with a number «1».
What to do after unsuccessful firmware
If there is no image at all, then you need to see if your computer has a video card integrated into the chipset or processor. If yes, then there will be video outputs directly on the motherboard for connecting a monitor (VGA, DVI, DisplayPort, HDMI). In this case, connect the monitor to this output.
If there is no built-in video card, then in this case you need a spare video card and a second PCI Express slot on the motherboard to connect two video cards. If you have a second PCI Express X16, you can simply install a second video card into it. If there is only one PCI Express X16, then you can use a special adapter (PCI Express riser) to connect a non-working video card, and insert a working one into the main connector and connect a monitor to it. Then we boot the computer, connecting the monitor to a working video card, and flash it.
Attention! We flash the old, non-working video card using the saved original BIOS file.
List of timings for mining different types of memory for RX 400/500.
Elpida timings.
1150 core frequencies, 1940-2070 memory, 4 GB work exactly:
777000000000000022AA1C00AC615B3CA0550F142C8C1506006004007C041420CA8980A9020004C01712262B612B3715
Slightly more aggressive:
777000000000000022AA1C00EF615C41B0551016BA0D96060060060004061420EA8940AA030004C01914292E692E3B16
Hynix memory timings.
Stable at frequencies 1150 for the core and 1980-2070 for memory, go to 4GB:
777000000000000022C39C00AC595A3D90550F12B84C8408004006007E0514206A8900A002003120100F292F94273116
You can slightly overclock the memory frequencies and try this timing:
999000000000000022C39C00AC595A3D90550F123CCF530C004006007E0514206A8900A002003120100F292F94273116
Faster timings, 1150 core and 1880-2040 memory, not for all cards, more suitable for the old 470 and 480 4 and 8 GB:
777000000000000022339D00AC595A3D90550F1230CB440900600600740114206A8900A002003120150F292F94273116
If the card does not want to chase any memory, then 1800-1950 MHz should produce 27-28 MH/s:
555000000000000022339D00AC51593980550F11AE8A8408004006006C0014206A8900A002003120140F262B88252F15
Universal timings, suitable for 470 and 570:
777000000000000022339D00CE515A3D9055111230CB440900400600740114206A8900A002003120100F292F94273116
777000000000000022339D00CE515A3D9055111234CC440900400600740114206A8900A0020031201E0F292F94273116
Timings for Samsung.
Aggressive 2000-2125 MHz from memory:
777000000000000022CC1C00AD615C41C0590E152ECC8608006007000B031420FA8900A00300000010122F3FBA354019
With the timing symmetry of the second version:
777000000000000022CC1C00AD615C41C0590E152ECC8608006007000B031420FA8900A00300000010122F3F88354019
777000000000000022CC1C00AD615C41C0590E152ECCA60B006007000B031420FA8900A00300000010122F3FBA354019
Micron timings.
I found one single timing on the Internet, so try it, they say the memory can stably withstand up to 2100 MHz:
777000000000000022AA1C0073626C41B0551016BA0D260B0060060004061420EA8940AA030000001914292EB22E3B16
Downvolting video cards for mining.
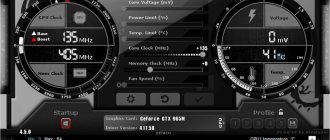
The video card core can operate in different modes depending on the load. Reduce frequencies when throttling, or work at maximum if there is no overheating.
To mine Ethereum, we don’t need high core frequencies, besides, video cards will consume more energy, which will negatively affect profitability, because the profit will be lower.
For stable mining and operation of the video card, a core frequency of 1150 MHz is enough. We change all values in the “GPU” table after 900 MHz.
Reducing the core frequency is half the battle, then you need to change the core voltage values. To do this, in the right column of the “GPU” table, change the values after 1257 mV to “65286”.
Additionally, you can try to lower the TDP of the video card by changing the following values to “100” or “110” W.
My rigs are running the HiveOS mining operating system, where the maximum TDP for video cards can be changed in the rig settings.
Overclocking video card RAM for Ethereum mining.
AMD RX can increase its hashrate by changing timings and overclocking video memory. The stock memory of regular video cards operates at its own frequencies and also has its own maximum. There is no need to increase the clock frequencies to the skies, because stable operation of the farm is the key to a good income in mining.
“Memory” table has a column with values, the bottom cell is the maximum frequency at peak load on the video card.
If the number is “1750”, then increasing this parameter to “2000” will be dangerous. It is dangerous in terms of the fact that the video card will freeze or generate errors. By trial and error, you can eventually find out what memory frequency is optimal for your video card, in my case it is “1900”.
If you have values in this cell above 1750 MHz, then you can safely raise the indicator to 1950 MHz, 2000 MHz and even up to 2100. And again, the optimal frequencies can only be identified with the help of tests.
Flashing the BIOS of the video card.
After we have finished changing all the necessary values in the tables, we need to save the BIOS file. Then open AtiWinFlash with administrator rights, open the modified file and click on the “Program” button. Wait for the process to complete and reboot.
If you are mining cryptocurrency on Windows 10, then do not forget to install the official drivers for mining from the AMD website, otherwise your video cards will not be detected by the system.
I advise all miners to use special operating systems for mining, the simplest is NiceHashOS, but there are a lot of disadvantages, and you will only have to configure video cards in the BIOS file (fan speed, TDP, overclocking, etc.)
The best choice is HiveOS, which has complete hardware setup, a user-friendly interface, monitoring, a BIOS firmware function, a mobile application and a perfectly working watchdog, which can reboot the farm in case of any error, which is extremely important for stable earnings from mining. .
If this article helped you, then support our project by joining the VK group and the TG channel.
Introduction and preparation
This article will discuss how to flash the BIOS in AMD video cards. To flash the video card, you will need the AMD VBFlash utility, which can be downloaded from this link.
It is recommended to disable it in Windows before flashing the BIOS of the video card. To do this, you need to open the “Device Manager”, and in the “Video adapters” item, select the one you need, right-click on it and select “Disable”.
Next we will talk about two possible ways to use the ATI Winflash utility - through its graphical interface, and through its console version.