In the Microsoft Office Word text editor, they often work with important documents that are not intended for strangers. This may be strictly confidential information or simply undesirable for third parties to view. Users want to protect a file, but not everyone knows how to do it. This is especially important if the computer on which the Word document is stored is shared by multiple people at home or work.
Important files require additional security
One of the best ways to protect data from user tampering is to set a password on the document. This way, only those who have the access code given to them by the owner can read and edit it. Unfortunately, Windows does not have the ability to hide files or folders - it only allows you to deny access to a particular user to a directory on the system. Moreover, often people who use a computer do so through the same account. We have to look for other solutions to protect text, because information nowadays decides a lot:
- Using the built-in function in Microsoft Office Word that allows you to set a password for text. To do this, you don’t have to use third-party programs, since everything is done right in the editor. You can install the combination on documents with the extension .doc, .docx, .ppt, .xls and .rtf. Using this method, you will not only restrict access to texts, but also protect them using AES, a technology that encrypts data in a 128-bit system.
- Through the WinRar archiver. This program is usually installed on every computer, so it is easy to find and use. If you don’t have an archiver, download it - it greatly simplifies working with your computer, data and their media.
- Using a third-party special program. There are a large number of services that allow you to set a password for a folder or file. We will look at one of them.
In addition, it is possible to protect a document only partially. This is also done in Microsoft Word. With this feature, you can prevent users who do not have a secret character combination from editing or formatting text. They will still be able to view the data.
It is also important to consider that Word, WinRar and security programs cannot send a combination of characters to your email or mobile phone if you have forgotten it. It is advisable to choose not only a reliable and complex password, but also a memorable one.
How to put a password on a Word 2016 document
To set password protection in Word 2016, follow these steps:
- In your Word document, go to the File menu.
- In the “Information” section, click on the “Document Protection” button.
- In the menu that opens, click on the “Encrypt using password” item.
- In the "Document Encryption" window, enter a password to encrypt the contents of this file, and then click on the "OK" button.
- In the “Password Confirmation” window, in the “Confirmation” field, re-enter the password for this document, and then click on the “OK” button.
The Word 2016 document is encrypted, the “Document Protection” option turns yellow.
Understanding text encoding
Information that is displayed as text is actually stored in a text file as numeric values. The computer converts these values into display characters using encoding.
An encoding is a numbering scheme in which each text character in a set is assigned a specific numeric value. The encoding may contain letters, numbers and other symbols. Different languages often use different character sets, so many of the existing encodings are designed to represent the character sets of their respective languages.
Different encodings for different alphabets
The encoding information saved with the text file is used by the computer to display text on the screen. For example, in the “Cyrillic (Windows)” encoding, the “Y” character corresponds to the numeric value 201. When you open a file containing this character on a computer that uses the “Cyrillic (Windows)” encoding, the computer reads the number 201 and displays "Y" sign.
However, if the same file is opened on a computer that uses a different encoding by default, the character corresponding to the number 201 in this encoding will be displayed on the screen. For example, if your computer uses the “Western European (Windows)” encoding, the “Y” character from the source Cyrillic-based text file will be displayed as “É”, since this is the character that corresponds to the number 201 in this encoding.
Unicode: a single encoding for different alphabets
To avoid problems with encoding and decoding text files, you can save them in Unicode. This encoding includes most characters from all languages that are commonly used on modern computers.
Since Word is based on Unicode, all files in it are automatically saved in this encoding. Unicode files can be opened on any computer with an English operating system, regardless of the language of the text. In addition, on such a computer you can save files in Unicode that contain characters that are not in Western European alphabets (for example, Greek, Cyrillic, Arabic or Japanese).
How to put a password on a Word 2013 document
Setting a password in Word 2013 is as follows:
- In the Word window, go to the "File" menu.
- From the "Details" section, click on "Document Protection".
- In the menu that opens, select “Encrypt using password.”
- In the “Document Encryption” window, enter a password to protect the file, and then click the “OK” button.
- In the “Password Confirmation” window, re-enter the password for the document and click the “OK” button.
A password has been set on a Word 2013 document.
How to put a password on a Word 2010 document
To set a password for a Microsoft Word 2010 document, follow these steps:
- In the program window, click on the “File” menu.
- After clicking on the “Information” item, in the Permissions field, click on the “Protect document” button.
- In the drop-down menu, click on the “Encrypt with password” item.
- In the Document Encryption window, enter a password for the document.
- Next, in the “Password Confirmation” window, confirm it by entering the password a second time.
Now the Word 2010 document has a password. You will be able to open the encrypted Word document again only after entering the correct password.
Join the conversation
Good morning, Anton! Nice to meet you. Greetings to the heroic Donetsk from Simferopol! Thank you for an interesting and useful site. I settled on the article “How to protect a document with a password.” About 3 years ago, my wife protected very important WORD and EXCEL documents (the child was playing around, but, as always, she forgot to write down the tricky passwords!). I scoured the internet and found a very interesting way to remove the protection. I'll share it below.
I am responding to your request: “What should you do if you still come across a document from an older revision with a doc extension? You can try opening this document using OpenOffice...” The answer is simple: Resave it directly in WORD with the new “docx” extension. The same applies to EXCEL “xls” files - you need to resave it as “xlsx”. That's all!
Typically, when working collaboratively with text files, there is no need to delve into the technical aspects of storing text. However, if you want to share a file with someone who works with text in other languages, download a text file from the Internet, or open it on a computer with a different operating system, you may need to set the encoding when you open or save it.
When you open a text file in Microsoft Word or another program (for example, on a computer whose operating system language is different from the one in which the text in the file is written), the encoding helps the program determine in what form the text should be displayed on the screen so that it could be read.
How to put a password on a Word 2007 document
To put a password on a Microsoft Word 2007 document, open the document on your computer, and then do the following:
- Click on the "Microsoft Office" button.
- Enter the "Microsoft Office" menu, and then click on the "Prepare" item.
- Next, click on “Encrypt Document”.
- The “Document Encryption” window appears inside the document, enter the password in the appropriate field, and then click on the “OK” button.
- In the “Password Confirmation” window, re-enter the password, and then click the “OK” button.
After that, close the Word 2007 document, it is now password protected.
WinRar to the rescue
How to put a password on a Word file? Documents can be password protected using the WinRar application. In a similar way, the protection of certain folders on the computer is ensured.
In order to take advantage of this advice, you need:
- Right-click on the file or folder.
- Select the option “Add to archive...”. The corresponding command will be displayed if there is WinRar on the computer.
- In the window that appears, go to the “Advanced” tab.
- Click on the “Set password” button.
- Enter the secret code and confirm it.
- Create an archive with the selected parameters.
After completing the procedure, the user will see a Rar archive with certain documents. It can only be opened if the user has the specified password.
How to put a password on a Word 2003 document
In order to put a password on a Microsoft Word 2003 document, you will need to perform the following steps:
- In the “Service” menu, click on the “Options...” item.
- In the “Settings” window that opens, go to the “Security” tab.
- In the “Security” tab, “Encryption options for this document” item, in the “password to open the file” field, enter the password, and then click on the “OK” button.
- In the “Password Confirmation” window, enter the password one more time, and then click on the “OK” button.
After this, close the Word document. A password was set on a Word 2003 document.
Now, when you try to open a Word document, the program will require you to enter a password. After entering the password, click on the “OK” button. The Word 2003 document will open.
Old versions of MS Word
It is worth paying attention to the fact that the algorithm of actions will depend on the version of Office used. Many people still work in Word 2003. Therefore, let's start looking at the process with this application.
How to set a password for a Word document? Users of MS Word 2003 will have to proceed like this:
- Open the document you want to password protect.
- Click on the “File” button and click on “Save As”.
- Select the “Service” option. It is located in the upper right part of the dialog box that appears.
- Click on the line “Security Settings...”.
- Enter your invented passwords in the specially provided lines. You can prohibit editing the document or leave the password only for opening the file.
- Click on the “Install protection” button.
- Repeat passwords if the system requires it.
- Confirm the installation of document security features.
That's all. Now it’s clear how to set a password for a Word document to edit or open. But this is just the beginning!
How to open a password-protected Word document
When you try to open a password-protected Word document of any version, the “Password” window will open, in which you must enter the password to open the file. If you enter the wrong password, the Word document will not open.
Enter the correct password and then click on the "OK" button.
The Word document will then open.
Attention! Please remember that each time you try to open an encrypted Word document, you will have to re-enter the password. Therefore, remember this document password well so that you can quickly open an encrypted Word document. If you want to make this document publicly available again, you will need to unprotect the Word document.
Should I change the encryption strength?
In a word, no . Unless you have a very specific reason to change the default encryption settings, I wouldn't go there. Microsoft Office uses AES with a 128-bit key, as well as SHA1 salts and block chain ciphers. While it's highly unlikely that your encryption could be broken, it would take a seriously knowledgeable person to complete the hack, and even then it would take 2,126.2 computing power to recover the AES-128 key.
In other words, there are currently no practical methods for cracking an AES-128 key.
However, if you really want to dig in, you can use the Office Customization Tool, which also has a relatively detailed help page to browse through. I won't give detailed instructions on how to use the OCT since it would be better to leave the encryption settings alone, but I can't deny the whims of those who want to tinker.
I would suggest setting up a virtual machine. , installing Office 2013/2016, downloading the Office Customization Tool and playing there, leaving the normal installation alone.
How to remove a password from a Word 2016 document
To remove a password in Microsoft Word 2016, follow these steps:
- Open a Word document, enter the password for the document.
- From the File menu, select Info.
- In the “Details” section, click on the “Document Protection” button.
- Select "Encrypt with password" from the drop-down list.
- In the “Document Encryption” window that opens, remove the previously set password, and then click on the “OK” button.
- After closing the Word document, in the warning window about saving changes in the Word document, click on the “Save” button.
The password from the Word 2016 document has been removed.
What other Microsoft Office documents can be protected?
You can protect not only Word or Excel documents. These can be presentation files, PDF files, books, text documents (notepad) and other documents.
At the end of the article, we should mention one more program - “LibreOffice”. Its features are free. To protect other documents with it, it is enough to set the item “Save with password” when saving the file to your computer, enter it and confirm. Then all text data will be protected.
How to remove a password from a Word 2013 document
You can remove a password from a Word 2013 document in this way:
- After opening the Word document, enter the password.
- From the File menu, go to the Details section.
- In the "Details" section, click on "Password protection."
- Select the Encrypt with Password option.
- In the “Document Encryption” window, remove the password and click on the “OK” button.
- In the warning window that opens after closing the document, click the “Save” button to save changes to the application settings.
The Word 2013 document is open to public access.
You may also be interested in:
- How to make page numbers in Word
- How to reverse text in Word - 5 ways
Keep your files close...
The encryption offered by Microsoft Office is strong. It is unlikely that AES will be broken in the near future, and if so, the computing requirements will be extremely high, beyond the reach of ordinary cybercriminals.
But that doesn't mean you can be complacent. Chances are you'll accidentally introduce a malicious entity into your network, giving access to sensitive information from inside the gate. With that in mind, think about where that email came from, or simply who you're sending the file to, and you won't become a weak security link cursed at the office.
Are you using Microsoft Office's built-in encryption? Or are you using an external tool? How do you manage password-protected sections of OneNote?
How to remove a password from a Word 2010 document
To remove the password from an encrypted Microsoft Word 2010 document, follow these steps:
- Open a Word document, enter the password for this document.
- Then in the “File” menu, click on “Information”.
- In the “Permissions” field, click on the “Protect Document” button.
- In the context menu, click on the “Encrypt with password” item.
- In the “Document Encryption” window that appears, delete the password you entered earlier, and then click on the “OK” button.
- After closing the Word document, a window appears warning that the document has been changed; click on the “Yes” button in this window.
The Word 2010 document is now open for free use.
How to remove a password from a Word 2007 document
To remove a password from a Word 2007 document, follow the steps:
- Open an encrypted Microsoft Word 2007 document by entering its password.
- After that, click on the “Microsoft Office” button.
- Next, click on the “Prepare” item, and then on the “Encrypt document” item.
- In the “Document Encryption” window, remove the password you entered earlier, and then click on the “OK” button.
- After you have closed the Word document, in the warning window that appears about changes in the document, click on the “Yes” button.
The protection of the Word 2007 document is removed and it can be opened by any computer user.
Blocking methods
Once you encrypt an item, to open it you will need to enter a secret code that will be known to a limited number of people. There is no other way to unlock it.
I strongly recommend coming up with a complex password containing both regular and capital letters and numbers. You can use special online services that automatically generate a set of characters according to specified criteria (length, characters used, etc.).
Now let's move on directly to the instructions for different versions of Word.
How to remove a password from a Word 2003 document
In order to remove a password from an encrypted Microsoft Word 2003 document, you must do the following:
- Open the document by entering the password for that Word document.
- Next, go to the “Tools” menu, and then click on “Options...”.
- In the “Options” window, in the “Security” tab, in the “password to open a file” field, delete the password you previously entered, and then click on the “OK” button.
- After closing the Word document, a window will appear warning you about changes in this file; click on the “Yes” button in this window.
After this, the protection from the Word 2003 document will be removed.
Selecting encoding when saving a file
If you do not select an encoding when saving the file, Unicode will be used. In general, Unicode is recommended because it supports most characters in most languages.
If you plan to open the document in a program that does not support Unicode, you can select the desired encoding. For example, on an English operating system, you can create a document in Traditional Chinese using Unicode. However, if such a document is opened in a program that supports Chinese but does not support Unicode, the file can be saved in the "Chinese Traditional (Big5)" encoding. As a result, the text will display correctly when you open the document in a program that supports Traditional Chinese.
Note: Because Unicode is the most comprehensive standard, some characters may not appear when you save text in other encodings. For example, suppose that a Unicode document contains text in both Hebrew and Cyrillic. If you save the file in the “Cyrillic (Windows)” encoding, the Hebrew text will not be displayed, and if you save it in the “Hebrew (Windows)” encoding, the Cyrillic text will not be displayed.
If you select an encoding standard that doesn't support some characters in the file, Word will mark them in red. You can preview the text in the selected encoding before saving the file.
When you save a file as encoded text, the text for which the Symbol font is selected, as well as the field codes, are removed from the file.
Encoding selection
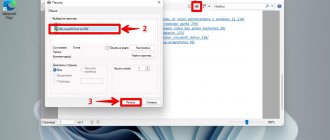
Open the File tab.
Click the Save As button.
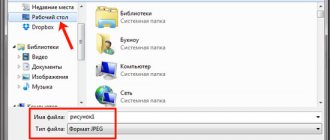
To save the file in a different folder, find and open it.
In the File name field, enter a name for the new file.
In the File type field, select Plain Text.
Click the Save button.
If the Microsoft Office Word - Check Compatibility dialog box appears, click Continue.
In the Convert File dialog box, select the appropriate encoding.
To use standard encoding, select the Windows (default) option.
To use MS-DOS encoding, select the MS-DOS option.
To set a different encoding, select the Other radio button and select the desired item in the list. In the Sample area, you can preview the text to see if it displays correctly in the selected encoding.
Note: To increase the display area of your document, you can resize the Convert File dialog box.
If the message "Text in red cannot be saved correctly in the selected encoding" appears, you can select a different encoding or select the Allow character substitution check box.
If character substitution is enabled, characters that cannot be displayed will be replaced with the nearest equivalent characters in the selected encoding. For example, an ellipsis is replaced by three dots, and corner quotation marks are replaced by straight ones.
If the selected encoding does not have equivalent characters for the characters highlighted in red, they will be stored as out-of-context (for example, as question marks).
If the document will be opened in a program that does not wrap text from one line to another, you can enable hard line breaks in it. To do this, select the Insert line breaks check box and specify the desired break symbol (carriage return (CR), line feed (LF), or both) in the End lines field.