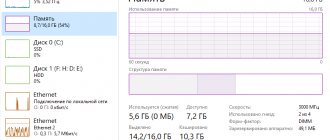
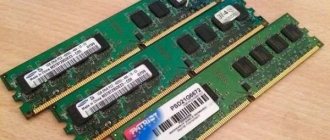
RAM or random access memory is the memory used to store temporary files and processes on your computer. In other words, RAM is used to store data and information needed for real-time tasks on your PC. This is similar to short-term memory in our brain, while storage (hard drives and solid-state drives) is more like long-term memory where we store our memories.
Because RAM is used to store data needed to run a PC in real time , faulty RAM sticks can prevent you from using your computer. Luckily, performing a RAM test is very easy .
BSOD (Blue Screen of Death) is a common consequence of faulty RAM, and if you regularly encounter this infamous screen, you should check your computer's RAM. There are many reasons for instability of RAM drives. RAM overclocking, physical malfunction, motherboard incompatibility, etc.
Today we will explain how to check your RAM and what apps you can use . Each method mentioned here is free, for one method you will need a USB drive.
Let's start with a tool that comes with every Windows machine, the Windows Memory Diagnostic Tool .
What is RAM and what is it used for?
RAM is abbreviated as RAM (random access memory) or RAM - in English, random access memory; in slang it is often called “RAM”. Below is one of its options.
The processor performs calculations, but intermediate results need to be stored. Who remembers elementary school: “we write seven, two in our minds.” This is what RAM is for. This is an essential element of any computing machine. Initially, RAM was assembled on magnetic cores and the like, and the amount of information written to it was minimal. Nowadays, RAM is a set of chips with a fairly large capacity. There is another type of memory in computers - ROM (read-only memory), which stores the BIOS firmware.
RAM differs from it in that it depends on the supply voltage; when the PC is turned off, all written bytes are erased. The RAM capacity for modern computing requires a relatively large amount, several GB, and the speed of data exchange is also important. There are two types of RAM - SRAM and DRAM , with static and dynamic access, respectively. The first type is based on the fact that each bit is stored in a separate flip-flop - a cell of two transistors. This type of computer memory places much less information per unit area of the crystal, but is less susceptible to damage, and the recorded data remains unchanged without additional operations until the power is removed from the circuit. It is used most of all in the processor's internal memory, called cache , and is located on its chips. We are directly interested in the computer's RAM. It works using dynamic access memory (DRAM), and capacitors are used to store information. This approach allows you to significantly increase the capacity per unit area, but somewhat increases the likelihood of a certain number of storage cells failing in emergency situations, such as “stress” in the form of overvoltage, overheating, and the like.
Additional software
In addition to the standard solution from Microsoft, users can download other testing programs from third-party developers. The most popular such application is Memtest . It can be downloaded for free from the official website https://memtest86.com/.
Download the image using the “ Download now!” " and create a bootable USB flash drive. After this, you will be able to run the MemTest86 on any personal computer (even one that does not run the operating system) and perform all the necessary checks.
Symptoms of RAM Damage
Signs that there may be problems with RAM are frequent computer crashes into the blue screen of death for XP; for Windows 8, 10 it can be black.
Moreover, most often failures occur when working with resource-intensive applications, such as games and graphic editors. The error codes change all the time. You may also experience some fuzzy flickering on the screen. The computer may not boot at all, producing sound signals; they can be deciphered according to the instructions for the motherboard. But all these signs do not necessarily indicate RAM; the video card or processor, or a low-power power supply may be to blame. It is worth conducting a Windows RAM test; it will help localize the cause of the problem. In addition, knowing that the RAM is to blame, you can easily carry out repairs yourself. Sometimes the cause of the failure is not even in the memory clearing chip itself, but in poor contact on the connector.
Recommendations before testing
If you haven’t looked into the system unit for a long time, then there is standard advice: open the cover of the unit, blow out dust from the entire space (you can use a vacuum cleaner). Pay close attention to memory sticks. It is advisable to remove them from the mother memory socket and blow out the connectors themselves to insert a RAM slot into them. It is advisable to wipe the memory contacts with something to remove dust; a regular eraser does an excellent job of this. It’s just that the contacts often become acidic and the connection leaves much to be desired. This causes a lot of glitches and errors. It is possible that after such a procedure there is no need to do any testing...
Be careful with RAM chips, they can be easily damaged.
RAM test on computers with Windows 7 and higher
This operating system has built-in tools that check RAM for errors. Therefore, it is not necessary to search for and install third-party software. The process itself takes a little time. It is also worth noting such a feature of Windows 7 (64- or 32-bit) and newer versions as self-diagnosis, that is, if it detects problems in the system, it itself will offer to test the RAM. If you see such a message, you should not refuse.
You can also check the performance of the RAM manually; to do this, we use one of the following methods:
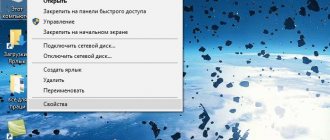
- Let's go to Control Panelby pressing Start. There we select “ Administration", and then "Windows Memory Checker».
- Before starting the operating system, press the F2 key. The computer will prompt you to run Windows or a memory test program. Use Tab to select the last one and press enter. The memory test will start. This option is the only one if the operating system does not boot at all.
- Go to the menu Start, in the program search bar we type “mdsched”. A window will appear with an icon to launch the memory checker.
- We click on the icon that says “ MdSched ” and the program for testing RAM is launched.
The program asks when to check, now or the next time you turn on the computer. Select the desired option. At the same time, do not forget that when you reboot, we risk losing all unsaved files. The program automatically turns on forced closing of applications, without giving time to cancel the decision. Therefore, we take precautions and correctly close all running programs. Windows closes and the verification procedure begins.
By pressing the F1 key you can select additional scan options:
- Test suite: basic, standard or advanced. Without additional parameters, the system selects the standard mode. Basic will speed up the process, but will make it less thorough. The extended one, on the contrary, will take time, but will check each cell thoroughly.
- The cache is enabled by default, but can be disabled. With the cache disabled, the time it takes to diagnose RAM will increase several times.
- Number of passes. Two are automatically selected, but you can set any number from 1 to 99. This will affect the quality and time of the test. In one pass, the check will be of lower quality. But passes of more than three do not reveal additional problems. Do not enter the number 0, in this case the RAM testing will continue indefinitely.
Navigation in the menu is carried out using the Tab keys to move between items and arrows to select an option. We enter the number of passes on the numeric keypad, first removing the standard two. Launch after selecting test parameters using F10.
The memory check process will begin; depending on the amount of RAM, it will take up to half an hour. At the same time, the progress of the process is constantly displayed on the screen: what percentage is checked, what pass is being made, whether problems are found. If you need to interrupt the test (you urgently need a computer), press ESC. After an interruption, you will have to start all over again, including the blocks you have already completed.
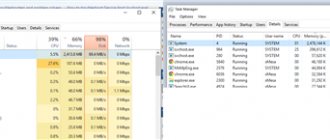
When the program finishes, the computer will automatically start the operating system. Moreover, it takes her more time than with the standard procedure. After the PC boots, a notification about the scan results will appear on the Taskbar . But it is worth paying attention to the fact that it may not appear at all if no problems are detected, but is displayed only for a couple of minutes. If you run the check and go to the kitchen to drink tea, you might miss it. In this case, “ Event Viewer ” in the Control Panel in the “ Administration ” section will help. We find there “ Windows Logs ” among them “ System ” and in the list of information “ MemoryDiagnostics-Result ”.
Other RAM Testing Tools – Prime95 and MemTest
Of course, there are other RAM testing tools, and below you can learn how to test RAM using Prime95 and MemTest. The good thing about these apps is that you don't have to restart your computer, both can run while the OS is running.
In Prime95, simply select "Large FFTs test" and let the application run overnight or at least a couple of hours. If you get zero errors, your RAM is fine. If you have overclocked CPU and RAM, you can select the "mix" option to test the CPU and RAM at the same time. Just remember to close all applications before running the test so that the tool can use all the available RAM on your system.
As an alternative we have MemTest from HCI Design. Simply download the application, run the executable file and click the "Start Testing" button. The tool uses all available RAM by default, so it is highly recommended to close all applications before testing. Again, it is best to run the tool overnight. If for some reason you can't do this, let the dough sit for at least a couple of hours.
How to check RAM using utilities
To check the RAM for functionality on a PC or laptop running Windows XP and an earlier version (there are still some), you need to use special programs. In addition, many of these programs offer a broader range of tests than the standard Microsoft tool. On the Internet, most of them can be downloaded quickly and free of charge. When choosing, you need to consider the following factors:
- There are programs that run from Windows. It’s easier to work with them - downloaded, installed, some work without installation, checked. But they are not suitable for cases where there are problems with the operating system. Also, checking from BIOS is more accurate. True, you will need to copy them to a flash drive or disk.
- Many utilities, especially those created a long time ago, cannot work with more than four GB of RAM. If there is more memory (64 bit versions allow this), then you will have to check it in parts, removing the strips, and this is unnecessary trouble.
As an example, let's look at how to work with one of the common free utilities Memtest86+ or similar programs. It is necessary to perform the following sequence of actions:
- Download the disk image from the Internet.
- We create a bootable USB flash drive or disk, which nowadays is not serious and takes up extra time. There are special programs for this, for example Rufus .
- When starting the computer in the BIOS, we select not the disk with the operating system, but the loading of our utility.
- We look at the results on the screen: Errors - detected errors. In most cases, the test can be interrupted by pressing ESC.
The design of the window in which the test results are displayed may be different, but everything should be clear intuitively.
Diagnostics with testmem5 program
And our small list of diagnostic tools ends with the TestMem5 program. It is also made specifically for testing RAM. You can download it completely free of charge, you just need to type the name into a search engine.
How to check your computer's RAM using this program? Let's figure it out.
Please note that you must run the program as an administrator.
It all looks like this:
The principle of operation of Testmem5 is somewhat different from the principle of operation of previous options. The main difference is that you can configure it yourself. Moreover, the tests are very flexible, and they have many different settings.
Of course, you can do this yourself, but it is much easier to download a pack with ready-made settings configurations from other users. We recommend options from 1usmus v3 and anta777, and the latter (or last) has three levels of settings: extreme, heavy and superlight. So you can choose what you need without any problems.
After you download the package with configurations, you still need to somehow make them work. In fact, it's easy to do:
- Download the option that suits you and put it in the program folder;
- Go to the program itself, click the “Configure and Exit” button, select the desired file and open it.
Super test on the topic “Money” and how can you be friends with it?
If problems are found
Minor damage to the RAM may not affect the operation of the computer, it will simply reduce the amount of memory and slightly reduce performance. But if problems have already arisen, and the memory test shows a malfunction, repairs are necessary. Of course, if the computer is under warranty and sealed, then we contact the service center or the seller. If not, and you are confident in your capabilities, then you can make the repairs yourself. We perform the following actions:
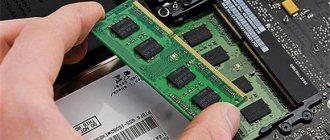
- We find sticks with RAM. On a desktop computer, remove the side cover. The laptop has a bottom panel, or in most models, only a part of it with an inscription or icon indicating memory. The installation location can be found in the motherboard manual, but it’s easy to find the RAM without it. Long boards installed vertically with rows of identical chips are the RAM strips of a desktop computer.
In a laptop they are smaller in size and are located in several tiers parallel to the motherboard. - First, let's check if the contacts are at fault; maybe the microcircuits have nothing to do with it. Having released the latches along the edges of the slats, we remove them. Under no circumstances should contacts be cleaned with sandpaper or a knife, as this will erase the protective layer of gold. To remove oxides, use a pencil eraser. After cleaning, degrease with alcohol. We install the strips back. It is impossible to do this incorrectly due to the key cutouts. The latches secure them automatically. Let's test again. Perhaps the problems will disappear.
- If cleaning the contacts does not help, then you will have to change the strips. Moreover, if there are several of them, then the RAM checks must be performed one stick at a time, removing the rest in order to find the faulty board. When choosing a replacement, we focus not only on the volume, but also on the reading speed, it must be supported by your motherboard.
How to identify a faulty RAM module
If the computer has only one stick, then it is obvious that there is a problem with it and it needs to be replaced.
If your computer has two or four sticks of RAM, then you need to test each one in turn. To do this, leave one stick of RAM and run the diagnostics again.
As soon as the test shows problems, the diagnosed bar must definitely be replaced.
Or you can do this:
- Test four strips.
- If there are mistakes, leave 2 strips and pull out 2 strips.
- If there are no errors, then we take out these strips in good order and insert the remaining ones one by one.
- Or if errors appear on the first two, then we remove one and test again until the faulty module is identified.
This way you can identify which bar is not working.
RAM sticks in the motherboard connector
Important! Disconnect and connect RAM sticks only when the computer is turned off.
Causes of OP malfunctions
We have already noted that RAM is a completely electronic component, so there are not many memory faults:
- there is poor contact between the bar and the slot;
- The contact ridge may oxidize if the strip has not been in the computer or in its original packaging for a long time. This problem is indicated by darkening of the contact group;
- brackets are installed that are incompatible with other modules or components of the PC;
- the memory slot has mechanical defects;
- you installed RAM with a manufacturing defect.
The simplest way to check RAM on a PC is to visually inspect the strips. The side fastenings must be latched and the bar must not wobble in the slot. If there are traces of oxidation of the contacts, try to carefully clean them using a regular school eraser. The problem has not disappeared - move the bracket to another slot if available.
You can also try going into the BIOS and resetting to default settings.
If these measures do not bring results, you need to move on to software methods for diagnosing memory.
Methodology for testing memory modules (version 0.9)
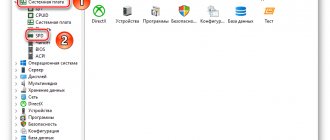
Today we will have three questions on the agenda: is it worth testing memory modules “in general”, the results in which programs and tests can be indicative in this matter, and of course, using the method of practical selection from these theoretically interesting programs to select the necessary and a sufficient minimum that would allow us to reliably compare modules based on performance (the remaining parameters: overclocking potential, SPD content are quite easy to find out, which is what we usually did in module reviews).
So is it necessary to test RAM, or is its performance today so great that it covers any requests of any programs in any modes (such opinions are sometimes heard)? In theory, everything is clear here: of course, it is necessary. Because there is a very big difference between the statement “there are almost no differences in performance, taking into account the results in ten, or even 20 applications,” especially if these applications (and testing conditions) were selected so that the result depended on the performance of some other components (that is, to test processors, video cards, etc.), and the statement that “there is no difference at all.” It is quite obvious that those who care about the performance of the memory subsystem may be dealing with tasks where there is active interaction with large amounts of memory, which today primarily concerns the multitasking environment, although not only it. However, if in practice the deviations are within the measurement error, the interest in such tests will indeed be minimal. Accordingly, it is necessary either to clearly demonstrate that there are conditions in which (fast, capacious, etc. memory) is useful, or to admit that there really is no difference.
But since the conditions can be very individual, the “naturalistic method” risks being too lengthy, cumbersome and still unpractical, and here synthetics, not complained by many, seem to be not such a useless thing, as, for example, in the case of testing processors. The algorithms used in different programs really differ greatly, and nowhere, say, except in SuperPi itself, exactly the same program code is used. Accordingly, the load on certain computing units of the processor, and therefore the overall performance, cannot be predicted from the results in one or two programs. But exchange with memory is a quantity that can be more easily “measured with a ruler”; delays (in different modes) and throughput do not depend on which program the request to read or write data came from. However, this is how it is measured, no one is going to get hung up on synthetics, I just wanted to note that in the case of memory testing, such data is a good help.
What to test on? The choice of OS is not in doubt only in terms of bit depth, it is clear: a 64-bit OS is necessary, because 2 GB will remain standard for a very short time, and even for 4 GB, 32-bit versions of Windows are not optimal, the actual available memory is less. XP or Vista? From the tester’s point of view, it would be better to test in XP; there is less chance that some non-periodic background processes will interfere with the process, and 64-bit Vista itself can work almost perfectly on one configuration and be strange in places on another (that is, either by itself The OS or drivers have not yet been finalized). However, there are apparently already many more users of 64-bit Vista than 64-bit XP, and for the relevance of the methodology, it is still more logical to use the most modern OS; again, it would be unfair to exclude games with DirectX 10 support from the methodology for this reason . Moreover, we ran all the tests in MS Vista, with the exception of two synthetic tests (Sandra and RMMA), and despite some difficulties that actually arose during the debugging period, the results were obtained quite correctly (whereas with XP 64 bit one strange incident arose, which we'll discuss later).
What to choose as a platform? There is also no particular doubt: in order for performance not to be limited by bus bandwidth, you need a memory controller integrated into the processor. Today this is the Socket AM2+ platform, but “tomorrow”, obviously, for DDR3 tests it will be very useful to switch to Socket AM3. Formally, the Intel platform presented recently, led by the Nehalem processor, could also lay claim to this role, but it is obvious that the integrated memory controller is new for Intel, compatibility with different memory modules is problematic, and the controller’s own behavior in different modes is sometimes surprising ( so the reported deviations may have little correlation with differences in the performance of the modules themselves). And here it’s not a memory test, but catching bugs, which is still a slightly different genre, and the user has the right to expect that the manufacturer himself will deal with this. By the way, in the first implementation of an integrated controller, AMD also had compatibility problems at one time, so we don’t see anything surprising or particularly criminal in this state of affairs. Of course, some kind of “roundup”, specially tailored for Nehalem modules, can be carried out using the same method.
However, we can’t expect any fundamental moments from the transition from DDR2 to DDR3. These are precisely quantitative changes, an increase in throughput, unfortunately, to one degree or another “compensated” by higher delays. But, of course, as the modules progress, the advantages of DDR3 become more distinct, and no one doubts that very soon DDR3 will overtake DDR2 not only in real speed characteristics, but also in the ratio of price and these same characteristics.
However, enough theory, let's see what the tests show. So that the example does not look academic, we selected the modules not “just like that”, but at the same time to clarify some typical questions that arise when choosing. Most often the question arises of choosing between modules from different manufacturers that have the same frequency (sometimes different stated timings), as well as different overclocking models with different maximum frequencies. However, why not sometimes compare the same expensive overclocking modules with the simplest modules that do not have any radiators, supplied in OEM packaging, but with twice or four times the volume? What, you ask, can such different things have in common? Well, for example, the most important consumer parameter: Her Majesty the retail price.
Configuration and software
Test stand:
- AMD Phenom X4 9850 processor
- Gigabyte MA790FX-DQ6 motherboard based on AMD 790FX chipset
- video card ATI Radeon HD 3870 GDDR4 512 MB
- hard drive: 500 GB Seagate Barracuda 7200.10 SATA, 7200 rpm
Memory modules:
- Qimonda HYS64T128020EU-2.5-B2 DDR2-800 6-6-6-12 1024 MB x 2
- Kingston KHX6400D2LLK2/2G DDR2-800 5-5-5-12 1024 MB x 2
- AENEON XTUNE AXT760UD00-18DB98X DDR2-1142 5-5-5-12 1024 MB x 2
- Transcend aXeRam TX1200QLJ-2GK DDR2-1200 5-5-5-12 1024 MB x 2
- Qimonda HYS64T5122020EU-25F-A DDR2-800 6-6-6-12 4096 MB x 2
Software:
- OS Windows Vista Ultimate (64 bit), Windows XP (64 bit), Catalyst 8.9 drivers
- Synthetic software packages (for measuring memory bandwidth and latency) Lavalys Everest 4.60, SiSoftware Sandra 14.20.2008.5, RMMA 2.35
- 7-Zip 4.10b
- codec XviD 1.0.2
- codec x264 rev 807
- PCMark Vantage
- 3DMark06 (Normal settings, 1280×1024)
- 3DMark Vantage (Default settings, Performance)
- Supreme Commander (Gas Powered Games) Default settings, built-in test
- World in Conflict (Sierra) - DirectX 10, Medium, built-in test
- Crysis (Crytek) - DirectX 10, Medium, Crytek Built-in, benchmark available for download
- Unreal Tournament 3 (Epic Games) - DirectX 10, 5 Details Level, 5 Textures Level, CTF-coret, 1280×1024, demo benchmark available for download
Since the testbed used a fairly average video card by modern standards, game tests were run at a lower resolution (1024x768) and medium quality settings, with the exception of Unreal Tournament 3 (1280x1024). However, when installing a more powerful card, only fps levels increase (and as the card becomes stronger, it is possible to increase the resolution), this process has little effect on the performance ratio between memory modules. All tests were carried out under Windows Vista, with the exception of Sandra (which has support for Vista only in the commercial version) and RMMA (which does not yet have support for this OS).
Synthetic tests (Everest, Sandra, RMMA)
Despite the fact that each test uses its own methods to measure throughput, the maximum read and write speeds according to Everest and RMMA differ slightly. The situation is similar with Sandra (using the example of this program, we compared the speed of reading from memory when using integer registers of the processor, and using the FPU module; practical equality is also observed here). Random access latency measured in Sandra and RMMA was higher than in Everest. However, despite the differences in absolute values, there were no differences in relative values between different test packages. In other words, you can choose a “winner” among any pair of modules, guided by the results of any of these packages. The consistency of the results was broken only by the tests of AENEON modules under Windows XP 64 bit, that is, both tests run under this OS (Sandra and RMMA) showed a low result, inconsistent with the results of all other tests. In terms of detail (variety of tests and modes), it is with regard to memory testing that RMMA leads among synthetics, which I would like to continue using in the future, but this requires support (RT driver) for Vista.
PCMark Vantage
From absolute synthetics we smoothly move on to programs that pretend to some kind of imitation of calculations in a particular class of programs. The prejudice against such programs is great, and in general it is formulated simply: “Who knows what is being tested there...” On the other hand, PCMark Vantage is still an industrially recognized test, which is not completely synthetic (unlike previous versions of this test), but imitates algorithms used in real applications. And if you look at testing from a purely utilitarian standpoint, there is probably nothing wrong with using such tests, as long as the measurements in them do not run counter to what real programs demonstrate. However, at this point the complaints against PCMark are quite justified, and at least the overall score is not suitable for comparing memory modules. A convincing victory for the weakest set of those considered is, you will agree, a too extravagant position that is unlikely to have any real justification. We look at the results in individual subtests and see that the last three subtests, which clearly responded to something other than memory characteristics, are to blame for such a strange result. It’s unlikely that anyone will be interested in the gaming subtest, given that Futuremark itself has a more authoritative package for analyzing performance in this popular category of applications. The remaining three results, in principle, can be used, but it is better to use them together, without selecting any one, since it is quite obvious that some tests respond more gratefully to an increase in frequency, while for others the maximum volume is more important. And if you look closely, there is no obvious discrepancy between the appetites of real applications from one category or another. For example, when editing photos for a home album (Memories Suite), faster memory should be more important than maximum capacity.
3DMark Vantage
This test is criticized no less, they say that in “stamps” it can be one thing, but in games it is completely different. Without in any way trying to prove that this test ideally conveys the performance picture of, for example, video cards, we will nevertheless express the seditious thought that this test does not demonstrate sharp contradictions with the average result in a more or less representative selection of games. In other words, a card that performs better in games almost always gets a higher score in this test. For such ideas, the author, of course, will immediately be pelted with hats, but those who wish can easily verify this for themselves by taking the results from any issue of 3D Speed. However, we repeat, advocating the use of this test instead of real games to evaluate video cards is indeed not entirely correct, if only because buyers are interested not only in finding out how much stronger one card is than another, but also in seeing how much stronger it is not in abstract parrots, but in usual frames per second (well, the processor rating and the very approach to testing processors in this package are even more far from reality).
Another thing: memory tests, simulating the load on which in games is, in general, not such a difficult task. Therefore, we decided to empirically check how the overall rating in this test compares with the results in real games when changing memory modules. And the result itself does not cause any rejection, just like 3DMark, the games voted for increasing the frequency, and in the same way (which was completely unexpected, but it turned out to be confirmed by other tests, with the exception of synthetics) they disliked this particular kit from Kingston.
Games
As already noted, in games the higher frequency turned out to be the most attractive factor. However, the increase in frames per second can hardly be called fundamental; it is quite obvious that the graphics subsystem for modern games is the bottleneck, and here any video card upgrade is guaranteed to bring more noticeable progress. However, this conclusion does not mean that this category of tests can be abandoned; there is still a difference, and it manifests itself even in such conditions. Well, strengthening the video card and, perhaps, raising the resolution, perhaps there is a reason to make the stand look modern. But there’s clearly no point in installing the most powerful card while setting the resolution to low, because “real” tests shouldn’t be half real (that is, it looks like real games or programs were taken, but few people will find the resolutions and settings used use in life), in such a situation they are no better than synthetics.
Archivers
There’s not even anything to comment on here; the increase in memory frequency is received with thunderous applause. And again we see a very strange, from a theoretical (and synthetic) point of view, loss of the second set of DDR2-800 to the first.
Multitasking environment
In all games, when tested with 2 GB memory kits, a noticeable drop in performance was found both by eye and in tests, while with an 8 GB kit the results actually returned to the original ones (as if nothing was running in the background of the game). Well, finally, the quad-core processor, which was missing real work, got the opportunity to show itself! However, for UT 3, not only an increase in volume, but also an increase in frequency turned out to be a good and almost equivalent compensation, so in this category of tests it cannot be said that everything is boring and there is nothing to test. Of course, the recommendation to install more memory is guaranteed to be suitable, but judging by the intentions of the manufacturers, very soon everyone interested in high performance of the memory subsystem will have to choose exclusively among different sets of large volumes.
conclusions
The main conclusion is perhaps the most banal: you need to test your memory. In any case, even in a very small and completely arbitrary selection, a couple of modules were found for which, despite the seemingly clear advantage of the second over the first when looking at the declared characteristics, the test results turned out to be not at all so clear. Even if such cases are an exception, most tests of other modern components, be it motherboards or video cards, are based on recording deviations from certain reference characteristics (observed among devices of the same class of equal price), sometimes for the better, sometimes for the worse. .
As for the selection of tests, among the synthetic ones that record throughput and latency, you can actually choose any one, since no fundamental differences in the results arose. Of course, measurement methods differ in different tests, so it is incorrect to compare results from Sandra, say, with RMMA. But if some module turned out to be faster than another according to the version of one program, then this was confirmed by the others. With the exception of one package, disagreements regarding which arose not even between different packages, but depending on the OS used. There is simply nothing to add in this case, all other tests were carried out only under Vista, and the results in them confirmed the opinion of Lavalys Everest that the performance of the AENEON kit is closer to Transcend than to Kingston. And either the results under 64-bit XP really turned out to be worse, or XP itself was not friendly in this case with the testing process (and somehow messed something up). This requires further research, although first I would like to understand whether 64-bit XP itself is still interesting to anyone as a basis for memory testing.
Of the remaining tests, no doubts arise regarding archivers (here changing memory can be quite comparable in effect to changing processors). Frankly speaking, it is quite acceptable to entrust the presentation of games to 3DMark Vantage; in any case, the “opinion” of this package turned out to be really close to the arrangement of modules that was demonstrated by the games themselves. Here you just need to take into account that the difference is really small and when comparing modules from different manufacturers with the same formal parameters, even such a sensitive device as 3DMark can show equality. Well, in this case, no differences will be found in the games. Some tests from PCMark, which claim to illustrate the situation in programs belonging to one or another category of socially important software, also do not contradict the results of all other tests, that is, they respond in a predictable way to changing modules. However, there are also subtests that clearly measure “something wrong,” and it’s probably not worth focusing on the overall score.
Finally, multitasking testing highlighted the importance of plenty of memory if you really want to get the most out of a powerful multi-core processor. Accordingly, it would be appropriate to study the differences in this mode only for large-volume sets (probably 4 gigabytes or more). There is no doubt about the prospects of such tests (if now a quad-core can be purchased for $150, and a triple-core even for $100, the share of such processors will inevitably grow, and users will quite naturally want to know what they can do from what was previously better and don't try). Well, how to simulate a multitasking environment (perhaps antiviruses, firewalls, encoders, or something else to run in the background) remains a question open for discussion.
The material was prepared with the assistance of the RTxLab.org testing laboratory. We thank NEO Group for the memory modules provided for testing
Test results
- To access the scan results: use the keyboard shortcut WIN + R (or right-click on the “Start” button → Run) → eventvwr.exe → OK;
- On the left, select: “Windows Logs” → right-click on “System” → Find;
- Enter MemoryDiagnostics-Results → Find Next;
- Close the search window → you will see the results of checking your memory for errors.
That's all. If the test reveals one or more errors, try running the memory test again in the “Wide” mode. If errors(es) appear even after repeated testing, then with a high degree of probability the faulty RAM module will have to be replaced.
How to view the RAM test report
To find out the results - whether there are any failures, whether the memory is operational, you should enter “Event Viewer” in the Windows search (regardless of the version):
Launch the classic application (if you are doing this for the first time, it may take a couple of minutes). On the left, go to the “Windows Logs” folder, then click on the “System” sub-element. A list will be loaded on the right, in which we find items with the name of the source – “Memory Diagnostics – Results”, click one by one and below (on the “General” tab) you will see a text message report: