Good evening, my delightful blog readers. Fedor Lykov is in touch. Today I will tell you how to draw in Word. I decided not to go to bed early today, but to write you, my friends, an article. I went through various topics of articles and finally chose. I think it will be exciting for both me and you.
Perhaps someone will think that they are well informed in this profile and there will be nothing for them to read here. Don’t rush, my friend, to close this article, maybe you’ll find something interesting and useful.
By the way, today I already wrote an article for you. I recommend reading it for general development, it won’t do any harm.
Before we start our topic, I want to tell you that there are two ways to draw in Word:
- This is done manually, similar to Paint (don’t worry, it will be easier)
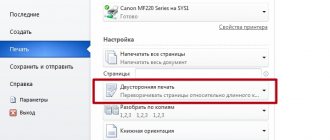
- This is drawing using templates (in other words, we will use shape templates)
Let's begin our exciting journey through the colorful Word.
Learning to turn on the “Drawing” tab
Many people don’t even realize that you can draw in this wonderful editor. Because the default tools tab does not want to be displayed until you find it and turn it on. That's how she is, with character. That is, to get to the point you need to display this tab.
This option is suitable for newer versions of Office, such as 2013 and above.
Let me show you where she's hiding:
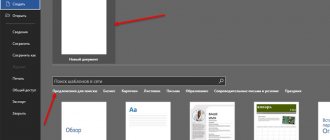
- Let's launch the editor.
- Then click “File”, and then “Options”.
- A window will open in front of us where we select “Customize Ribbon”.
- Now find “Main Tabs” and check the “Drawing” box.
- And finally, don’t forget to click “Ok” so that the changes we made are not made in vain.
As soon as we close the options, a new “Drawing” tab will immediately appear in the Quick Access Editor panel.
How to make a drawing in Word
The Compass-3D program is a computer-aided design (CAD) system that provides ample opportunities for creating and processing design and design documentation. This product was created by domestic developers, which is why it is especially popular in the CIS countries.
Compass 3D - drawing program
No less popular, and all over the world, is the Word text editor created by Microsoft. In this short article we will look at a topic that concerns both programs. How to insert a fragment from Compass into Word? This question is asked by many users who often work in both programs, and in this article we will answer it.
Lesson: How to insert a Word table into a presentation
Looking ahead, let's say that you can insert not only fragments into Word, but also drawings, models, and parts created in the Compass-3D system. You can do all this in three different ways, we will talk about each of them below, moving from simple to complex.
Lesson: How to use Compass-3D
Inserting an object without the possibility of further editing
The simplest method of inserting an object is to take a screenshot of it and then add it to Word as a regular image (drawing), unsuitable for editing, like an object from Compass.
1. Take a screenshot of the window with the object in Compass-3D. To do this, do one of the following:
- press the “PrintScreen” on your keyboard, open some graphics editor (for example, Paint ) and paste the image from the clipboard into it ( CTRL+V ). Save the file in a format convenient for you;
- use a program to create screenshots (for example, “Screenshots on Yandex Disk” ). If you do not have such a program installed on your computer, our article will help you choose the right one.
Programs for taking screenshots
2. Open Word, click in the place where you want to paste the object from the Compass as a saved screenshot.
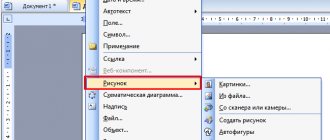
3. In the “Insert” , click the “Pictures” and select the image you saved using the Explorer window.
Lesson: How to insert a picture in Word
If necessary, you can edit the inserted image. You can read about how to do this in the article provided at the link above.
Inserting an object as a picture
Compass-3D allows you to save fragments created in it as graphic files. Actually, it is precisely this opportunity that can be used to insert an object into a text editor.
1. Go to the File , select Save As , and then select the appropriate file type (JPEG, BMP, PNG).
2. Open Word, click in the place where you want to add an object, and insert the image in exactly the same way as described in the previous paragraph.
Note: This method also excludes the possibility of editing the inserted object. That is, you will be able to change it like any drawing in Word, but you will not be able to edit it like a fragment or drawing in Compass.
Editable insert
And yet, there is a method by which you can insert a fragment or drawing from Compass-3D into Word in the same form as it is in the CAD program. The object will be available for editing directly in a text editor; more precisely, it will open in a separate Compass window.
1. Save the object in the standard Compass-3D format.
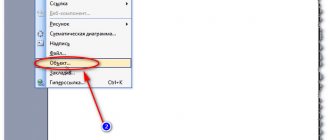
2. Go to Word, click in the desired place on the page and switch to the “Insert” .
3. Click on the “Object” located on the Quick Access Toolbar. Select Create from File and click Browse .
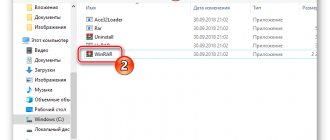
4. Go to the folder in which the fragment created in Compass is located and select it. Click OK .
Compass-3D will be opened in the Word environment, so if necessary, you can edit the inserted fragment, drawing or part without leaving the text editor.
Lesson: How to draw in Compass-3D
That's all, now you know how to insert a fragment or any other object from the Compass into Word. I wish you productive work and effective learning.
Open the drawing panel
And this method is perfect for older and more experienced versions of Office, such as 2003, 2007 and, of course, 2010.
We need:
- Take it, go to the “Insert” section, then find the mini triangle under “Shapes” and click on it.
- A small menu will open, where at the very end we select “New Canvas”.
- This will give us a new tab called “Format”.
There is also the opportunity to open the drawing panel; to do this, take and insert a picture into the text and click on it with the mouse. Now we know how to draw in Word through the panel.
Drawing with pencil and marker
For people who use older versions. Open the “Insert” section, then “Shapes”. Now select “Drawn Curve”.
We will use this line as a pencil.
Here we simply draw everything, for example a circle or a square. Next, you can fill them with color; to do this, select the color you like in the “Shape Styles”. One click will change the color. And beauty comes.
For those who like to draw in Word 2016. The marker there will be “Feathers”, which live in the “Drawing” section. They create a drawing, just like with a pencil. We need to hold the marker with the computer mouse while we create. Now our image is ready.
Drawing with shapes
So, in this program you can draw not only with a pencil or marker, but also with shapes. We are required to go to the “Insert” section and select “Shapes”.
Now we select any figure we like and place it in the right place in the editor. After the figure is ready, double-click on it, thereby activating the figure control panel.
You can do the following with the figure:
- Changing the style of the figure.
- Change the size, volume and rotation of the picture.
- Also do the filling, as well as various contours.
Option 4: Create a chart
On the same “Insert” - “Illustrations” tab there is a “Diagram” function, by clicking on which you can select the desired type of chart. A table will open in which you need to enter the initial data for its construction.
You can change the chart type at any time.
The following types are available:
- Bar Chart: A bar chart in 2D, 3D, or category views.
- Bar: Inverted histogram.
- Graph: lines constructed from points with and without highlighting these points.
- Circular: used to display specific gravity - also in 2D, 3D views. Sometimes moving unplaced data to a second diagram is used.
- Spot: displays points; it is possible to use smoothing lines for them.
- With areas: displays changes in processes over time.
- Donut: Similar to Circle, but can display multiple rows of data.
- Petal: used, for example, when displaying points assigned during a tasting evaluation of products.
- Surface: Used to show changes in values along 2 dimensions. There is also a contour diagram - a top view of the surface.
- Bubble: Displays rows of three values on a plane.
- Exchange: Displays sets of 3 values (highest, lowest and closing rates).
- Cylindrical, conical, pyramidal: histogram in the form of corresponding figures.
It is possible to change the display of rows by columns or rows. Each axis and title of the chart can be specified manually. You can also change the scale and background of the chart area.
Using Effects
You can also use a variety of effects when drawing in this test editor. After we complete our image, click on it and open “Shadow Effects”.
Here we select the shadow for our drawing.
If you need a fill, you need to click on “Shape Fill”. This will set the color that suits you.
You can also change the color of the shape's outline. You will need to click on “Shape Outline”, and then select any color.
We can also set the volume of the picture; this function is responsible for the effects. Click on “Volume”, then on any effect. Now the drawing will have the shape you choose.
Let's look at grouping, ungrouping, and rotating pictures.
Now the time has come, we have combined the pictures in the editor, but they need to be grouped so that in the end there is a single object. We will need:
- Select the picture with the left mouse button, and with the right mouse button select “Group” from the menu.
- Next, select the picture and click “Copy”. Then we transfer it to another place in the program. This is done to separate the object. This is how similar objects are formed.
- To ungroup, you need to right-click on the objects and select “Ungroup” from the menu.
- What about the turn? For it, select the drawing, as we already know, and click on the “Rotate” function. Ready. Now select from the list provided, for example, “Rotate right 90 degrees,” or any other.
Option 5: Additional features of the “Illustrations” tab
You can insert a picture from a file saved on a computer, flash drive, or other storage device into the document being created. Click on the “Drawing” icon to open a regular dialog box in which you select the location of the file and the file itself. Using the “Picture” tab, you can insert clips that are available in MS Office.
Through the same block, a screenshot is taken using the “Snapshot” button. You can insert a picture of any program that is not minimized in the taskbar.