When you delete photos from your iPhone, they move to the Trash for 40 days. During this period, the user can restore the photo. But how to do this and where is the “Trash” with deleted photos located in the iPhone? We will talk about this simple but important topic in this article.
Modern cloud services for storing and deleting files
Cloud services work according to the same algorithm - files are uploaded to them, where the content is then synchronized. If the user mistakenly deletes a file, he always has the opportunity to restore it.
Emptying the recycle bin is done manually, so until the user does this, all files will be stored. The storage period is not limited; the volume also depends on the user’s capabilities. Therefore, you can connect to a cloud service and not worry about free space on your own device.
The most popular services include:
- Microsoft OneDrive – does not delete files;
- Google Drive – you can empty the entire recycle bin at once;
- Dropbox - no recycle bin, files become hidden.
The choice in favor of one or another cloud service is made by the device owner himself. There is a fee to use the service; before you start, you should evaluate the advantages and benefits of the offer.
Cloud services are a simple and reliable way to delete content from the gadget’s memory
Is There a Recycle Bin on iPhone to Save You from Data Loss
Part 2: How to Recover Deleted Files on iPhone?
3 Ways to Recover Data from iPhone SE/6S Plus/6s/6 Plus/6/5S/5C/5/4S/4/3GS!
Steps on how to use dr.fone to recover deleted data on your iPhone
Dr. Fone offers three different methods to recover lost data from your device. Let's look at each of the three individually.
1.Recover from iPhone directly
2.Recover from iTunes backup file
3.Recover from iCloud backup file
Cart in "Gallery"
Most often, when it comes to accidentally deleting files, it refers to videos and photos, which take up the most space. Viewing this kind of information on Android occurs through the “Gallery” application. This is where the trash can is located, to access which you will need:
- Launch "Gallery".
- Go to the “Albums” tab.
- Open the “Recently Deleted” or “Trash” directory (the name depends on the firmware version).
It is worth understanding that on the Apple iPhone 13, recently deleted files are stored in the trash for a limited amount of time. As a rule, the recovery period ranges from 15-60 days, so there is no need to delay the return of data.
How to recover photos via iTunes
Apple devices sync not only with the cloud, but also with iTunes. Yes, many people neglect this method of saving backups, because it requires connecting the smartphone via cable to the computer. However, this is one of the most reliable and also the only free way to return deleted photos to iPhone. So don't neglect it.
Let's assume you've already synced photos with iTunes . Here's what you need to do:
- Connect your iPhone to your computer and launch iTunes (or Finder);
- Go to the “Photos” section and mark the photo for recovery;
I hate restoring photos via iTunes more than anything else in the world.
- Go to the main section and start data synchronization;
- Wait for the synchronization to complete – the photos will appear on the iPhone.
By the way, if for some reason you don't like iTunes or Finder (on newer versions of macOS), you can use Tenorshare UltData to restore your backup. Just open the “Restore from Backup” tab, give the utility permission to read backups and use it to restore the one you need.
Recycle bin in Apple iPhone 13 for other files
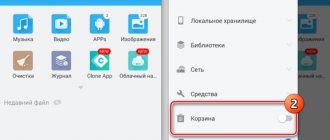
It’s also worth talking about where to find the recycle bin in which documents, apk and other types of files not related to the “Gallery” are placed. Finding them is not easy, but it is still possible. It all depends on the firmware version and whether it involves temporary storage of deleted information:
- Launch Explorer.
- Go to the "Browse" tab.
- Open the Recently Deleted section.
It is possible that your phone is deprived of the ability to temporarily store data in the trash. Then it will not be possible to restore the information.
Where is the trash can with deleted files on the iPhone - kak.manesu.com
If you have more space in iCloud than you need, you can downgrade your storage plan.
The content of the article:
What happens when you decrease your storage plan
When you downgrade your iCloud storage plan, the storage decrease takes effect after your current monthly or annual subscription ends.*
If you downgrade or cancel your plan and your stored iCloud content exceeds your available storage, some of your data will not be uploaded into iCloud. Learn how to manage your storage by deleting information that you don't need anymore.
If you downgrade to the free iCloud Storage plan, you'll have 5GB of storage.
Downgrade your iCloud storage from any device
You can decrease your iCloud storage plan from your iPhone, iPad, iPod touch, Mac, or PC. Just follow these quick steps.
On your iPhone, iPad, or iPod touch
- Go to Settings > > iCloud > Manage Storage or iCloud Storage.
- Tap Change Storage Plan.
- Tap Downgrade Options and enter your Apple ID password.
- Choose a different plan.
- Tap Done.
On your Mac
- Choose Apple menu > System Preferences, then click Apple ID. If you're using macOS Mojave or earlier, you don't need to click Apple ID.
- Click iCloud.
- Click Manage in the lower-right corner.
- Click Change Storage Plan in the upper-right corner.
- Click Downgrade Options.
- Enter your Apple ID password, then click Manage.
- Choose a different plan.
- Click Done.
On your Windows PC
- Open iCloud for Windows.
- Click Storage.
- Click Change Storage Plan.
- Click Downgrade Options.
- Enter your Apple ID password, then click Manage.
- Choose a different plan.
- Click Done.
Learn more
* Contact Apple within 14 days of an upgrade for a refund. Partial refunds are available where required by law.
Information about products not manufactured by Apple, or independent websites not controlled or tested by Apple, is provided without recommendation or endorsement. Apple assumes no responsibility with regard to the selection, performance, or use of third-party websites or products. Apple makes no representations regarding third-party website accuracy or reliability. Risks are inherent in the use of the Internet. Contact the vendor for additional information. Other company and product names may be trademarks of their respective owners.
Published Date: October 09, 2019
Source: support.apple.com
How to delete a file from iCloud?
If the need arises, you can delete a file from iCloud Drive as follows: Settings → iCloud → Storage → Storage → Other documents. At this address in the settings you can see the entire tree of files on the disk and you can delete files.
Interesting materials:
How to divide two negative numbers? How to prepare garlic for autumn planting? How to prepare garlic for sowing? How to prepare a response to a statement of claim? How to prepare dill seeds for sowing? How to prepare virgin soil for potatoes? How to prepare for a retelling? How to connect a new remote control to the TV? How to connect to a Premier subscription? How to cheer up your pen pal?
Part 4, How to Permanently Empty Trash on iPhone/iPad/iPod
The above operations will simply delete the files from the Trash, but the data still exists somewhere on your iPhone. If you want to completely empty the Trash on your iPhone, you'd better take the help of a professional phone data erase tool. Apeaksoft iPhone Eraser is one of the best options for you. It offers a 100% promise to safely delete all your data (contacts, SMS, photos, videos, account information, browser history, music, games, downloads, etc.) from iOS devices (iPhone X/8/7/6 / 5 / 4 , iPad or iPod) without the possibility of recovery.
Free Download Free Download
Features of iPhone eraser:
- 1. It can help you erase iPhone content and settings permanently and thoroughly.
- 2. Three levels of erasing are available, you can erase all data from iOS devices safely and clearly.
- 3. iPhone Eraser allows you to connect more than one iOS device and erase all content and settings from multiple devices at the same time to save your time.
- 4. Support various iOS devices (iPhone 4~iPhone X; iPad/iPod).
How to use Aiseesoft FoneEraser
Step 1. Download and launch iPhone Eraser.
Before you start, please note that this software will delete all content on your iOS device at once without giving you a selective option, so you need to backup some important data if you are not going to delete it permanently.
Step 2. Connect your iOS device to iPhone Eraser and wait a few seconds for the program to detect your device. You can connect multiple iOS devices to the software at the same time.
Step 3. Select erase level.
As we mentioned in the features above, there are three erasing levels available: low, medium and high.
Three erasing levels:
• Low: Quickly erase data and rewrite the device once, saving time for large numbers of data files.
• Medium: Completely erase all data and overwrite the device twice without leaving a trace. No one will know that the data on your device has been deleted.
• High level: Completely destroy the data by overwriting the data three times, which is the safest and most radical way to start the device in a clean state.
Step 4. Start erasing your iOS data and settings
After selecting the erase level, you can click the Start button to erase all data and settings on your iPhone/iPad/iPod. You will now completely and permanently delete all data and settings on your iOS devices. Here you may also want to delete bookmarks on iPhone and iPad.
Want to get rid of junk on iPhone/iPad/iPod, there is no good tool for iOS users to achieve the goal with just one click. Because in the Photos, Mail and Notes app there is only a visible trash folder. So you have to empty the Trash manually. There is still a lot of invisible junk in your iOS devices that is difficult to remove.
If you want to permanently delete all data and settings on your iPhone/iPad/iPod before selling it to avoid privacy exposure, there is a powerful and professional iPhone eraser that can do you the favor. You can easily and permanently delete all contents from your iOS devices with this iOS data eraser without worrying about whether the deleted data can be recovered. You can select the erasing level according to your requirements. Download the trial version to experience its powerful erasing ability now!
Free Download Free Download
Where are recently deleted photos on Samsung?
Open the Gallery app, tap the three bars, select Trash. Select the photos
, click "Restore".
Interesting materials:
How to make a GIF from a video in Telegram? How to make a hyperlink to a file? How to make a hyperlink to a link? How to make a hyperlink in Google Drive? How to make a voice from a voiceover? How to make a voice like a bot? How to make a voice like Google Translator? How to make your voice beautiful and gentle? How to make a voice in Google Translator? How to make your voice clear and clear?
Which Android apps use the recycle bin?
It’s possible to live without a shopping cart, but it’s difficult, so developers offer applications that are a good alternative to the standard shopping cart. Installation of each application can be paid or free. Paid ones aren't always better, but free ones have more ads.
ES Explorer for Android
The application is suitable for devices that do not support file managers. Explorer removes one or more web applications and creates a backup copy. To delete files, click on the button at the top of the page, then select the files you want to delete, hold them down and click the uninstall button.
Dumpster for Android instead of the recycle bin
The application works as a temporary storage folder for any files. By installing the application, the user receives a full-fledged recycle bin where you can view all deleted files. To clean Dumpster in a timely manner, go to the software settings and enable the necessary function.
While the delete option is not activated, the user can view the moved files and restore them
. Manual removal is started with the Empty key, the software works without a network.
The application will be a good replacement for the standard shopping cart
Recycle master - an alternative to the trash can on your smartphone
A unique application that, in addition to all standard options, can enable blocking. If you set a password, you can restrict access to remote objects. The auto-cleaning option is also enabled manually; cleaning is available after 7-30-90 days. While cleanup is disabled, you can store files in the Recycle master that you don't need to see for a large number of people.
If necessary, files from the “recycle bin” in the form of Recycle master are restored to their original location. If the files are not restored by the first click, a deep recovery is launched
.
How to recover photos from iCloud
Once you enable iCloud synchronization of photos , they will be saved to the cloud, and you can delete them from your device without the risk of permanent loss. Just when you need them, you can quickly and easily restore photos on your iPhone from iCloud by downloading them to your device again.
To recover photos from iCloud , we also need the Tenorshare UltData utility:
- Launch the Tenorshare UltData utility on your computer;
- Connect your iPhone to your computer via a Lightning cable;
Recovering data from iCloud via UltData is much more convenient than directly
- In the utility interface, click “Recovery from iCloud”;
After the download is complete, all photos will appear in this window.
- Log in to your Apple ID account and select the photos you want;
- Check them and click "Restore".
How to empty the trash on iPhone?
If we began to describe all the actions with “Kozina”, we should also note such an opportunity as cleansing. This is especially necessary when you don't have enough space on your iPhone and you regularly make sure there are no unnecessary files and photos. To empty the trash on your iPhone, do this:
- open the “Trash” in your iPhone, as shown above in our instructions
- click on the top button “ Select ”
- On the bottom left you will see the “ Delete all ” button - click on it
- A pop-up window will appear with confirmation and the total number of photos to be deleted - click “Delete”
When you confirm, after a second you will see an empty cart. We recommend that you be careful and review all the photos that you are going to delete. After this confirmation, you will no longer be able to recover those photos.
This concludes our article.
If you are exploring the capabilities of your iPhone or are interested in advice, go to our main section dedicated to this topic. We regularly update our collection of useful instructions for iOS. Follow the news in our Telegram channel
How to recover deleted photos?
If you deleted a photo and want to restore it from the trash, it’s not difficult. For this:
- open the recently deleted section as described above
- click on the “ Select ” button and mark those deleted photos that you want to return back to the gallery
- At the bottom you will see a button “Restore" - click on it
- To confirm the action, click again on “ Recover Photo ”
After completing the steps, the selected photos will move to the main gallery of your iPhone and to the place where they were before deletion.