For cases where we are faced with incorrect update in the application , you will face headaches. But you don't have to live with it as you can go back to the correct version where your mobile phone and this app are working properly. A way to bend the rules and live with what we need without always demanding the latest because it's not always the best.
Contents [show]
- Downgrade applications on Android Kill the application
- Find a replacement
- Don't support updates
Downgrade apps on Android
This is a process that we will have to go through in order for the applications to work properly. Something that used to be much easier to do, but a few years ago Android we lost the ability to remove updates from the apps themselves . This attempted to stop a process that should not always be positive as it caused other errors in the system due to incompatibility.
To prevent this from happening to you, we will give you the keys that will help you find exactly the version that works and with which your mobile phone should work normally again.
Kill application
The first thing we must do to discard the falsehood that this application gives us is to put an end to it. As long as it is on our mobile phone, we will not be able to revert our object to the previous version. But to do this we must first look at the version it contains. The process we are going to follow is as follows:
- Go to Mobile Settings.
- We enter Applications.
- We choose the application that gives us problems.
- We go down to the end, where we will see the version.
We should write down this number or take a screenshot to remember the current version in which we have errors. After this, we can go up to clear the cache and accumulated data, as recommended at the beginning in the storage. Then we can remove the application from the system.
Find a replacement
The next step will be one that will give us the opportunity to return to the version of the application in which it worked correctly . To do this, we must start by searching for the most recommended Android application websites for the version we need. Among the ones we can trust the most are Apk Pure, MalaVida or APKMirror. We can use any of them as they work similarly.
Once we gain access, we must enter the special section for the application we are looking for. In case the bug appears in a less popular application, it is possible that there are not many versions available, but usually we find a large variety. On the page of the application itself we will have access to all ordered versions.
We have to look for the one we have installed on the mobile phone and it gives us so much trouble to take the previous one instead of the one. Internally we will have one or more versions corresponding to different systems of the Android architecture. Most likely your terminal is compatible with a model that contains ARM64, only older smartphones from 2016 should select ARM. If we get confused, there is no problem, we will only find that the application does not work and we will have to try an alternative option.
When we download the file and proceed to install them, for the first time we have to provide installation permissions for unknown sources, which is not dangerous because we have already verified websites that do not have any dangers.
Don't support updates
Once we manage to install it on our mobile phone, once we see that it works correctly, all we have to do is protect it. If we don't take this step, within a few hours or days Google Games will update it and the errors will appear again. That's why we have to enter the store, access the search and find the application we need. We then tap the top three items and turn off automatic updates for that particular app.
Installing the desired version
After uninstalling the application, it's time to reinstall the desired version. If only there was a vast historical repository of almost every Android APK you could possibly need or need to install easily. Oh wait, there is, and it's called APK Mirror. (And we launch it too.)
APK Mirror is quite easy to navigate.
Just go there and find the application you need. If you don't know which version you want and are rolling back to fix the problem, try to remember what day you first had the problem and look at one or two versions after that time. Also consider contacting the developer to report your issue and check later that it has been fixed - you don't want to be stuck using an old version for too long, it could be a security issue.
Some apps also have multiple versions for different architectures and DPIs, so you'll need to do a little research to determine what you need. Most modern phones will be arm64.
In Android 8.0 and later (including Android 9 and 10), installation from unknown sources is performed on a per-app basis.
Once you've found the version of the app you want, installing it is usually as simple as downloading it from APK Mirror and, well... installing it. Simply tap the download notification to begin the process.
On older versions of Android (up to Android 8.0 Oreo - consider upgrading for your own safety if your phone is that old), you'll have to manually enable a separate switch to install apps from unknown sources. This is usually found under Settings -> Security, or you can search the Settings app for “Install apps” or “Install unknown apps.”
In Android 8.0 Oreo and later, this is treated as a per-app permission. Your phone may indirectly ask if you want to change this for a given app, prompting you to enter settings and toggle the Allow from this source setting, at which point you can return to the setup screen and continue. In earlier versions of Android, such as Nougat, you will have to manually toggle the global setting that allows installation from "Unknown sources" in Settings (Settings -> Security -> check or slide the switch for Unknown sources.).
Once you enable the feature, go back and try installing the app again and it should work.
However, if the app you want is listed as "APK Bundle" on our sister site APK Mirror, you'll need the included APK Mirror app to install it, and the process will be a little more tedious. (Don't blame us, blame Google.)
What about system applications?
No matter how much we try to imitate these steps in the applications that come standard with the system, we cannot do them. Android restrictions give us the ability to disable only those applications that the system needs to function properly, but there is a way to bypass this limitation. To do this, let's go back to Google Play by repeating this process:
- We are looking for an application that we want to fix.
- Touch the Delete button.
- We confirm the installation of updates.
- Tap in the upper right corner and avoid automatic updates.
With this we will achieve our goal with any application in the system and its correct operation.
Login to recovery
“Recovery” is a special boot mode on Android, with which you can reset settings or flash the system. If you buy gadgets in trusted certified stores and with an already installed OS, then they should have the stock “recovery” mode. How to enter “recovery” depends only on your device model. The most common combination is the power button and the volume down key.
For example, if you don’t know how to return the old version of Android to Lenovo, then this combination will work for most of their devices. I would like to note that before entering “recovery”, you need to turn off the phone. If you are looking for how to return the old version of Android Sony Xperia, then you need to press three buttons: those that we have already named, and the camera button. You can easily find more detailed instructions for various models on the World Wide Web. But what to do after entering boot mode?
And on an iPhone?
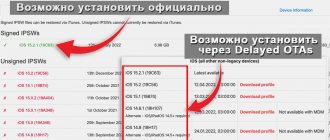
For all those iOS users, you should know that the rollback options in any iOS app are complex. Apple has limited the ability to install legacy apps for several generations, preventing us from manually fixing problems with some apps. We need to be sure that our bugs will be fixed soon by the developer in the App Store and proceed with the update as soon as possible.
How to return to the old version of Android after updating?
First, come to terms with the fact that standard system resources do not provide a system rollback option, such as in the Windows OS. Accordingly, when you return to the old version, all installed programs and personal files will be deleted. Therefore, immediately before the procedure for returning the old version, make backup copies of all important documents, files, phone numbers, and so on. Be prepared to say goodbye to user settings, saved accounts or applications, they will be erased, everything except the built-in ones.
Next, you will have to perform a factory reset yourself. How to do this depends only on your version of the operating system, but most often this item is found if you go to “Settings” and “Backup and reset”. This parameter can also be found in “Confidentiality”. In any case, finding a factory reset will be easy. Next, you will need to perform a series of actions that are a little more complicated, that is, enter recovery. And how to return the old version of Android using it - read on.
When is it time to return?
Although this method may save us from the problem we are facing, there will come a time when we will have to activate the application again in order to receive news and fixes for other problems that we may not have experienced. We will decide exactly this moment, but usually a couple of weeks is enough.
During this time we will need to check on Google Play that the bug has been fixed, which we can do by looking at the information in the application to check the version and in the latest comments to get opinions. The next thing to do is to click the update button and, if we want, enable automatic updates again.
How to disable Android update after flashing
Rolling back Android updates is not the last thing you should do. Since smartphones, as a rule, automatically update Android to the new version by default, all your actions can be canceled out by it in an instant.
That is, you will flash the firmware and return the previous version of Android, go to bed, and wake up the next day with the new version already installed.
- Let's find out how to unlock a Lenovo phone: step-by-step instructions, expert advice
To disable automatic Android updates you need to:
- Go to device settings;
- Select “About phone”;
- Go to “System Update”;
- Go to update settings by clicking on the icon with 3 vertical dots;
- And deactivate the automatic update feature.
I hope the questions discussed helped you reset your Android update back to the previous version, as well as prevent the update from happening again by blocking it.
Didn't find the answer? Then use the search form:
Last update date: 18-09-2020
Disabling updates and notifications for installed software
To prevent new versions of installed games and applications from downloading to your smartphone on their own, you need to do the following:
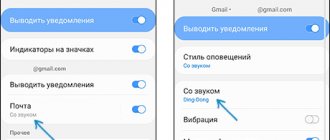
After you change the auto-update settings, new versions of programs will no longer be downloaded to your phone. However, notifications about their presence will not stop bothering you in the future. To also disable the update notification, in the Play Store, go to the “Notifications” tab and uncheck the corresponding lines.
A complete refusal to update may result in the loss of functionality of a particular application. For example, updating the Smart Hub on a Samsung TV and not updating it for the Smart Remote on the phone will make it impossible to remotely control the TV from an Android device.
In such cases, you can obtain the current version of the installed software manually:
Charge your smartphone
What is worth noting first of all is that before starting this procedure you need to charge the device well. It doesn’t matter how long it takes to roll back the system and how long the gadget will reboot after that.
If during such manipulations in the “recovery” mode the device does not have enough charge and it cannot fully complete its task, then, most likely, problems with its further use cannot be avoided.
- How to cancel a subscription on Android (Google Play)
The same applies to flashing your phone yourself. For some users, certain system functions disappeared or did not work, even the touchpad became inoperable. In some cases, the firmware did not install at all and it was simply impossible to enter the OS. But even then recovery helped again. If you cannot enter this mode or it simply does not exist, there are a number of simple utilities for flashing this mode directly through the operating system. Sometimes you may need a PC for this task.
We told you about how to return the old version of Android after updating. Treat your gadget with care and it will serve you for a long time.
Author: Amil | Publication date: 10/17/2016 | In the section: Android instructions The Android operating system is constantly being improved: device manufacturers and Google itself correct errors, combat shortcomings, optimize energy consumption, and also add new functions. It would seem that updating to a newer version of the OS is always good. However, all this is far from so rosy: you can often upgrade to an unfinished version and your smartphone or tablet will work much worse than on a stable build. That is why we decided today to talk about how to return the old version of Android after updating. Unfortunately, neither Google, as the creator of the OS, nor device manufacturers have provided such a function. There is no point in using a full reset to factory settings from the corresponding menu; all your data will simply be deleted, and the operating system version will remain the same. We think that this is clearly not what you want. So what should we do?
How to roll back updates on Android from backup
Every user of computer devices, be it a mobile phone, laptop or PC, must be aware that the software environment does not last forever, and it is necessary to regularly back up data. In the case of Android, it is better to create copies of the entire system and this should be done immediately after purchasing the device. There are many applications that create backups, the most popular being Titanium Backup.
And remember, before updating the system to the next version, you first need to wait for feedback on its operation, learn about all the nuances, pros and cons. And only then decide to update Android.
Rollback on devices from ASUS
So, it's time to talk about how to roll back Android to the previous version. On many devices this takes a very long time. But there are also exceptions. Old tablets and smartphones from ASUS require the following steps required for a rollback:
Step 1. Download the firmware you need, suitable for your model. You can find it on the official website or other resources dedicated to mobile technology.
Step 2. The downloaded file should be placed in the root directory of the device.
Step 3. Next, the device must be rebooted.
Step 4. After scanning, a triangle and an exclamation mark should appear on the panel near the clock. Click on this icon.
Step 5. Agree with the proposed procedure.
After this, the flashing procedure will begin. Interestingly, it doesn’t matter to the system which firmware version you installed. This means that in this way you can not only rollback, but also update.
Returning the old version of Android using Recovery
First, save all your data. You can use any program, but we recommend Titanium Backup. To use it, you need Root rights, as well as to restore the old version of the OS, so if you don’t have them, get them. Each device has its own unique instructions for obtaining them. Here's exactly what you should do:
- After installing Recovery, you must turn off the gadget and enable Recovery mode. Again, each brand (and sometimes model) of smartphone/tablet uses a different key combination to log in. For example, in the case of Samsung, you need to press and hold the device’s power button and “Vol +”; with Sony – Power, “Vol –” and the camera power button; from HTC – “Vol –” and Power before enabling Recovery mode;
- Confirm your agreement to completely delete all data from your smartphone and perform a rollback by selecting the appropriate sub-item;
- Wait for the rollback process to the old version of the OS to complete, and then select “reboot system now” to exit Recovery mode and let the operating system boot;
- As you can see, everything is back to normal and now you have the previous version of Android that you had when you purchased the gadget.
We agree, the process is clearly not an easy one and it is worth using it only in one single case, if the device really does not work well with the new version of the OS: it constantly freezes, essential applications do not turn on, etc. In other cases, we recommend simply getting used to the new interface and new features - this is not always a bad thing. Moreover, people adapt to everything quite quickly. So what does it cost you to cope with a smartphone or tablet?! In any case, now you know what to do if you decide to return the old version of Android after updating. If you have any difficulties, we recommend visiting the 4pda forum, where you can find out detailed information on your device.
Sooner or later there comes a time when, for some reason, you need to return to an earlier version of the firmware on your Android device. These reasons can be very different: from software failures and errors to dissatisfaction with some unofficial build of the operating system.
In any case, you need to be fully armed and know how to undo changes made to the software.