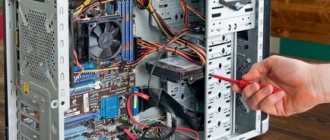
Let's imagine this situation: you stored all important documents, photographs, recordings and other files on your favorite laptop, while all the objects were located only on the hard drive - you did not “upload” them to cloud services. One day the device suddenly stopped responding to the power button. It would seem that you can give the device to the service and wait a few days, but you urgently need a document that is stored on the HDD. In such a situation, a regular desktop PC and a pair of screwdrivers will help you cope with the problem - you need to connect the hard drive from the laptop to the computer.
Drive types
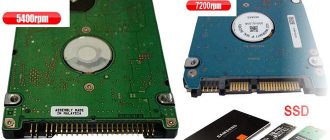
First, let's briefly look at what types of drives are found in laptops, since the connection method will directly depend on this.
SATA
The most common interface, which is equipped with two connectors - a 7-pin for data exchange and a 15-pin for connecting power. The SATA interface is universal - it is used both in motherboards for desktop PCs and in laptops.
IDE
Outdated interface that can only be seen on a 10 year old PC. Such drives are equipped with a 40-pin connector for the information exchange cable and a 4-pin port for power.
Connecting such a laptop HDD to a PC will have to be done using an adapter (if the motherboard on the PC does not support IDE).
mSata
Modern small SSDs found on the latest laptop models are produced in this format. You will have to connect to the computer via an adapter.
M.2
Another standard for solid-state drives, which is used in thin laptops to save space. SSDs of this format can contain three types of connectors - the difference between them lies in the location of the cutout:
- Type B - cutout near the left side. Connects only to the corresponding slot.
- Type M - cutout near the starboard side. Only supported by M slot.
- Type B&M – contains both cutouts. Can be connected to any of the previously listed slots.
How to place a small mobile HDD in a system unit
Another problem that often puzzles users is how to place the HDD from a laptop inside a desktop computer. Here, too, several options are allowed:
- Installation in a 2.5" basket. Many computer cases of the latest generation have SSD cages where you can insert a 2.5-inch HDD from a laptop.
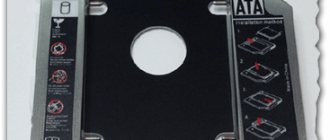
- Using a 3.5”-2.5” adapter The mobile drive is placed inside the adapter, fixed, then inserted all together into a cage for a standard 3.5” hard drive and screwed in place. There are adapters for more compact media – 1.8”.
- The location of the laptop disk at the bottom of the system unit. It is advisable to place a mouse pad or a layer of rubber underneath the HDD to reduce vibration. This method is only suitable for short-term connection; you should not work this way constantly.
And of course, before installing the mobile HDD inside the system unit, do not forget to turn off the power to the computer. When connecting via external ports (USB, eSATA), this is not necessary.
Source: https://f1comp.ru/zhelezo/kak-podklyuchit-zhestkij-disk-ot-noutbuka-k-kompyuteru-2/
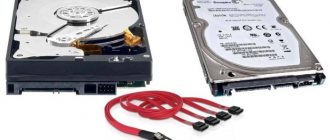
We connect a disk with a similar interface
If the laptop is equipped with a SATA hard drive, and the board of the desktop PC also supports such an interface, then you will not have any problems with the connection - you just need to prepare a special SATA cable.
One end of the SATA cable is connected to the connector on the drive, and the other to the corresponding output on the motherboard.
Expert opinion
Daria Stupnikova
WEB programming and computer systems specialist. Editor of PHP/HTML/CSS site os-helper.ru .
Ask Daria
Additionally, you need to connect power to the hard drive from the power supply - if the unit is not equipped with the required wire, you will have to purchase a Molex-SATA adapter.
To connect IDE to the corresponding port on the motherboard, you will have to buy or find a wide cable containing 40 pins, as well as a Molex power cable and a 3.5-2.5 IDE adapter.
In order for the PC to start from the laptop HDD, the device must be switched to “Slave” mode. To do this, you need to switch the jumper on the contacts. Data about its location can be found on the disk.
With M.2 and mSATA SSDs, everything is much simpler - you just need to insert them into the designated slot on the motherboard.
Connecting to MacBook
MacBook users may also encounter the need to connect an external drive to the device. In terms of output features, there are no significant differences between the equipment of Apple and other brands. The MacBook uses either the usual USB or Thunderbolt as connectors for connecting peripherals. If the memory was purchased universal, and not specifically for Apple, then a USB cable is included in the package. In this case, you can connect it using a Thunderbolt to USB adapter.
After connecting, the hard drive will appear on the desktop as a removable drive. If this does not happen, then the problem may lie in differences in the file systems. For the most part, memory for Windows is formatted in NTFS, and for MacOS - ExFAT or Mac OS Extended. The first option is universal and will allow you to work on both operating systems, the second is exclusively Apple, and Windows gadgets will not understand it.
The NTFS format is readable on a MacBook, but the functionality will be reduced - you can open and view files, but you won’t be able to save them to the device or write from it. To get a full set of features, the disk must be formatted.
- On the MacOS desktop, follow the path: “Go” - “Utility” - “Disk Utility”.
- In the left work area we find the connected memory.
- Select the drive and click on the “Erase” button.
- Click on “Partition” (disk partition) and indicate the type of file system that should be obtained after formatting. The best option is ExFAT.
- After selecting the system type, click “Apply”, this will start the formatting process, and wait for the procedure to complete.
In case of errors when working with the hard drive after formatting it, you can select “First Aid” in the Disk Utility menu. This is software for “treating” the drive. It may fix some problems, but if they occur, then this is the first sign of a media failure, and it is better to take care of the safety of the data by dumping it somewhere else.
Connecting a disk with a different interface
If the computer motherboard does not support the interface that the drive is equipped with, then you will have to purchase one of the following adapters:
- IDE-SATA – for connecting old IDE drives to a modern SATA connector.
- SATA-USB – for connecting SATA to a computer via USB. The simplest method, thanks to which you do not have to open the system unit.
- mSATA-USB or 2-USB.
- IDE-USB, etc.
The easiest connection method involves using an adapter from the device interface to USB - when using it, you only need to disassemble the laptop and remove the drive.
How to connect a hard drive from a laptop to a computer
I think those who often work on a laptop have sometimes found themselves in a similar situation: they need to copy a lot of files from the laptop’s hard drive to the hard drive of a desktop computer. How to do it?
Option 1. Simply connect your laptop and computer to the local network and transfer files. True, if the speed on your network is not high, then this method will take a lot of time (especially if you need to copy several hundred gigabytes).
Option 2. Remove the hard drive (hdd) from the laptop and then connect it to the computer. All information from the hdd can be copied very quickly (on the downside: you need to spend 5-10 minutes connecting).
Option 3. Buy a special “container” (box) into which you can insert a laptop’s hdd, and then connect this box to the USB port of any PC or other laptop.
Let's take a closer look at the last couple of options...
1) Connecting a hard drive (2.5-inch hdd) from a laptop to a computer
Well, the first thing you need to do is remove the hard drive from the laptop case (you will most likely need a screwdriver, depending on your device model).
You must first turn off the power to the laptop and then remove the battery (green arrow in the photo below). The yellow arrows in the photo mark the fastening of the cover, behind which the hard drive is located.
After removing the cover, remove the hard drive from the laptop case (see green arrow in the photo below).
Next, disconnect the computer system unit from the network and remove the side cover. Here you need to say a few words about the hdd connection interface.
IDE is an old interface for connecting a hard drive. Provides connection speed of 133 MB/s. Nowadays it is becoming less and less common, I think there is no point in considering it in this article...
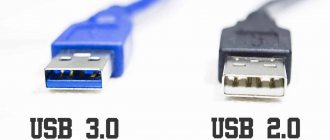
SATA I, II, III - new hdd connection interface (provides speeds of 150, 300, 600 MB/s, respectively). Key points related to SATA, from the point of view of the average user:
— there are no jumpers that were previously on the IDE (which means the hard drive cannot be “wrongly” connected);
— higher operating speed;
— full compatibility between different versions of SATA: you don’t have to worry about conflicts between different equipment, the drive will work on any PC, no matter what version of SATA it’s connected through.
So, in a modern system unit, the drive and hard drive must be connected via a SATA interface. For example, in my example, I decided to connect a laptop hard drive instead of a CD-ROM.
Actually, all that remains is to disconnect the wires from the drive and connect the laptop’s hdd to them. Then it’s trivial to turn on the computer and copy all the necessary information.
In the photo below, you can note that the disk is now displayed in “my computer” - i.e. you can work with it as with a regular local disk (sorry for the tautology).
By the way, if you want to leave the disk permanently connected to the PC, then you need to secure it. To do this, it is best to use special “sleds” that allow you to secure 2.5-inch drives (from laptops; smaller in size compared to 3.5-inch computers) in bays from regular hdds. The photo below shows similar “sleds”.
2) Box (BOX) for connecting a laptop hdd to any device with USB
For users who don’t want to “mess around” with dragging disks back and forth, or, for example, want to get a portable and convenient external disk (from a leftover old laptop disk) - there are special devices on the market - “boxes” (BOX).
What he really is? A small container, slightly larger than the hard drive itself. It usually has 1-2 USB ports for connecting to PC (or laptop) ports. The box can be opened: the hdd is inserted inside and secured there. Some models, by the way, are equipped with a power supply.
Actually, that's all, after connecting the drive to the box, it closes and then you can use it together with the box, as if it were a regular external hard drive! The photo below shows a similar box from the Orico brand. In appearance it is practically no different from an external hdd.
If you look at this box from the back, there is a lid, and behind it there is a special “pocket” into which the hard drive is inserted. Such devices are quite simple and very convenient.