Good afternoon friends. The laptop screen does not turn on, the screen is black, but the laptop works. Anyone can face this, but what to do? Let's look at the reasons, because there are quite a lot of them. If the monitor does not light up, this does not mean that the laptop has malfunctioned. Newcomers in such a situation mostly rush to the service center. But the fact is that most of these troubles with a black screen can be eliminated yourself. So, first, the user must reset the hardware settings, and then look for the causes of this problem.
Main factors that cause black screen
There are dozens of factors that cause such a screen to appear. From here, to make it more convenient, we will divide them into categories:
- The computer hardware is incorrectly configured;
- There is a problem with the battery or charger;
- The monitor cable has broken, the backlight or matrix has failed;
- The computer's RAM or the slot of this board has failed;
- The video card has failed;
- The system board has become damaged due to overheating or damage.
Of course, not every one of these faults can be corrected by the user himself. For some problems only a master is competent. Therefore, let's look at which of these problems a person can fix on his own. One of the most common problems is the failure of the video card. To find out if the screen is working, the fastest way is to connect a second external screen. Is it not working for you either? In this case, the fault lies with the video card.
You cannot change various parts in a laptop yourself without having the necessary knowledge. In this case, you need to contact a professional. Of course, you can start repairing your laptop yourself. But, things can go so far that you cause more damage to your computer than it was before your repair. The only way out in such a case is to buy a new monitor.
Procedure for detaching and reinstalling strips
You need to do the following:
- Remove the adapter plug from the power socket, thereby ensuring complete isolation of the device from the power supply;
- Next, following the instructions described above, remove the battery from the laptop;
- Armed with a suitable screwdriver, unscrew the screws holding the cover of the unit where the RAM is located closed;
- During the unscrewing process, you must carefully remember the original location of each screw, since they have different lengths, otherwise difficulties may arise later during assembly (or simply capture the entire procedure on video, which you can watch if controversial issues arise). That is why specialists always use a table with a large area when dismantling, where they can easily place all the removed screws in the order in which they will then have to be screwed back into place;
- The bar is secured with special clamps on different sides, therefore, without making significant efforts, they must be bent;
- Disconnect the bar;
- Clean the RAM slots and contacts;
- If there are additional slots, then insert the strip into another slot. During installation, the click of the latches is usually clearly audible;
- Reassemble the laptop, carefully tightening all the screws;
- Insert the battery into its original place;
- Connect via adapter to power supply;
- Will try to start Windows on the laptop again.
If there is no positive result after all the measures taken, if instead of starting the system the user sees only a black screen, then a modern modification of the software from the manufacturer’s resource can help.
Let's analyze the functioning of the monitor
If you have a reason to think that the monitor is not working due to mechanical problems, in this case you need to find out how the video card and motherboard function.
So, let's connect a second display to the laptop using the HDMI input (VGA is possible). Turn on the computer. If after turning on the second first screen works, then the monitor cable or the backlight on the monitor is faulty.
Important: you can start your computer when you have already connected an external screen. To freely switch from monitor to monitor, you need to use the Fn and F8 buttons. Relevant for ASUS and other brands.
Next, we will carry out all operations to remove failures and errors in settings and various programs with a faulty display, using a second monitor (you need to borrow it from friends), connecting the monitor via the VGA/HDMI input.
FAQ
After entering the bios password, there is no Windows 7 boot icon, the monitor turned off (went into power-saving mode), the f8 key does not work.
- Try resetting the BIOS by removing the battery from the motherboard.
- The energy saving mode will not work immediately after starting the computer; rather, the problem is related to one of the components. Check the connection between the video card and the motherboard, the video card and the monitor, etc.
- If everything is fine with the BIOS and Windows 7 does not boot, reinstall the OS. Apparently, this is the easiest method to get rid of the black screen.
After changing to Windows 7 from 32bit to 64bit, a black screen began to appear. When connected to a TV, everything works.
The 64-bit version may not have drivers installed for your monitor or video card. Check on the manufacturer's website whether the monitor supports this OS. There is a suspicion that your specific VGA monitor is not supported by this edition of Windows. Try booting Windows in Safe Mode or with the “Enable low resolution video mode (640 × 480)” option.
I use VirtualBox with Linux. I turned off the virtual machine, after loading - a black screen with an underscore on the left.
If you save the state (Suspend) on the virtual machine, in principle, no problems should arise. If you turn off the virtual machine, then Linux tries to boot when you turn it on. Why a black screen with an underline appears after rebooting Linux is a separate question. Check the key settings of the virtual machine. If the error persists, try installing Linux on Vmware Player.
When I turned on the computer, nothing appeared. The camera is working and the computer is turned on. What is the problem - RAM or hard drive?
To diagnose the problem, it is advisable to recall previous events. Did your computer show any symptoms of failure (hard drive noise), did you delete system files on the drive, etc. This will help narrow down the list of possible causes. Next, watch at what stage the black screen appears. If the hardware initialization is successful, then the problem is in the operating system - that is, Windows does not start. In this case, we recommend reinstalling the OS from a bootable USB flash drive or disk.
I changed the video card. I start the PC - the BIOS is there, and after that it’s just a dark screen. Is it because of the drivers?
Maybe. Go to Windows Safe Mode, remove old drivers and install new ones. Then restart your PC. If that doesn't help, read the entire article.
Let's start troubleshooting
So, before we proceed with the laptop, it is advisable to reset the device’s hardware settings. With a high percentage of probability, this will help you remove the black screen:
- Turn off the minicomputer and unplug the cord from the outlet;
- Then, remove the battery from the device;
- Press the power button for 25 seconds;
- Next, you need to reinsert the battery into the computer;
- Connect the charger;
- Then, turn the laptop back on.
After you have reset your hardware, if your PC starts to boot, it will ask you what type of OS to boot into. Select “Windows normal startup”.
Also, this screen may appear due to problems with the BIOS. The BIOS is also easy to reset. So, you updated its drivers and reset its settings, but they did not help you. In this case, you need to disassemble the laptop.
Contact problems
The scratch disk in some laptop models is not firmly attached to the sled. A situation where the fan makes noise when turned on, and the desktop screen is black, may mean that the hard drive contacts have failed. It can also be accessed by removing the cover on the bottom of the laptop.
Before any work, the laptop is disconnected from the network and the battery is removed from it. After removing the cover, the hard drive is removed and inserted more tightly. If it is in the slide, you need to check the tightness of their fastening; if necessary, the disk is adjusted for better contact with the connector.
We solve problems related to BIOS
If we reset the settings in the BIOS, then this action can help you if before this reset was performed, the user performed certain actions in the BIOS.
So, to reset we use the keyboard:
- Immediately after the laptop boots up, you need to press the DEL button;
- We will reset the settings using the F9 key;
- Save the configuration using the F10 button;
- All we have to do is restart our PC.
If you did not have time to click on one of the indicated buttons and carry out these actions as quickly as possible, the BIOS settings may not change. And because of this, the computer screen will remain black. In home cases, remove the CMOS (small battery on the motherboard), which stores the BIOS settings, including when the PC is turned off.
How to remove possible problems with the operational board?
I have already written in my articles, and I will repeat today, that the computer needs to be cleaned of dust. But, if such cleaning was carried out incorrectly, then it is quite possible that your laptop will turn on, but the screen will not function.
Also, this action may occur if you installed the RAM board incorrectly. Failures are possible both with the RAM and with the functioning of other loops. In any case, you will need to disassemble the laptop and find out how exactly you connected everything.
An error in the operation of the operational board could occur if you accidentally spilled water on your keyboard or the air humidity in your room simply increased. To solve this problem with RAM boards, we will perform the following operations:
- You need to turn off the charger and battery;
- Remove the laptop cover where the RAM board is located;
- If your microcomputer does not have such a compartment, it is advisable to completely disassemble the device;
- Next, you need to carefully bend the board mount;
- We take out the operational board itself, if there are several of them, we take out everything;
- We blow all elements with compressed air. The main thing is that it is dry and clean;
- Have you noticed traces of oxidation on the board elements? Don't forget to clean them;
- Next, all the strips need to be installed back into the PC and secured with special clamps until you hear clicks.
Having completed these operations, we collect all the elements back. Don't forget to screw the untwisted parts back. If the operation of removing the strips could not help you, it is quite possible that other parts will fail. Quite often, the cables break, there may be a small short circuit, or the backlights simply break - in this case, you need to contact a specialist.
what happens if you press f10 and enter
In the Software section, to the question I’m trying to install xp on the laptop in the BIOS, set to boot from the drive, press f10-enter, it reboots, a black screen and writing asked by the author Roland Garros, the best answer is the Bootloader is damaged! How to restore Windows with this error: 1. Disassemble the system unit, check the cable to the hard drive, you can change the cables (if there are 2 of them) between the drive and the screw. Reboot and try. 2. Insert the disk with Windows XP into the drive, and do not forget to set the BIOS to boot from CD-ROM. After booting from the disk, press the R key to open the recovery console. If your computer has only one OS installed, the following information will appear: 1: C:WINDOWS Which copy of Windows should you sign in to? Type 1, press Enter. A message will appear: Enter the administrator password: If the administrator does not have a password, then simply press Enter. Next, enter the command fixmbr and press the Enter button. The following message appears: **WARNING** There is a non-standard or invalid master boot record on this computer. Using FIXMBR may damage your existing partition table. This will result in loss of access to all partitions of the current hard drive. If there are no disk access problems, it is recommended that you abort the FIXMBR command. Are you confirming the new MBR entry? Enter the letter Y (yes, yes) and press Enter. — A message appears: A new master boot record is being created on the physical disk DeviceHarddisk0Partition0. The new master boot record has been successfully created. Then the system prompt will appear: C: WINDOWS> Type fixboot and press Enter. After this, the message will appear: Destination partition: C:. Do you want to write a new boot sector to the C: partition? Enter the letter Y (yes, yes) and press Enter. A message will appear: File system on boot partition: NTFS (or FAT32). The FIXBOOT command writes a new boot sector. The new boot sector was successfully written. The system prompt C:WINDOWS> All operations have been completed, now exit the recovery console. Now exit the recovery console, enter the exit command and press Enter. After this, the computer will restart. If the error continues to appear, then go to step 3. 3. You need to write the Ntldr and NTDETECT files to the root of drive C. You can download them here, unzip them and write them to a flash drive. Next, you will need a boot disk such as Windows LiveCD, Linux LiveCD, Hirens boot, Reanimator xP or others that allow you to boot without Windows and access the file system. You can download Linux LiveCD from the Dr. Web website (there is also a built-in antivirus there) - a very necessary thing, and then using the built-in file manager Midnight Commander, move the specified files to the root of drive C. - The only peculiarity of Midnight Commander is that the Windows file system it shows in the "win" directory. Download LiveCD. We used the same disk to restore Windows without losing data. Sometimes the computer starts to start, the NTLDR is missing error no longer exists, but it starts complaining about the boot.ini file located in the same root of drive C, then the archive you downloaded also contains this file and it must also be replaced.
The more complex the equipment, the greater the likelihood of failures in its operation. This type of device also includes laptops.
More than half of laptop owners are faced with unexpected problems regarding the loss of functionality of this complex device, for example, displaying a black screen when the mobile computer is loaded again.
Failures occur for many reasons, which are often caused not only by factory defects, but also by careless handling of the laptop.
Of course, the easiest way to solve the problem is through specialized service centers, but often the causes of problems lie on the surface and can be completely eliminated on their own.
You need to install a working BIOS version
If your second screen functions perfectly, but your computer screen refuses to work, also disabling the settings and returning to the factory BIOS settings could not help, in this case it is advisable to reflash the BIOS.
There are different options for updating the BIOS:
- Using the "MS-DOS" option;
- Using OS;
- Without entering DOS and starting the computer.
The easiest way to update the BIOS is to use third-party software. But, it is more correct to manually go to the main resource of the creators of your motherboard and simply download updates from this site.
The main thing is to create a backup copy of the OS or at least a restore point before installing the BIOS. When you start installing BIOS without an access point, your system may crash and you will lose all settings.
Black screen with cursor
When a PC overheats, some of its devices turn off. For example, the same monitor. It may turn off in full screen, or some part of it. Due to overheating, the video card turns off more often than others. If this is the case, you need to turn off the device and cool it down.
Usually, the temperature is checked either using AIDA64 or Speccy. It is advisable to check the temperature twice a week, or at least once.
These programs show the temperature of other parts of the mobile gadget. When the device overheats, the display may also turn off:
- The CPU also has the ability to turn off the monitor when it overheats;
- When the motherboard overheats, various problems are possible in the PC;
- When the hard drive overheats, problems with programs and utilities on the PC also occur;
When errors occur in the settings or the computer malfunctions, the only method of restoring programs to failure is to boot the computer in safe mode (SA).
Hard reset
A hard reset can help when the laptop turns on but the screen is black. It is done differently on models from individual manufacturers. HP offers detailed instructions both on its website and in the computer documentation. In general, you need to proceed as follows:
- the laptop turns off and is disconnected from the network;
- the battery is pulled out;
- the power button is pressed for 20 seconds or more - this is necessary to neutralize the remaining charge on the elements of the motherboard;
- The laptop is connected to the network by the charger and turns on.
To double check, you can connect an external monitor or TV to the system. When you turn it on, you need to be careful: if BIOS check lines appear on the connected device during startup, and there is no image on the display, then the problem is in the laptop screen. A visit to the service center is required.
How to boot a laptop in safe mode?
Quite often, the laptop reboots after it is turned on and the PC screen simply does not have time to load normally. In this case, it is advisable to boot it in safe mode:
- Before loading the device, you need to enter another loading method - the F8 button (sometimes for different models the DEL button or other buttons of the F row are suitable for this). It is best to look in the instructions for the motherboard;
- In safe mode you need to choose one of 3 boot options;
- Then, we enter the OS in this mode;
- You can also log in to BR in other ways. For example, through the command line “ cmd ” and “ msconfig ”. These applications are launched if you enter these inscriptions through the “Start” search.
Video system
You can check the serviceability of the cable connecting the video card or motherboard to the display matrix by connecting the laptop to a third-party screen: computer monitor, TV.
To do this, you must connect your laptop via a supported interface to the image output device.
For most, this is an outdated VGA port, although many modern devices are not equipped with it.
In this case, the common connection should be DVI or modern HDMI. There is no difference for the user, only the plugs and wires are different.
Rice. 7 – Connecting to an external image output device via the VGA interface
If a picture appears on the TV/monitor, then the problem is in your display - the backlight is faulty, there is a problem with the cable.
In the latter case, you can replace it yourself, but it is not always easy to find the necessary component, and even fewer people will be able to carefully and correctly unscrew the device, replace the old cable and put everything back together. Yes, in such a way as not to harm the laptop.
When connecting the PC to the TV, a picture appeared on the latter - take the device to a service center.
Specialists will find the problem and offer a solution. Sometimes it can be expensive, such as replacing the screen matrix.
Overheat
Often, a device turns off automatically when the temperature of one of its components reaches the limit set by the developer.
In such a situation, the culprit is most often an overheated central processor, which prevents the computer from starting again.
Rice. 8 – Fairly warm
The cooling system cannot cope with the tasks assigned to it for a number of reasons:
Dust problem
The fan blades and radiator tubes with plates are covered with dust, which reduces the thermal conductivity of the metal and the efficiency of removing warm air from heated power elements.
You will have to remove the bottom cover of the device and get rid of dust using a can of compressed air, cotton swabs (just do not leave lint) or a vacuum cleaner with a hairdryer.
If you are going to blow it out, it is better to take the laptop outside or onto the balcony.
Rice. 9 - Lots of dust
It is also recommended that once every two years (each service center and manufacturer will set their own deadlines) replace the thermal paste, which is located on the contact area between the central processor and the cooler.
It is better not to replace heat-conducting paste at home if you do not have such experience - it is fraught with consequences.
Windows or driver problems
When you start the PC, a boot screen appears in front of you (where it says which button you can use to open the BIOS), then the logo of the Windows operating system being launched, and after it boots only a cursor is displayed, but you can call the Task Manager.
Try starting Explorer manually:
- Open the Task Manager.
- From the File menu, select Create a new task.
- In the text line of the window that appears, write explorer and press Enter.
Rice. 10 – Launching Explorer manually
Did not help? Let's use Safe Mode. To get into it, we reboot, and then press F8 for several seconds. When a screen appears with a list of launch options, select the appropriate one.
Rice. 11 – Starting Safe Mode
If everything was successful, we look for the application or driver that caused the problem (remember what you installed or updated before it occurred).
Often, rolling back the system state, resetting it (if it’s Windows 10) or reinstalling it helps here.
So, in BR you can reconfigure the laptop:
- Turn on the device;
- Reboot the OS and enter the “Control Panel”;
- The OS loads in the panel;
- Then, the “Advanced system parameters” window will open;
- Then, launch “Advanced”, then “Download and Recovery”;
- After this, go to the settings and uncheck the “Reboot automatically” command. Then you need to save the tinctures.
This operation makes it possible when you turn on the computer again and the error “0x000000000 NO_DEVUCE_BOOT” appears on the display. How to remove this glitch is written in detail on the Microsoft website.
How to remove an error in BR?
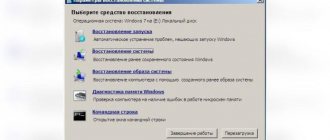
Even after loading your computer into BR, your laptop still boots automatically? In this case, you need to do a “Windows Restore”. To do this, Windows needs to select a system option that is easy to return to: select the date at which the screen worked perfectly.
If you managed to start the OS and the screen started working, then it is advisable to start updating the video card drivers and BIOS. Even if the monitor is working perfectly, it is advisable to update the drivers periodically, approximately once every 30 days. It will be easier for you if your PC updates them automatically.
Checking the functionality of video card drivers
The video card driver should work correctly
Check the status of video card drivers that may conflict with the system.
To do this, you need to restart the operating system in safe mode by activating the low-resolution video mode support item in its menu.
After logging in, go to the control panel.
To do this, right-click on the “Start” menu and select “Device Manager” from the list that appears.
Select the installed video card there in the “Video adapters” section and go to its properties window.
On the “Driver” tab, click the Remove button.
Driver removal example
Then restart your computer and install the factory drivers that came with your video card.
You can go to its manufacturer’s website and download their latest version there.
If you don’t know which drivers to look for, call the “Run” tab using the Win+R key combination.
Enter in the opening field
and click on the “Ok” button.
In this case, the DirectX Diagnostic Tools window will appear, which will display the name of the existing video card.
Using the information received, downloading the necessary ones is quite simple.
Removing the error using external media
On laptops with Windows 8 or 10 installed, you can restore the OS by using a bootable USB flash drive.
So, to do this, we will do the following:
- The installation flash card (or disk) is inserted into the PC;
- Have you inserted a flash drive? The options should appear;
- The following commands appear in the window: “Language – Russian”, “Time format – Russia”, “Keyboard – Russian”;
- A window appears that installs the system;
- At this moment, select not “Install”, but in the lower box “OS Restore”;
- Then, you need to select “Troubleshooting”;
- In the next window you will be offered a small number of methods on how to solve the problem with the OS; if these options do not suit you, click “Advanced options”;
- A new window will open, you need to select “System Restore”.
When all of the above options do not help, all you have to do is take your PC to a specialist!
Conclusion: if a situation arises - the laptop screen does not turn on, the screen is black, but the laptop works, you can try to fix the computer at home. But it will be better if you still take it to the master! Good luck!
Sincerely, Andrey Zimin 02/27/2020
System boot recovery
Another reason why a laptop starts, but the Windows system itself does not want to boot, is the incorrect shutdown of the computer, partial failure of the hard drive, or the effect of viruses on the system. So, what to do if the laptop does not turn on. In any case, you must press the F8 key while the computer is booting to bring up the system boot menu.
The first thing you should try is to select the option to load the last known known configuration. If the system was shut down incorrectly, you may be able to boot the computer without unnecessary manipulation. If the error is deeper, then you need to try to select safe mode. It may happen that the safe mode boot has been disabled. In this case, the system recovery utility will help, through the installation disk or removable drive.
To do this, you must have the same version of the system on a disk or flash drive as installed on your computer. It is noteworthy that netbooks do not have optical drives, so the option with a disk is eliminated.
In the BIOS menu, set the boot from the desired position and wait for the Windows installer to load. In the window where the install button appears, you need to click on “System Restore” in the lower left corner of the screen.
A window will appear with several options for resolving the error. You must select Windows startup recovery. The system will do all the work on its own and the computer will restart.
It won’t be superfluous to disassemble the laptop once every six months and clean it of dust. It would seem that such an insignificant thing as dust cannot cause problems, but in reality everything turns out differently. A large accumulation of dust clogs the heat sink channels, disrupts the cooling process of the system and internal parts, which can lead to failure of the processor, video card or motherboard.
Victoria program
After booting the system, you need to check the hard drive for errors and bad sectors. This can be done using the Victoria program. It is distributed free of charge, and downloading it is not difficult.
After starting the program, you must go to the Tests tab and click the Start button. A verification process will start, which will indicate the number of normal, bad and unrecoverable sectors. After completing the check, you can choose the option of further recovery of sectors.
- Ignore - the scan is carried out without correcting bad sectors.
- Erase - all data found from bad sectors will be erased for further rewriting.
- Remap - a scan is launched with reassignment of bad sectors to backup areas available on each hard drive.
- Restore - data will be read from bad sectors and an attempt will be made to rewrite them. On disks larger than 80 gigabytes, this function does not work.