Defender is an antivirus component preinstalled in the Windows 7 operating system. If you are using anti-virus software from a third-party developer, then it makes sense to stop using Defender, since its functioning remains of little practical use. But sometimes this component of the system is disabled without the user's knowledge. Turning it back on is quite simple, but it’s not always possible to figure it out on your own. This article will consist of 3 ways to disable and enable Windows Defender. Let's get started!
Turn Windows 7 Defender on or off
Windows Defender is not a full-fledged antivirus program, so comparing its capabilities with such mastodons of computer protection software development as Avast, Kaspersky and others is incorrect. This OS component allows you to provide simple protection against viruses, but you can’t count on blocking and detecting any miner or a more serious threat to your computer’s security. Also, Defender may conflict with other antivirus software, which is why this service component has to be turned off.
Let's say you are satisfied with the work of this antivirus program, but because of some recently installed program or as a result of setting up the computer by another person, it turned out to be disabled. No problem! As was said earlier, instructions for resuming the work of the Defender will be indicated in this article.
A simple computer blog for the soul)
Hi all.
Today we’ll talk about Windows 10, I recently installed it on a virtual computer. I installed the latest version, that is, Creators Update. Although when you read this, the latest version may be different. In general, it doesn't matter. So, here I am trying to install one program... and it pops up to me that the Windows system has protected the computer and is not allowing me to install the program. In short, it protects me from this program, although I launched it myself. I don’t know what to say, it seems to be security, but for me this security is too much... And I also found out that the SmartScreen filter is involved here. That is, this is his doing, you know? I made inquiries about SmartScreen and what it even is. And I found out that this thing looks at what exactly you are running and decides whether it is safe or not. If the program is unsafe, its launch will be blocked. Actually that's what happened to me...
But I didn't give up that easily. I started surfing the Internet and found out everything. In short, this SmartScreen needs to be disabled, it’s understandable. But I didn’t manage to do it the first time.
So, look... in short, I run the DML.exe file, I don’t remember what kind of installer it is, it doesn’t matter, well, so I run:
Well, then this message pops up:
Disable Windows Defender 7
You can stop Windows Defender by turning it off through the interface of the Defender program itself, stopping the service responsible for its operation, or simply removing it from the computer using a special program. The latter method will be especially useful if you have very little disk space and every megabyte of free disk space is valuable.
Method 1: Program settings
The easiest method to disable this component is in its settings.
- We need to get into the “Control Panel”. To do this, click on the “Start” button on the taskbar or on the button of the same name on the keyboard (the engraving on the “Windows” key matches the design of the “Start” key in Windows 7 or later versions of this OS). On the right side of this menu we find the button we need and click on it.
- If the “Category” view type is enabled in the “Control Panel” window, then we need to change the view type to “Small icons” or “Large icons”. This will make it easier to find the Windows Defender icon.
In the upper right corner of the content window there is a "View" button and the selected view is indicated. Click on the link and select one of the two viewing types that suit us.
- Find the “Windows Defender” item and click on it once. The icons in the Control Panel are arranged chaotically, so you will have to skim the list of programs located there yourself.
- In the Defender window that opens, find the “Programs” button on the top panel and click on it. Then click on the “Options” button.
- In this menu, click on the “Administrator” line, which is located at the very bottom of the left options panel. Then uncheck the “Use this program” option and click on the “Save” button, next to which a shield will be drawn. In Windows 7, a shield indicates actions that will be performed with administrator rights.
After disabling Defender, a window like this should appear.
Click “Close”. Done, Windows Defender 7 is disabled and should not bother you from now on.
Method 2: Disable the service
This method will allow you to disable Windows Defender not in its settings itself, but in the system configuration.
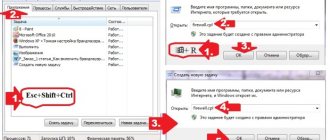
- Press the key combination “Win + R”, which will launch a program called “Run”. We need to enter the command written below into it and click “OK”.
msconfig - In the “System Configuration” window, go to the “Services” tab. Scroll down the list until you find the line “Windows Defender”. We uncheck the box in front of the name of the service we need, click “Apply”, and then “OK”.
- If you then receive a message from System Settings that offers a choice between restarting your computer right now or not rebooting at all, it is better to select “Exit without rebooting.” You can always restart your computer, but it is unlikely that you can recover data that was lost due to a sudden shutdown.
Windows has protected your computer: how to disable it? A simple solution
Most users, when a notification window appears, for some reason immediately begin to panic, because there is only a “Do not execute” button, and there is no cancellation to launch the application. But here it is worth paying attention to the fact that immediately below the notification there is a hyperlink “More details...”, clicking on which reveals additional information describing the security problem.
The “Run anyway” button also appears. You press it and everything works smoothly. But you won’t use such a cumbersome technique every time, will you?
Enabling Windows Defender 7
Now we will look at the methods to enable Windows Defender. In two of the three methods described below, we only need to check a box. We will do this in Defender settings, system configuration and through the Administration program.
Method 1: Program settings
This method repeats almost all the instructions for disabling it through the Defender settings, the only difference is that Defender itself will prompt us to enable it as soon as it is launched.
We repeat the instructions “Method 1: Program settings” from steps 1 to 3. A message from Windows Defender will appear, notifying us that it is disabled. Click on the active link.
After some time, the main antivirus window will open, displaying data about the last scan. This means that the antivirus has turned on and is completely ready to work.
Deactivating a filter in group policies
Now let's see how to disable the message: "Windows has protected your computer" using Group Policy Management. In the editor (gpedit.msc) through the computer configuration and Windows components, find the Defender SmartScreen section, and in the folders for two browsers (if we are talking about the tenth version of the system) in the SmartScreen function settings, disable this option.
Note: Please note that the settings in this plan only apply to browsers, so to completely deactivate the service, it is better to use the previous technique. Alternatively, you can disable it in the registry, but such actions may seem too complicated to the average user, so for obvious reasons this solution is not given.
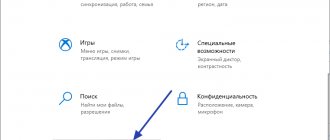
Where is Defender quarantine located in the operating system?
Attention. The utility may consider some files on your computer dangerous and quarantine them.
To find out the list of files placed there and, if necessary, restore them from quarantine, use this method:
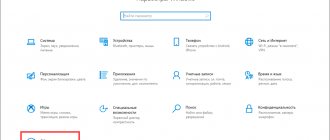
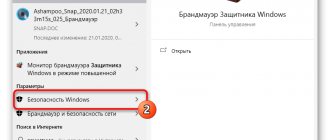
- Through the “Start” menu, open “Settings”, where we select “Update and Security”.
- In the menu on the left, select “Windows Defender” and click on the link “Open Windows Defender Security Center.”
- Select “Virus and Threat Protection” and follow the “Scan Log” link.
- By clicking on the link “View the full magazine” we open the full list.
- To restore the selected file, select the “Show details” link and click on the “Restore” button.
The “Delete All” button does not delete files from quarantine, but erases them from the computer. Be careful.
Windows Defender is far from the most effective anti-malware tool. His responsibilities include only fighting Trojan programs; he may not notice many other types of viruses. Whether to use it or not is a personal decision for each user.
Hello, friends! While I was writing about Microsoft Security Essentials, I came across Windows Defender 7. I realized that I didn’t know anything about it and decided to write an article to make it a little clearer for myself why Windows Defender 7 is needed and when it is advisable to use it.