- Easy way for current programs
- How to change font size on a Windows computer?
- How to change the font for Windows elements?
- How to work with new fonts in Windows?
- Programs for changing fonts
The need to change the font on your computer arises in different cases. In order not to spoil your eyesight, it is better to enlarge the letters on your PC screen. With the help of fonts you can make your workplace unique. You can change not only the size, but also the color, width and other parameters.
Standard operating system tools for changing fonts
If you are using the seventh version of the operating system, then it is enough to use standard tools. There are two options for working with fonts that will help you quickly solve personalization problems.
Using the Control Panel
This method will quickly solve the question of how to change the font size in Windows. You need to go to the Control Panel through the Start menu, and then do this:
- open the “Fonts” section;
- if you want to change the size, select the appropriate box on the left;
- Select the menu item for which you want to customize the font from the drop-down list;
- indicate the scale of letters using numbers or using the slider;
- If you want the letter outlines to be thicker, place a marker next to the word "Bold".
In other tabs you can change the font style and other settings. To save the changes you have made, click the Apply button.
How to change the font using Personalization
In the Control Panel of the seventh version of the operating system, there is another section that helps you configure the display of menu items and the Desktop - “Personalization”. The easiest way to get to this part of the menu is by right-clicking on an empty space on the Desktop. In the default context menu at the bottom there is the “Personalization” item, click on it. A window will open in front of you in which you can change the design of the Desktop, select a theme and make other changes.
Here you can change the font in the windows. For this:
- select “Window Color”;
- then select the item you want to customize;
- Select the appropriate font from the drop-down list;
- On the right side, indicate the desired size and color of the outline.
This is the easiest way to change the font in Windows, which is available to every PC owner. After making changes to the settings, click on the “Apply” button. After that they will come into force. Unfortunately, this method is not available on some builds of Windows 10.
Editing the Registry
If you haven’t found a font that suits you in the “Personalization” section, then you need to find and download the ChangeFont archive for Windows. Then strictly follow the instructions:
- open the archive and run the file ChangeFont.reg using notepad;
- look in the folder C:/Windows/Fonts for the name of the font that suits you;
- then replace its name with the word "FONT" in the file.
Apply registry changes by running this file. Then restart your computer, then the changes you made will take effect. The archive also contains a DefaultFont.reg file, which must be executed to roll back the settings to those set by default.
It is important not only to know how to change the font on a Windows computer using the registry, but also to choose the right modified version. It must support the Cyrillic script in order to obtain readable characters. If you choose an option that is not compatible, you will see empty squares or strange symbols instead of letters.
Special utilities to change the font
It is best to use special utilities to work with fonts. There are many such programs, but the best and most popular are two of them, distributed free of charge. The advantages of the programs: ease of use and compatibility with Windows 7 and 10. Let's tell you more about each.
Control Panel and Personalization
If you have Windows 7 or 8.1, go to the “Control Panel”, launch the “Fonts” applet, click the “Change font size” link on the left, select the element for which the font will be adjusted from the drop-down menu, and then select the size of the font itself. Apply the settings.
In the "seven" you can change the font size and typeface for individual elements in the window appearance parameters. To do this, open the “Personalization” applet, click the “Window Color” link, in the window that opens, select an interface element and select the appropriate font for it. By the way, you can change not only the size and typeface of the font, but also its color and density.
Changing the font size in programs
As a rule, every program for working with text or displaying text content has settings that allow you to change the font size. Let's consider this operation using the Microsoft Word text editor as an example.
When creating a new document, select the desired font size in the toolbar by selecting it from the drop-down menu or clicking the "Increase Size" or "Decrease Size" buttons.
When editing an existing document, select all the text using the Ctrl+A key combination and change the font in the same way.
If you use the built-in notepad program, then go to the Format>Font menu and select the required size, style and type of font.
Font" src="https://www.pc-school.ru/wp-content/uploads/2018/07/notepad-select-size.jpg" alt="go to menu Format>Font" width="530″ height=”475″ srcset=”https://www.pc-school.ru/wp-content/uploads/2018/07/notepad-select-size.jpg 530w, https://www.pc-school.ru /wp-content/uploads/2018/07/notepad-select-size-150×134.jpg 150w" sizes="(max-width: 530px) 100vw, 530px" />
Depending on the program you are using, these parameters may be located in different places in the settings. Typically, software developers make the interface intuitive and easy to customize, and, as a rule, finding these settings is not difficult.
Method 1: Use the keyboard to resize text
There is a fairly simple way to adjust the letter size on different sites for convenient use. It doesn't require any special skills. You just need to remember the combination of “hot keys” on your keyboard.
- Find the keys on your computer or laptop keyboard "Ctrl" And «+», «-" Press the keys simultaneously "Ctrl"+"+", to enlarge the font and "Ctrl"+"-", to reduce it.
To increase the font, simultaneously hold down the “ Ctrl ” + “ + ” keys, to decrease “ Ctrl ” + “ — ”, regardless of the location of the keys on the keyboard - To return the letters to their previous size, you should press the keyboard shortcut "Ctrl+0".
To return the previous font size, press the key combination “Ctrl+0”
Important! The described method is suitable for different versions of the Windows operating system. It can be used both in the new 10 and in the older 8 and 7.
Installation via shortcut
In order to save space on the system hard drive, a function has been created to install fonts as a shortcut. It is useful when working with a large number of files, the total weight of which takes up a significant portion of the space on a PC or laptop. You can configure this function as follows:
- Open Fonts again or the corresponding section in the “Control Panel”. We go to the marked section.
- Now check the box next to the bottom item and click the “OK” button to apply the changes.
- The setup is done, now you need to set the font as a shortcut. To do this, right-click on the file and select the marked item.
- A window will appear with the installation process. Wait a few seconds.
- You can check the result in the Fonts folder. There will be a shortcut icon next to the corresponding font.
If the path to the main file from which the shortcut was created has changed, the font will not work.
Why can't I zoom in on the screen using the keyboard?
Some users are facing the problem that when pressing hotkeys, the screen content does not increase in any way.
The cause of this problem may be a simple keyboard malfunction. However, it may function normally during normal use, but the hotkey combinations do not work. Most likely, you have damaged some part of the keyboard in some way.
If there was no damage, the problem most likely lies in the software of the connected device. If such a problem occurs on a laptop, you should update the driver packages for all connected devices and analyze the computer with an antivirus.
Working with the registry
How else can you change the font on a Windows 7/10 computer? Using a simple registry tweak that replaces the Segoe UI system font with a custom one. Download the archive with registry files from the ChangeFont.zip link, open the ChangeFont.reg file in Notepad and replace the word “FONT” with the name of your new font. Its name can be found in the folder C:/Windows/Fonts.
Apply the registry tweak and restart your computer. To restore default settings, merge the DefaultFont.reg file, which is also included in the archive.
When setting up fonts in Windows 7/10 through the registry, make sure that the font you are installing supports Cyrillic, otherwise you will get crappy text or empty squares instead of text. This mainly applies to fonts downloaded from the Internet.
Recommended settings
To avoid problems with vision, ophthalmologists recommend setting up the computer screen in such a way that it is possible to fully see all the necessary information from a distance of 50 cm.
If during work it becomes necessary to reduce the distance to the monitor and squint, it is recommended to change the font settings to comfortable ones.
Programs to change the font in Windows 10
Among the ways to change the font in Windows 10 is to use programs specially designed for this purpose.
Winaero Tweaker utility
Here the procedure is as follows:
- Open the utility and go to Advanced settings.
- Select an option from the available list - the text in the status bar, headers, and even captions for icons are available for change.
- Click on Change font, selecting the style, size and style.
- Save changes (Apply changes), exit Windows and log back in.
Everything that has been changed in the program can be restored just as easily. To reset the settings, select the corresponding button (Reset) in its main menu. When you click it, the text display settings will become the same as before using the utility.
Advanced System Font Changer
Another method that will help you change the font on your Windows 10 computer is to use the Advanced System Font Changer. Working with the utility is not difficult - just follow these steps:
- Go to the utility and select from the list the fonts that will change.
- Set text options. When using the utility, you can change the fonts of headings, menu items, and the status bar in the window.
- If necessary, make changes to the characteristics of other elements.
You can use the Advanced System Font Changer program for free by downloading it from the developer’s official website. If you need to reset the settings, you can use the Default button located in the main window of the utility.
System Font Size Changer
The System Font Size Changer utility helps you change the font settings of Windows 10 by making changes to the registry. Moreover, before starting, the program offers to save a reg file with the current parameters. It should be opened when you need to return the default settings.
In the program window, you can adjust the font size or make it bold. Standard system elements are available for modification - headers, menus, message boxes, captions and panel names. Unlike most similar utilities, this one even changes the font of the tooltips.
Winaero Tweaker
If you need to change the font itself, we recommend using the Winaero Tweaker . For example, to change the system font in Windows 7/10 (the utility works with all popular OS versions), you need to select the Advanced Appearance Settings – System font setting in the left panel, turn on the “Use the following font” radio button, click “Change system font”, Select the font you like from the list that opens, click “OK” and apply the new settings by clicking “Sign out now” at the bottom of the utility window.
In the “Advanced Appearance Settings” section, you can also change the fonts for individual elements: icons (Icon), context menus (Menus), message windows (Message Font), status bar (Status Bar Font) and window titles (Title Bars).
These options allow you not only to select a typeface, but also to enlarge the font on your computer. System Font Size Changer and Winaero Tweaker are free, both support restoring default settings, and both work with Windows 7, 8.1 and 10.
Installing new fonts
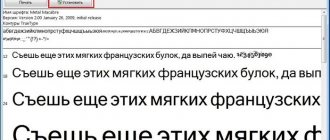
Let's consider installation on Windows 7. First of all, we need to find new fonts. The website www.1001fonts.com will help us out with this, where you can find dozens of free fonts. For our purpose, we will download a new symbol set called Metal Macabre .
Now let's unpack the archive with Metal Macabre and open the file MetalMacabre.ttf. After this action, the file will open in a special utility for viewing alphanumeric characters.
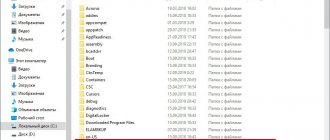
In this utility you need to click the Install button. This action installs Metal Macabre on the system. You can view the installed Metal Macabre in the shared folder where all the fonts installed in the system are located. You can open this folder in the Control Panel, as well as using the Run and the fonts command
In this folder, in addition to viewing all installed character sets, you can also delete them. Essentially, in this folder we are deleting a regular file with the extension “.ttf”.
Now let's look at installing on Windows 10. For this example, let's take a new font from www.1001fonts.com called The Godfather .
After downloading and unpacking The Godfather archive, open the file TheGodfather-v2.ttf. After this action, an almost identical utility for installing The Godfather will open.
All further steps to install the new The Godfather character set are similar to installing Metal Macabre in Windows 7, so you can safely click the Install button. The only difference between the Windows 10 utility and Windows 7 is the new “ Use shortcut ” option. By checking this box when installing, for example, TheGodfather-v2.ttf in the folder with fonts, this file will not be copied, but a link to this file will be installed. That is, the file TheGodfather-v2.ttf, for example, located on the desktop will be The Godfather font in Windows 10. After deleting this file, The Godfather will disappear from Windows 10. It is also worth noting that you can delete fonts through the “Fonts ” panel .
How to reduce the size of desktop shortcuts
To quickly access data, many users save files on the Desktop. If the number of shortcuts increases, this affects work efficiency. You won't be able to resize the desktop page. You can change the screen resolution, as described earlier, or increase the size of the shortcuts. To do this, just press the “Ctrl” key and scroll the mouse wheel “Forward”.
Accordingly, to reduce the shortcuts, you need to press the “Ctrl” key and scroll the wheel “Down”.
Instead of reducing the screen scale on your computer, you can change the size of the icons. To do this, call the context menu (RMB on the desktop) and in the “View” parameter select the size: “Large or Regular or Small icons.”
You can control the position of shortcuts on the Desktop through the context menu (right-click on an empty space). The “View” item lists the following commands: “Arrange automatically”, “Align icons to grid” and “Display icons”.
This is how to use the OS capabilities to change the page scale.
Advanced System Font Changer
Another program that allows you to change Windows 10 fonts is Advanced System Font Changer. The actions in it will be very similar:
- Click on the font name opposite one of the items.
- Select the font you need.
- Repeat as necessary for other elements.
- If necessary, on the Advanced tab, change the size of the elements: the width and height of icon labels, the height of the menu and window title, and the size of the scroll buttons.
- Click the Apply button to log out and apply the changes when you log back in.
You can change fonts for the following elements:
- Title bar — window title.
- Menu - menu items in programs.
- Message box - font in message boxes.
- Palette title - font for panel titles in windows.
- Tooltip—font of the status bar at the bottom of program windows.
In the future, if there is a need to reset the changes made, use the Default button in the program window.
You can download Advanced System Font Changer for free from the official website of the developer: https://www.wintools.info/index.php/advanced-system-font-changer
Magnifier
If none of the proposed options allows you to see the letters clearly without experiencing discomfort, you can enable a function such as “Screen Magnifier”. To do this, go to the start menu and select the “All programs” section.
In the list that appears, select the “Standard” folder, then go to the “Special Features” section and select the desired application.
After clicking on the “Screen Magnifier” button, a small window will appear on the desktop in which you can adjust the screen magnification percentage.
Making the screen comfortable and making the font larger is not difficult. Using the suggested tips and watching the video, it will take no more than 5 minutes.
Sources
- https://vkspy.info/pc/kak-umenshit-razmer-shrifta-na-ekrane-kompyutera-o-kompyuterah-prosto
- https://viarum.ru/kak-izmenit-masshtab-ekrana-windows/
- https://kkg.by/kak-izmenit-razmer-shrifta-v-windows/
- https://pc-consultant.ru/rabota-na-komp-yutere/kak-umenshit-shrift-na-kompjutere-s-pomoshhju-klaviatury/
- https://derudo.ru/screen_zoom.html
- https://MonitorVsem.ru/lajf-hak/umenshit-masshtab-ekrana
- https://setafi.com/elektronika/klaviatura/kak-uvelichit-masshtab-na-ekrane-s-pomoshhyu-klaviatury/
- https://AlfaMan.org/hi-tech/kompyutery/223-kak-uvelichit-ili-umenshit-masshtab-ekrana-na-kompyutere.html
- https://brit03.ru/ustrojstva/kak-uvelichit-masshtab-na-ekrane.html
- https://vsenotebooki.ru/nastroika/kak-uvelichit-shrift-na-noutbuke-kombinatsiya-klavish-dlya-windows-10-i-7
- https://mir-tehnologiy.ru/kak-na-kompyutere-sdelat-shrift-bolshe/
[collapse]
How to change the font on Windows 10
Following our instructions, which are described below, you will learn how to change the font on a Windows 10 computer. Be careful when following the steps according to the instructions.
- Open the Start and click on Settings .
- After this, a window with Windows settings will open, click on the “Personalization” .
- In the "Personalization" , go to the "Fonts" .
- In a new window, you need to view the available fonts. If you don't find a suitable font, then click on "Get more fonts from the Microsoft Store" . Select the appropriate font and install it on your computer. Be sure to write down the name of the appropriate font in a notepad or on a piece of paper, as this will be needed when performing further actions.
- Once you have chosen the appropriate font and written down its name, create a notepad on your desktop.
- Then, open Notepad and paste the following text:
| Windows Registry Editor Version 5.00 [HKEY_LOCAL_MACHINESOFTWAREMicrosoftWindows NTCurrentVersionFonts] “Segoe UI (TrueType)”=”” “Segoe UI Bold (TrueType)”=”” “Segoe UI Bold Italic (TrueType)”=”” “Segoe UI Italic (TrueType)” ="" "Segoe UI Light (TrueType)"="" "Segoe UI Semibold (TrueType)"="" "Segoe UI Symbol (TrueType)"="" [HKEY_LOCAL_MACHINESOFTWAREMicrosoftWindows NTCurrentVersionFontSubstitutes] "Segoe UI"="Your font" |
- Please note that you need to replace the “Your font” with the value of the font that you wrote down in a notepad or piece of paper.
- After that, click on the "File" .
- In the context menu, click on the item “Save as...” .
- Now set any file name with the .reg prefix, in the “File type:” select “All files” , and then click on the “Save” .
- Then right-click on the saved file and select “Merge” .
- In the pop-up window, confirm your intentions to contribute changes to the registry, just click on the “Yes” . In the next pop-up window, click on the “OK” .
As a result of all the actions performed, you must restart the computer. After a reboot, the font on your computer will change, including Windows elements, applications, window contents, and more.
As you can see, changing the font on a computer is not that difficult. To do this, it is enough to have some knowledge of working with Windows functions and the Registry Editor. After reading the article to the end, you have automatically received this knowledge, which means you can share it with others.
If you have any questions, leave a comment below the article!
Changing the text scale using screen resolution settings
Adjusting the screen resolution can help you cope with the problem of inappropriate text size. It works as follows: when the resolution increases, the size of fonts and icons decreases, and vice versa, in order to increase icons and text, you need to decrease the screen resolution.
Follow these simple steps to adjust your screen resolution:
- Right-click on a part of the desktop that is free from folders and icons.
- In the window that opens, select the “Display Settings” column.
Right-click on an empty space on the desktop and open the “Display Settings” item in the menu. - Then find the line “Screen resolution” and change its value to the one you need.
Find the line “Screen resolution” and change it to the required value
Helpful information! Remember that not all computers can change the display resolution to a value higher than stated. Therefore, you may not be able to reduce the size of the font and icons.
Change text style
Read also:
Text design for Windows can be set for each interface separately.
In this case, no changes will occur in the program settings as a whole.
It's not at all difficult to do this.
1Open the “Window Color and Appearance” tab on the taskbar. The name may differ slightly depending on the version installed on your computer. But the bookmark is responsible for the same function.
Tab for windows 10
2Now you need to find the “Object” item, in which you will determine the desired interface that requires changes in the style of writing text. 3You must set new options for style, size, and color. Such manipulations should be done individually for all sections to be changed. 4Confirm your actions with the “Ok” button. 5For the settings to take effect, click “Ok” again.
There are cases when the style for writing text is subject to change, but the rest of its parameters are not available for editing.
Unfortunately, nothing can be done about this - this is the default in the program.
back to menu
There is another option
Read also: How to identify a font from a picture? The best services of 2019
You need a free version of fonts from the Internet. You can find it without problems on the Internet.
Types of fonts
The downloaded folder is most often submitted in archived form. The archive is used by Zip. Keep it on your desk.
You should not install it in any other place; there is a risk that it will get lost in the depths of the computer.
Now you can unpack the archive into the Fonts folder in the Windows system directory. After such actions, a new icon with the appropriate type of text will be added.
To view, you need to left-click on the file.
Further, when working in Word, the new text style will be reproduced automatically.
return to menu return to menu
In Yandex
Some pages of the sites contain rather small text, it is quite difficult for a person to read, especially if he has visual impairments. Therefore, the creators of browsers made it so that users of their works could independently change the size of letters.
You can increase the font in Yandex as follows:
- Open the browser menu and click on “Settings”.
- When the window opens, you will need to find and click on the “Show advanced settings” button. To find it, you need to go to the bottom of the tab using the scroll wheel. At the same time, the list of browser options that open will increase.
- Then we look for the “Web Content” section.
- Find "Font Size". Usually in Yandex the letter size is “Medium”. To increase (or decrease) the font in Yandex, just click on the desired cell and select “Large” or “Very Large” from the drop-down list (if you need to reduce the letters, then it is advisable to select “Small” or “Very Small”).
Detailed font settings
- For more detailed settings of texts, click on the “Customize fonts” button and in the window that opens, find “Minimum font size”.
- Using the slider, you can adjust the size of the letters to the required size. Also, with this setting, there is a “preview” area, that is, you can immediately see exactly how the text will look just by adjusting the values.
As you can see, there are several techniques. Changing the scale of letters is not a difficult operation, as it seems. Choose the one that is most comfortable for you.
You have just learned how to change the font size, now you can safely start studying the article on how to make text wrap around an image
Thank you for sharing the article on social networks!
Font related issues: incorrect character encoding
The most common problem on Windows 7 related to fonts is incorrect character encoding. In this case, the menu and pop-up windows will not contain Russian text that everyone can understand, but rather hieroglyphs.
Most often, this problem occurs due to the installation of software that changes the registry settings. Another possible reason is the installation of an English version of the operating system.
This problem can be solved quite simply:
- Through the “Control Panel”, enter the “Language and Regional Options” tab.
- Go to the "Advanced" item.
- In the “Language of programs that do not support Unicode” tab, instead of English, which will most likely be installed, specify Russian.
- To restart a computer.
Most likely, these simple manipulations will help solve the problem. If the problem is not resolved, try reinstalling the OS.