Many people have often heard about the clipboard, but not all users know why it is needed. In fact, when you work at a computer, you regularly use this tool, you just never pay attention to it.
In principle, it is not necessary to know all the subtleties. However, if you are still wondering where the clipboard is in Windows 7, then the information below will be useful to you.
What is this “clipboard” function and why is it needed?
BO is a certain amount of memory allocated to RAM for the purpose of temporarily storing information.
The clipboard is used to copy and transfer data between directories. To enter something into the BO, you need to click “Copy” / “Cut” in the menu called up with the right mouse button. To extract data from the clipboard, you need to click on “Paste” in the same menu.
Similar procedures can be performed using the keyboard. The corresponding keyboard shortcuts for the above commands are:
It should be noted that when new data is added to the clipboard, the previous ones are erased.
The BO itself is hidden from the user, and he can only rely on his memory, because he usually has no opportunity to see what it contains.
How to enable or disable
As many have already guessed, working with the clipboard is very simple and does not require a long period of mastering. By default, this feature is available to everyone.
In order to start using the clipboard, you just need to remember 2 combinations of “hot keys”: “Ctrl + C” - is responsible for copying, in turn, “Ctrl + X” is for cutting. The difference between them is that in the first case we create a digital copy of a file, part of the text, etc., and in the second we remove this information from its original location and then move it.
The functions are also clearly distinguishable. When copying files, objects to which the “Ctrl + C” combination is applied will not change their appearance, which cannot be said about cutting. After applying the "Ctrl + X" command, the cut files will become barely transparent.
The first stage is clear. Now let's try to move the cut files to a new folder. To do this, we need a new combination “Ctrl + V”, popularly known as “insert”. To use it successfully, you need to find the area where the previously cut files will be placed and press the corresponding keys on the keyboard.
There is another way to use the clipboard, but it is much less effective. You can copy or cut data by calling the context menu by clicking the right mouse button. Then click "Copy" or "Cut" as per your requirement.
Similar to the work done earlier, we will place the data in a new location, also by applying RMB to any unoccupied area in the new location.
How to open and see what's on the clipboard?
In Windows 7, Microsoft decided to do without the “clipbrd.exe” application, which allows you to see what is contained in the BO. However, if necessary, it is possible to take this application from Windows XP and install it in Windows 7. This can easily be done using a flash drive.
It is recommended that if you have no experience using the command line, use some kind of archiver or shell for the Total Commander OS.
After finishing the unzipping operation, an application will appear that allows you to open and see what is on the clipboard.
There are also many third-party applications that not only serve to analyze the current contents of the BO, but also the user will have access to the history of previously performed operations.
Such programs can be used as a notebook when you need to frequently enter various repeating data into a document.
Below we will look at examples of such programs.
Clipboard where is it located in windows
Read the beginning of the article...
Good afternoon friends! Today I will answer a question that worries many users: - Where can I find the clipboard? The clipboard is easier to find in the Windows XP operating system. Therefore, we will start with it. In this system, all your copied data is stored in the file clipbrd.exe
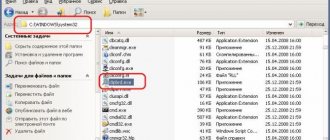
Like other similar files, this file is stored on the system drive C, namely in the WINDOWS folder, then we select the system32 file and actually come to the desired clipbrd.exe file.
If we look inside this file, we will find our copied material there: video, copied file or folder, i.e. everything that we managed to copy during this time.
Where to find the clipboard in windows 7
In the Windows 7 operating system, things are a little different. The file clipbrd.exe is missing there. The creators of the Windows 7 operating system added the clip.exe file there. But, strange as it may seem, there is no access to this file. A kind of clipboard protection.
Many people borrow from friends who have Windows XP installed and simply copy the clipbrd.exe file into the system32 folder of their 7. But personally, I don’t see much point in this. Although, to be honest, I once wanted to do this myself. I had problems with the clipboard. I searched for the reason for a long time, then I understood. It turned out that one program was to blame for everything. When I turned it on, the clipboard refused to work. I just tried not to copy anything while running this program. You, too, may have something similar, which is why I said in the previous article “How to clear the clipboard of accumulated files.” If your clipboard does not work, check its compatibility with the programs you have installed.
So where can I find the Windows 7 clipboard?
But we digress. I would say that accessing the file clip.exe. locked for security reasons. The system32 folder is located in the WINDOWS system folder, and novice users should not look there again. As they say, “out of harm’s way.” We can say that the clipboard is located there.
But cases are different, and it may be necessary to return data that was previously on the clipboard. There is a wonderful program for this called Punto Switcher. I will tell you in more detail how to use it in one of the following articles.
However, there is still a lot that can be said about where to find the clipboard. In this article we will limit ourselves to what has already been said.
In conclusion, a video about the clipboard:
Good luck with your computer!
Sincerely, Andrey Zimin 09/25/2013
Anecdote in each article:
info-kibersant.ru
CLCL.exe
CLCL.exe – This application is capable of saving the last 30 copied data. Another advantage of this application is that there is no need for installation. You just need to open the program and an icon similar to a paperclip will appear at the bottom of the taskbar in the system tray area.
Once launched, the application will display a double window.
At the top are files with what is on the clipboard, and at the bottom is a log of the history of copying operations. The contents of this log will be available for viewing even after the computer is restarted.
What is a clipboard?
The clipboard is the amount of RAM allocated by the system for temporary storage of information.
Using the clipboard, you can move or copy files between computer drives and directories, as well as shuffle or copy text from one document to another.
Information gets to the clipboard if you select “Copy” ( Ctrl+C ) or “Cut” ( Ctrl+X ) in the context menu. And if you select the “Paste” item ( Ctrl+V ), then you extract information from the clipboard.
Only one information can be stored on the clipboard, that is, when copying new information, the old one is deleted.
But all these operations occur unnoticed by the user, since the clipboard itself is invisible by default. And when during work you have to frequently move information using the clipboard, you can get confused and forget what you copied there the last time.
But it’s not all bad; in Windows you can see what’s currently stored on the clipboard.
How to run the tracking tool in Punto Switcher?
If you have Windows 7 and you cannot view your clipboard history, then after installing the program described above, the problem will be solved.
On the taskbar, right-click on the Punto Switcher icon and go to settings. In the General section, open the Advanced tab. Find the item “Monitor clipboard” and check the box next to it.
Now go to the “Hotkeys” section, find the “Show clipboard history” item and click the “Assign” button. Set a keyboard shortcut that is convenient for you to call up the buffer history.
Another option can be used. Right-click on the program icon on the taskbar. Select "Clipboard" from the context menu. In the drop-down list, click “View History.”
So, now you know where the clipboard is in Windows 7 and how to view its history.
How to view the contents of the clipboard in Windows XP.
In Windows XP there is a program with which you can view the contents of the clipboard, it is called clipbrd.exe.
To find out what is currently on the clipboard, press the Win+R key combination and enter clipbrd in the program window, after which a new window will open called “Clipboard”. Inside this window you will see what is currently in the computer's memory.
If it is text, then you will see the text, if it is a file, then you will see the path to this file.
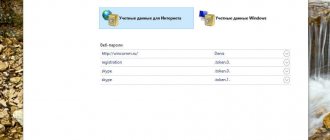
Clipboard history in Microsoft office
The Microsoft Office package programs Word, Excel, PowerPoint include the ability to work with an extended clipboard. To activate it you need to click on the barely noticeable button here:
and then you get into an additional window in which the clipboard is located. The last 20 copied elements, including screenshots, are saved here.
You can only insert from there manually, and the list is cleared after closing the program. You can also clear the clipboard using the “Clear all” button. By the way, you can work with Word and Excel documents online.
These are the pies