When the first computers appeared, all programs, games and other files took up virtually no disk space. Now things are completely different, and it is often necessary to install additional storage media. Therefore, every user should know how to connect a second hard drive to a computer. In fact, this is not difficult to do, you just need to follow simple instructions.
First, the device must be purchased in a store. Please note that the hard drive has several connection interfaces. After purchasing the purchase, you can begin installing the device.
Preparing for installation
Before installing a hard drive, it is recommended that you get to know your computer better. After the system unit has been deployed, it is necessary to answer several questions, namely:
- How many hard drives are already connected to the motherboard? Most often, a computer has only one hard drive, so installing a second drive is not difficult. In most cases, the HDD is located directly under the DVD-ROM, so finding it will not be difficult;
- Is there additional space to install a second hard drive? If it is not possible to install a second or third disk, then you will have to purchase a USB drive;
- What type of cable is used to connect the hard drive to the computer? If the purchased device does not have the same interface as on a PC, it will be difficult to install it.
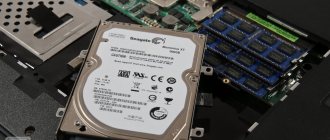
Please note that you will need a 3.5-inch hard drive. There is no need to buy small disks designed for laptops.
Let's sum it up
Although the disk initialization process does not erase data on the device, further operations may. Therefore, if you want to fix an uninitialized drive without losing data, you will need a data recovery program. However, if your drive shows as “Unknown, Not Initialized” due to physical damage, then no data recovery software will help, you need to take the drive for repair and then there is a chance that the data will be recovered.
Physical disk connection
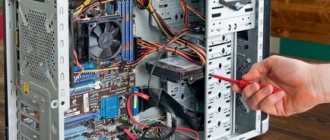
If the system unit has not yet been disassembled, disassemble it. Now it is recommended to get rid of static electricity. This is done by any means known to you. If you wish, you can purchase a special grounding bracelet in the store.
In the next step, it is recommended to install the hard drive into the system unit case. To prevent the drive from vibrating, it is fastened with four bolts. This is easy to do, since there are special holes in the mount.
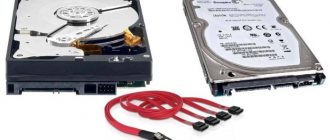
After some minor manipulations, the hard drive will be secured in the case; now all that remains is to connect the hard drive. Before plugging in the power cable and cable, it should be noted that the procedure is slightly different for the IDE and SATA interfaces.
IDE interface
When connecting a drive with an IDE interface, it is recommended to pay attention to such a nuance as setting the operating mode:
- Master (main).
- Slave (subordinate).
If you are installing an additional hard drive, then you must enable Slave mode. To do this, you need to use a jumper (jumper), which is installed in the second place. The first row includes Master mode. It is important to note that on modern computers, the jumper can be completely removed. The system will automatically determine which hard master is.
At the next step, you need to connect the second or third hard drive to the mother. To do this, the IDE interface is connected to a cable (wide, thin wire). The second end of the cable is connected to the IDE 1 Secondary socket (the main drive is connected to the zero socket).
The final connection step is power supply. To do this, a white chip with four wires is connected to the corresponding connector. The wires come directly from the power supply (a box with wires and a fan).
SATA interface
Unlike IDE, a SATA drive has two L-shaped connectors. One is for the power connection, and the second is for the data cable. It should be noted that such a hard drive does not have a jumper.
The data cable is connected to a narrow connector. The other end is connected to a special connector. Most often, the motherboard has 4 such ports, but there are exceptions and there are only 2 ports. One of the slots may be occupied by a DVD drive.
There are cases when a drive with a SATA interface was purchased, but no such connectors were found on the motherboard. In this case, it is recommended to additionally purchase a SATA controller that is installed in a PCI slot.
The next step is to connect the power. An L-shaped wide cable is connected to the corresponding connector. If the drive has an additional power connector (IDE interface), it is enough to use one of the connectors. This completes the physical connection of the hard drive.
Preliminary diagnostics of HDD
Connecting a new local drive can bring a number of troubles. If the computer does not see the hard drive, the problem is in the HDD or Windows system.
Checking Visibility in BIOS
The input and output system is the entry level that allows you to interact with the computer. When the operating system (OS) does not load or starts with errors, you should restart the PC and press DEL or F2. Depending on the model, BIOS or UEFI will open. Information about drives is in the Storage section. If the HDD disappears and is not displayed, the problem lies in the cable or the part itself.
Problem with physical media
To correct the situation you need to:
- Check the HDD connection to the computer.
- Inspect the contacts and jumpers, the SATA cable. Oxidation, internal breaks, and bends prevent the computer from seeing the media. You need to use the part correctly and inspect it carefully before purchasing.
- If a break or damage to the cable is detected, the cable must be replaced. The power connector should be located close to the unit itself. It is advisable to remove the adapters.
- You can determine the status of the hard drive by connecting it to another PC. If the problem reoccurs, the part is faulty.
Note! Before adding a drive, turn off the power to the computer by unplugging the power cord.
BIOS setup
When all manipulations with the hard drive are completed, you should turn on the computer and then enter the BIOS. It is important to note that launching the BIOS on each computer is carried out differently. To do this you need to use the key:
- F8;
- Delete;
- F2.
After entering the BIOS, you need to proceed to configuration settings. It is important to assign booting from the drive on which the operating system is installed. If the priority is set incorrectly, the system simply will not boot.
If one of the disks does not appear in the BIOS, it means that the hard drive was connected incorrectly or the cable was damaged. It is recommended to inspect all wires and reconnect (don't forget to turn off the computer).
Once the BIOS setup is completed, you can boot into the operating system. After this, all that remains is to assign a letter to the drive.
Selecting a file system and formatting
Finally, disk initialization is approaching the final stage, at which it will be necessary to format the created partition.
Here, it is better to specify NTFS as the file system (it is considered more stable than FAT32, and can save files larger than 4 GB), leave the cluster size at the default value of 512 bytes (this will allow more economical distribution and use of the resources of the created partition), in As a volume label, you should enter the name that will be displayed in the system (file manager and context menus), and uncheck quick formatting (for the first time, it is strongly recommended to perform a full formatting, which will avoid problems in the future). You should not use directory compression, since this can only lead to a slowdown of the disk due to the speed of reading or writing information to it.
Next, go to the completion window and, if all parameters are set correctly, click the start formatting button (Finish). If some parameters need to be changed, the return to previous menu button is used. At the end of the process, the system will display a message on the screen in the form of an autorun window, if it is enabled. But sometimes a warning may appear that the disk is not initialized.
Final stage
Since connecting the hard drive to the computer is not enough, you need to make the final setup directly from Windows. On some computers, this procedure is carried out automatically. To check this, you should open “My Computer”, and then see if a new disk has appeared.
If nothing happens, you need to launch the control panel. Then select “Administration”. Once a new window opens, you will need to select “Computer Management”. In the left column, you need to find the “Disk Management” tab (on some computers “Disk Manager”).
Now it is recommended to perform the following steps sequentially:
- At the bottom of the window, select disk 1 (if more than 2 hard drives are connected, select the disk with the highest number). This will be the new hard drive;
- You must assign a letter to the logical volume. To do this, right-click on the disk and then select “Assign letter”;
- As soon as the disk is assigned a new letter, it must be formatted. The procedure can take a long time, it all depends on the size of the hard drive. When formatting, it is important to select the NTFS file system.
When the formatting process is complete, a new disk will appear in the My Computer root directory. If for some reason you cannot connect the HDD using the built-in manager, it is recommended to use third-party programs.
An excellent tool for working with hard drives is Partition Manager. In addition, such a utility allows you to split the disk into several logical volumes.
What to do if initialization errors occur?
Such problems usually do not happen with new hard drives. But if the system displays a message that the disk is not initialized, you can use the command line (cmd in the Run console) to fix it.
It first uses the diskpart command, to view and select a disk you need to use list disk, and to clean the partition table you need to use clean. After this, you can format it manually using a sequence of commands create partition primary, select partition 1, active and format fs=ntfs, which are entered without punctuation and press the enter key after each of them.
In other cases, you can use specialized programs like Partition Magic, but if none of the tools help, you will have to recheck the connections or look for malfunctions in the hard drive itself (perhaps physical damage). For these cases, you can try to use the HDD Regenerator program, and then perform all the above operations again.
Source
Let's summarize:
You will never know the time and reason why the system equipment failed to perform its functions. There may be several small factors behind the drive that the PC is not initializing.
It is entirely up to you to provide your machine with a healthy environment and utilize all its capabilities. In this article, we have discussed the reasons for this error and possible solutions to fix the external hard drive problem. One of them is the file recovery method using Recoverit Data Recovery if you feel the need to access your data.
conclusions
Now you know how the hard drive is connected to the motherboard. Using these instructions, you can easily connect an HDD or SSD drive. This does not require any special skills or knowledge in the computer field.
Sources
- https://programka.net/sovety/podklyuchit-zhestkij-disk-k-pk
- https://te4h.ru/podklyuchenie-zhestkogo-diska-k-materinskoj-plate
- https://FB.ru/article/135996/kak-ustanovit-jestkiy-disk-na-kompyuter-pravila-ustanovki-jestkogo-diska-na-kompyuter
- https://remontka.pro/connect-hdd/
- https://mobila.guru/faqsingle/kak-podkljuchit-zhestkij-disk-k-kompjuteru-samostojatelno/
- https://itkompik.ru/voprosy-pk/ustanovka-zhestkogo-diska.html
- https://linchakin.com/posts/how-to-connect-hard-drive-to-computer/
- https://kompukter.ru/kak-ustanovit-zhyostkij-disk-na-kompyuter-c-windows-7-ili-10/
- https://fast-wolker.ru/kak-podklyuchit-zhestkij-disk-k-kompyuteru.html
How to connect and initialize a new hard drive in Windows 7
You bought a new hard drive in the store and want to use it in your Windows 7 , but after connecting the drive is not visible in “ My Computer ”.
In order for it to appear there, you need to initialize the new hard drive in your system.
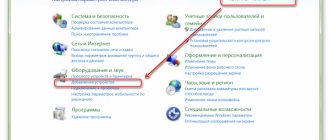
If you have a control panel in categories: Start-Control Panel-System and Security-Administrative Tools-Computer Management
And if not by category: Start-Control Panel-Administrative Tools-Computer Management
A window will open where you need to select Disk Management
Next we see something like this
Choose MBR if you have a disk less than 2TB,
or GPT if you have a disk larger than 2TB.
Next, on the new disk (on which it says “ not allocated ”), right-click and select “ create simple volume ”
The Create Simple Volume Wizard will open.
Leave everything as default to use all disk space and click Next
Select a drive letter and click Next
We choose to format in NTFS , you can enter the name of the volume (this is not necessary) and check the quick formatting
Check the data and click Finish
After these steps we can see that the new hard drive has been initialized