Wi-Fi technology is very widely used in the life of a modern person, as it allows you to easily and quickly solve the problem of connecting to the Internet without using conventional wires. This is especially true when using laptops, which can be used to access the Internet in any convenient place thanks to the presence of a built-in Wi-Fi adapter.
That is why the situation when Wi-Fi does not work on a laptop leads to significant inconvenience and even some problems. There are many reasons why Wi-Fi may not work on a laptop computer. It is simply unrealistic to solve the most serious of them on your own without the help of specialists, but there are quite a lot of them that can be eliminated on your own. Let's look at them.
Is the problem with your laptop or router?
A fairly common problem that a laptop has stopped connecting to the WiFi network is not a problem with the laptop itself, but with the settings of the router that distributes the network. Thus, the laptop can be configured correctly, but Wi-Fi still does not turn on precisely because it has nothing to connect to.
To rule out the possibility that the problem is related to this, you should try to connect to the network from any other device that is equipped with a Wi-Fi adapter - from another laptop, smartphone, tablet, etc.
If Wi-Fi does not work from another gadget, then the problem lies in the Wi-Fi router distributing the Internet. If the connection is successful, the problem is in the laptop and before solving it, you first need to determine why Wi-Fi stopped working.
Security Key
If the computer cannot connect to the router in order to provide Internet access via Wi-Fi, the reason may be extremely trivial. This is an incorrectly entered password. It's the security key.
Nowadays it is very rare to find Wi-Fi networks where even the simplest password is missing. This minimizes the number of unwanted connections.
If this is a home network, then make sure that no one in the household has changed the password. It is also worth turning on the symbol display mode and checking whether everything is entered correctly. Some users accidentally turn on the capitalization mode, do not change the layout, or miss some characters in a hurry.
If the password is correct and there were no errors when entering it, then the reason lies in the software or in the security settings.
Hardware enable adapter
Based on such diagnostics, you can accurately determine that this problem arose precisely because of the laptop. When Wi-Fi does not work on it, you can try using several methods.
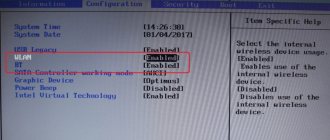
The first one is to check if the wireless adapter on your laptop is enabled. Almost all modern models have light indicators for the operation of the WiFi module and there are special key combinations to enable it in hardware.
Typically, a lit indicator indicates that the module is turned on. If the indicator does not light up at all or lights up in red, then Wi-Fi is not working precisely because of the wireless network adapter. It must be turned on.
Most often, such indicators are located directly on the keyboard, side or front panel of the device case. Sometimes they are located on the monitor body or near the touchpad.
To enable the module of such a network, press the key combination Fn and one of the system keys F1-F12. The specific combination depends on the laptop manufacturer. Usually, the corresponding antenna icon is located on the desired key. If it is not there, then to turn on Wi-Fi you should try pressing the standard combination for a particular model: • Fn+F3 for Acer; • Fn+F2 for Asus, Dell or Gigabyte; • Fn+F5 on Fujitsu devices; • Fn+F12 on HP laptops.
After pressing the corresponding keys, we check whether the wireless connection module operation indicator lights up or whether it stops glowing red. After this, you should try to connect to the network again. If this does not help, move on to the next step.
Can't find network
Sometimes a laptop PC does not connect to a Wi-Fi network because it simply does not see it.
It happens that the wireless network itself is working. But when I try to connect, it is not even in the list of available Wi-Fi on the laptop screen.
Here it is recommended to check the operation of the Wi-Fi and Wireless drivers. Also, a standard procedure in the form of diagnosing problems will not hurt.
It is possible that the list can be simply updated and the network will appear there.
Software enablement
When Wi-Fi stops working and turning it on in hardware does not give positive results, you also need to turn it on in software, which is done directly from the operating system the laptop is running.
To programmatically enable WiFi that has stopped working on Windows 7, 8 or 10, you need to perform the following sequence of actions:
1. On the notification panel, which is located near the clock, select the network connection status icon;
2. From the list that opens, select “Network and Sharing Center” or “Network Settings” depending on the version of the operating system;
3. The next step is “Changing adapter parameters.”
Among the list of all existing connections, you need to pay attention to the color of the “Wireless Network Connection” icon. If your WiFi does not work and the wireless adapter is disabled, the connection icon will not be highlighted. In this case, right-click on its icon and select “Enable” from the context menu that opens. The color of the connection icon should change.
In this case, the wireless network adapter turns on, all you have to do is find the one you need in the list of available wireless networks and connect to it.
If, after such actions, Wi-Fi, which has stopped working, continues to be inactive, you need to move on to the next method of solving the problem.
Sleep mode
There are situations when the user’s laptop does not connect to home or third-party Wi-Fi just after waking up from sleep mode. There are recommendations here on what to do.
This is possible when the operating system disables the networkless adapter. This is done in order to reduce battery consumption. And when the laptop is woken from this sleep mode, an error appears. This is a fairly common phenomenon when the computer is running on the built-in battery, and not on the mains.
The problem is solved quite simply. You need to open the power settings, and in them, disable the adapter from turning off when entering sleep mode.
Driver installation and update
Quite often, the wireless Wi-Fi connection does not turn on due to the lack of a driver or when it is very outdated. To determine whether the driver is installed, you need to select “Properties” from the context menu of the “My Computer” icon, which is located on the desktop or in the “Start” menu. Next, in the window that opens, select the “Device Manager” command from the menu on the left.
In the new window that opens with a list of connected devices, you need to find the name of the laptop’s wireless network adapter. Usually its name is “Wireless Network Adapter” or “Wireless Network Adapter”, along with which the device manufacturer should be indicated: Realtek, Atheros, Qualcomm or something else.
Having found the desired item and right-clicking on it, select “Properties” from the context menu. In the window that opens, there should be an item “Device is working normally.” But even if there is a mark indicating the normal operation of the device, this is far from a guarantee that the correct driver version is installed and Wi-Fi is turned on correctly. To check it, in the window with the properties of the wireless device, go to the “Driver” tab and pay attention to the items “Date of development” and “Vendor”.
If the supplier is Microsoft or the program development date is several years behind the current one, go to the official website of the laptop manufacturer and download the latest official version of the driver.
The same should be done if there is no wireless adapter among the list of installed devices.
If the wireless communication module is present in the list of devices, but is marked with a yellow exclamation mark, this means that the device is disabled, as a result of which the network has stopped working. In this case, opening the device properties window, you need to click the “Engage” button.
Another reason why Wi-Fi stopped working on a laptop may be that the energy-saving mode is enabled, which prevents the wireless connection from working. To disable it, you need to do the following: 1. Open Control Panel; 2. Select the “Power Options” icon;
3. In the window that opens, select the “High” mode.
Network detected but not connecting
If your laptop does not connect to a Wi-Fi wireless network, but it was detected, you need to find the reason.
Experts and experienced users identify several factors that can lead to problems of this nature. This largely makes it clear why a working laptop does not connect to the Wi-Fi network.
- The signal transmitter has low power. The peculiarity of the situation is that the laptop is able to see the presence of a network. But at the same time, the router itself, which provides access to the wireless network, cannot be seen by the receiver from the laptop. This often happens if a weak router is used over a large area. Or the transmitter power settings have been changed. Sometimes the problem is solved by installing a repeater or repeater.
- The MAC address filtering function is activated in the router settings. One of the possible reasons why the computer does not connect to an available Wi-Fi network. Everything is elementary. When the filter is enabled, only certain devices can connect to the Internet. If the device is not in the white list, or is included in the filter’s black list, then the connection will not be established. The problem is easily solved. You need to add the connected device to the white list.
- The lln mode is used in the Internet equipment settings. It is relevant for modern laptop models. But at the same time, old devices can only connect in llbgn mode.
- The driver is malfunctioning. If your computer sees a Wi-Fi network but does not connect to the Internet, you should check the network card driver. When your computer uses software that is incompatible with the router, the connection will not work. It is recommended to go to the manufacturer’s website and download the latest version of drivers from there.
When a laptop does not connect to a Wi-Fi network available and visible to the computer, it is not uncommon for an error message to appear on the screen. It indicates that the connection failed.
A very, very common situation. It may occur for the following reasons:
- the driver is missing or damaged;
- changes have been made to the router settings;
- access is blocked by antivirus;
- firewall prevents;
- The driver and software are not compatible.
If in such a scenario the laptop does not connect to the Internet via a Wi-Fi network, it is recommended to completely remove this network in the operating system settings and then install it again. In most cases, such measures help solve the problem.
External obstacles to the signal
It's also worth noting that a broken wireless network can also be the result of more than just laptop problems. The wireless signal is affected by some external factors that may weaken it. Ceilings, walls, floors and similar obstacles significantly degrade the signal quality of the access point and laptop.
As you know, the signal quality on a personal computer is displayed in the form of several marks - the more of them, the higher the quality of the signal. If the wireless connection level is displayed as 1 or 2 marks, then you don’t have to try to use WiFi - in this case it will not work properly.
In this case, you need to move the router closer to your workplace, move the workplace closer to the Wi-Fi router, or buy a new, more powerful router.
Consequences of updates
Despite the fact that Windows 7 is no longer supported, and updates for the operating system itself are not coming, drivers, antiviruses and other software can still be updated. And if the laptop does not connect to the Wi-Fi network after updates, you should pay attention to this.
Drivers, antiviruses and programs directly related to wireless access may not work correctly as a result of updates.
Here it is recommended to check the relevance of the driver, make sure it matches the equipment, and also disable the antivirus program.
It is possible that the laptop will switch to Airplane mode, which also often prevents the wireless connection from being established.
If everything was functioning normally before all these updates, you can roll back the system to a working state.
Other causes of Wi-Fi problems
The causes of problems with the functioning of the wireless network adapter described above are the most common and you can fix them on your own.
It is worth noting that all of these are software solutions to the problem, which can be solved by installing, reinstalling or updating the device driver, as well as performing some operations with the OS.
But often the problem with the operation of the wireless connection module lies in hardware errors. What are these errors? These are problems that are directly related to the board itself, most often due to its physical damage.
To fix such problems, you will need to disassemble the laptop. It is worth noting that such actions can only be performed if you have certain skills in this area. If such skills are missing, it is better to entrust the work to professionals.
One of the most common physical damages is an unconnected antenna wire to the proximity module. This problem occurs with laptops that have been repaired or if their owner independently cleaned the cooling system from dust. In such cases, the antenna is sometimes simply forgotten, as a result of which the adapter will not be able to establish a connection even near the signal source. To fix this problem, you just need to connect its antenna to the Wi-Fi module.
Sometimes the reason that Wi-Fi stops working is the usual overheating of the network card. Most often this is the result of the laptop being placed on some kind of soft surface. The thing is that at the bottom of the device there are holes through which cold air enters, cooling all the computer boards. By blocking these holes, the system will overheat, which can lead to failure of certain components.
Another common cause of device overheating is dust, which can prevent cold air from entering the cooling system.
That is why, in order to avoid such problems, it is recommended to clean the laptop from dust at least once every year: in this case, it will be possible to avoid repairing the laptop as a result of overheating of its components.
In the most extreme cases, the wireless adapter may even burn out. In this case, only replacing it with a new one will help. You can determine this problem using the device manager, in which the module will simply no longer be displayed. When you try to install a driver for a wireless network, a message appears stating that the corresponding device is not installed on the system.
Typical situations
To understand why a laptop does not connect via Wi-Fi in a given situation, you should look at the typical and most common situations.
Users usually encounter the following scenarios:
- The device does not recognize the equipment that distributes wireless Internet. There is a high probability that the module is not active, or the router does not have the necessary driver.
- When connecting, the equipment is recognized, but the connection is still not established. Here the reasons may lie in the security code and more. The connection fails, or the connection attempt takes forever.
- The laptop was connected to the network, but traffic was still not received or transmitted.
Next, it’s worth looking at the most likely causes of such situations.
If all else fails
If none of the tips above helped, you can use a simple, but often effective solution: restart both your computer and your wireless router. Please note that after a reboot, the router turns on for up to 5-10 minutes before it starts distributing the network. Be patient. Also, despite the opinion of many skeptics, sometimes the problem diagnostic function found in the Windows operating system helps solve problems with a wireless network.
Thus, most of the existing solutions to problems related to the fact that Wi-Fi has stopped working on a laptop have been listed above. Almost all such methods and recommendations can be used by anyone who is faced with a similar problem, since this does not require any special skills. If nothing helps, and the wireless network does not start working, there is only one option left - go for help to a quality service center, where they can solve any problems with the laptop.
If the article did not help solve your problem and Wi-Fi still does not work, write in the comments, I will try to help.
Incorrect saved parameters
It doesn't matter what operating system is installed on the laptop. This could be the current Windows 10, or the more outdated Windows 7. The point is that the device does not connect to the Wi-Fi network.
There is a possibility that this is due to incorrectly saved data on the computer. The laptop remains automatically connected to the network. But if changes have been made to the router settings, or the password has been changed, you will no longer be able to connect using the previously saved parameters.
It is possible that the router was reset accidentally or on purpose. In this case, you will need to re-register the necessary parameters and save the new data to automatically connect to your home wireless network.
Unidentified network
Some laptops may not recognize the wireless network. Here the reason probably lies in the equipment itself that the Internet distributes.
Therefore, you will need to check the condition of the cable, the correctness of its connection, and the presence of a signal from the main equipment of the service provider. A simple reboot of the router or the laptop itself often helps.
The reason is the access point. What to do
Selecting the operating frequency
Wi-Fi routers operating according to the IEEE 802.11n standard or later (802.11ac and 802.11ax) support 2 broadcast frequency bands - 2.4 GHz and 5 GHz. They can be turned on either simultaneously or separately - only 2.4 GHz or only 5 GHz.
In apartment buildings crammed to the ceiling with wireless devices, the 2.4 GHz frequency is often overloaded, so communication through it is not very stable or fast. The 5 GHz frequency, on the contrary, is still free, so some users leave only it and turn off the 2.4 GHz.
This is reasonable if all Wi-Fi devices in the apartment also operate according to 802.11n – 802.11ax standards. But the oldies, which saw the light in the 802.11a/b/g era (before 2009), are only able to connect to a 2.4 GHz access point. If the laptop with which the problem occurred is one of these, then it will not even see the 5 GHz network.
To correct the error, open the wireless network settings in the router control panel (on the TP-Link Archer C7 the required section is called “Select operating frequency”), and if there is o, change the setting to “Use 2.4 GHz and 5 GHz simultaneously” or “Only 2.4 GHz."
Finding the best channel
The inability to access the Internet due to congestion of the frequency band - the radio channel in which communication between the access point and the network device occurs - is also very typical for the 2.4 GHz range. When a device tries to squeeze into a “corridor”, where it is already too crowded and noisy, it either fails, or the connection is established, but there is no connection.
In the default wireless network settings, channel selection is in “Auto” mode. But this is not always the optimal solution. Tuning using the alternate manual search method sometimes allows you to find a freer and less noisy channel.
By the way, the inSSIDer utility, free for home users, helps to monitor channel congestion in real time, as well as a number of other network parameters.
The “Network” tab contains a list of access points broadcasting on the same frequency as yours, their names (SSID), channels used (Channel), security settings (Security), mac addresses and signal quality (Signal). The smoother and more consistent the line, the more stable the connection.
An enlarged scale of the signal level and stability graph is displayed in the upper right area of the window.
Load distributions across the entire 2.4 GHz frequency band, including overlaps and overlaps that can cause interference, are shown in the lower left area.
Revealing the secret of the name
The laptop may not see the access point because the latter does not show its name (SSID) in the list of available connections.
The SSID hiding feature is intended to serve as an additional security measure. However, any somewhat advanced “mom’s hacker” can easily bypass such protection, and a not too experienced owner of an access point will sooner break his head than realize that his computer does not see Wi-Fi precisely because of this small setting. Therefore, if there is no special need, it is better not to use this function.
Managing SSID visibility on the Archer C7 router is located in the 2.4 GHz and 5 GHz wireless mode settings sections. The Enable SSID Broadcast checkbox is checked by default.
If you remove it, instead of the access point name, “Hidden Network” will appear in the list of available connections on your computer. And in order to connect to it, you will have to enter the name (SSID) manually.
We can repeat it
Residents of spacious houses and apartments often suffer from another misfortune - the disappearance of the Wi-Fi signal at a distance from the router. Increasing the transmitter power through the access point settings does not always help, dragging the device from place to place does not either.
To solve such problems, there are special devices - Wi-Fi repeaters (repeaters). It is enough to install one or two of these in places where the signal is fading - and your entire home will be covered with a stable and uniform wireless network.
Connecting the repeater to the router is as easy as shelling pears:
- Connect both devices to the power supply and place them at a short distance from each other.
- Set up and activate the wireless network on the router according to its instructions (if it is not configured in advance).
- Press and release the "WPS" button (on some models it is labeled "QSS" or two rounded arrows resembling a "yin-yang" logo) first on the extender, then on the router. This will connect them to each other without a password.
- If one or both devices do not support WPS, connect the repeater with a cable via the LAN port to the computer, open the admin panel of the repeater (according to its instructions) and specify in the Wi-Fi connection section the name and password of the network you are going to strengthen.
- After establishing a connection with the access point, move the repeater to that part of the house where the router signal does not reach. Plug it into a power outlet and use it.
Interference is not a hindrance for us
Concrete jungles of crowded human settlements present the opposite problem – interference. They are created not only by wireless devices inside and outside your apartment, but also by electrical appliances, wires, antennas, LED lamps, etc. Weak interference reduces the stability of communication, while strong interference can drown out the signal completely.
Unfortunately, humanity has not come up with a radical defense against all interference at once, but some tricks will help reduce their influence.
Here they are:
- Place the Wi-Fi signal source in a room where there are no powerful electrical appliances. Install it higher than devices that use the wireless network. For example, above the door in the hallway.
- To create cable connections between devices, for example, a computer and TV, use only high-quality shielded cable. If there are a lot of copper wires in the apartment, transfer some of the devices to connect to the network via Power Line or fiber optics.
- If possible, block off the places where power lines are laid in the walls with cabinets.
- Connect wireless devices that support the EEE 802.11n/ac/ax standard to an access point that operates at 5 GHz.
- If possible, replace a low-power WiFi router, especially one that has been used for 3-5 years, with a new and more powerful one with MU-MIMO support.
Recommendations are not a panacea, but if moving from a “person-house” to a spacious house is not in the near future, they will at least help you improve your communication.
Why is there NO Internet access via a TP-Link WiFi router?
The problem when there is no Internet access through a wifi router is relevant for all models - Asus, D-Link, Keenetic and so on. But as surveys on our website show, there are more TP-Link users, so the decision will primarily be addressed to them.
To correct network configurations, you need to go to the control panel at tplinkwifi.net and open the “Network - WAN” section. Here you need to select your type of Internet connection and, if necessary, specify connection data (username, password, server address)
What is your opinion: is WiFi harmful?
Yes
22.92%
No
77.08%
Voted: 36560
The main thing is to choose the right type of Internet connection and enter the authorization data specified by the provider, if required.
A signal that everything has been done correctly and the Internet has appeared on the router will be a green (or blue depending on the model) WAN indicator.
Also pay attention to the DHCP server settings section. It must be enabled to automatically distribute IP addresses for all connected devices.
A separate article on the site is devoted to the problem of setting up IP parameters on a computer when an error occurs in the operation of DHCP on an Ethernet adapter.
Checking your router settings
If you know how to configure the router yourself, go to its administrative part, and then check the correctness of the saved authentication data, the encryption algorithm used and the wireless mode (check with your provider), and the presence or absence of bindings to the MAC addresses of devices.
Alternatively, try changing the channel. By default, most routers have automatic channel selection, but you can set any other channel except the 12th and 13th. As a last resort, reset the router settings to factory settings, and then reconfigure the connection.