The Android mobile operating system is most valued by users for its ease of use and flexibility, thanks to which the platform can be completely adapted to their own needs. At the same time, many are not even aware of all the possibilities offered by the OS. For example, the interactive Home button not only performs the function of returning to the main menu, which is what it is mainly used for, but it can also be used for other tasks.
Some users encounter a problem when the virtual buttons located on the device screen disappear, which most often happens as a result of the device falling or other mechanical impacts, but can also be a consequence of software malfunctions, for example, installation of inappropriate or unstable firmware. In such situations, the task is to return interactive buttons to the screen. In other cases, on the contrary, their presence becomes a problem, since a lot of space on the display is allocated for them, which may not suit owners of smartphones with a small screen; this is usually associated with the desire to get rid of buttons.
Let's look at how to return buttons to the screen or remove them, and also tell you about the capabilities of the Home button that you might not know about.
Difference from physical smartphone control keys - which is better?
If we talk about physical buttons, including the volume control and the power key (and in older models also the “Home” symbol), then these buttons are usually classified as mechanical. All other gadget pointers are software.
Among the softkeys in most models there are 3 types:
- "Back". Using it, you can return to the previous page, close active tasks step by step, and also remove the on-screen alphabetic keyboard.
- "Home". This button returns the user to the main menu or home screen. In this case, all applications remain in the same state as before the click.
- "Latest Applications". This option allows you to view applications that you have used in the recent past and return to them in one click.
Older smartphones may have 4 or more touch icons on the screen. In this case, one of them is the menu symbol.
There is no clear opinion on the question of which buttons are better and more convenient (virtual or physical), so the choice always remains with the owner of the gadget.
Types of navigation bars
Drawer Layout
This is a sliding panel on the side, most often on the left. This solution was introduced by Google and is described in the official Material Design guidelines for Android application design.
Drawer Layout is recommended for navigation between application features. Access to a panel element is achieved in one action: swipe from the panel in the opposite direction or tap on the “hamburger” icon.
Prerequisites for use
Drawer is perfect for those cases when the application has a fairly large number of important features (more than 5) and you would like to have access to them in a minimum number of steps. In total, access to a feature is obtained in 2 actions: swipe (or tap on the “hamburger”) + tap on the item (an element on the navigation panel, hereinafter referred to as item) of the feature itself.
pros
Minuses
Good examples
Tab Navigation
The Material guidelines insist that we call this type of navigation Bottom Navigation, but I very often come across applications and ready-made libraries in which such a panel can be located on the top, left, or right. Therefore, I believe that it would not be a mistake to call it Tab Navigation because of its main components - tabs. The guidelines also contain the term Tab Navigation, but its essence is exactly the same (although it is intended for navigation between subfeatures). Therefore, we will combine these two terms into one Tab Navigation and by it we mean a panel that is located along one side of the screen and is always visible to the user.
Prerequisites for use
pros
Minuses
The far right item in the form of a hamburger opens a list of all other features of the application
Good examples
Circle Menu
In some place on the screen (ideally on the bottom right, since most people are right-handed and this is the most convenient place to tap when gripping a smartphone with one hand) a round button is placed (most often with a hamburger icon) when pressed, a panel appears in the form of a collection of round items that are hidden either when you select one of them, or by tapping on the free space.
Prerequisites for use
If you want to surprise the user and fit up to 9 features on the panel, then this is a good choice. Any feature will be available in 2 taps: by the button that opens the panel and by the item.
pros
Minuses
Classic Menu
Classic menu - there is a main panel that occupies the entire screen and contains all the features of the application. It is almost impossible to find applications with such navigation on Google Play, since it contains a number of restrictions and the implementation of basic cases on it (more on this in the following chapters) will be impossible.
Prerequisites for use
This solution can be taken if you need to implement a small application. Also, this approach would be good for training for novice developers. Any feature is available in one click, but if there is a large nesting of features (that is, from one feature the next one will open, and from that one another), then this solution will be the worst of all possible, since going deeper and deeper to some feature, the user moves away from the main navigation panel and if he wants to go to another feature, he will have to make a huge journey “home”.
pros
Minuses
Hybrid navigation
It turns out that using only one type of navigation is not enough due to the excess of content. Then the decision is made to combine different types of navigation.
Tab + Classic Navigation
This is what we did, for example, in the new VK application:
Since the application has a lot of features, it is simply impossible to place them all on one bottom panel. Therefore, one of the items is created, which opens a panel with all the features that are not included in the lower panel.
Drawer + Tab Navigation
Applications for learning English Lingualeo
To break a feature into subfeatures, you can use Tab Navigation. Moreover, for such separation, the panel on top is most often used.
How to enable/disable virtual buttons
To use the mode or disable it, you must have Root rights - access that allows you to make changes to Android system folders and files. If your smartphone does not yet have the Root Explorer program, then download it from the Play Store.
After special features become available to you, install on your gadget one of the programs that allows you to transfer control to the on-screen keyboard.
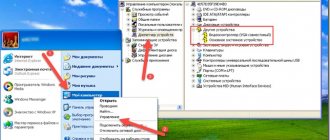
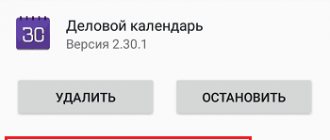
The most popular software is Full Screen Toggle. You can download this application from the Android software store. After successful installation, you will find an icon in the device menu, highlighted in the photo with a red square.
When you press this symbol once, the following splash screen will appear on the screen:
Further user actions involve selecting one of the actions. Clicking on the top line will turn off on-screen navigation, and clicking on the bottom bar will turn them on. A prerequisite for activating the selected action is to restart the smartphone.
The second most popular program that launches on-screen navigation is the Full!screen program. You can also download the extension from the application store. The program takes up minimal memory space and is launched via the icon in the upper corner of the screen.
Some smartphone models allow you to enable or disable on-screen pointers without third-party applications, so before looking for an assistant, you can try the following operation:
- Open Root Explorer and select the “Show hidden files” option.
- Move to the root folder and open build.prop in it.
- In the last line of the opened file we write qemu.hw.mainkeys=o, after which we reboot the device.
As a result of the operation performed, an additional active bar should appear at the bottom of the screen.
In conclusion of the article about touch control of a smartphone, I would like to say that this function allows you to extend the life of the gadget and simplifies the use of the device.
Android navigation buttons - what they are and how to use them - is a question that requires an answer from users of gadgets of this OS. This option allows you to use gestures to control your smartphone. This article provides information describing the option. You can find out what it is. What additional functions open after this. The user will understand how to customize the navigation bar to make it useful.
What to do if the notification panel is not working
First, you need to figure out why the notification panel does not open. There may be several reasons:
- Software conflict with a third-party application
- Firmware update fails
- Device screen sensor malfunction
If the notification panel stops opening after installing an application, try uninstalling it and checking the functionality of the notification panel again. If the notification bar error appears after updating the firmware, do the following:
- Try installing the update again
- Do a factory reset (read the article)
- Reinstall the firmware (read the article)
Often problems with the notification panel arise due to a malfunction of the device’s touch screen after falls or moisture (read our article). First you need to check the operation of the screen sensor using the Screen Touch Test utility. Open the app and tap on different areas of the screen. Where the clicks are registered and a white mark remains, the sensor is working properly.
If there is no white mark left in the upper area of the screen, it means that the sensor in these places does not respond to presses, and this leads to the inability to open the notification panel. The best solution in such a situation would be to contact a service center, however, you can also use alternative ways to open the notification panel.
What are the navigation buttons on your phone for?
These are useful and provide convenience. You need to work with them as follows:
- One click – back;
- Hold your finger and release – go to the screen;
- Retention and conduct – review implementation;
- Standard drag and drop – moving objects.
If there is no navigation, the option is provided on the phone. You can activate it through the settings. You need to go there. Find and select the System tab. On the page, the user must find the navigation and enable it. deactivating an object is required according to a similar scheme.
How to remove navigation buttons on Android?
If desired, the user can remove one element of the built-in navigation. If such a need arises, it is recommended to perform the following manipulations:
- The quick access panel to options opens.
- On the panel you need to click on the navigation element.
- Once activated, a round button will quickly appear on the screen.
Android navigation buttons can be moved at your own discretion. You can work with elements in a similar way. You are allowed to clean the control panel completely. To speed up the process and remove all options at once, you will have to use special third-party applications.
How to hide navigation buttons on Android?
If necessary, the user can remove status indicators at a time. This will help get the software displayed on the display. To carry out this operation, you must enter the code SYSTEM_UI_FLAG_FULLSCREEN.
After activation, the strip located at the top will disappear. The name of the utility will disappear. It will move up. If you need to remove it, it's worth adding two additional lines of code - ActionBaractionBar = getActionBar() and actionBar.hide().
Users are given the option to combine flags. Due to this, it will be possible to hide the control panel and the operation bar of the smartphone at the same time. Despite the convenience and versatility of the method, it is important to remember that pressing the display will return the panel. The line will be reflected again. When the Home button is activated, the person will return to the utility. The status bar will be visible.
How can I get them back?
Android OS is a flexible system. If desired, hidden elements can be quickly returned. To perform this operation, you do not need to download third-party applications. One of the most popular applications is Ultimate Dynamic Navbar. Using it, the user must perform the following actions:
If you have any questions, please let us know Ask a Question
- The application must be downloaded and installed.
- It is being launched.
- Goes to settings.
- Next, you should put the top switch in the working position.
- Place a checkmark in the lower autorun section.
The remaining necessary settings should be set at your own discretion. If all actions are performed correctly, a floating panel will appear. At the same time, the standard one does not disappear anywhere. To hide it, you will need to use the Xposed Framework utility.
If you want to return it back, you will need to act in the opposite way. Go to settings, check that previously enabled options are disabled. The main thing is to follow these instructions. It will be possible to install or remove a panel with control buttons.
Common repair options
These steps will help in many cases of malfunctioning of a phone or tablet running Android OS due to software, so you can apply these tips when you doubt the system is working correctly.
- Reboot your device. Perhaps it was under heavy software load or a minor error occurred. Maybe the application just froze, but the sensor is working?
- Update the firmware. To do this, go to the following items: “Settings” – “About device” – “System updates” – “Check now”. More often than not, the problem is solved.
- Reset settings to factory defaults. Save all important data to a memory card, computer or similar storage device. Click “Settings” – “Memory” – “Reset to factory settings” – “Reset settings” – “Erase everything”. If necessary, confirm your choice. Wait a few minutes and the reboot will happen automatically
- What to do if the screen is glitchy? If it works but is slow, just clean the phone as a whole. Remove unnecessary files and applications and the cache (Settings - Applications - any application from the list - Clear cache). To remove other junk and clean up RAM, use CCleaner, Cleaner Master or another application.
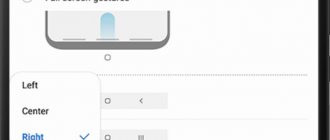
How to swap navigation buttons on Android 9?
The owner of the device has the ability to swap the navigation buttons on Android 9. If you want to switch to full gesture control, you can hide them. There is a standard scheme for changing buttons:
- You need to go to the section with on-screen control settings;
- The System opens;
- Next, you need to click on the System navigation line;
- Goes to the line Three navigation buttons. Here you should click on Settings and change places;
- In this line, select the required combination of buttons.
If you cannot find the item you need, you will need to act differently. In the search, you should specify the key Button. Next, select a menu item. A similar scheme of actions is active on all touch phones.
How to insert a SIM card?
To insert a SIM card into your phone, you will need a key clip, which is included in the kit. If there was no key or you lost it, a regular paperclip or needle will do. Insert it into the special hole on the side of the phone and press lightly. The SIM card tray can be pryed off by hand. Inside there is a small diagram for the correct location of the SIM card. After installing the SIM card, insert the tray back until it clicks.
- How to customize navigation buttons in MIUI 11 on Xiaomi (Redmi), or switch to gesture control
SIM card clip
Navigation buttons have disappeared on the screen in Android - what to do?
When buttons disappear on the screen, this is a rather unpleasant defect. It can surprise the user who doesn't expect anything. A similar circumstance arises when changing the official firmware. At first, the absence of the main elements is frightening. After this, the lack of access to system notifications becomes alarming.
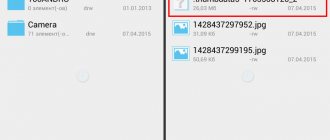
For everything to start working, you will need to use a PC. A special USB driver and Android SDK must be installed on it. After this you need to carry out the following manipulations:
- The gadget connects to the PC via a USB port.
- The code line window opens. Here you need to enter the following command adb shell am start -ncom.google.android.setupwizard/.SetupWizardTestActivity.
- A dialog for the first launch will appear on the screen. It will prompt the user to change the language. Then you will need to join Google Now. After completing this operation, the desktop will appear.
- Finally, all you have to do is restart your tablet or smartphone. Previously disappeared buttons will automatically reappear.
The instructions are quite simple. To achieve the optimal result when implementing it, you need to follow the presented scheme.
Summing up
Manufacturers of Android OS smartphones are planning to use different navigation panels. Some of them are based on gestures. It is not worth switching completely to this control option. Virtual buttons, with certain settings, are capable of not only performing the required main options. They can be enabled, hidden, and configured to perform additional actions.
December 22, 2015
A long time ago, when the Android operating system was just beginning, each smartphone manufacturer used it to make controls as it was more convenient for them. The reference devices, the Nexus line, had a standard set of touch keys under the screen, and then everyone tried to stand out - Samsung had a mechanical button, HTC had a touchpad scanner and buttons to the left and right of it, and so on. And here’s the thing, little has changed since the creation of the first smartphones on Android, six years have passed, and manufacturers continue to make controls the way they think is most correct. Unfortunately, or fortunately, there is still no general standard.
I decided to think a little and collect all the main control methods in a smartphone based on Android OS, tell me which of them seem the most convenient and inconvenient to me, and also ask what you think about this.
Classic controls are what we see in the Nexus line of smartphones, the most current LG Nexus 5X and Huawei Nexus 6P. Despite the fact that each new “nexus” is made by a different manufacturer, here Google protects and defends its right to dictate terms. The system is extremely simple - three on-screen touch buttons: Back, Home, Running applications. A similar control scheme is used by Japanese Sony, Motorola, as well as in many smartphones from Chinese brands that are still little known in the world. The advantages of such control, in my opinion, are that it is as simple and understandable as possible, and is always tailored to the current version of the operating system. Cons – lack of any settings, there are three on-screen buttons and that’s it.
There is an option with changeable on-screen touch keys; in fact, this is also a classic Android scheme, but in it you can change the location of the keys or even add new ones. This type of control is used in some LG devices, in YotaPhone 2, in devices with Cyanogenod, optionally. The advantages of this scheme are all the conveniences of classic control, but, at the same time, the ability to customize, add and remove keys, and change their position.
The next separate type of control is the touch panel under the screen. Typical for large and medium-sized Chinese brands - Huawei, Lenovo, ZTE, Xiaomi. Most of the smartphones from these companies are equipped with a touch panel with three keys below the screen. The advantages of this option are that the touch panel does not take up precious screen space, and on almost all devices these keys are backlit. The disadvantages characteristic of the classic scheme are that there are no settings in most devices; you cannot add or subtract buttons here, for obvious reasons.
One of the most popular options is a button below the screen and two keys, one to the left and one to the right of it. This option is popular because it is used by Samsung in its smartphones and, as a result, is very common. New flagships also add a fingerprint scanner to the center key. Pros - there is a hardware button that is easier and more familiar to press; it can also “wake up” the device without resorting to the power key. Cons – to be honest, it’s hard for me to name. Probably the drawback is that this scheme combines mechanical and touch buttons and it takes time to get used to.
A very rare option so far, implemented in Android smartphones by Meizu, and even then in a couple of devices - a mechanical key with an integrated sensor and fingerprint scanner. The Chinese took inspiration from Apple, but they developed the idea with one single key and a scanner on it further, adding a touch panel. It turns out to be a universal button that performs both the role of the Home and Back keys, and the role of a scanner, and also replaces the power button. The advantages of this option are its general convenience - all important actions are concentrated on one button and you can perform them as quickly as possible, without moving your finger from one key to another. The downside is that it takes time to get used to this scheme.
The HTC company also stands apart - at one time their smartphones had touch-sensitive keys on the screen, then touch-sensitive ones under the screen, but not three, like most manufacturers, but two (the HTC logo was in the center). Now the devices of the Taiwanese brand have on-screen buttons and a scanner with an embedded touch key under the display (HTC One M9 Plus, One A9). It’s difficult for me to objectively describe the pros and cons of these options, because I’m used to HTC smartphones and use them more often than others.
If we take all the schemes as a whole, then personally the closest to me would be the Meizu option, a scheme borrowed from Apple with the development of the idea: a mechanical key under the screen with a sensor and scanner inscribed in it. And the second most convenient option, in my opinion, is the classic option with the ability to add or remove keys and change their position on the touch panel. Which option is most convenient for you? Not because you have a smartphone with a certain type of control and you are used to it, but in general.
Many phone manufacturers have long abandoned mechanical keys in favor of touch ones. Now the operating system and applications are controlled by three icons located at the bottom of the screen. This feature made it possible to make mobile devices more compact - an important advantage was the saving of free space on the front panel of the case.
In total, smartphones have three touch keys - triangle, circle and square. The triangle is designed to move to the previous page in almost any application (back). The round icon helps you go to the start screen (home). But the most functional is the square (menu). It has several capabilities, allowing you to switch between programs, view a list of running applications, or activate multi-window mode. Not all users know about the listed options for using the key, so we will tell you about each in more detail.
Reassigning keys - Make it convenient
It so happened historically that on smartphones it is more convenient for me to have the “Back” navigation button on the right. And on my BQ Aquaris U Plus it’s just on the left and reaching for it “oh, how inconvenient.” Getting used to it is not a problem, but it’s too late for my fingers to grow in length, and the inconvenience of getting used to it has not gone away. The smartphone manufacturer BQ Aquaris, unfortunately, did not provide a tool for changing the functionality of the navigation buttons, even on-screen ones, so we had to turn to third-party applications.
The most preferred application - GravityBox - did not cope with the task assigned to it. It allowed you to assign any action to pressing the “Back” and “Home” buttons, but it could not somehow influence the “Recent” button. There was a wild idea to completely block both the “Back” and “Recent” buttons, assigning all responsibilities to the remaining “Home” button, but GravityBox could not simply disable the “Recents” button. The Spaniards generally somehow protected their smartphones “from fools”, and, as far as I know, so far no one has been able to get system root rights on the stock firmware of these smartphones.
Leaving GravityBox alone, I turned to other software that specialized in reassigning the functionality of navigation buttons. In the battle with the software of the Spanish-Chinese gadget, only one software with the original name “Key Remapping” was able to win. I use it.
Results
The square icon on your smartphone's navigation bar has several functionalities. The key allows you to return to the previous running application, display a list of open programs, or split the screen. The listed functions greatly simplify the use of the smartphone. Perhaps the developers of the Android operating system will soon develop additional features for the navigation buttons.
04.07.2019
Users of modern smartphones today have a lot of options for managing their gadgets. At the same time, few people realize that a huge part of them is located literally at hand. Take, for example, the Home button. As a rule, we find one, or at most two, uses for it. But this key is much more functional than it might seem at first glance. And today we will find out all its capabilities!
Naturally, as the name suggests, the Home button is designed to navigate to the main screen of your device from open applications or from a secondary screen. But its functions are not limited to this.
Table of navigation types
We have reviewed the most common types of navigation, their features, advantages and limitations. Now it would be nice to put everything into one picture and make recommendations on choosing the type of navigation for different applications. Since some types are good for some conditions, some for others, we can make a table with parameters and weights for each. Let's assume that only one type of navigation is selected for the application.
Using this table, you can roughly understand what type of navigation your application needs.
Let's look at an example: It is necessary to implement an application with 7 main features, an obvious interface, and from each screen there is the opportunity to “go deeper” into other features.
To determine the recommended type, we need to add up the weights of all three parameters and compare the resulting sums for each type of navigation:
Drawer Layout: 2 + 2 + 2 = 6 Tab Navigation: 0 + 2 + 2 = 4 Circle Menu: 1 + 0 + 2 = 3 Classic Menu: 1 + 2 + 0 = 3
As you can see, the most suitable type of navigation will be Drawer Layout, since it scored the largest amount. The closest “competitor” Tab Navigation lost in terms of a large number of main features.
Such a table is very arbitrary and cannot give an absolutely accurate answer, but it can help orient a novice developer at least in which direction it is worth looking