Some users may need to delete a virtual disk (drive, floppy drive) that appears in Explorer of the Windows operating system. Sometimes, the computer uses several virtual drives, all of them are displayed in the file manager window.
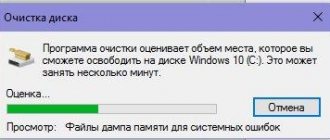
Therefore, in such situations, users have questions about how to remove a virtual drive so that it is not visible in the Explorer window, especially in cases where several virtual drives were used on the PC.
Working in Windows, users create a virtual drive (disk drive) to open a disk image file, without using a physical CD/DVD drive or inserted media—an optical laser disc—on the computer. This is necessary in some situations.
Using system tools or third-party software, a virtual optical drive is created on the computer. The Windows operating system detects the virtual drive and works with it as with a regular physical drive.
Creating a virtual drive will be needed in the following situations:
- if there is no physical CD/DVD disk on the computer;
- to open a disk image directly on a virtual disk;
- to install a program, launch a game, etc.
Computer games, programs, operating systems are saved as a file with the extensions “.ISO”, “.NRG”, “.MDF”, “.IMG”, etc. Essentially, this is a complete copy of an optical CD/DVD disc in the form of one file.
To open a disk image on a PC, you first need to burn the disk image onto optical media (CD/DVD disk), and then insert the recorded disk into the computer's drive. A virtual disk eliminates the need to write a disk image to an optical disk. The image is mounted directly on the virtual disk.
Modern laptops often do not have physical CD/DVD drives, so the use of virtual drives is important there. A virtual drive will be needed to launch or install a game, program, or open a multimedia disc. One computer can have multiple virtual disk drives.
How to remove a virtual disk drive after use? There are several ways to remove a virtual drive from Explorer, depending on what exactly was used to create the virtual drive on a particular computer.
For example, if a user is interested in the question of how to remove a virtual disk drive in Windows 7, then he will have to use the installed programs with which it was created. Starting from Windows 8 and higher, the operating system has a built-in tool for working with disk images.
In this article, we look at deleting a virtual optical drive (ROD) rather than deleting a virtual hard disk. Both are often called virtual disks (a virtual drive or floppy drive is a disk on a PC), but serve different purposes.
First, let's see how to remove a virtual drive in Windows 10, Windows 8.1, Windows 8, and then we will remove the virtual drive created using the most popular programs: UltraISO, Daemon Tools Lite, Alcohol 120%, used for these purposes.
Methods for uninstalling a virtual disk
In total, it is worth highlighting two methods that will allow you to correctly remove the drive. You need to select the one that corresponds to the preliminary process for creating the virtual hard disk. In practice, everything does not look as complicated as it seems at first glance.
Method 1: Disk Management
This method is suitable for you if the virtual drive was created specifically through the specified tool.
Remember that before performing the steps described below, you should copy all the necessary information from the disk you are deleting, since after the final uninstallation you will not be able to restore it.
To remove a disk, you need to do the following:
- Click on the “Start” button with the right mouse button (RMB), and then select “Disk Management” from the context menu.
In the window that appears, you need to find the virtual disk you are looking for. Please note that this must be done at the bottom, not at the top of the list. After you have found the drive, right-click on its name (the desired area is indicated in the screenshot below) and in the context menu, click on the line “Disconnect virtual hard disk”.
You will see that the hard drive has disappeared from the list of media. All that remains is to delete the file on which all the information from it is stored. To do this, go to the folder whose path you remembered earlier. The required file has the extension “VHD”. Find it and delete it in any convenient way (via the “Del” key or the context menu).
- Finally, you can empty the Recycle Bin to free up space on your main drive.
This completes this method.
Method 2: "Command Line"
If you created the virtual drive via the Command Line, then you should use the method described below. The following operations must be performed:
- Open a Windows search box. To do this, just activate the line on the taskbar or click on the button with a magnifying glass. Then enter the command “cmd” into the search field. The result of the query will appear on the screen. Right-click on its name, and then select the “Run as administrator” option from the context menu.
If you have User Account Control activated, then a request to launch the command handler will appear on the screen. Click Yes.
Now enter the query “subst” into the command line, and then press “Enter”. This will display a list of all the virtual hard disks created previously and also show the path to them.
Remember the letter that identifies the drive you need. In the screenshot above, these letters are “X” and “V”. To remove the disk, enter the following command and press Enter:
Instead of the letter “X” you should put the one that indicates the desired virtual drive. As a result, you will not see any additional progress windows on the screen. Everything will be done instantly. To check, you can enter the “subst” command again and make sure that the disk has been removed from the list.
By using one of the above methods, you can remove the virtual hard disk without much effort. Remember that these steps do not allow you to delete physical partitions on your hard drive. To do this, it is better to use other methods that we talked about earlier in a separate lesson.
Source
Using the "subst" command
Using the "Subst" command is not accompanied by any problems. The whole process is quite clear and easy to implement for every PC owner.
To call the command, you need to click “Start”, enter “Subst” in the search bar and press “Enter”. When the command task completes, the disk disappears.
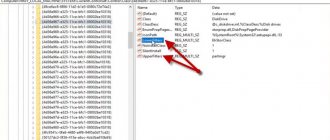
However, it also happens that after the next start of Windows, the “unreal” drive suddenly turns out to be open again. This “illogical behavior” can be explained. Some builds of Windows contain certain startup files that specify the automatic opening of such a drive after the next start of the operating system.
To solve this problem, it is important to run another service command shell:startup. The command will open a dialog box indicating the directory where the startup file is located.
By clicking on the batch file, a message will open in text format, which will indicate the path to the file from the startup directory. Having followed the specified path, all that remains is to delete the file there. Now the disk drive will not appear even after a reboot.
So, there are a sufficient number of ways to remove virtual drives. Everyone can choose the one that is absolutely clear to them and will be accompanied by fewer difficulties. It is really necessary to get rid of an unnecessary virtual drive; this will ensure not only comfortable work on the computer, but also make it easier for the operating system.
All about Windows 10 virtual devices
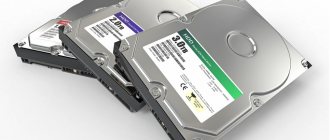
With the development of technology and the increasing availability of high-speed Internet, the need for physical storage media is steadily decreasing. Of course, it is not possible to completely abandon CDs and DVDs, flash drives and external hard drives, since they are needed for backup data storage. However, virtual devices can quite reduce their use to a minimum.
What are virtual devices in Windows 10 and what are they for?
Virtual devices are software codes that imitate physical devices, fully or almost fully implementing their functionality.
. Examples of this kind of devices that are most often used in everyday life are:
Virtual keyboards are needed if it is impossible to use physical ones; they are not capable of more. For example, if the real keyboard is broken or a person with disabilities is using the computer, you can display the input device on the screen and use the cursor to enter a key combination or type text.
Virtual drives are designed to connect CD and DVD images to a computer and then interact with them. Disk images are often used when installing software products: applications, games and system shells.
Virtual hard disks are the most widely used. First of all, because the virtual hard drive partition is very easy to encrypt or protect with a password. This significantly increases the security of documents and other important data. In addition, VZD is a convenient environment for testing software, scripts and other software development products. Virtual disk technology makes it easy to back up data, clone physical media, and much more.
Method 1: Using Third Party Software
First, let's explore the possibility of deleting a virtual disk using third-party applications. The algorithm of actions will be described using the example of the most popular program for processing disk drives - DAEMON Tools Ultra.
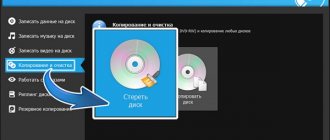
- Launch DAEMON Tools and click “Save” in the main window.
If the window that opens does not display the object that you want to delete, right-click in it and select “Add images...” from the list that opens, or simply use the Ctrl I key combination.
The file open shell will start. In it, move to the directory where the virtual disk with the standard VHD extension is located, mark it and click “Open”.
The disk image will appear in the DAEMON Tools interface.
https://www.youtube.com/watch?v=zLIcRsIwSTU
In the “Image Types” block of the new window, click “Mark All”.
All names of image types will be marked. Then click "Uncheck All".
All marks will be removed. Now check the box next to “vhd” only (this is the virtual disk extension) and click “Scan”.
The image search procedure will be launched, which may take quite a long time. The scanning progress is displayed using a graphical indicator.
After the scan is completed, a list of all virtual disks that are on the PC will be displayed in the DAEMON Tools window. Right-click on the item from this list that you want to erase and select the “Delete” option or press the Del key.
In the dialog box that appears, check the “Remove from Image and PC Catalog” checkbox, and then click “OK”.
After this, the virtual disk will be removed not only from the program interface, but also completely from the computer.
:/> How to disable programs from autorunning in Windows 10 when turned on: how to remove applications from startup
How to create a virtual hard disk in Windows 10
Creating a VZD is a fairly simple procedure that takes little time. It is done as follows:
The virtual disk is connected and working. All that remains is to create a section. For this:
For myself, I only created virtual hard disks a couple of times. The first time the reason was that important documents were stored on a work computer, to which many people had access.
Therefore, during working hours I initialized the VZD, and after work I turned it off. All data on the disk was saved, but no one had access to it.
The second time I created a VZD to store very personal media files. Unfortunately, the hard drive then burned down along with the virtual disk.
Deleting a volume on the command line
1. Open a command prompt as an administrator: one way is to right-click on the Start menu and select “Command Prompt (Administrator).”
2. Type the command Diskpart and press the Enter key => enter the command list volume and press the Enter key. Please note the volume number you want to delete. For example, we need to remove drive F, after entering the list volume command we saw that it is “Volume 4”.
3. Enter the command select volume No. and press the Enter key (No. must be replaced with the number of the volume that you want to delete). In our example, the volume number is 4, which means the command will look like select volume 4
4. Type delete volume and press Enter.
When it says “Volume deleted successfully,” you can close the command line.
How to create a virtual drive
Using standard Windows 10 tools, you cannot create and permanently save a virtual drive in the system. The service responsible for virtual DVD devices starts working only after the image is mounted. That is, the virtual drive immediately disappears as soon as the ISO file is extracted from it. This is how standard Windows capabilities differ from special emulator programs. This implementation option was chosen to save RAM.
To connect a virtual drive, perform the following steps:
diskpart utility
It not only allows you to create a hard drive, but also offers several more features compared to the first method. First, you need to find the utility through the Start menu by typing diskpart in the search bar. On the line with the found utility, you need to right-click and run it as administrator.
To create a virtual partition 1. vhd of a fixed size (2000 MB) in the root of the logical D partition, you must enter the following command - create vdisk file= D :1.vhd type=fixed maximum=2000. After this you need to press Enter. To select the created disk, the command must be entered - select vdisk file = D:1. vhd. Then a few more commands are written:
- Attach vdisk - attaching a virtual partition.
- List disk - view the results of previous operations.
- Create partition primary - creates a primary partition.
After this, Windows will prompt you to format the disk. This can be done from the command line or use the appropriate operating system wizard. This completes the process of creating a virtual disk in Windows 7 and you can start using it, for example, installing a second OS from a flash drive.
How to remove a virtual device in Windows 10
If the virtual drive is not used, then I recommend removing it. Supporting a virtual DVD takes up computer resources, albeit small ones, but they may be needed if you play a more or less decent game. I always immediately check out the image as soon as I'm done with it.
How to remove a virtual drive
As mentioned above, a standard virtual drive in Windows is removed by extracting a file - a disk image. If you used third-party emulator programs, then in each of them the drive is removed in its own way.
Removing a standard virtual drive
To remove a standard virtual drive, open the Disk Management console, and then do the following:
Source
Temporary files
To carry out the correct installation or update of programs, antiviruses, etc. Temporary files are created on the computer. The operating system stores them in the Temp folder, which is located on drive C. Temporary files are not needed for the daily operation of programs.
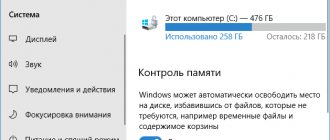
However, sometimes a glitch occurs due to which temporary files are not deleted. This leads to the Temp folder gradually becoming clogged and taking up more and more space on the system disk.
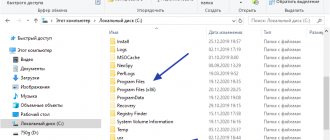
To fix this, you need to remove the intermediate files manually. This is done very simply. You need to go to the Temp folder, which is located at “Computer” > Drive C > Windows folder.
To free up memory on drive C, you need to uninstall the contents of this folder.
In Windows 10, Windows 7 and other versions of the OS, there are two folders for storing temporary files. You can get to the second one through the Start menu. You just need to enter the search query %Temp%. The folder needs to be opened and cleaned.
It is worth noting that sometimes the operating system may issue a warning that some files cannot be deleted. This indicates that they are currently being used by some program.
If such a message appears, then simply click the “Skip” button.
How to delete a virtual disk?
In the window that appears, in the left block, click “Disk Management”. .
Confirm running the command: in the “Delete Simple Volume” window, click “Yes”.
Method #2: using the command line.
For example, subst X: /D (delete section X). .
Go to the “Settings…” subsection.
Set to "No".
First, you need to delete the virtual volume, then unpin the virtual disk, then go to the desired folder in the file explorer and manually delete the disk.
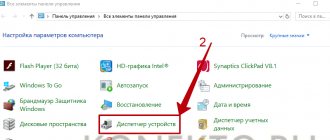
How to clean the C drive in Windows 7?
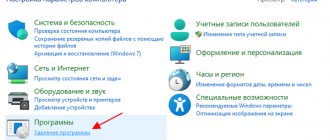
Set the view mode to “Category” and open the “System and Security” section. Find "Administration" and select "Free up disk space." The Windows Memory Cleaner will automatically download.
How to delete partitions on a hard drive?
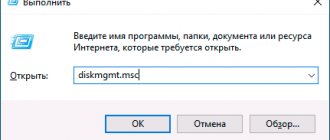
Open “Start” and type diskmgmt.msc into the search bar, press ENTER. In the window that opens, right-click the partition that you want to delete and select the “Delete Volume” command.
2 2 · Good answer
How to create a virtual drive in Ultraiso?
- Run the program as administrator.
- In the program, open the menu “Options” - “Settings”.
- Go to the "Virtual Drive" tab.
- In the “Number of devices” field, specify the required number of virtual drives.
- Click OK.
- As a result, a new “CD Drive” drive will appear in Explorer, which is a virtual UltraISO drive.
4 1 · Good answer
How to delete a local disk on Windows 10?
On the keyboard on the left, press two keys Win + X. A menu opens, select “Disk Management”. The Disk Management window opens. There, use the left mouse button to select the desired disk and click the red cross icon at the top. Or right-click on the desired disk and select “Delete Volume”. The disk (partition) will be deleted (along with the data). And physically this will be free space on the hard drive.
Use the recovery option
- Move your mouse cursor to the top right side of the screen.
- In the menu that appears, left-click or tap on the “Settings” feature.
- Now in the settings window, you will need to find and left click on the “Change PC settings” option.
- Left-click or tap the Update & Recovery feature.
- Left click or click on the "Recovery" button.
- Now next to “Update your PC without affecting your files,” left-click or click on the “Get Started” button.
- Follow the onscreen instructions to complete the system update.
- RELATED: 5 Best Driver Removal Tools to Make Sure Everything Gets Removed
To access the Recovery option in Windows 10, go to Settings > Update & Security > Recovery and click the Restart Now button.
Utilities
Different programs can add virtual drives themselves. For example, DAEMON Tools does just that. Today there are plenty of similar emulators that do without human consent.
- Uninstall the emulator and all its files. If you don’t understand utilities, then uninstall all the software installed over the last week. The virtual disk drive is not necessarily integrated right away. This can happen under different conditions. Attention (!), some applications may then require you to insert a disk.
- For those who have not used emulators, but the drives still appear, then you should do the opposite - install them. Take UltraISO or DAEMON Tools. In their settings, look for something with the words optical drive. This way you can access them and, accordingly, remove the hated BD-ROM.
By the way, read this article too: How to remove Lite Browser from your computer?
Error when starting the application 0xc0000022. How to fix it?
It often happens that when you try to launch any application on a computer with the Windows 7 or 8 operating system, a window appears with the message: “Error initializing the application 0xc0000022.” In this case, you should not immediately delete the application. There are several reasons contributing to its occurrence that should be checked.
The only option that cannot be eliminated on your own is the pirated origin of the application. As a rule, in such programs the code for bypassing activation is written incorrectly. In other cases, problems can be resolved simply and painlessly.
Reasons for the appearance and methods of eliminating the error
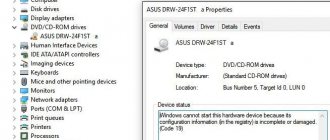
Often, when such an error appears, the text states that the library is missing or damaged, preventing loading. It looks something like this: file name.dll. In most cases, this error is caused by libraries with the following initial letters: nv***.dll and d3d***.dll. In this case, you can try to download and install them from the Internet, but there are no guarantees of the quality of these files. The best way is to simply install or update Nvidia or Microsoft DirectX drivers.
The next reason for the appearance of error 0xc0000022 may be a malfunction of the drivers and libraries that are responsible for the interaction of the computer with the video card. To fix it, you need to visit the official resource of the graphics adapter manufacturer, download and install the latest versions of drivers. It is also recommended to install the latest full version of DirectX from a trusted source.
If this does not give any results, then you can resolve the error in another way. You need to download the problematic application as an administrator. Install all windows updates that were not installed. Next, you need to open a command line as an administrator using the Win+R key combination and enter sfc/scannow in it.
In some cases, this error occurs due to failures in the antivirus or firewall system. So before taking drastic action, you need to check the contents of the quarantine. Sometimes an antivirus mistakes completely safe applications for malicious files and blocks their operation. If this is the case, then you need to transfer the necessary files from quarantine to “exceptions” and check the functionality of the program.
If these steps failed to fix error 0xc0000022, then you should try a system rollback. According to many, this is the most effective way. To restore the system, go to “Start”, then “All Programs”. In the list, select “Standard”, then “System” and then “System Restore”. After which the rollback window will appear.
There you should click on the “Next” button. Then, opposite the item “Show other restore points” you need to check the box. In the list that appears, you must select the date on which error 0x0000022 did not appear. Then click on the “Next” button and in the window that appears, click “Finish”.
This will cause the computer to restart, during which a system restore will take place. Then it should turn on and error 0xc0000022 will disappear. When rolling back, all programs and documents that were installed after the selected date will be deleted, and previously saved photos, audio, video data and files will remain intact.
All these measures can eliminate the error 0xc0000022 that occurs when starting the application. If not, then you will have to reinstall the operating system, but this is quite rare.