Author of the article
Kristina Gorbunova
Higher education in the specialty “Information Systems”. In the field for more than 7 years, he develops websites on WordPress and Tilda.
When starting a laptop for the first time, there is always a need to connect it to the Internet. This is necessary to download the latest updates to the system, install new versions of applications and software. Let's look at how to turn on Wi-Fi on an Asus laptop.
Checking the Wi-Fi module on a laptop
Laptops often come with a pre-installed operating system (Windows 7, 10). Drivers on a netbook are also built into the OS or pre-installed by the manufacturer along with proprietary software.
When you turn on the laptop for the first time, it is recommended to check whether the network card and Wi-Fi module are active. Both of these components are responsible for the correct transfer of data between the router and the computer. To check the Wi-Fi hardware module:
- Launch Device Manager. Press the Win+R key combination and type devmgmt.msc in the window that opens.
- In System Utility, open the “Network Adapters” tab.
- Locate the wireless signal receiving module. Its name may include the word Wireless or Wi-Fi.
- Right-click on the component name and select “Properties”. Make sure the device is working properly.
- In the context menu, in addition to properties, there is also the line “Disable/Enable device”. If the component is enabled by default, do not click this button.
On Asus, the Wi-Fi module may not appear in Device Manager. Then, in order to connect to the router, you will need to activate it through the BIOS.
Operative methods
The operation is necessary in the following cases:
- open fracture;
- comminuted fracture;
- closed with offset;
- osteomyelitis;
- incorrect fusion of fragments.
The following therapeutic methods are used:
Skeletal traction - Performed if closed reduction is not possible. Under local anesthesia, nylon threads are passed through the skin and bone fragments, which pull the fragments into the correct position. The ends of the threads form a ring that is held on a plaster hook. The patient remains in this state for 3 weeks, after which the threads are removed and the plaster is reapplied for another three weeks.
Open reduction - This is a full-fledged operation, during which bones and fragments are connected using screws and screws, plates, knitting needles, and wire. After the operation, the patient walks in a cast for another 4 weeks.
Closed one-stage reduction - Used for finger fractures without displacement of the nail phalanx. This is the setting of bones to their natural position, before injury. It is performed under anesthesia, as the procedure is painful. It is often possible to successfully set the bones only the third time. Traction devices are used for reposition. After the operation, the position and mobility of the bones are checked; if everything is in order, the foot is immobilized with a splint until complete recovery.
Turn on the Wi-Fi adapter on an Asus laptop
The method for activating the wireless module depends on the laptop model. You can enable the Wi-Fi module:
- using a toggle switch or a separate button;
- a combination of certain keys;
- via BIOS.
A switch or a combination of buttons on the keyboard
In most Asus laptops, the Wi-Fi module is launched by a combination of the Fn button and one of the keys (from F1 to F12). Most often Fn+F2. A special symbol is applied to the desired button.
There are laptop models in which a special key is located not on the keyboard, but above it.
On older laptop models there is a special toggle switch to activate the Wi-Fi module. It is located on one of the side edges of the case or next to the touchpad.
Without Fn key
You can activate Wi-Fi without using the function buttons. For this:
- In the tray, click on the wireless networks icon next to the clock.
- In the menu that opens, select “Network and Sharing Center.”
- A window will open to view network information. Click on "Change adapter settings".
- A list of network connections will open. Right-click on “Wireless Network” and select “Enable”.
Using BIOS
If the wireless network adapter does not appear in Device Manager, you need to restart your computer and go to basic settings. On an Asus laptop, immediately after rebooting, you must hold down the F2 key.
In the BIOS you need to find the section where the wireless interface settings are located. In older versions of the basic settings, it is located in the Security tab, I/O Interface Security section. If the Wireless Network Interface item is set to Lock, you need to change it to Unlock, save the changes and restart the laptop. After restarting, Wi-Fi should work.
If the default item is set to Unlock, then you do not need to change it. This means that the problem is in the driver or operating system settings.
Benefits of licensed software
Here is a short and simple diagram that gives an understanding of how to set up wireless networks with easy presses of buttons and keys. But it is effective if official software is installed In the case when the user works on pirated software, conflicts between programs and equipment are possible. Therefore, you will have to bypass the convenient and logical commands and buttons developed by ASUS specialists for the convenience of their customers. You will need to download a special WI-FI activation program. Along with it, drivers are needed for the wireless network adapter, which will be able to connect the equipment installed on the computer with the new program. This method has its advantage - to set up Wi-Fi, the user no longer has to look for buttons and press keys; just one click of the mouse is enough to connect or disconnect wireless networks.
Installing drivers
A laptop with a pre-installed operating system already has a standard driver package by default. It ensures the components work correctly. But if the laptop did not have an OS by default, you need to install drivers. They are on the disk supplied with the laptop and on the official Asus website.
You can install drivers by booting from disk. The method is suitable for laptops with a built-in optical disc drive.
The downside of this method is that DVD-ROM is not available in most new laptop models. But Asus has a series of portable DVD drives for laptops.
The second way to install drivers is through the device manager. You first need to save the files on your laptop. To find the driver, open the official Asus website.
Enter your laptop model into the search box.
If you don't know your laptop model, look at the sticker on the back of the case.
After the search has returned the laptop page, go to the “Support” section.
In the "Support" section, open the "Drivers and Utilities" tab.
Specify the version and bitness of the operating system.
Find the “Wireless” subsection in the list of drivers and download the necessary software.
Be sure to unpack the archive.
Open Device Manager. Go to the properties of the wireless adapter and select the “Driver” tab.
Click on the Update Driver button and select Find drivers on this computer.
Select the folder where the driver was extracted.
Wait for the installation to complete.
You can also install the driver directly from the unpacked folder. Open the file with the .exe extension. If the installer is missing, it is recommended to use Device Manager.
Configure the router
- We connect the router to the power supply. Then, using a network cable, we connect it to the laptop.
- Open any browser and enter “https://192.168.1.1” in the address bar and press “Enter”. A line for entering your login (Username) and password should appear. Enter the values “admin” and “admin” into the lines. Also, the login and password can be found on the bottom of the router, on a sticker. Click “Login”.
- Next comes the stage of setting up a WAN network so that the router can distribute the Internet. First, you need to find out from the provider, look on their website or in the service connection agreement what type of connection is used (Dynamic or Static IP, PPTP, L2TP, etc.). You also need to find out whether the provider needs to bind by the MAC address of the device. a. For Dynamic IP. Go to the “Network” tab, “Wan” subsection. In the “WAN Connection Type” item, select “Dynamic IP”, click the “Save” button to save the parameters.
b. For Static IP. Go to the “Network” tab, “Wan” subsection. In the “WAN Connection Type” item, select “Static IP” and enter in the lines below the IP address, subnet mask, gateway that we received from the provider. Often, the provider provides this information on a reminder when connecting. Click the “Save” button to save the parameters. - After all the manipulations, the Internet should appear - the red cross should disappear next to the network icon and when you hover you will see the network that you configured. If this does not happen, check the settings in the “Wan” tab, you made a mistake somewhere.
Connecting wireless Internet on different versions of Windows
If the Wi-Fi adapter works correctly, you still won’t be able to access the Internet instantly on Asus. You will need to establish a connection with the router distributing the network. For this:
- Click on the wireless connections icon in the tray.
- In the list that opens, select your network and click on the “Connect” button.
- Enter your password (security key).
- Don't forget to check the "Connect automatically" option. This is necessary so that when you turn on the laptop, it immediately connects to this network.
- Check the Internet in your browser.
Depending on the version of the operating system, the procedure will be slightly different.
Windows 7
To enable Wi-Fi on an Asus laptop in Windows 7:
- Launch the taskbar from the Start menu.
- Open the “Network and Internet” section.
- Launch Network and Sharing Center.
- Click on "Change adapter settings".
- Right-click on “Wireless Connection” and select “Properties” from the list.
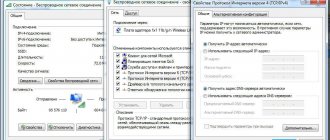
- Uncheck the box next to protocol version 6. Select protocol version 4 with the mouse and open its properties.
- Make sure that automatic retrieval of IP addresses and DNS servers is enabled.
- Return to the “Network Connections” section, right-click on “Wireless Connection” and select “Connection”.
- Select the wireless network distributed by your router and click on the “Connection” button.
- Enter your network password and click on the “OK” button.
After entering the password, the Internet will begin to function, and the authorization data will be saved in Windows 7. If necessary, they can be changed by opening the connection settings.
Windows 8
The procedure for initially preparing a wireless adapter for connection is no different from Windows 7. You need to launch the “Control Panel” using the Win+X buttons and go to the “Network and Internet” section.
Next, you also need to make sure that the IPv6 protocol is deactivated, and in IPv4, automatic retrieval of IP and DNS data is selected.
To connect to the Internet, click on the wireless networks icon in the tray.
Select your network from the list and click on the “Connect” button.
Enter your network password.
If the entered data is correct, a connection to the wireless network will be established.
Windows 10
To set up Wi-Fi in Windows 10, open Settings in the Start menu.
A settings window will open that replaces the Control Panel. Select “Network and Internet” there.
Open the “Wi-Fi” subsection and click on “Configure adapter settings.”
Select “Wireless Connection”, right-click on it and go to properties.
Next, disable the IPv6 protocol in the same way and set automatic IP and DNS acquisition in the IPv4 protocol.
Right-click on “Wireless Connection” and select “Connect/Disconnect”. A section with a list of wireless networks will open. Select yours and click on the “Connect” button.
Enter the password set on the wireless network and click on the “Next” button.
The procedure is considered complete if the connection is established.
Enabling the WiFi adapter through BIOS
Sometimes the adapter can be disabled through the BIOS, and you can only turn it back on there. On an Asus laptop, when booting the system, you must hold down the F2 button to get to this menu. The section we need, where the network settings are located, is usually called Wireless Network Security, but it may differ on different models of Asus laptops depending on the Bios version. To enable the WiFi adapter, you need to unlock it, confirm the action, save the settings and exit the BIOS.
Possible problems
Even if the Wi-Fi adapter is configured correctly, the following connection problems may occur:
- there is no wireless networks icon in the tray;
- the Wi-Fi icon is crossed out;
- the icon displays a snowflake;
- The wireless connection is established, but the Internet does not work.
No Wi-Fi icon in tray
This problem on the laptop does not always mean that the network is not working. Sometimes its disappearance is due to the personalization of the OS. In Windows 10, you can check the icon display settings like this:
- Open Settings via the Start menu. Go to the "Personalization" section.
- In the notification area, click on “Icons displayed in the taskbar.” Make sure the checkbox next to wireless networks is checked.
- Go to the “Turn on and off system icons” section and make sure that the toggle switch next to the network is set to the “On” position.
If after this the Wi-Fi icon does not turn on, restart Explorer:
- Open “Task Manager” using the Ctrl+Shift+Esc button combination.
- Find “Explorer” in the list of active processes.
- Right-click on it and select “Restart”.
Wireless network icon crossed out
The problem occurs when the Wi-Fi adapter is deactivated. To be able to connect the laptop, it needs to be started.
Use a key combination or a special Wi-Fi enable button. Make sure you don't accidentally activate Airplane mode.
You can try to enable the adapter through “Network Connections” by selecting the appropriate item in the context menu.
The Wi-Fi icon shows a snowflake
This is not a bug or problem. The system simply notifies the user that there are available wireless networks to connect to.
To connect to your home router, click on this icon and select the desired network. Then you will need to enter a password and click on the “Connect” button.
If you are unable to connect to the network, restart the router.
General setup information
First, when attempting to communicate with the Internet, you should consider the operating system installed on your electronic device. The most popular of them currently are Windows 10, Windows 8 and Windows 7. Other less common operating systems are also known: GNU/Linux, UNIX, BSD, etc.
Secondly, you should not ignore the model of your Asus laptop. Most of the existing products can be configured according to similar principles, but there are also minor differences for the company's older series.
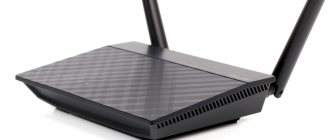
Types of Asus laptops